背景
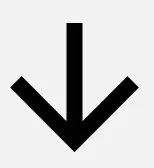
假设我有一个看起来像从上到下箭头的VectorDrawable:
<vector xmlns:android="http://schemas.android.com/apk/res/android"
        android:width="24dp"
        android:height="24dp"
        android:viewportWidth="24.0"
        android:viewportHeight="24.0">
    <path
        android:pathData="M20,12l-1.41,-1.41L13,16.17V4h-2v12.17l-5.58,-5.59L4,12l8,8 8,-8z"
        android:fillColor="#010101"/>
</vector>
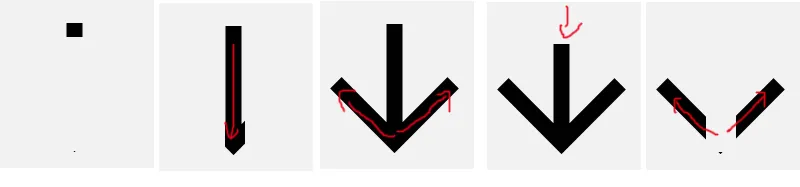
我希望展示一个看起来像流体倒入的动画,首先什么也不显示,然后显示顶部区域,接着是中间区域,最后是底部。当所有内容都显示完毕后,开始隐藏,先隐藏顶部,然后是中间,最后是底部。
这是我所指的草图:
问题
有一些关于VectorDrawable动画的教程,似乎需要很多矢量图形的理解,但没有简单的方法来完成这样的事情。
我找到的
我找到了一个用于此目的的工具,但我不知道如何使用它,而且示例链接目前已经失效:
https://romannurik.github.io/AndroidIconAnimator/
我也找到了一些关于VectorDrawable动画的教程,但我找不到这个具体动画的解释:
http://www.androiddesignpatterns.com/2016/11/introduction-to-icon-animation-techniques.html
这个链接特别提到了我应该使用什么,我认为我应该使用 "trimPathStart"、"trimPathEnd"、"trimPathOffset" 或者 "clip-path"。他们给出的示例动画似乎就是这样做的:
 但是我找不到如何实现它。
问题是:
如何在VectorDrawable上应用这样的动画?
使用支持库,旧版Android版本是否也可以工作?
编辑:
我已经成功地实现了箭头的动画,但是它有两个问题:
因为它是单一路径,所以看起来不太好。需要知道如何将其分成3个路径,以便每个路径都可以很好地动画。
似乎代码中使用的所有内容都是API 21及以上版本的。我是通过查看之前写的链接(这里)来完成的,需要知道如何支持旧版本。
以下是代码:
res/drawable/vector_animation.xml
<animated-vector
    xmlns:aapt="http://schemas.android.com/aapt"
    xmlns:android="http://schemas.android.com/apk/res/android"
    android:drawable="@drawable/ic_darkblue_arrow">

    <target android:name="a_stroke">
        <aapt:attr name="android:animation">
            <objectAnimator
                android:duration="5000"
                android:interpolator="@android:interpolator/fast_out_slow_in"
                android:propertyName="trimPathEnd"
                android:startOffset="1300"
                android:valueFrom="0"
                android:valueTo="1"/>
        </aapt:attr>
    </target>


</animated-vector>
res/drawable/vector.xml
<vector xmlns:android="http://schemas.android.com/apk/res/android"
        android:width="24dp"
        android:height="24dp"
        android:viewportHeight="24.0"
        android:viewportWidth="24.0">
    <path
        android:name="a_stroke"
        android:fillColor="#010101"
        android:pathData="M20,12l-1.41,-1.41L13,16.17V4h-2v12.17l-5.58,-5.59L4,12l8,8 8,-8z"/>
</vector>
res/layout/activity_main.xml
<?xml version="1.0" encoding="utf-8"?>
<FrameLayout
    xmlns:android="http://schemas.android.com/apk/res/android"
    xmlns:app="http://schemas.android.com/apk/res-auto"
    xmlns:tools="http://schemas.android.com/tools"
    android:layout_width="match_parent"
    android:layout_height="match_parent">

    <ImageView
        android:id="@+id/imageView"
        android:layout_width="200dp"
        android:layout_height="200dp"
        android:contentDescription="@null"
        android:src="@drawable/vector_animation"/>

</FrameLayout>
MainActivity.java
public class MainActivity extends AppCompatActivity {

    @Override
    protected void onCreate(Bundle savedInstanceState) {
        super.onCreate(savedInstanceState);
        setContentView(R.layout.activity_main);
        final Animatable cursiveAvd = ((Animatable) ((ImageView) findViewById(R.id.imageView)).getDrawable());
        cursiveAvd.stop();
        cursiveAvd.start();
    }
}
编辑: 我创建了一个简单的三路径箭头VectorDrawable,并成功地对其进行了动画处理。
这是我创建的VectorDrawable:
ic_drawing.xml
<vector xmlns:android="http://schemas.android.com/apk/res/android"
        android:width="210dp"
        android:height="297dp"
        android:viewportHeight="1052.3622"
        android:viewportWidth="744.0945">
    <path
        android:name="main_line"
        android:fillColor="#00000000"
        android:pathData="M742.6,9.7C313,-8.4 316.2,860.8 316.2,860.8"
        android:strokeAlpha="1"
        android:strokeColor="#000000"
        android:strokeLineCap="butt"
        android:strokeLineJoin="miter"
        android:strokeWidth="5.32507801"/>
    <path
        android:name="left_line"
        android:fillColor="#00000000"
        android:pathData="m314.3,846.6c-211.4,-254.3 -160,-294.3 -160,-294.3"
        android:strokeAlpha="1"
        android:strokeColor="#000000"
        android:strokeLineCap="butt"
        android:strokeLineJoin="miter"
        android:strokeWidth="5"/>
    <path
        android:name="right_line"
        android:fillColor="#00000000"
        android:pathData="M320,843.8C364.2,751.2 437.4,670.7 471.4,566.6"
        android:strokeAlpha="1"
        android:strokeColor="#000000"
        android:strokeLineCap="butt"
        android:strokeLineJoin="miter"
        android:strokeWidth="5"/>
</vector>
vector_animation2.xml
<animated-vector
    xmlns:aapt="http://schemas.android.com/aapt"
    xmlns:android="http://schemas.android.com/apk/res/android"
    android:drawable="@drawable/ic_drawing">

    <target android:name="main_line">
        <aapt:attr name="android:animation">
            <objectAnimator
                android:duration="5000"
                android:interpolator="@android:interpolator/fast_out_slow_in"
                android:propertyName="trimPathEnd"
                android:startOffset="1300"
                android:valueFrom="0"
                android:valueTo="1"/>
        </aapt:attr>
    </target>
    <target android:name="left_line">
        <aapt:attr name="android:animation">
            <objectAnimator
                android:startDelay="5000"
                android:duration="5000"
                android:interpolator="@android:interpolator/fast_out_slow_in"
                android:propertyName="trimPathEnd"
                android:startOffset="1300"
                android:valueFrom="0"
                android:valueTo="1"/>
        </aapt:attr>
    </target>
    <target android:name="right_line">
        <aapt:attr name="android:animation">
            <objectAnimator
                android:startDelay="5000"
                android:duration="5000"
                android:interpolator="@android:interpolator/fast_out_slow_in"
                android:propertyName="trimPathEnd"
                android:startOffset="1300"
                android:valueFrom="0"
                android:valueTo="1"/>
        </aapt:attr>
    </target>

</animated-vector>
所以,它运行得很好,但仅适用于较新版本的Android,并且我仍然想知道如何将现有的VectorDrawable漂亮地分割,而不是创建一个新的。
app:srcCompat替代android:src,并确保按照正常步骤在 gradle 文件中启用了矢量支持(vectorDrawables.useSupportLibrary = true)。 - Lewis McGeary