Android全屏模式下如何在软键盘可见时调整布局

197
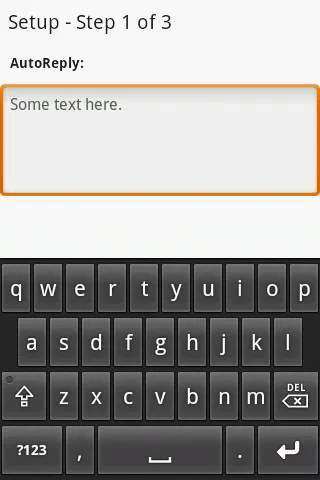
我已经进行了大量的研究,以调整软键盘激活时的布局,并且已经成功实现了。但是当我在清单文件中的活动标记中使用android:theme="@android:style/Theme.NoTitleBar.Fullscreen"时,问题就出现了。
为此,我使用了不同选项的android:windowSoftInputMode="adjustPan|adjustResize|stateHidden",但没有成功。
之后,我通过编程方式实现了FullScreen,并尝试使用各种布局来与FullScreen配合使用,但都无济于事。
我参考了这些链接,并查看了许多与此问题相关的帖子:

http://android-developers.blogspot.com/2009/04/updating-applications-for-on-screen.html

http://davidwparker.com/2011/08/30/android-how-to-float-a-row-above-keyboard/

这里是XML代码:

<?xml version="1.0" encoding="utf-8"?>
<RelativeLayout android:id="@+id/masterContainerView"
    android:layout_width="fill_parent" android:layout_height="fill_parent"
    android:orientation="vertical" xmlns:android="http://schemas.android.com/apk/res/android"
    android:background="#ffffff">

    <ScrollView android:id="@+id/parentScrollView"
        android:layout_width="fill_parent" android:layout_height="wrap_content">

        <LinearLayout android:layout_width="fill_parent"
            android:layout_height="fill_parent" android:orientation="vertical">

            <TextView android:id="@+id/setup_txt" android:layout_width="wrap_content"
                android:layout_height="wrap_content" android:text="Setup - Step 1 of 3"
                android:textColor="@color/top_header_txt_color" android:textSize="20dp"
                android:padding="8dp" android:gravity="center_horizontal" />

            <TextView android:id="@+id/txt_header" android:layout_width="fill_parent"
                android:layout_height="40dp" android:text="AutoReply:"
                android:textColor="@color/top_header_txt_color" android:textSize="14dp"
                android:textStyle="bold" android:padding="10dp"
                android:layout_below="@+id/setup_txt" />

            <EditText android:id="@+id/edit_message"
                android:layout_width="fill_parent" android:layout_height="wrap_content"
                android:text="Some text here." android:textSize="16dp"
                android:textColor="@color/setting_editmsg_color" android:padding="10dp"
                android:minLines="5" android:maxLines="6" android:layout_below="@+id/txt_header"
                android:gravity="top" android:scrollbars="vertical"
                android:maxLength="132" />

            <ImageView android:id="@+id/image_bottom"
                android:layout_width="fill_parent" android:layout_height="wrap_content"
                android:layout_below="@+id/edit_message" />

        </LinearLayout>
    </ScrollView>

    <RelativeLayout android:id="@+id/scoringContainerView"
        android:layout_width="fill_parent" android:layout_height="50px"
        android:orientation="vertical" android:layout_alignParentBottom="true"
        android:background="#535254">

        <Button android:id="@+id/btn_save" android:layout_width="wrap_content"
            android:layout_height="wrap_content" android:layout_alignParentRight="true"
            android:layout_marginTop="7dp" android:layout_marginRight="15dp"
            android:layout_below="@+id/edit_message"
            android:text = "Save" />

        <Button android:id="@+id/btn_cancel" android:layout_width="wrap_content"
            android:layout_height="wrap_content" android:layout_marginTop="7dp"
            android:layout_marginRight="10dp" android:layout_below="@+id/edit_message"
            android:layout_toLeftOf="@+id/btn_save" android:text = "Cancel" />

    </RelativeLayout>
</RelativeLayout>

enter image description here

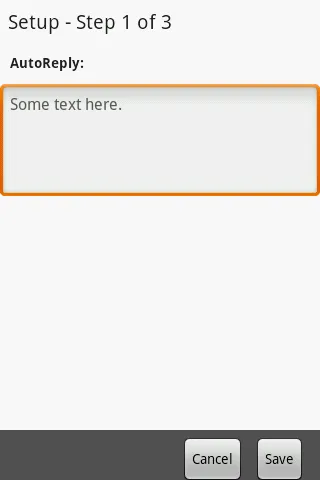
当软键盘出现时,我希望底部的两个按钮向上移动。

enter image description here


1
我认为你必须在ScrollView里面和EditText下面添加按钮。 - Balaji Khadake
我已经尝试了许多不起作用的选项... - Vineet Shukla
1
将您的按钮放在FrameLayout中,并将FrameLayout的权重设置为1,最后仅使用android:windowSoftInputMode="adjustPan"。请告诉我这是否有效。 - Sherif elKhatib
@VineetShukla,你找到全屏的工作了吗? - Muhammad Babar
4
请注意,根据android.view.WindowManager.LayoutParams#SOFT_INPUT_ADJUST_RESIZE的文档,“你不能同时使用adjustResizeadjustPan”。这两个选项是互斥的。 - Denys Kniazhev-Support Ukraine
29个回答

279

根据yghm的解决方法,我编写了一个方便的类,使得我可以通过一行代码解决这个问题(当然,在将新类添加到我的源代码后)。这个一行代码是:

     AndroidBug5497Workaround.assistActivity(this);

实现类如下:


public class AndroidBug5497Workaround {
    
    // For more information, see https://issuetracker.google.com/issues/36911528
    // To use this class, simply invoke assistActivity() on an Activity that already has its content view set.

    public static void assistActivity (Activity activity) {
        new AndroidBug5497Workaround(activity);
    }
    
    private View mChildOfContent;
    private int usableHeightPrevious;
    private FrameLayout.LayoutParams frameLayoutParams;

    private AndroidBug5497Workaround(Activity activity) {
        FrameLayout content = (FrameLayout) activity.findViewById(android.R.id.content);
        mChildOfContent = content.getChildAt(0);
        mChildOfContent.getViewTreeObserver().addOnGlobalLayoutListener(new ViewTreeObserver.OnGlobalLayoutListener() {
            public void onGlobalLayout() {
                possiblyResizeChildOfContent();
            }
        });
        frameLayoutParams = (FrameLayout.LayoutParams) mChildOfContent.getLayoutParams();
    }

    private void possiblyResizeChildOfContent() {
        int usableHeightNow = computeUsableHeight();
        if (usableHeightNow != usableHeightPrevious) {
            int usableHeightSansKeyboard = mChildOfContent.getRootView().getHeight();
            int heightDifference = usableHeightSansKeyboard - usableHeightNow;
            if (heightDifference > (usableHeightSansKeyboard/4)) {
                // keyboard probably just became visible
                frameLayoutParams.height = usableHeightSansKeyboard - heightDifference;
            } else {
                // keyboard probably just became hidden
                frameLayoutParams.height = usableHeightSansKeyboard;
            }
            mChildOfContent.requestLayout();
            usableHeightPrevious = usableHeightNow;
        }
    }

    private int computeUsableHeight() {
        Rect r = new Rect();
        mChildOfContent.getWindowVisibleDisplayFrame(r);
        return (r.bottom - r.top);
    }
}


10
谢谢!我不知道为什么,但我必须将 "return (r.bottom - r.top);" 替换为 "return r.bottom" 才能使它在我的 HTC One Mini 上正常工作,否则活动视图会因状态栏的大小而被推得太高。不过我还没有在其他设备上测试过。希望这可以帮到你。 - Joan
5
你好Joseph Johnson,我使用了你的代码,运行得非常完美。但是最近在一些小设备上遇到问题,键盘和布局之间会出现空白的间隔(空白屏幕)。请问你对这个问题有什么想法吗?我也尝试过返回r.bottom。 - Pankaj
3
很遗憾,它在Nexus 7(2013)上无法使用。即使设置为"adjustNothing",仍会滚动。 - Le-roy Staines
6
非常棒的答案,非常感谢。在Nexus 6上运行时,我需要使用frameLayoutParams.height = usableHeightNow;而不是frameLayoutParams.height = usableHeightSansKeyboard;,否则某些元素会落在屏幕外。 - RobertoAllende
2
空白部分出现在键盘上方。如何避免这种情况? - ARUNBALAN NV
显示剩余29条评论

45

既然答案已经被选出来并且问题已知是一个错误,我想我可以添加一个“可能的解决方法”。

当软键盘显示时,您可以切换全屏模式。这样可以使“adjustPan”正常工作。

换句话说,我仍然将@ android:style / Theme.Black.NoTitleBar.Fullscreen用作应用程序主题的一部分,将stateVisible | adjustResize用作活动窗口软输入模式的一部分,但要使它们一起工作,我必须在键盘弹出之前切换全屏模式。

使用以下代码:

关闭全屏模式

getWindow().addFlags(WindowManager.LayoutParams.FLAG_FORCE_NOT_FULLSCREEN);
getWindow().clearFlags(WindowManager.LayoutParams.FLAG_FULLSCREEN);

打开全屏模式

getWindow().addFlags(WindowManager.LayoutParams.FLAG_FULLSCREEN);
getWindow().clearFlags(WindowManager.LayoutParams.FLAG_FORCE_NOT_FULLSCREEN);

注意 - 灵感来自:在全屏模式下隐藏标题


1
我很感激你抽出时间来解决这个问题,给你一个赞。我一定会测试这种方法,并尽快告诉你它是否适用于我,谢谢。 - Vineet Shukla
1
工作得很好!真的是一个很好的解决方案!我支持你! - Mike
1
https://dev59.com/cm445IYBdhLWcg3wq8Lp - LEO
1
键盘咔嗒作响,使键盘背景变黑。这种咔嗒声效果看起来不太好:( - user2234
哇,谢谢!通过结合 AndroidBug5497Workaround 提到的解决方法,它对我非常有效。我已经将组合源代码上传到 GitHub 上... https://github.com/CrandellWS/AndroidBug5497Workaround/blob/master/AndroidBug5497Workaround.java - CrandellWS
这个答案非常好!非常感谢!哇哇哇 - Future Deep Gone

28

我尝试了Joseph Johnson的解决方案,但像其他人一样,我遇到了内容和键盘之间间隙的问题。这个问题是因为在使用全屏模式时软输入模式始终为pan。当你激活一个被软输入隐藏的输入字段时,这种平移会干扰Joseph的解决方案。

当软输入出现时,内容首先根据其原始高度进行平移,然后按照Joseph的解决方案请求的布局进行调整大小。调整大小和后续的布局不会撤消平移,从而导致间隙。事件的完整顺序如下:

  1. 全局布局监听器
  2. 平移
  3. 内容的布局(=实际调整内容的大小)

无法禁用平移,但可以通过更改内容的高度来强制平移偏移量为0。这可以在监听器中完成,因为它在平移发生之前运行。将内容高度设置为可用高度会产生流畅的用户体验,即没有闪烁。

我还做出了以下更改。如果其中任何一项引入了问题,请告诉我:

  • 将可用高度的确定切换为使用getWindowVisibleDisplayFrame。缓存Rect可避免一些不必要的垃圾。
  • 也允许删除监听器。这在您为具有不同全屏要求的不同片段重用活动时非常有用。
  • 不区分键盘显示或隐藏,而是始终将内容高度设置为可见显示框架的高度。

它已在Nexus 5上进行了测试,并在从微小到大的屏幕尺寸的API级别16-24的模拟器上运行过。

代码已经移植到Kotlin,但是将我的更改移植回Java很简单。如果需要帮助,请告诉我:

class AndroidBug5497Workaround constructor(activity: Activity) {
    private val contentContainer = activity.findViewById(android.R.id.content) as ViewGroup
    private val rootView = contentContainer.getChildAt(0)
    private val rootViewLayout = rootView.layoutParams as FrameLayout.LayoutParams
    private val viewTreeObserver = rootView.viewTreeObserver
    private val listener = ViewTreeObserver.OnGlobalLayoutListener { possiblyResizeChildOfContent() }

    private val contentAreaOfWindowBounds = Rect()
    private var usableHeightPrevious = 0

    // I call this in "onResume()" of my fragment
    fun addListener() {
        viewTreeObserver.addOnGlobalLayoutListener(listener)
    }

    // I call this in "onPause()" of my fragment
    fun removeListener() {
        viewTreeObserver.removeOnGlobalLayoutListener(listener)
    }

    private fun possiblyResizeChildOfContent() {
        contentContainer.getWindowVisibleDisplayFrame(contentAreaOfWindowBounds)
        val usableHeightNow = contentAreaOfWindowBounds.height()
        if (usableHeightNow != usableHeightPrevious) {
            rootViewLayout.height = usableHeightNow
            // Change the bounds of the root view to prevent gap between keyboard and content, and top of content positioned above top screen edge.
            rootView.layout(contentAreaOfWindowBounds.left, contentAreaOfWindowBounds.top, contentAreaOfWindowBounds.right, contentAreaOfWindowBounds.bottom)
            rootView.requestLayout()

            usableHeightPrevious = usableHeightNow
        }
    }
}

10
这似乎是最好的答案。我在这里将其移植到Java:https://gist.github.com/grennis/2e3cd5f7a9238c59861015ce0a7c5584。注意,我遇到了观察者未激活的异常,并且也必须检查它。 - Greg Ennis
1
天啊!我一直在遍历所有系统视图层次结构,寻找那个幽灵空间。我差点放弃电脑去开一辆食品车,但在最后一刻看到了你的答案。它有效 :) - rupps
1
@Greg Ennis 感谢你的 Java 移植。省了很多精力和时间。 - Ikun
这对我来说是有效的,除了removeListener调用似乎没有起作用。我在possiblyResizeChildOfContent调用和removeListener调用内设置了断点,即使我触发了removeListener断点,possiblyResizeChildOfContent仍然被调用。还有其他人遇到这个问题吗? - Quinn
好的,我通过简单地指定侦听器类型来解决了我的问题,就像这样private val listener = ViewTreeObserver.OnGlobalLayoutListener { possiblyResizeChildOfContent() }。我猜没有类型它没有被正确地删除。 - Quinn
显示剩余3条评论

15

如果你使用系统UI方法 (https://developer.android.com/training/system-ui/immersive.html),我刚刚找到了一个简单可靠的解决方案。

它适用于当你使用View.SYSTEM_UI_FLAG_LAYOUT_FULLSCREEN时,例如如果你使用CoordinatorLayout

对于WindowManager.LayoutParams.FLAG_FULLSCREEN(你也可以使用android:windowFullscreen在主题中设置)它不能起作用,但是你可以通过SYSTEM_UI_FLAG_LAYOUT_STABLE来达到类似的效果(根据文档,这个标志“具有相同的视觉效果” )。这个解决方案再次适用。

getWindow().getDecorView().setSystemUiVisibility(View.SYSTEM_UI_FLAG_FULLSCREEN
                    | View.SYSTEM_UI_FLAG_HIDE_NAVIGATION /* If you want to hide navigation */
                    | View.SYSTEM_UI_FLAG_LAYOUT_FULLSCREEN | View.SYSTEM_UI_FLAG_LAYOUT_STABLE)

我在运行Marshmallow的设备上进行了测试。

关键是软键盘也是系统窗口之一(例如状态栏和导航栏),因此系统发出的WindowInsets包含准确可靠的有关其信息。

对于在DrawerLayout中绘制状态栏后面的使用情况,我们可以创建一个布局,忽略顶部插图,并应用底部插图,该插图考虑到软键盘。

这是我的自定义FrameLayout

/**
 * Implements an effect similar to {@code android:fitsSystemWindows="true"} on Lollipop or higher,
 * except ignoring the top system window inset. {@code android:fitsSystemWindows="true"} does not
 * and should not be set on this layout.
 */
public class FitsSystemWindowsExceptTopFrameLayout extends FrameLayout {

    public FitsSystemWindowsExceptTopFrameLayout(Context context) {
        super(context);
    }

    public FitsSystemWindowsExceptTopFrameLayout(Context context, AttributeSet attrs) {
        super(context, attrs);
    }

    public FitsSystemWindowsExceptTopFrameLayout(Context context, AttributeSet attrs,
                                                 int defStyleAttr) {
        super(context, attrs, defStyleAttr);
    }

    @RequiresApi(Build.VERSION_CODES.LOLLIPOP)
    public FitsSystemWindowsExceptTopFrameLayout(Context context, AttributeSet attrs,
                                                 int defStyleAttr, int defStyleRes) {
        super(context, attrs, defStyleAttr, defStyleRes);
    }

    @Override
    public WindowInsets onApplyWindowInsets(WindowInsets insets) {
        if (Build.VERSION.SDK_INT >= Build.VERSION_CODES.LOLLIPOP) {
            setPadding(insets.getSystemWindowInsetLeft(), 0, insets.getSystemWindowInsetRight(),
                    insets.getSystemWindowInsetBottom());
            return insets.replaceSystemWindowInsets(0, insets.getSystemWindowInsetTop(), 0, 0);
        } else {
            return super.onApplyWindowInsets(insets);
        }
    }
}

同时使用它:

<com.example.yourapplication.FitsSystemWindowsExceptTopFrameLayout
    xmlns:android="http://schemas.android.com/apk/res/android"
    android:layout_width="match_parent"
    android:layout_height="match_parent">

    <!-- Your original layout here -->
</com.example.yourapplication.FitsSystemWindowsExceptTopFrameLayout>

这理论上适用于任何设备,无需进行过多修改,比任何尝试以随机屏幕尺寸的1/31/4作为参考的黑客更好。

(需要API 16+,但我仅在Lollipop+上使用全屏以在状态栏后面进行绘制,所以在这种情况下它是最佳解决方案。)


@Dilip 前提条件满足的情况下,它适用于API 16+。 - Hai Zhang

10
请注意,当为活动设置WindowManager.LayoutParams.FLAG_FULLSCREEN标志时,android:windowSoftInputMode="adjustResize"不起作用。你有两个选择。
  1. 要么在你的活动中禁用全屏模式。活动在全屏模式下不会被重新调整大小。您可以在xml中(通过更改活动的主题)或Java代码中执行此操作。在onCreate()方法中添加以下行。

    getWindow().addFlags(WindowManager.LayoutParams.FLAG_FORCE_NOT_FULLSCREEN);   
    getWindow().clearFlags(WindowManager.LayoutParams.FLAG_FULLSCREEN);`
    

或者

  1. 使用另一种方式来实现全屏模式。在您的 onCreate() 方法中添加以下代码。

getWindow().addFlags(WindowManager.LayoutParams.FLAG_FORCE_NOT_FULLSCREEN);
getWindow().clearFlags(WindowManager.LayoutParams.FLAG_FULLSCREEN);
getWindow().setSoftInputMode(WindowManager.LayoutParams.SOFT_INPUT_ADJUST_RESIZE);
View decorView = getWindow().getDecorView();
// Hide the status bar.
int uiOptions = View.SYSTEM_UI_FLAG_FULLSCREEN;
decorView.setSystemUiVisibility(uiOptions);`

请注意,方法2只适用于Android 4.1及以上版本。


@AnshulTyagi 方法二仅适用于Android 4.1及以上版本。 - Abhinav Chauhan
4
分别在Nexus 9和三星S4上测试了5.0和4.4.2版本,第二种方法无效。 - RobVoisey
2
第二种方法根本不起作用,我在上面浪费了很多时间。 - Greg Ennis
谢谢,你救了我的一天。 - Deni Rohimat

9

我也曾面临这个问题,并想出了一个解决方法,我在HTC one、Galaxy S1、S2、S3、Note和HTC Sensation上进行了测试。

在您的布局的根视图上放置全局布局监听器。

mRootView.getViewTreeObserver().addOnGlobalLayoutListener(new ViewTreeObserver.OnGlobalLayoutListener(){
            public void onGlobalLayout() {
                checkHeightDifference();
            }
    });

然后我检查了屏幕的高度差,如果屏幕高度差大于屏幕高度的三分之一,我们可以假设键盘是打开的。

取自这个答案
private void checkHeightDifference(){
    // get screen frame rectangle 
    Rect r = new Rect();
    mRootView.getWindowVisibleDisplayFrame(r);
    // get screen height
    int screenHeight = mRootView.getRootView().getHeight();
    // calculate the height difference
    int heightDifference = screenHeight - (r.bottom - r.top);

    // if height difference is different then the last height difference and
    // is bigger then a third of the screen we can assume the keyboard is open
    if (heightDifference > screenHeight/3 && heightDifference != mLastHeightDifferece) {
        // keyboard visiblevisible
        // get root view layout params
        FrameLayout.LayoutParams lp = (FrameLayout.LayoutParams) mRootView.getLayoutParams();
        // set the root view height to screen height minus the height difference
        lp.height = screenHeight - heightDifference;
        // call request layout so the changes will take affect
        .requestLayout();
        // save the height difference so we will run this code only when a change occurs.
        mLastHeightDifferece = heightDifference;
    } else if (heightDifference != mLastHeightDifferece) {
        // keyboard hidden
        PFLog.d("[ChatroomActivity] checkHeightDifference keyboard hidden");
        // get root view layout params and reset all the changes we have made when the keyboard opened.
        FrameLayout.LayoutParams lp = (FrameLayout.LayoutParams) mRootView.getLayoutParams();
        lp.height = screenHeight;
        // call request layout so the changes will take affect
        mRootView.requestLayout();
        // save the height difference so we will run this code only when a change occurs.
        mLastHeightDifferece = heightDifference;
    }
}

这可能不是百分之百可靠的解决方案,而且在某些设备上可能无法正常工作,但它对我有用,希望对你也有帮助。


1
需要进行一些调整,但它起作用了。在Nexus 7 2013中,我不得不将键盘高度(screenHeight/3)减少一些像素。好主意,谢谢! - Joao Sousa

9
android:fitsSystemWindows="true"添加到布局中,此布局将进行调整大小。

这就是解决我的方法。另外,请确保您将其设置在正确的视图上。如果您有一个应该放在状态栏下面的背景,请不要将其设置在那里,而是在内部布局中设置。可能 EditText 视图等应该在第二个内部布局中。此外,请观看此演讲,因为它可以使事情更加清晰:https://www.youtube.com/watch?v=_mGDMVRO3iE - Stan
1
也对我有用。感谢@Stan的评论,我也能够在ViewPager上放置FULLSCREEN主题属性,使其与活动/片段布局一起工作。 - marcouberti
对我来说完美地工作了。我将它放在我的片段布局的顶部,现在全屏主题与adjustResize标志一起正常工作。有点奇怪。 - Alex Sullivan

8

我实现了Joseph Johnson的解决方案,它运行得很好。但我注意到使用这个解决方案后,应用程序中的抽屉有时无法正确关闭。因此,我添加了一个功能,在用户关闭包含编辑框的片段时,删除监听器“removeOnGlobalLayoutListener”。

    //when the application uses full screen theme and the keyboard is shown the content not scrollable! 
//with this util it will be scrollable once again
//https://dev59.com/XGs05IYBdhLWcg3wJurp
public class AndroidBug5497Workaround {


    private static AndroidBug5497Workaround mInstance = null;
    private View mChildOfContent;
    private int usableHeightPrevious;
    private FrameLayout.LayoutParams frameLayoutParams;
    private ViewTreeObserver.OnGlobalLayoutListener _globalListener;

    // For more information, see https://code.google.com/p/android/issues/detail?id=5497
    // To use this class, simply invoke assistActivity() on an Activity that already has its content view set.

    public static AndroidBug5497Workaround getInstance (Activity activity) {
        if(mInstance==null)
        {
            synchronized (AndroidBug5497Workaround.class)
            {
                mInstance = new AndroidBug5497Workaround(activity);
            }
        }
        return mInstance;
    }

    private AndroidBug5497Workaround(Activity activity) {
        FrameLayout content = (FrameLayout) activity.findViewById(android.R.id.content);
        mChildOfContent = content.getChildAt(0);
        frameLayoutParams = (FrameLayout.LayoutParams) mChildOfContent.getLayoutParams();

        _globalListener = new ViewTreeObserver.OnGlobalLayoutListener()
        {

            @Override
            public void onGlobalLayout()
            {
                 possiblyResizeChildOfContent();
            }
        };
    }

    public void setListener()
    {
         mChildOfContent.getViewTreeObserver().addOnGlobalLayoutListener(_globalListener);
    }

    public void removeListener()
    {
        if (Build.VERSION.SDK_INT >= Build.VERSION_CODES.JELLY_BEAN) {
            mChildOfContent.getViewTreeObserver().removeOnGlobalLayoutListener(_globalListener);
        } else {
            mChildOfContent.getViewTreeObserver().removeGlobalOnLayoutListener(_globalListener);
        }
    }

    private void possiblyResizeChildOfContent() {
        int usableHeightNow = computeUsableHeight();
        if (usableHeightNow != usableHeightPrevious) {
            int usableHeightSansKeyboard = mChildOfContent.getRootView().getHeight();
            int heightDifference = usableHeightSansKeyboard - usableHeightNow;
            if (heightDifference > (usableHeightSansKeyboard/4)) {
                // keyboard probably just became visible
                frameLayoutParams.height = usableHeightSansKeyboard - heightDifference;
            } else {
                // keyboard probably just became hidden
                frameLayoutParams.height = usableHeightSansKeyboard;
            }
            mChildOfContent.requestLayout();
            usableHeightPrevious = usableHeightNow;
        }
    }

    private int computeUsableHeight() {
        Rect r = new Rect();
        mChildOfContent.getWindowVisibleDisplayFrame(r);
        return (r.bottom - r.top);
    } 
}

使用包含我的EditText的类

@Override
public void onStart()
{
    super.onStart();
    AndroidBug5497Workaround.getInstance(getActivity()).setListener();
}

@Override
public void onStop()
{
    super.onStop();
    AndroidBug5497Workaround.getInstance(getActivity()).removeListener();
}

7

我目前正在使用这种方法,它非常有效。技巧在于我们从21以上和以下的不同方法中获取键盘高度,然后将其用作活动中根视图的底部填充。我假设您的布局不需要顶部填充(位于状态栏下方),但如果需要,请告诉我更新我的答案。

MainActivity.java

public class MainActivity extends AppCompatActivity {
    @Override
    protected void onCreate(final Bundle savedInstanceState) {
        super.onCreate(savedInstanceState);
        setContentView(R.layout.activity_main);

        RelativeLayout mainLayout = findViewById(R.id.main_layout);

        if (Build.VERSION.SDK_INT >= Build.VERSION_CODES.LOLLIPOP) {
            ViewCompat.setOnApplyWindowInsetsListener(mainLayout , new OnApplyWindowInsetsListener() {
                @Override
                public WindowInsetsCompat onApplyWindowInsets(View v, WindowInsetsCompat insets) {
                    v.setPadding(0, 0, 0, insets.getSystemWindowInsetBottom());
                    return insets;
                }
            });
        } else {
            View decorView = getWindow().getDecorView();
            final View contentView = mainLayout;
            decorView.getViewTreeObserver().addOnGlobalLayoutListener(new ViewTreeObserver.OnGlobalLayoutListener() {
                @Override
                public void onGlobalLayout() {
                    Rect r = new Rect();
                    //r will be populated with the coordinates of your view that area still visible.
                    decorView.getWindowVisibleDisplayFrame(r);

                    //get screen height and calculate the difference with the useable area from the r
                    int height = decorView.getContext().getResources().getDisplayMetrics().heightPixels;
                    int diff = height - r.bottom;

                    //if it could be a keyboard add the padding to the view
                    if (diff != 0) {
                        // if the use-able screen height differs from the total screen height we assume that it shows a keyboard now
                        //check if the padding is 0 (if yes set the padding for the keyboard)
                        if (contentView.getPaddingBottom() != diff) {
                            //set the padding of the contentView for the keyboard
                            contentView.setPadding(0, 0, 0, diff);
                        }
                    } else {
                        //check if the padding is != 0 (if yes reset the padding)
                        if (contentView.getPaddingBottom() != 0) {
                            //reset the padding of the contentView
                            contentView.setPadding(0, 0, 0, 0);
                        }
                    }
                }
            });
        }
    }
...
}

别忘了给你的根视图加上一个id:

activity_main.xml

<RelativeLayout
    xmlns:android="http://schemas.android.com/apk/res/android"
    android:id="@+id/main_layout"
    android:layout_width="match_parent"
    android:layout_height="match_parent">

希望这能对某些人有所帮助。

1
不理解,为什么这个答案还没有排在前面。其他的可能会出现故障、闪烁,但这个答案非常出色,特别是如果你有5个以上的API。 - Anton Shkurenko
1
我尝试了许多解决方案,除了这个之外都不起作用。谢谢Sdghasemi。 - Farzad

5

1)创建KeyboardHeightHelper:

public class KeyboardHeightHelper {

    private final View decorView;
    private int lastKeyboardHeight = -1;

    public KeyboardHeightHelper(Activity activity, View activityRootView, OnKeyboardHeightChangeListener listener) {
        this.decorView = activity.getWindow().getDecorView();
        activityRootView.getViewTreeObserver().addOnGlobalLayoutListener(() -> {
            int keyboardHeight = getKeyboardHeight();
            if (lastKeyboardHeight != keyboardHeight) {
                lastKeyboardHeight = keyboardHeight;
                listener.onKeyboardHeightChange(keyboardHeight);
            }
        });
    }

    private int getKeyboardHeight() {
        Rect rect = new Rect();
        decorView.getWindowVisibleDisplayFrame(rect);
        return decorView.getHeight() - rect.bottom;
    }

    public interface OnKeyboardHeightChangeListener {
        void onKeyboardHeightChange(int keyboardHeight);
    }
}

2) 让您的活动全屏:

activity.getWindow().getDecorView().setSystemUiVisibility(View.SYSTEM_UI_FLAG_LAYOUT_STABLE | View.SYSTEM_UI_FLAG_LAYOUT_FULLSCREEN);

3) 监听键盘高度变化并为您的视图添加底部填充:

View rootView = activity.findViewById(R.id.root); // your root view or any other you want to resize
KeyboardHeightHelper effectiveHeightHelper = new KeyboardHeightHelper(
        activity, 
        rootView,
        keyboardHeight -> rootView.setPadding(0, 0, 0, keyboardHeight));

所以,每当屏幕上出现键盘时,您视图的底部填充将会改变,并且内容将会重新排列。

网页内容由stack overflow 提供, 点击上面的
可以查看英文原文,
原文链接