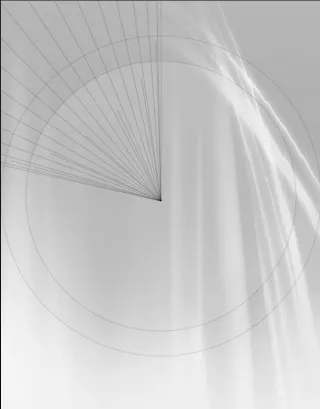
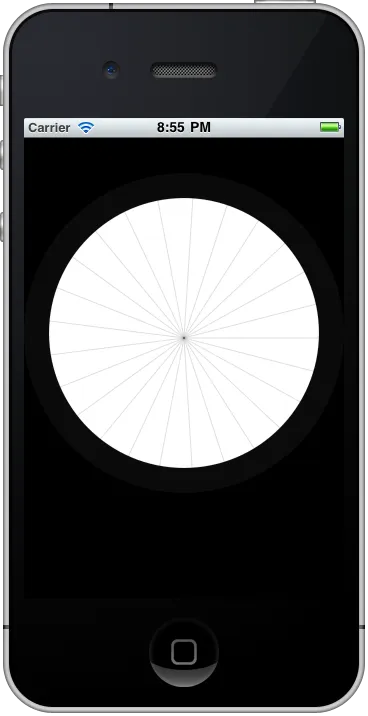
我已经苦苦搜索了一段时间,需要帮助。我只想从我的显示器中心(160,200)画出25条线,间隔为14.4度。我一直在使用这行代码,在for循环中使用x作为14.4度的乘数 -
    UIImage*backgroundImage = [UIImage imageNamed:@"Primate Background Only.png"];
[backgroundImage drawInRect:CGRectMake(0, 0, 320, 480)];
// 绘制外圆
rect = CGRectMake(0.0, 35.0, 320.0, 320.0);
CGContextRef contextRef = UIGraphicsGetCurrentContext();                // Get the contextRef
CGContextSetLineWidth       (contextRef, 0.5);                  // Set the border width
CGContextSetRGBFillColor    (contextRef, (219.0f/255.0f), (219.0f/255.0f), (219.0f/255.0f), 0.05f);             // Set the circle fill color to GREEN
CGContextSetRGBStrokeColor  (contextRef, 0.0, 0.0, 0.0, 0.2);           // Set the circle border color to BLACK
CGContextFillEllipseInRect      (contextRef, rect);                 // Fill the circle with the fill color
CGContextStrokeEllipseInRect    (contextRef, rect);                 // Draw the circle border
// 画出内圆
rect = CGRectMake(25.0, 60.0, 270.0, 270.0);                        // Get the contextRef
CGContextSetLineWidth       (contextRef, 0.5);                  // Set the border width
CGContextSetRGBFillColor    (contextRef, (219.0f/255.0f), (219.0f/255.0f), (219.0f/255.0f), 0.25f);
CGContextSetRGBStrokeColor  (contextRef, 0.0, 0.0, 0.0, 0.2);           // Set the circle border color to BLACK
CGContextFillEllipseInRect      (contextRef, rect);                 // Fill the circle with the fill color
CGContextStrokeEllipseInRect    (contextRef, rect);
// 绘制线段
CGContextRef context = UIGraphicsGetCurrentContext();
CGContextTranslateCTM(context, 0.0, 0.0);
    for (x=1; x<26; x++) {

        CGContextSetLineWidth       (context, 0.5);
        CGContextSetRGBStrokeColor  (context, 0.0, 0.0, 0.0, 0.25);
        CGContextMoveToPoint        (context, 160, 200);
        CGContextAddLineToPoint     (context, (160.0 * (cos((x*14.4)*(M_PI/180)))), (160.0 * (sin((x*14.4)*(M_PI/180)))));                      //  The angle is in degrees
        CGContextAddLineToPoint     (context, 200, 65);
        CGContextAddLineToPoint     (context, 160, 200);
        CGContextStrokePath(context);                           // Why is this not showing both line color and infill?
        CGContextSetFillColorWithColor   (context, [UIColor whiteColor].CGColor);
        CGContextFillPath           (context);
        CGContextRef context = UIGraphicsGetCurrentContext();
    }
(我本来想在这里发布一张图片,但它不允许我!)
请问有人能够纠正我的三角函数吗?我想要从12点钟开始顺时针绘制25条线,直到24:00。但它只会逆时针绘制90度然后返回,而且所有的线都超长了。
非常感激。
以上是用于绘制两个外圆和内部段的更大代码示例,如所请求的。接下来我将尝试上传图片。
x的循环等。 - Gustav Larsson