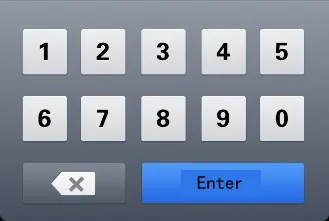
我想制作一个自定义的键盘。我不知道如何使用XML和Java来实现。下面的图片是我想要制作的键盘模型。它只需要数字。
我想制作一个自定义的键盘。我不知道如何使用XML和Java来实现。下面的图片是我想要制作的键盘模型。它只需要数字。
本答案介绍如何制作自定义的系统键盘,该键盘可以在用户手机上安装的任何应用程序中使用。如果您想制作仅在您自己的应用程序中使用的键盘,则请参见我的其他答案。
下面的示例将如下所示。您可以根据任何键盘布局进行修改。

keyboard_view.xml
这个视图就像一个容器,将会容纳我们的键盘。在这个例子中只有一个键盘,但是你可以添加其他键盘并在这个KeyboardView中交换它们。
<?xml version="1.0" encoding="utf-8"?>
<android.inputmethodservice.KeyboardView
    xmlns:android="http://schemas.android.com/apk/res/android"
    android:id="@+id/keyboard_view"
    android:layout_width="match_parent"
    android:layout_height="wrap_content"
    android:keyPreviewLayout="@layout/key_preview"
    android:layout_alignParentBottom="true">

</android.inputmethodservice.KeyboardView>
key_preview.xml
键盘预览是按下键盘键时弹出的布局。它只显示您正在按哪个键(以防您的手指遮挡了它)。这不是多项选择弹出窗口。如果需要,请查看候选视图。<?xml version="1.0" encoding="utf-8"?>
<TextView
xmlns:android="http://schemas.android.com/apk/res/android"
android:layout_width="match_parent"
android:layout_height="match_parent"
android:gravity="center"
android:background="@android:color/white"
android:textColor="@android:color/black"
android:textSize="30sp">
</TextView>
在res文件夹中创建一个xml文件夹。(右键单击res并选择新建 > 目录。)
然后将以下两个xml文件添加到其中。(右键单击xml文件夹并选择新建 > XML资源文件。)
number_pad.xml
这里开始变得更有趣了。这个键盘定义了按键的布局。<?xml version="1.0" encoding="utf-8"?>
<Keyboard xmlns:android="http://schemas.android.com/apk/res/android"
android:keyWidth="20%p"
android:horizontalGap="5dp"
android:verticalGap="5dp"
android:keyHeight="60dp">
<Row>
<Key android:codes="49" android:keyLabel="1" android:keyEdgeFlags="left"/>
<Key android:codes="50" android:keyLabel="2"/>
<Key android:codes="51" android:keyLabel="3"/>
<Key android:codes="52" android:keyLabel="4"/>
<Key android:codes="53" android:keyLabel="5" android:keyEdgeFlags="right"/>
</Row>
<Row>
<Key android:codes="54" android:keyLabel="6" android:keyEdgeFlags="left"/>
<Key android:codes="55" android:keyLabel="7"/>
<Key android:codes="56" android:keyLabel="8"/>
<Key android:codes="57" android:keyLabel="9"/>
<Key android:codes="48" android:keyLabel="0" android:keyEdgeFlags="right"/>
</Row>
<Row>
<Key android:codes="-5"
android:keyLabel="DELETE"
android:keyWidth="40%p"
android:keyEdgeFlags="left"
android:isRepeatable="true"/>
<Key android:codes="10"
android:keyLabel="ENTER"
android:keyWidth="60%p"
android:keyEdgeFlags="right"/>
</Row>
</Keyboard>
以下是需要注意的一些事项:
keyWidth: 这是每个键的默认宽度。 20%p 表示每个键应该占父元素宽度的 20%。但是可以被单个键覆盖,正如您在第三行中看到的删除和输入键。keyHeight: 它在这里进行了硬编码,但您可以使用类似 @dimen/key_height 的东西来动态设置不同屏幕大小的高度。Gap: 水平和垂直间隙告诉键之间留多少空间。即使将其设置为 0px,仍然存在一个小间隙。codes: 这可以是确定按下键时发生或输入什么的 Unicode 或自定义代码值。如果要输入较长的 Unicode 字符串,请参见 keyOutputText。keyLabel: 这是显示在键上的文本。keyEdgeFlags: 这表示应将键对齐到哪个边缘。isRepeatable: 如果按住键,则会重复输入。method.xml
这个文件告诉系统可用的输入法子类型,我在这里只包含一个最小版本。
<?xml version="1.0" encoding="utf-8"?>
<input-method
xmlns:android="http://schemas.android.com/apk/res/android">
<subtype
android:imeSubtypeMode="keyboard"/>
</input-method>
创建一个新的Java文件,我们称之为MyInputMethodService。这个文件将所有内容绑在一起。它处理从键盘接收到的输入,并将其发送给接收它的任何视图(例如EditText)。
public class MyInputMethodService extends InputMethodService implements KeyboardView.OnKeyboardActionListener {
@Override
public View onCreateInputView() {
// get the KeyboardView and add our Keyboard layout to it
KeyboardView keyboardView = (KeyboardView) getLayoutInflater().inflate(R.layout.keyboard_view, null);
Keyboard keyboard = new Keyboard(this, R.xml.number_pad);
keyboardView.setKeyboard(keyboard);
keyboardView.setOnKeyboardActionListener(this);
return keyboardView;
}
@Override
public void onKey(int primaryCode, int[] keyCodes) {
InputConnection ic = getCurrentInputConnection();
if (ic == null) return;
switch (primaryCode) {
case Keyboard.KEYCODE_DELETE:
CharSequence selectedText = ic.getSelectedText(0);
if (TextUtils.isEmpty(selectedText)) {
// no selection, so delete previous character
ic.deleteSurroundingText(1, 0);
} else {
// delete the selection
ic.commitText("", 1);
}
break;
default:
char code = (char) primaryCode;
ic.commitText(String.valueOf(code), 1);
}
}
@Override
public void onPress(int primaryCode) { }
@Override
public void onRelease(int primaryCode) { }
@Override
public void onText(CharSequence text) { }
@Override
public void swipeLeft() { }
@Override
public void swipeRight() { }
@Override
public void swipeDown() { }
@Override
public void swipeUp() { }
}
注意:
OnKeyboardActionListener 监听键盘输入。在本示例中,它还需要所有这些空方法。InputConnection 用于将输入发送到另一个视图,例如 EditText。我将此放在最后,因为它涉及到我们已经添加的文件。要将自定义键盘注册为系统键盘,您需要在 AndroidManifest.xml 文件的 application 部分之后的 activity 后面添加 service 部分。
<manifest ...>
<application ... >
<activity ... >
...
</activity>
<service
android:name=".MyInputMethodService"
android:label="Keyboard Display Name"
android:permission="android.permission.BIND_INPUT_METHOD">
<intent-filter>
<action android:name="android.view.InputMethod"/>
</intent-filter>
<meta-data
android:name="android.view.im"
android:resource="@xml/method"/>
</service>
</application>
</manifest>
完成了!现在您应该能够运行您的应用程序。但是,在设置中启用键盘之前,您不会看到太多内容。
每个想要使用您的键盘的用户都必须在Android设置中启用它。有关如何执行此操作的详细说明,请参见以下链接:
以下是摘要:
现在,您应该能够在Android中任何可以输入的地方使用您的键盘。
上面的键盘可用,但要创建其他人想要使用的键盘,您可能需要添加更多功能。请查看以下链接以了解更多信息。
不喜欢标准的 KeyboardView 的外观和行为吗?我当然不喜欢。它看起来好像自从 Android 2.0 以来就没有更新过。那么 Play 商店中的所有自定义键盘呢?他们看起来与上面丑陋的键盘完全不同。
好消息是,您可以完全自定义自己键盘的外观和行为。你需要做以下几件事:
ViewGroup。您可以用Button填充它,甚至可以制作自己的自定义键视图,这些视图继承View。如果使用弹出视图,则请注意。onKeyClicked(String text)或onBackspace()等事情调用其方法。keyboard_view.xml、key_preview.xml或number_pad.xml,因为这些都是标准KeyboardView所需的。您将在自定义视图中处理所有这些UI方面。MyInputMethodService类中,实现您在键盘类中定义的自定义键盘侦听器。这取代了不再需要的KeyboardView.OnKeyboardActionListener。MyInputMethodService类的onCreateInputView()方法中,创建并返回您的自定义键盘的实例。不要忘记将键盘的自定义监听器设置为this。keyboard.xml的文件,该文件将放置在res/xml文件夹中(如果该文件夹不存在,请创建它)。<?xml version="1.0" encoding="utf-8"?>
<Keyboard xmlns:android="http://schemas.android.com/apk/res/android"
android:keyWidth="15%p"
android:keyHeight="15%p" >
<Row>
<Key android:codes="1" android:keyLabel="1" android:horizontalGap="4%p"/>
<Key android:codes="2" android:keyLabel="2" android:horizontalGap="4%p"/>
<Key android:codes="3" android:keyLabel="3" android:horizontalGap="4%p" />
<Key android:codes="4" android:keyLabel="4" android:horizontalGap="4%p" />
<Key android:codes="5" android:keyLabel="5" android:horizontalGap="4%p" />
</Row>
<Row>
<Key android:codes="6" android:keyLabel="6" android:horizontalGap="4%p"/>
<Key android:codes="7" android:keyLabel="7" android:horizontalGap="4%p"/>
<Key android:codes="8" android:keyLabel="8" android:horizontalGap="4%p" />
<Key android:codes="9" android:keyLabel="9" android:horizontalGap="4%p" />
<Key android:codes="0" android:keyLabel="0" android:horizontalGap="4%p" />
</Row>
<Row>
<Key android:codes="-1" android:keyIcon="@drawable/backspace" android:keyWidth="34%p" android:horizontalGap="4%p"/>
<Key android:codes="100" android:keyLabel="Enter" android:keyWidth="53%p" android:horizontalGap="4%p"/>
</Row>
</Keyboard>
请注意,您需要创建 backspace 可绘制对象,并将其放置在 res/drawable-ldpi 文件夹中,大小非常小(如 18x18 像素)
然后在您想要使用它的 xml 文件中(其中包含 TextView),您应该添加以下代码:
<RelativeLayout
...
>
.....
<android.inputmethodservice.KeyboardView
android:id="@+id/keyboardview"
android:layout_width="fill_parent"
android:layout_height="wrap_content"
android:layout_alignParentBottom="true"
android:layout_centerHorizontal="true"
android:focusable="true"
android:focusableInTouchMode="true"
android:visibility="gone"
/>
......
</RelativeLayout>
android.inputmethodservice.KeyboardView的xml文件必须是RelativeLayout,以便能够设置alignParentBottom="true"(通常键盘显示在屏幕底部)。TextView的Activity的onCreate函数中添加以下代码。 // Create the Keyboard
mKeyboard= new Keyboard(this,R.xml.keyboard);
// Lookup the KeyboardView
mKeyboardView= (KeyboardView)findViewById(R.id.keyboardview);
// Attach the keyboard to the view
mKeyboardView.setKeyboard( mKeyboard );
// Do not show the preview balloons
//mKeyboardView.setPreviewEnabled(false);
// Install the key handler
mKeyboardView.setOnKeyboardActionListener(mOnKeyboardActionListener);
请注意,mKeyboard和mKeyboardView是您需要创建的私有类变量。
然后,您需要使用以下函数打开键盘(必须通过onClick xml属性将其与TextView关联)
public void openKeyboard(View v)
{
mKeyboardView.setVisibility(View.VISIBLE);
mKeyboardView.setEnabled(true);
if( v!=null)((InputMethodManager)getSystemService(Activity.INPUT_METHOD_SERVICE)).hideSoftInputFromWindow(v.getWindowToken(), 0);
}
最后,您需要OnKeyboardActionListener来处理您的事件。
private OnKeyboardActionListener mOnKeyboardActionListener = new OnKeyboardActionListener() {
@Override public void onKey(int primaryCode, int[] keyCodes)
{
//Here check the primaryCode to see which key is pressed
//based on the android:codes property
if(primaryCode==1)
{
Log.i("Key","You just pressed 1 button");
}
}
@Override public void onPress(int arg0) {
}
@Override public void onRelease(int primaryCode) {
}
@Override public void onText(CharSequence text) {
}
@Override public void swipeDown() {
}
@Override public void swipeLeft() {
}
@Override public void swipeRight() {
}
@Override public void swipeUp() {
}
};
希望能够帮到您!
大多数代码可以在这里找到。
____________________________________________________________-
编辑:
由于自API级别29起,KeyboardView已过时,因此您可以在这个网站找到其代码,并在实现上述键盘之前在您的代码中创建一个类。
本文将告诉您如何创建一个仅在您的应用程序中使用的自定义键盘。如果您想要创建一个可在任何应用程序中使用的系统键盘,则请参见我的其他答案。
下面的示例展示了一个效果。您可以针对任何键盘布局进行修改。
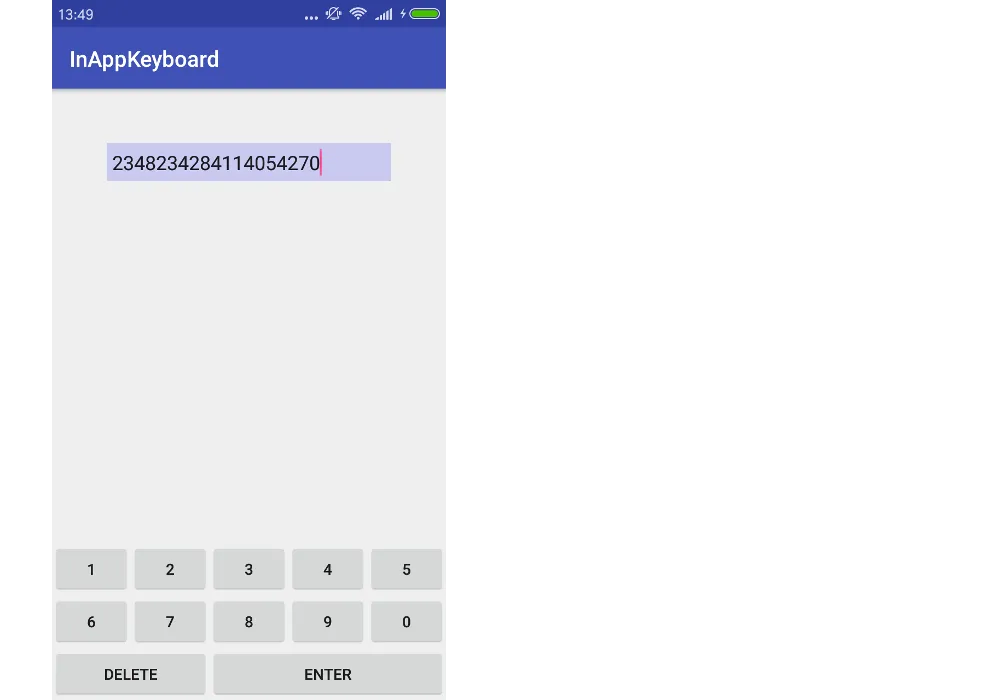
我将我的项目命名为InAppKeyboard,您可以根据需要随意命名。
键盘布局
向res/layout文件夹添加布局文件。我将其命名为keyboard。该键盘将是一个自定义复合视图,我们将从此xml布局文件中填充它。您可以使用任何布局来排列键,但我使用的是LinearLayout。请注意merge标记。
res/layout/keyboard.xml
<merge xmlns:android="http://schemas.android.com/apk/res/android">
<LinearLayout
android:layout_width="match_parent"
android:layout_height="wrap_content"
android:orientation="vertical">
<LinearLayout
android:layout_width="match_parent"
android:layout_height="wrap_content"
android:orientation="horizontal">
<Button
android:id="@+id/button_1"
android:layout_width="0dp"
android:layout_height="wrap_content"
android:layout_weight="1"
android:text="1"/>
<Button
android:id="@+id/button_2"
android:layout_width="0dp"
android:layout_height="wrap_content"
android:layout_weight="1"
android:text="2"/>
<Button
android:id="@+id/button_3"
android:layout_width="0dp"
android:layout_height="wrap_content"
android:layout_weight="1"
android:text="3"/>
<Button
android:id="@+id/button_4"
android:layout_width="0dp"
android:layout_height="wrap_content"
android:layout_weight="1"
android:text="4"/>
<Button
android:id="@+id/button_5"
android:layout_width="0dp"
android:layout_height="wrap_content"
android:layout_weight="1"
android:text="5"/>
</LinearLayout>
<LinearLayout
android:layout_width="match_parent"
android:layout_height="wrap_content"
android:orientation="horizontal">
<Button
android:id="@+id/button_6"
android:layout_width="0dp"
android:layout_height="wrap_content"
android:layout_weight="1"
android:text="6"/>
<Button
android:id="@+id/button_7"
android:layout_width="0dp"
android:layout_height="wrap_content"
android:layout_weight="1"
android:text="7"/>
<Button
android:id="@+id/button_8"
android:layout_width="0dp"
android:layout_height="wrap_content"
android:layout_weight="1"
android:text="8"/>
<Button
android:id="@+id/button_9"
android:layout_width="0dp"
android:layout_height="wrap_content"
android:layout_weight="1"
android:text="9"/>
<Button
android:id="@+id/button_0"
android:layout_width="0dp"
android:layout_height="wrap_content"
android:layout_weight="1"
android:text="0"/>
</LinearLayout>
<LinearLayout
android:layout_width="match_parent"
android:layout_height="wrap_content"
android:orientation="horizontal">
<Button
android:id="@+id/button_delete"
android:layout_width="0dp"
android:layout_height="wrap_content"
android:layout_weight="2"
android:text="Delete"/>
<Button
android:id="@+id/button_enter"
android:layout_width="0dp"
android:layout_height="wrap_content"
android:layout_weight="3"
android:text="Enter"/>
</LinearLayout>
</LinearLayout>
</merge>
Activity布局
仅用于演示目的,我们的Activity仅有一个EditText并且键盘位于底部。我把自定义的键盘界面命名为MyKeyboard。(我们很快会添加这一段代码,所以现在忽略错误)将所有键盘代码放入单个视图中的好处是方便在另一个Activity或应用程序中复用。
res/layout/activity_main.xml
<?xml version="1.0" encoding="utf-8"?>
<RelativeLayout
xmlns:android="http://schemas.android.com/apk/res/android"
xmlns:tools="http://schemas.android.com/tools"
android:layout_width="match_parent"
android:layout_height="match_parent"
tools:context="com.example.inappkeyboard.MainActivity">
<EditText
android:id="@+id/editText"
android:layout_width="match_parent"
android:layout_height="wrap_content"
android:background="#c9c9f1"
android:layout_margin="50dp"
android:padding="5dp"
android:layout_alignParentTop="true"/>
<com.example.inappkeyboard.MyKeyboard
android:id="@+id/keyboard"
android:layout_width="match_parent"
android:layout_height="wrap_content"
android:orientation="vertical"
android:layout_alignParentBottom="true"/>
</RelativeLayout>
添加一个新的 Java 文件。我把它叫做MyKeyboard。
需要注意的最重要的一点是,没有与任何EditText或Activity进行硬链接。这使得很容易将其插入到任何需要它的应用程序或活动中。此自定义键盘视图还使用InputConnection,它模仿系统键盘与EditText通信的方式。这就是我们避免硬链接的方式。
MyKeyboard是一个复合视图,它会填充我们上面定义的视图布局。
MyKeyboard.java
public class MyKeyboard extends LinearLayout implements View.OnClickListener {
// constructors
public MyKeyboard(Context context) {
this(context, null, 0);
}
public MyKeyboard(Context context, AttributeSet attrs) {
this(context, attrs, 0);
}
public MyKeyboard(Context context, AttributeSet attrs, int defStyleAttr) {
super(context, attrs, defStyleAttr);
init(context, attrs);
}
// keyboard keys (buttons)
private Button mButton1;
private Button mButton2;
private Button mButton3;
private Button mButton4;
private Button mButton5;
private Button mButton6;
private Button mButton7;
private Button mButton8;
private Button mButton9;
private Button mButton0;
private Button mButtonDelete;
private Button mButtonEnter;
// This will map the button resource id to the String value that we want to
// input when that button is clicked.
SparseArray<String> keyValues = new SparseArray<>();
// Our communication link to the EditText
InputConnection inputConnection;
private void init(Context context, AttributeSet attrs) {
// initialize buttons
LayoutInflater.from(context).inflate(R.layout.keyboard, this, true);
mButton1 = (Button) findViewById(R.id.button_1);
mButton2 = (Button) findViewById(R.id.button_2);
mButton3 = (Button) findViewById(R.id.button_3);
mButton4 = (Button) findViewById(R.id.button_4);
mButton5 = (Button) findViewById(R.id.button_5);
mButton6 = (Button) findViewById(R.id.button_6);
mButton7 = (Button) findViewById(R.id.button_7);
mButton8 = (Button) findViewById(R.id.button_8);
mButton9 = (Button) findViewById(R.id.button_9);
mButton0 = (Button) findViewById(R.id.button_0);
mButtonDelete = (Button) findViewById(R.id.button_delete);
mButtonEnter = (Button) findViewById(R.id.button_enter);
// set button click listeners
mButton1.setOnClickListener(this);
mButton2.setOnClickListener(this);
mButton3.setOnClickListener(this);
mButton4.setOnClickListener(this);
mButton5.setOnClickListener(this);
mButton6.setOnClickListener(this);
mButton7.setOnClickListener(this);
mButton8.setOnClickListener(this);
mButton9.setOnClickListener(this);
mButton0.setOnClickListener(this);
mButtonDelete.setOnClickListener(this);
mButtonEnter.setOnClickListener(this);
// map buttons IDs to input strings
keyValues.put(R.id.button_1, "1");
keyValues.put(R.id.button_2, "2");
keyValues.put(R.id.button_3, "3");
keyValues.put(R.id.button_4, "4");
keyValues.put(R.id.button_5, "5");
keyValues.put(R.id.button_6, "6");
keyValues.put(R.id.button_7, "7");
keyValues.put(R.id.button_8, "8");
keyValues.put(R.id.button_9, "9");
keyValues.put(R.id.button_0, "0");
keyValues.put(R.id.button_enter, "\n");
}
@Override
public void onClick(View v) {
// do nothing if the InputConnection has not been set yet
if (inputConnection == null) return;
// Delete text or input key value
// All communication goes through the InputConnection
if (v.getId() == R.id.button_delete) {
CharSequence selectedText = inputConnection.getSelectedText(0);
if (TextUtils.isEmpty(selectedText)) {
// no selection, so delete previous character
inputConnection.deleteSurroundingText(1, 0);
} else {
// delete the selection
inputConnection.commitText("", 1);
}
} else {
String value = keyValues.get(v.getId());
inputConnection.commitText(value, 1);
}
}
// The activity (or some parent or controller) must give us
// a reference to the current EditText's InputConnection
public void setInputConnection(InputConnection ic) {
this.inputConnection = ic;
}
}
对于系统键盘,Android 使用 InputMethodManager 来将键盘指向当前聚焦的 EditText。在此示例中,活动将提供一个从 EditText 到我们自定义键盘的链接。
由于我们不使用系统键盘,我们需要禁用它以防止在触摸 EditText 时弹出。其次,我们需要获取 EditText 中的 InputConnection 并将其传递给我们的键盘。
MainActivity.java
public class MainActivity extends AppCompatActivity {
@Override
protected void onCreate(Bundle savedInstanceState) {
super.onCreate(savedInstanceState);
setContentView(R.layout.activity_main);
EditText editText = (EditText) findViewById(R.id.editText);
MyKeyboard keyboard = (MyKeyboard) findViewById(R.id.keyboard);
// prevent system keyboard from appearing when EditText is tapped
editText.setRawInputType(InputType.TYPE_CLASS_TEXT);
editText.setTextIsSelectable(true);
// pass the InputConnection from the EditText to the keyboard
InputConnection ic = editText.onCreateInputConnection(new EditorInfo());
keyboard.setInputConnection(ic);
}
}
如果您的Activity有多个EditText,则需要编写代码将正确的EditText的InputConnection传递给键盘。(您可以通过向EditText添加OnFocusChangeListener和OnClickListener来实现此操作。有关详细信息,请参见本文。)您还可能希望在适当的时候隐藏或显示键盘。
就是这样。现在您应该能够运行示例应用程序并根据需要输入或删除文本。您的下一步是修改所有内容以适合自己的需求。例如,在我的某些键盘中,我使用的是TextView而不是Buttons,因为更容易自定义它们。
TextView而不是Button。然后只需使背景成为可绘制对象,当按下时改变外观状态即可。View的子类,并且定制键盘,其是ViewGroup的子类。键盘通过编程方式布置所有键。键使用接口与键盘通信(类似于片段如何与活动通信)。如果您只需要单个键盘布局,则不需要这样做,因为xml布局可以正常工作。但是,如果您想看到我一直在研究的示例,请查看这里的所有*和Keyboard*类。请注意,我还在那里使用容器视图,其功能是交换键盘。EditText,那么您需要为它们添加一个onFocusChangedListener,以便当它们获得焦点时,您可以将当前EditText的InputConnection分配给您的自定义键盘。 - SuragcheditText.setShowSoftInputOnFocus(false);解决了这个问题。” - pmiguelpinto使用KeyboardView:
KeyboardView kbd = new KeyboardView(context);
kbd.setKeyboard(new Keyboard(this, R.xml.custom));
kbd.setOnKeyboardActionListener(new OnKeyboardActionListener() {
....
}
现在你有一个kbd,它是一个普通的视图。
这里的好处是R.xml.custom指的是/res/xml/custom.xml,它以xml格式定义了键盘的布局。要了解更多关于该文件的信息,请参考:Keyboard、Keyboard.Row和Keyboard.Key。
这是一个软键盘的示例项目。
https://developer.android.com/guide/topics/text/creating-input-method.html
你的软键盘应该与此类似,只是布局不同。
编辑: 如果您只需要在应用程序中使用软键盘,则非常简单! 创建一个垂直方向的线性布局,并在其中创建3个水平方向的线性布局。 然后将每行按钮放置在这些水平线性布局中的每一个中,并为按钮分配权重属性。对于所有按钮,请使用android:layout_weight=1,以便它们间隔相等。
这样就可以解决问题了。如果您没有得到预期的结果,请在此处发布代码,我们将帮助您!
KeyboardView相关的XML文件和源代码。
http://www.fampennings.nl/maarten/android/09keyboard/index.htm
<com.donbrody.customkeyboard.components.keyboard.CustomKeyboardView
android:id="@+id/customKeyboardView"
android:layout_width="match_parent"
android:layout_height="wrap_content"
android:layout_alignParentBottom="true" />
然后将您的EditText注册到其中,并告诉它它们应该使用什么类型的键盘:
override fun onCreate(savedInstanceState: Bundle?) {
super.onCreate(savedInstanceState)
setContentView(R.layout.activity_main)
val numberField: EditText = findViewById(R.id.testNumberField)
val numberDecimalField: EditText = findViewById(R.id.testNumberDecimalField)
val qwertyField: EditText = findViewById(R.id.testQwertyField)
keyboard = findViewById(R.id.customKeyboardView)
keyboard.registerEditText(CustomKeyboardView.KeyboardType.NUMBER, numberField)
keyboard.registerEditText(CustomKeyboardView.KeyboardType.NUMBER_DECIMAL, numberDecimalField)
keyboard.registerEditText(CustomKeyboardView.KeyboardType.QWERTY, qwertyField)
}
迄今为止,Suragch给出了最好的答案,但他跳过了一些重要的细节,这些细节对于编译应用程序非常重要。
我希望通过改进他的答案来给出更好的答案。我将添加他未加入的所有缺失元素。
我使用安卓应用程序APK Builder 1.1.0编译了我的apk。现在让我们开始。
要构建一个安卓应用程序,我们需要几个按照特定格式组织并相应大写的文件和文件夹。
res layout -> 显示应用程序在手机上的外观的xml文件。类似于html如何塑造web页面在浏览器上的外观一样。使您的应用程序可以根据屏幕自适应拟合。
values -> 常量数据,如colors.xml、strings.xml、styles.xml。这些文件必须拼写正确。
drawable -> 图片{jpeg、png,...}。名称任意。
mipmap -> 更多的图片。用于应用程序图标?
xml -> 更多的xml文件。
src -> 在html中类似于JavaScript。布局文件将启动起始视图,您的java文件将动态地控制标签元素并触发事件。可以像在html中一样直接在layout.xml中激活事件。
AndroidManifest.xml -> 此文件注册了您的应用程序信息。应用程序名称、程序类型、所需权限等。这似乎使安卓更加安全。程序实际上不能做它没有在清单中要求的事情。
现在有4种类型的安卓程序:activity、service、content provider和broadcast reciever。我们的键盘将是一个service,这允许它在后台运行。它不会出现在启动应用程序列表中;但可以卸载。
编译应用程序需要gradle和apk签名。您可以研究一下或使用安卓APK Builder。它非常容易。
现在我们了解了安卓开发,让我们来创建文件和文件夹。
按照上面讨论的,创建文件和文件夹。我的目录如下所示:
请注意,如果您正在使用像Android Studio这样的IDE,它可能有一个项目文件。
A: NumPad/res/layout/key_preview.xml
<?xml version="1.0" encoding="utf-8"?>
<TextView
    xmlns:android="http://schemas.android.com/apk/res/android"
    android:layout_width="match_parent"
    android:layout_height="match_parent"
    android:gravity="center"
    android:background="@android:color/white"
    android:textColor="@android:color/black"
    android:textSize="30sp">
</TextView>
B: NumPad/res/layout/keyboard_view.xml
<?xml version="1.0" encoding="utf-8"?>
<android.inputmethodservice.KeyboardView
xmlns:android="http://schemas.android.com/apk/res/android"
android:id="@+id/keyboard_view"
android:layout_width="match_parent"
android:layout_height="wrap_content"
android:keyPreviewLayout="@layout/key_preview"
android:layout_alignParentBottom="true">
</android.inputmethodservice.KeyboardView>
C: NumPad/res/xml/method.xml
<?xml version="1.0" encoding="utf-8"?>
<input-method xmlns:android="http://schemas.android.com/apk/res/android">
<subtype android:imeSubtypeMode="keyboard"/>
</input-method>
D: Numpad/res/xml/number_pad.xml
<?xml version="1.0" encoding="utf-8"?>
<Keyboard xmlns:android="http://schemas.android.com/apk/res/android"
    android:keyWidth="20%p"
    android:horizontalGap="5dp"
    android:verticalGap="5dp"
    android:keyHeight="60dp">

    <Row>
        <Key android:codes="49" android:keyLabel="1" android:keyEdgeFlags="left"/>
        <Key android:codes="50" android:keyLabel="2"/>
        <Key android:codes="51" android:keyLabel="3"/>
        <Key android:codes="52" android:keyLabel="4"/>
        <Key android:codes="53" android:keyLabel="5" android:keyEdgeFlags="right"/>
    </Row>

    <Row>
        <Key android:codes="54" android:keyLabel="6" android:keyEdgeFlags="left"/>
        <Key android:codes="55" android:keyLabel="7"/>
        <Key android:codes="56" android:keyLabel="8"/>
        <Key android:codes="57" android:keyLabel="9"/>
        <Key android:codes="48" android:keyLabel="0" android:keyEdgeFlags="right"/>
    </Row>

    <Row>
        <Key android:codes="-5"
             android:keyLabel="DELETE"
             android:keyWidth="40%p"
             android:keyEdgeFlags="left"
             android:isRepeatable="true"/>
        <Key android:codes="10"
             android:keyLabel="ENTER"
             android:keyWidth="60%p"
             android:keyEdgeFlags="right"/>
    </Row>

</Keyboard>
<?xml version="1.0" encoding="utf-8"?>
<resources>
    <color name="colorPrimary">#3F51B5</color>
    <color name="colorPrimaryDark">#303F9F</color>
    <color name="colorAccent">#FF4081</color>
</resources>
<resources>
    <string name="app_name">Suragch NumPad</string>
</resources>
G: NumPad/res/values/styles.xml
<resources>

    <!-- Base application theme. -->
    <style name="AppTheme" parent="android:Theme.Material.Light.DarkActionBar">
        <!-- Customize your theme here. -->
    </style>

</resources>
H: Numpad/AndroidManifest.xml
这是一个争议很大的文件。我曾经觉得我永远也编译不了我的程序,感到非常沮丧。如果您查看Suracgh的回答,您会发现他将第一组字段留空,并在此文件中添加了activity标签。正如我所说,安卓程序有四种类型。activity是带有启动器图标的常规应用程序,而这个数字键盘不是一个activity!此外,他没有实现任何activity。
我的朋友们并不包括activity标签。你的程序会编译通过,但当你试图启动它时,它会崩溃!至于xmlns:android和uses-sdk;我无法帮助您。只要尝试一下我的设置看看是否有效就行。
正如您所见,有一个service标签,将其注册为服务。还有service.android:name必须是我们java文件中扩展服务的公共类的名称。它必须相应地大写。另外,package是我们在java文件中声明的包的名称。
<manifest xmlns:android="http://schemas.android.com/apk/res/android"
    package="Saragch.num_pad">

    <uses-sdk
        android:minSdkVersion="12"
        android:targetSdkVersion="27" />

    <application
        android:allowBackup="true"
        android:icon="@drawable/Suragch_NumPad_icon"
        android:label="@string/app_name"
        android:supportsRtl="true"
        android:theme="@style/AppTheme">

        <service
            android:name=".MyInputMethodService"
            android:label="Keyboard Display Name"
            android:permission="android.permission.BIND_INPUT_METHOD">

            <intent-filter>
                <action android:name="android.view.InputMethod"/>
            </intent-filter>

            <meta-data
                android:name="android.view.im"
                android:resource="@xml/method"/>

        </service>

    </application>
</manifest>
I: NumPad/src/Saragch/num_pad/MyInputMethodService.java
注意:我认为Java是src的替代方案。
这是另一个问题文件,但不像清单文件那样有争议。我对Java有足够的了解,知道什么是什么,什么不是。我几乎不了解XML以及它如何与Android开发相结合!
这里的问题是他没有导入任何东西! 我的意思是,他给了我们一个“完整”的文件,使用了无法解析的名称! InputMethodService,Keyboard等。 Suragch先生这样做是不好的实践。谢谢你帮助我,但是如果不能解析名称,你是如何期望代码编译成功的呢?
下面是正确编辑过的版本。我碰巧找到了一些提示,驱使我去了解究竟应该导入什么。
package Saragch.num_pad;

import android.inputmethodservice.InputMethodService;
import android.inputmethodservice.KeyboardView;
import android.inputmethodservice.Keyboard;

import android.text.TextUtils;
import android.view.inputmethod.InputConnection;

import android.content.Context;
import android.content.Intent;
import android.content.pm.PackageManager;
import android.os.Build;
import android.os.Bundle;
import android.view.View;
import android.widget.ImageView;
import android.widget.TextView;
import android.widget.Toast;


public class MyInputMethodService extends InputMethodService implements KeyboardView.OnKeyboardActionListener
{
    @Override
    public View onCreateInputView()
    {
     // get the KeyboardView and add our Keyboard layout to it
     KeyboardView keyboardView = (KeyboardView)getLayoutInflater().inflate(R.layout.keyboard_view, null);
     Keyboard keyboard = new Keyboard(this, R.xml.number_pad);
     keyboardView.setKeyboard(keyboard);
     keyboardView.setOnKeyboardActionListener(this);
     return keyboardView;
    }

    @Override
    public void onKey(int primaryCode, int[] keyCodes)
    {

        InputConnection ic = getCurrentInputConnection();

        if (ic == null) return;

        switch (primaryCode)
        {
         case Keyboard.KEYCODE_DELETE:
            CharSequence selectedText = ic.getSelectedText(0);

            if (TextUtils.isEmpty(selectedText))
            {
             // no selection, so delete previous character
             ic.deleteSurroundingText(1, 0);
            }

            else
            {
             // delete the selection
             ic.commitText("", 1);
            }

            ic.deleteSurroundingText(1, 0);
            break;

         default:
            char code = (char) primaryCode;
            ic.commitText(String.valueOf(code), 1);
        }
    }

    @Override
    public void onPress(int primaryCode) { }

    @Override
    public void onRelease(int primaryCode) { }

    @Override
    public void onText(CharSequence text) { }

    @Override
    public void swipeLeft() { }

    @Override
    public void swipeRight() { }

    @Override
    public void swipeDown() { }

    @Override
    public void swipeUp() { }
}
编译并签名你的项目。
对于一个新手 Android 开发者,这是我不熟悉的领域。我想要学习手动编译,因为我相信真正的程序员能够手动编译。
我认为 Gradle 是编译打包成 APK 的工具之一。APK 类似于 JAR 文件或 ZIP 文件中的 RAR 文件。然后有两种类型的签名:debug key 不允许在 Play 商店中使用,而 private key 可以。
那么,让我们帮助 Saragch 先生吧。感谢您观看我的视频,请点赞并订阅。
我曾经遇到过同样的问题。一开始我使用了表格布局,但在按下按钮后布局会发生变化。不过我找到了这个页面,非常有用。http://mobile.tutsplus.com/tutorials/android/android-user-interface-design-creating-a-numeric-keypad-with-gridlayout/