问题:
一个比显示它的容器小得多的位图会变得模糊,颜色区域的清晰边缘也会被不加仪式地混合。
当放大时,这只是对一个非常小的图像(几个像素)应用双线性滤波器的结果。
期望的结果是在放大图像的同时保持单个像素的原始颜色。
为了实现这个结果,只需要将 Graphics 对象的 InterpolationMode 设置为:
e.Graphics.InterpolationMode = InterpolationMode.NearestNeighbor
这个滤镜,也被称为点过滤器,简单地选择一个颜色,该颜色是最接近正在评估的像素颜色的颜色。当评估颜色均匀的区域时,所有像素的结果都是相同的像素颜色。
只有一个问题,Graphics对象的PixelOffsetMode的默认值是:
e.Graphics.PixelOffsetMode = PixelOffsetMode.None
在此模式下,与图像顶部和左侧边框相对应的外部像素(在普通图像采样中)绘制在由容器(目标位图或设备上下文)定义的矩形区域的边缘中间。
因此,由于源图像很小且其像素被放大了很多,第一条水平和垂直线的像素明显被切成了两半。
这可以使用其他PixelOffsetMode来解决:
e.Graphics.PixelOffsetMode = PixelOffsetMode.Half
这种模式通过将图像的渲染位置向后移动半个像素来实现。
以下是结果的示例图像,可以更好地解释这一点:
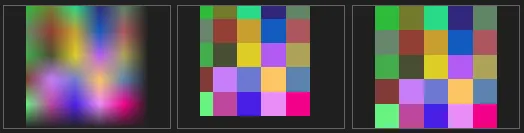
     Default Filter        InterpolationMode        InterpolationMode
   InterpolationMode        NearestNeighbor          NearestNeighbor
        Bilinear          PixelOffsetMode.None     PixelOffsetMode.Half
注意:
.Net的MSDN文档没有很好地描述PixelOffsetMode参数。你可以找到6个显然不同的选项。像素偏移模式实际上只有两种:
PixelOffsetMode.None(默认)和PixelOffsetMode.Half。
PixelOffsetMode.Default和PixelOffsetMode.HighSpeed与PixelOffsetMode.None相同。
PixelOffsetMode.HighQuality与PixelOffsetMode.Half相同。
阅读 .Net 文档,似乎在选择其中一个时有速度影响。实际上差别微不足道。
C++文档(以及GDI+总体),更加明确、精确,应该代替 .Net 文档。
如何进行:
我们可以将小源位图绘制到新的、较大的位图上,并将其分配给
PictureBox.Image属性。
但是,假设PictureBox大小在某个时刻(因为布局更改和/或DPI感知妥协)发生了变化,我们(几乎)回到了出发点。
一个简单的解决方案是直接在控件表面上绘制新的位图,并在必要时将其保存到磁盘。
这也将允许在需要时缩放位图而不失去质量。
Imports System.Drawing
Imports System.Drawing.Drawing2D

Private pixelBitmap As Bitmap = Nothing

Private Sub Form1_Load(sender As Object, e As EventArgs) Handles MyBase.Load
    pixelBitmap = Image.FromStream(New MemoryStream(File.ReadAllBytes("[File Path]")), True, False)
End Sub

Private Sub PictureBox1_Paint(sender As Object, e As PaintEventArgs) Handles PictureBox1.Paint
    e.Graphics.InterpolationMode = InterpolationMode.NearestNeighbor
    e.Graphics.PixelOffsetMode = PixelOffsetMode.Half
    e.Graphics.DrawImage(pixelBitmap, GetScaledImageRect(pixelBitmap, DirectCast(sender, Control)))
End Sub

Private Sub PictureBox1_Resize(sender As Object, e As EventArgs) Handles PictureBox1.Resize
    PictureBox1.Invalidate()
End Sub
GetScaledImageRect 是一个辅助方法,用于在容器内缩放图像:
Public Function GetScaledImageRect(image As Image, canvas As Control) As RectangleF
    Return GetScaledImageRect(image, canvas.ClientSize)
End Function

Public Function GetScaledImageRect(image As Image, containerSize As SizeF) As RectangleF
    Dim imgRect As RectangleF = RectangleF.Empty

    Dim scaleFactor As Single = CSng(image.Width / image.Height)
    Dim containerRatio As Single = containerSize.Width / containerSize.Height

    If containerRatio >= scaleFactor Then
        imgRect.Size = New SizeF(containerSize.Height * scaleFactor, containerSize.Height)
        imgRect.Location = New PointF((containerSize.Width - imgRect.Width) / 2, 0)
    Else
        imgRect.Size = New SizeF(containerSize.Width, containerSize.Width / scaleFactor)
        imgRect.Location = New PointF(0, (containerSize.Height - imgRect.Height) / 2)
    End If
    Return imgRect
End Function
Graphics.InterpolationMode设置为NearestNeighbor,以实现所需的结果。 - Visual VincentInterpolationMode为NearestNeighbor是必要的,但这还不够。你还需要设置e.Graphics.PixelOffsetMode = PixelOffsetMode.Half。这是设计上的考虑,在NearestNeighbor模式下,绘制的矩形会偏移半个像素:如果你不这样做,顶部/右侧和顶部/底部行中的像素将被裁剪。 - Jimi