我正在寻找一个适用于文本的好的全景拼接库。我尝试过OpenCV和OpenPano,它们在普通照片上都表现良好,但在文本上失败了。例如,我需要拼接以下3张图像:这些图像之间有约45%的重叠。
如果有一个选项可以使其中一个提到的库在文本图像上表现良好,而不是找另一个库,那就太好了。
我需要该库在Linux ARM上工作。
如果有一个选项可以使其中一个提到的库在文本图像上表现良好,而不是找另一个库,那就太好了。
我需要该库在Linux ARM上工作。
matchImages 函数中完成,请参见下面的代码):
H_templ_ratio)来创建一个模板图像,如下所示: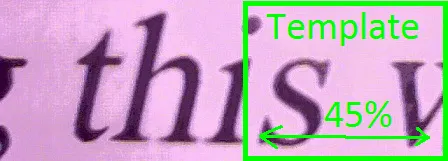
genTemplate 函数完成此步骤。
addBlackMargins 函数完成此过程。
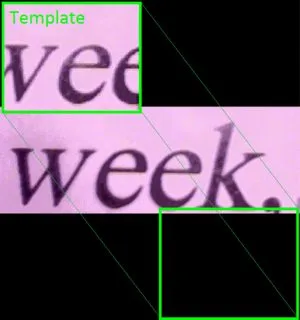
Mat2Edges 函数内完成)。这将为匹配过程 添加稳健性。以下是一个示例:
matchTemplate将模板与图像进行匹配,然后使用minMaxLoc函数检索最佳匹配位置。这一步包括计算我们将所有图像拼接在一起的最终矩阵的大小。如果所有输入图像的高度不相同,则特别需要此步骤。
此步骤在calcFinalImgSize函数内完成。我不会在此详细介绍,因为即使它看起来有点复杂(至少对我来说是这样),这只是简单的数学(加减乘除)。如果您想理解公式,请拿起笔和纸。
一旦我们有了每个输入图像的匹配位置,我们只需要进行简单的数学运算,将输入图像复制到最终图像的正确位置即可。同样,我建议您检查代码以获取实现详细信息(请参见stitchImages函数)。
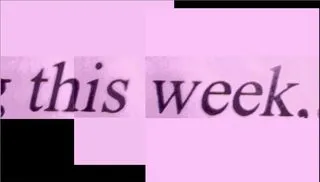
这是使用您提供的输入图像的结果:

如您所见,结果并不是“像素完美”,但应该足以用于OCR。
这是使用不同高度的输入图像的另一个结果:
我的程序是用Python编写的,使用了cv2(OpenCV)和numpy模块。但是它可以轻松地移植到其他语言,如C++、Java和C#。
import numpy as np
import cv2

def genTemplate(img):
    global H_templ_ratio
    # we get the image's width and height
    h, w = img.shape[:2]
    # we compute the template's bounds
    x1 = int(float(w)*(1-H_templ_ratio))
    y1 = 0
    x2 = w
    y2 = h
    return(img[y1:y2,x1:x2]) # and crop the input image

def mat2Edges(img): # applies a Canny filter to get the edges
    edged = cv2.Canny(img, 100, 200)
    return(edged)

def addBlackMargins(img, top, bottom, left, right): # top, bottom, left, right: margins width in pixels
    h, w = img.shape[:2]
    result = np.zeros((h+top+bottom, w+left+right, 3), np.uint8)
    result[top:top+h,left:left+w] = img
    return(result)

# return the y_offset of the first image to stitch and the final image size needed
def calcFinalImgSize(imgs, loc):
    global V_templ_ratio, H_templ_ratio
    y_offset = 0
    max_margin_top = 0; max_margin_bottom = 0 # maximum margins that will be needed above and bellow the first image in order to stitch all the images into one mat
    current_margin_top = 0; current_margin_bottom = 0

    h_init, w_init = imgs[0].shape[:2]
    w_final = w_init

    for i in range(0,len(loc)):
        h, w = imgs[i].shape[:2]
        h2, w2 = imgs[i+1].shape[:2]
        # we compute the max top/bottom margins that will be needed (relatively to the first input image) in order to stitch all the images
        current_margin_top += loc[i][1] # here, we assume that the template top-left corner Y-coordinate is 0 (relatively to its original image)
        current_margin_bottom += (h2 - loc[i][1]) - h
        if(current_margin_top > max_margin_top): max_margin_top = current_margin_top
        if(current_margin_bottom > max_margin_bottom): max_margin_bottom = current_margin_bottom
        # we compute the width needed for the final result
        x_templ = int(float(w)*H_templ_ratio) # x-coordinate of the template relatively to its original image
        w_final += (w2 - x_templ - loc[i][0]) # width needed to stitch all the images into one mat

    h_final = h_init + max_margin_top + max_margin_bottom
    return (max_margin_top, h_final, w_final)

# match each input image with its following image (1->2, 2->3)
def matchImages(imgs, templates_loc):
    for i in range(0,len(imgs)-1):
        template = genTemplate(imgs[i])
        template = mat2Edges(template)
        h_templ, w_templ = template.shape[:2]
        # Apply template Matching
        margin_top = margin_bottom = h_templ; margin_left = margin_right = 0
        img = addBlackMargins(imgs[i+1],margin_top, margin_bottom, margin_left, margin_right) # we need to enlarge the input image prior to call matchTemplate (template needs to be strictly smaller than the input image)
        img = mat2Edges(img)
        res = cv2.matchTemplate(img,template,cv2.TM_CCOEFF) # matching function
        _, _, _, templ_pos = cv2.minMaxLoc(res) # minMaxLoc gets the best match position
        # as we added margins to the input image we need to subtract the margins width to get the template position relatively to the initial input image (without the black margins)
        rectified_templ_pos = (templ_pos[0]-margin_left, templ_pos[1]-margin_top)
        templates_loc.append(rectified_templ_pos)
        print("max_loc", rectified_templ_pos)

def stitchImages(imgs, templates_loc):
    y_offset, h_final, w_final = calcFinalImgSize(imgs, templates_loc) # we calculate the "surface" needed to stitch all the images into one mat (and y_offset, the Y offset of the first image to be stitched)
    result = np.zeros((h_final, w_final, 3), np.uint8)

    #initial stitch
    h_init, w_init = imgs[0].shape[:2]
    result[y_offset:y_offset+h_init, 0:w_init] = imgs[0]
    origin = (y_offset, 0) # top-left corner of the last stitched image (y,x)
    # stitching loop
    for j in range(0,len(templates_loc)):
        h, w = imgs[j].shape[:2]
        h2, w2 = imgs[j+1].shape[:2]
        # we compute the coordinates where to stitch imgs[j+1]
        y1 = origin[0] - templates_loc[j][1]
        y2 = origin[0] - templates_loc[j][1] + h2
        x_templ = int(float(w)*(1-H_templ_ratio)) # x-coordinate of the template relatively to its original image's right side
        x1 = origin[1] + x_templ - templates_loc[j][0]
        x2 = origin[1] + x_templ - templates_loc[j][0] + w2
        result[y1:y2, x1:x2] = imgs[j+1] # we copy the input image into the result mat
        origin = (y1,x1) # we update the origin point with the last stitched image

    return(result)

if __name__ == '__main__':

    # input images
    part1 = cv2.imread('part1.jpg')
    part2 = cv2.imread('part2.jpg')
    part3 = cv2.imread('part3.jpg')
    imgs = [part1, part2, part3]

    H_templ_ratio = 0.45 # H_templ_ratio: horizontal ratio of the input that we will keep to create a template
    templates_loc = [] # templates location

    matchImages(imgs, templates_loc)

    result = stitchImages(imgs, templates_loc)

    cv2.imshow("result", result)
OpenCV 3 has a Stitcher class which can perform stitching on Text as well as photos.
import cv2
imageFiles = [YOUR IMAGE FILE NAMES]
images = []
for filename in imagefiles:
    img = cv2.imread(filename)
    images.append(img)
stitcher = cv2.createStitcher()
使用您提供的图片,我使用了这个方法得到了以下结果:

H_templ_ratio吗,还是有更好的方法? - Alaa M.