在React Navigation 5中向createMaterialBottomTabNavigator添加自定义的“添加”按钮

4
我正在制作一个项目(react native,expo,react navigation 5),我想在底部选项卡中添加自定义的“添加”按钮,但是由于...

导航器只能包含'Screen'组件作为其直接子元素

...所以我需要找到一种方法来传递我的自定义组件。似乎很容易,因为有文档:

...但是在查看这些问题以及其他人的问题时,我只找到了非常复杂的示例或者是早期版本中如何实现此功能的示例。

最终,我找到了一个简单的解决方案,目前运行得很好(非常感谢任何关于为什么这可能是个糟糕想法的建议)。

如果有人遇到类似的困境,我想分享我的解决方案。请参见下面的答案。

4个回答

5
将组件放在导航器外面,并使用CSS将其定位在选项卡上方。按照示例调整选项卡的左右图标。
如我所说,欢迎提出以不同方式实现此目标的建议,但我还没有遇到任何问题(请祈求好运)。
这是它的外观: enter image description here 这是小兔子:
import React from 'react';
import { createMaterialBottomTabNavigator } from '@react-navigation/material-bottom-tabs';
import { Ionicons, MaterialIcons, FontAwesome } from '@expo/vector-icons';

import AddButton from '../../components/UI/AddButton';
import SpotlightProductsScreen from './SpotlightProductsScreen';
import ProductsScreen from './ProductsScreen';
import UserSpotlightScreen from './../user/UserSpotlightScreen';
import UserProductsScreen from './../user/UserProductsScreen';


const ProductsOverviewScreen = props => {

  const Tab = createMaterialBottomTabNavigator();

  return (
    <>
      <AddButton
        navigation={props.navigation}
        style={{
          position: 'absolute',
          zIndex: 99,
          bottom: 5,
          alignSelf: 'center',
          shadowColor: 'black',
          shadowOpacity: 0.15,
          shadowOffset: { width: 0, height: 2 },
          shadowRadius: 8,
          elevation: 3 //Because shadow only work on iOS, elevation is same thing but for android.
        }}
      />
      <Tab.Navigator
        initialRouteName="Spotlight"
        labeled={false}
        shifting={true}
        activeColor="#f0edf6"
        inactiveColor="#3e2465"
        barStyle={{ backgroundColor: 'rgba(127,63,191,.9)' }}
      >
        <Tab.Screen
          name="Spotlight"
          component={SpotlightProductsScreen}
          options={{
            tabBarIcon: ({ color }) => (
              <Ionicons
                name={
                  Platform.OS === 'android'
                    ? 'md-notifications'
                    : 'ios-notifications'
                }
                color={color}
                size={27}
                style={{
                  marginLeft: -35
                }}
              />
            )
          }}
        />
        <Tab.Screen
          name="Förråd"
          component={ProductsScreen}
          options={{
            tabBarIcon: ({ color }) => (
              <MaterialIcons
                name={'file-download'}
                color={color}
                size={27}
                style={{
                  marginLeft: -70
                }}
              />
            )
          }}
        />
        <Tab.Screen
          name="Mitt Förråd"
          component={UserProductsScreen}
          options={{
            tabBarIcon: ({ color }) => (
              <MaterialIcons
                name={'file-upload'}
                color={color}
                size={30}
                style={{
                  marginRight: -70
                }}
              />
            )
          }}
        />
        <Tab.Screen
          name="Min Sida"
          component={UserSpotlightScreen}
          options={{
            tabBarBadge: 4,
            tabBarIcon: ({ color }) => (
              <FontAwesome
                name={'user'}
                color={color}
                size={30}
                style={{
                  marginRight: -35
                }}
              />
            )
          }}
        />
      </Tab.Navigator>
    </>
  );
};

export default ProductsOverviewScreen;

它起作用了。我成功地让我的按钮出现在选项卡的底部中间。但是有一个问题。我使用bottom 25将我的按钮位置设为绝对位置。现在我的一半按钮无法点击,而另一半可以点击。外面是不可点击的。 - Najam Us Saqib
你有没有找到任何解决方案或者自己想出来的方法来解决那个不可点击的部分? - sanister

3
你可以尝试这样做:
<Tab.Screen 
        name = "Button" 
        component={ScanStack} 
        options={{
        tabBarButton:()=>
        <View style={{position:'relative',bottom:35,alignItems:'center', justifyContent:'space-around',height:85}}>
          <Icon 
            name="barcode-scan"
            type = "material-community" 
            reverse
            color={'yellow'}
            reverseColor='black'
            containerStyle={{padding:0,margin:0,elevation:5}}
            onPress={()=>console.log('Hi')}
            size={30}/>
          <Text>Scan</Text>
        </View>
        }}/>

在组件中必须使用有效的React组件,我尝试使用component={()=>null},但控制台中出现了警告。

结果


在 Material Design 底部导航栏中出现问题,只有一半的按钮显示出来。 - Najam Us Saqib

0
步骤1:在bottomTabNav.js中,将component-prop设置为返回空内容的屏幕。
import React from 'react'
const AddMoreScreen = () => {
  return  null
}
export default AddMoreScreen
//I created AddMoreScreen.js component 

第二步:如步骤1所述,我提供了一个不渲染任何内容到组件属性的屏幕,在选项属性中,我将点击tabBarButton对象并向其返回自定义按钮。
  ...
 <Tab.Screen
    name={"Add"}
    component={AddMoreScreen}
    options={{
      tabBarButton: ()=> <AddMoreModal />
    }}
  />
  ...

步骤三:最后是我们的中心按钮代码,在我的情况下,如果我按下按钮,模态框必须从底部出现,只需根据您的要求更改以下代码。AddMoreModal.js

export default function AddMoreModal() {
const [modalVisible, setModalVisible] = useState(false);

return (
<View style={{ marginTop: 15, marginLeft: 10, marginRight: 10, }}>
  <TouchableOpacity
    onPress={() => {
      setModalVisible(true);
    }}
  >
    <View style={styles.buttonStyle}>
      <Image
        source={icons.quickAddOutlined}
        style={styles.bottomTabImage}
      />
      <Text style={styles.bottomTabText}>Add</Text>
    </View>
  </TouchableOpacity>

  <View style={styles.container}>
    <Modal
      backdropOpacity={0.3}
      isVisible={modalVisible}
      onBackdropPress={() => setModalVisible(false)}
      style={styles.contentView}
    >
      <View style={styles.content}>
        <Text style={styles.contentTitle}>Hi !</Text>
        <Text>Welcome to CRAZY MIDDLE BUTTON! forgotten by react-native navigation</Text>
      </View>
    </Modal>
  </View>
</View>
);
}


const styles = StyleSheet.create({
content: {
backgroundColor: "white",
padding: 22,
justifyContent: "center",
alignItems: "center",
borderTopRightRadius: 17,
borderTopLeftRadius: 17,
},
contentTitle: {
fontSize: 20,
marginBottom: 12,
},
contentView: {
justifyContent: "flex-end",
margin: 0,
},
buttonStyle: {
marginBottom: 0,
alignItems:'center',
justifyContent:'center'
},
bottomTabImage: {
width: 25,
height: 25,
},
bottomTabText: {
marginTop: 4,
fontSize: FONTS.body3.fontSize,
fontFamily: FONTS.body3.fontFamily,
color: COLORS.fontGray90,
},
});

步骤4:在此输入图片描述


0

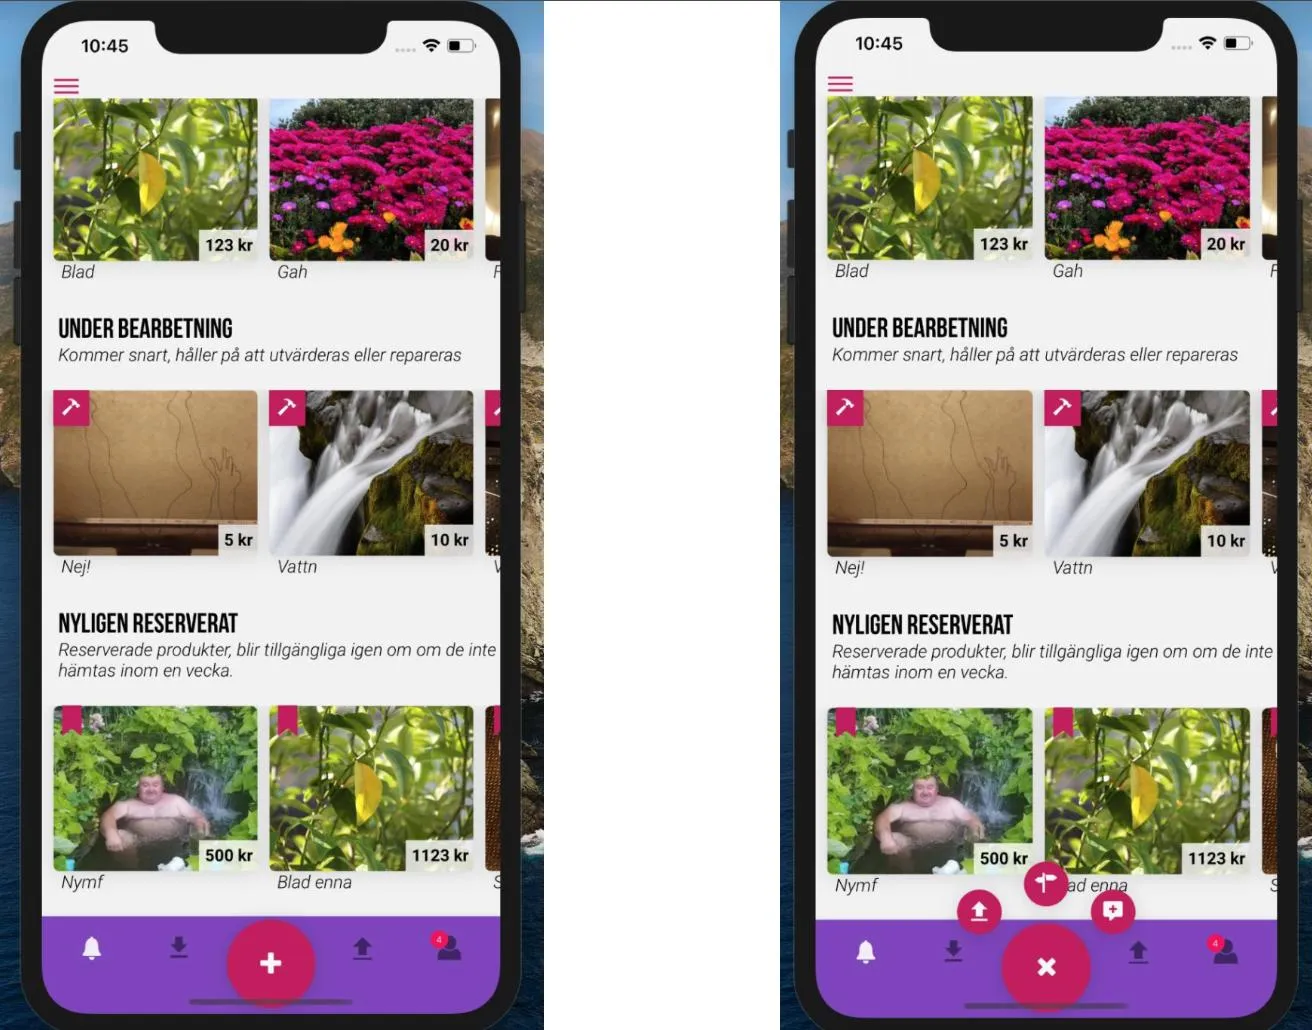
我曾经遇到过同样的问题,我需要将一个自定义组件添加到选项卡导航器中,但它与屏幕无关,而且我尝试了所有方法都失败了。在我的情况下,我尝试使用createMaterialTopTabNavigator。

React Navigation 5的文档有点粗糙,而且没有太多React Navigation 5的示例,但经过多次尝试,我终于能够创建一个自定义组件并自己进行样式设置,以便混合路由创建的选项卡和嵌入在选项卡导航器中的自定义按钮。

import * as React from 'react';
import { View } from 'react-native'
import {
  NavigationHelpersContext,
  useNavigationBuilder,
  TabRouter,
  TabActions,
  createNavigatorFactory,
} from '@react-navigation/native';
import styled from 'styled-components'
import Colors from '../constants/Colors';

const customTabNavigator = ({ 
  initialRouteName, 
  children, 
  screenOptions, 
  tabContainerStyle, 
  contentStyle, 
  leftIcon,
  rightIcon 
}) => {
  const { state, navigation, descriptors } = useNavigationBuilder(TabRouter, {
    children,
    screenOptions,
    initialRouteName,
  });

  return (
    <NavigationHelpersContext.Provider value={navigation}>
      <OuterWrapper style={tabContainerStyle}>
        { leftIcon }
        <TabWrapper>
          {state.routes.map((route, i) => {
            return (
              <Tab
                key={route.key}
                onPress={() => {
                  const event = navigation.emit({
                    type: 'tabPress',
                    target: route.key,
                    canPreventDefault: true,
                  });

                  if (!event.defaultPrevented) {
                    navigation.dispatch({
                      ...TabActions.jumpTo(route.name),
                      target: state.key,
                    });
                  }
                }}
                style={descriptors[route.key].options.tabStyle}
              >
                { descriptors[route.key].options.label ?? <Label active={state.index === i}>{descriptors[route.key].options.title || route.name}</Label> }
              </Tab>
            )
          })}
        </TabWrapper>
        { rightIcon }
      </OuterWrapper>
      <View style={[{ flex: 1 }, contentStyle]}>
        {descriptors[state.routes[state.index].key].render()}
      </View>
    </NavigationHelpersContext.Provider>
  );
}

const OuterWrapper = styled.View`
  height: 55px;
  flex-direction: row;
  justify-content: space-between;
  background-color: ${Colors.grey1};
`
const TabWrapper = styled.View`
  flex: 1;
  flex-direction: row;
  justify-content: space-evenly;
`
const Tab = styled.TouchableOpacity`
  padding: 0 24px;
  justify-content: center;
  height: 100%;
`
const Label = styled.Text`
  font-family: Futura-Medium;
  font-size: 26px;
  color: ${({ active }) => active ? Colors.grey6 : Colors.grey3};
`

export default createNavigatorFactory(customTabNavigator)

import customTabNavigator from './customTabNavigator'
import * as React from 'react';
import { View, Image } from 'react-native'

import {
  ProjectsScreen,
  RenderScreen,
  EventsScreen,
  CameraScreen
} from '../screens';

import Colors from '../constants/Colors'

import logo from '../assets/images/icon.png'
import { Ionicons } from '@expo/vector-icons';
import { TouchableOpacity } from 'react-native-gesture-handler';

const TopTab = customTabNavigator();
const INITIAL_ROUTE_NAME = 'Home';

export default function MainNavigator({ navigation, route }) {

  navigation.setOptions({ headerTitle: getHeaderTitle(route) });
  return (
      <TopTab.Navigator
        initialRouteName={INITIAL_ROUTE_NAME}
        leftIcon={(
          <TouchableOpacity style={{ height: "100%", justifyContent: "center" }} onPress={() => alert("Whatever")}>
            <Image source={logo} style={{ resizeMode: "center", width: 70, height: 40 }} />
          </TouchableOpacity>
        )}
      >
        <TopTab.Screen
          name="Home"
          component={ProjectsScreen}
          options={{
            title: 'Proyectos',
          }}
        />
        <TopTab.Screen
          name="Preview"
          component={EventsScreen}
          options={{
            title: 'Eventos',
          }}
        />
        <TopTab.Screen
          name="Render"
          component={RenderScreen}
          options={{
            title: 'Mi cuenta',
          }}
        />
        <TopTab.Screen
          name="Camera"
          component={CameraScreen}
          options={{
            title: "Camera",
            label: (
              <View style={{ width: 36, height: 32, backgroundColor: Colors.grey3, borderRadius: 3, alignItems: "center", justifyContent: "center" }}>
                <Ionicons name="md-camera" style={{ color: Colors.grey5 }} size={25} />
              </View>
            ),
            tabStyle: { flexDirection: "row", alignItems: "center", justifyContent: "flex-end", flex: 1  }
          }}
        />
      </TopTab.Navigator>
  );
}

function getHeaderTitle(route) {
  const routeName = route.state?.routes[route.state.index]?.name ?? INITIAL_ROUTE_NAME;

  switch (routeName) {
    case 'Home':
      return 'Montar vídeo';
    case 'Preview':
      return 'Previsualizar vídeo';
    case 'Render':
      return 'Renderizar';
    case 'Gallery':
      return 'Galería'
    case 'Camera':
      return 'Camera'
  }
}

根据https://reactnavigation.org/docs/custom-navigators的示例,我添加了不同的样式和两个新属性:leftIcon和rightIcon。这些属性接收一个组件,用于将其呈现到选项卡包装器的相应侧面。这些组件可以是带有自定义onPress的TouchableWhatever,与屏幕无关:P
希望这能帮到你,我差点就要跳楼了,哈哈。

网页内容由stack overflow 提供, 点击上面的
可以查看英文原文,
原文链接