被接受的答案的 Swift (4.0) 版本基本上是相同的:
let yellowView: NSView
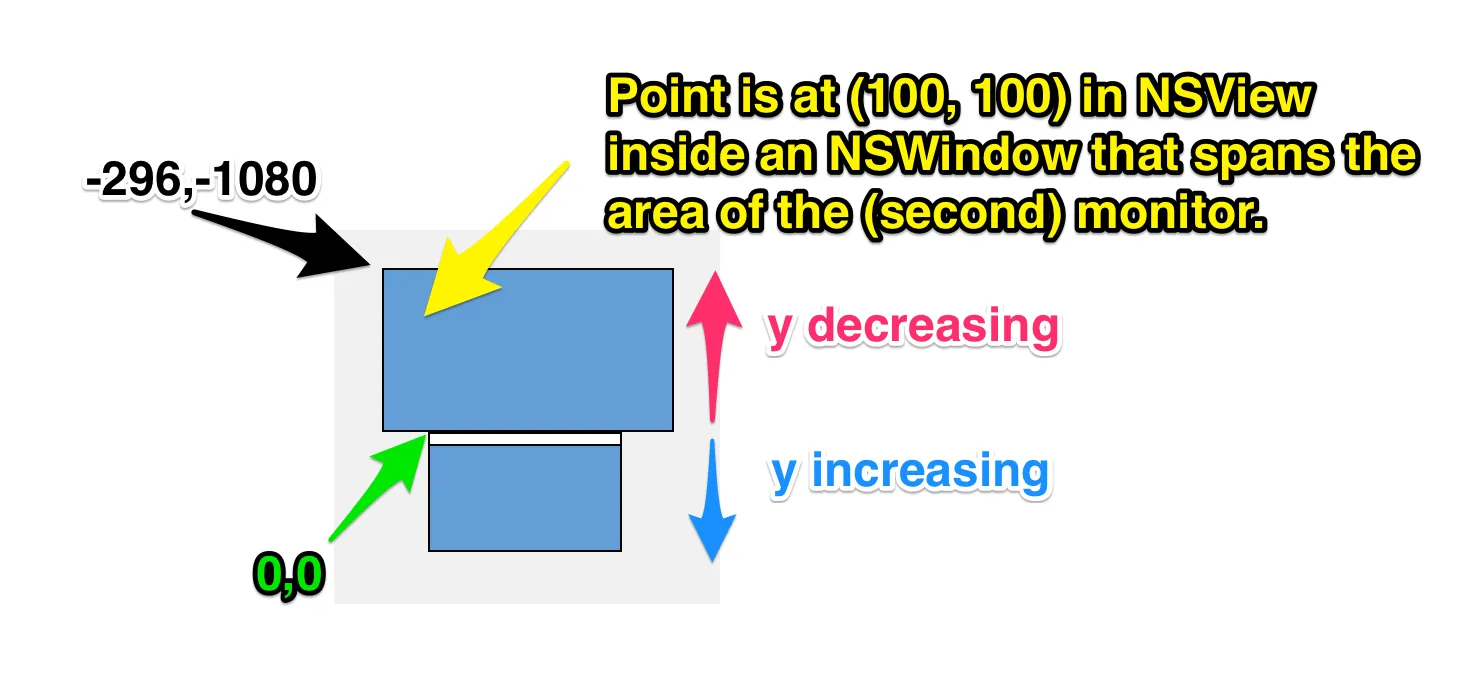
let yellowPoint = NSPoint(x: 100, y: 100)
let pointInWindow = yellowView.convert(yellowPoint, to: nil)
let pointOnScreen = yellowView.window?.convertToScreen(NSRect(origin: pointInWindow, size: .zero)).origin ?? .zero
let contentRect = NSRect(origin: pointOnScreen, size: NSSize(width: 32, height: 32))
let newWindow = NSWindow(contentRect: contentRect, styleMask: ...)
以下是另一种实现方式:
let someView: NSView
var rect: NSRect
rect = NSRect(x: 100, y: 100, width: 0, height: 0)
rect = someView.convert(rect, to: nil)
rect = someView.window?.convertToScreen(rect) ?? rect
rect.size = NSSize(width: 32, height: 32)
let newWindow = NSWindow(contentRect: rect, styleMask: ...)
在这里,我们介绍一种创建矩形的简单方法。对于那些需要详细指导的人,下面是一步步的操作:
1. 创建一个矩形。 在视图坐标系内所需位置初始化一个大小为零的矩形。
let someView: NSView // Some existing view
var rect = NSRect(x: 100, y: 100, width: 0, height: 0)
2. 从视图转换为窗口。 通过将目标 view 指定为 nil,将矩形从视图的坐标系统转换为窗口的坐标系统。
rect = someView.convert(rect, to: nil)
3. 将窗口坐标系转换为屏幕坐标系。 接下来,将矩形从窗口的坐标系统转换为屏幕的坐标系统。
请注意,someView.window 可能为 nil,因此我们使用可选链(即在 window? 中使用 ?)并在这种情况下回退到 rect 的原始值。这可能不是必需的,但这是一个好习惯。
rect = someView.window?.convertToScreen(rect) ?? rect
4. 设置矩形的大小。 使用新窗口所需的大小更新矩形。
rect.size = NSSize(width: 32, height: 32)
5. 创建窗口。 使用转换后的矩形初始化一个新窗口。
let newWindow = NSWindow(contentRect: rect, styleMask: ...)
NSPoint pointOnScreen = [[yellowView window] convertRectToScreen:(CGRect){.origin=pointInWindow}];应该改为:NSPoint pointOnScreen = [[yellowView window] convertRectToScreen:(CGRect){.origin=pointInWindow}].origin;- TyR