如何在UIAlertController中验证文本字段?

22

有人可以告诉我如何验证UIAlertController内的UITextFields吗?

我需要它可以防止用户在两个字段都没有输入时点击“保存”。

这是我目前的代码:

@IBAction func btnStart(sender: AnyObject) {
    var alert = UIAlertController(title: "New user",
        message: "Add a new user",
        preferredStyle: .Alert)

    let saveAction = UIAlertAction(title: "Save",
        style: .Default) { (action: UIAlertAction!) -> Void in

            self.textFieldName = alert.textFields![0] as UITextField
            self.textFieldEmail = alert.textFields![1] as UITextField
            self.saveUser(self.textFieldName.text, email: self.textFieldEmail.text)
            self.tableView.reloadData()
    }

    saveAction.enabled = false

    let cancelAction = UIAlertAction(title: "Cancel",
        style: .Default) { (action: UIAlertAction!) -> Void in
    }

    alert.addTextFieldWithConfigurationHandler {
        (textFieldName: UITextField!) in
        textFieldName.placeholder = "Enter full name"
    }

    alert.addTextFieldWithConfigurationHandler {
        (textFieldEmail: UITextField!) in
        textFieldEmail.placeholder = "Enter valid email adress"
        textFieldEmail.keyboardType = .EmailAddress

    }
    alert.addAction(saveAction)
    alert.addAction(cancelAction)

    presentViewController(alert,
        animated: true,
        completion: nil)
}

这是我用来验证电子邮件字段的函数:

func isValidEmail(testStr:String) -> Bool {
    let emailRegEx = "[A-Z0-9a-z._%+-]+@[A-Za-z0-9.-]+\\.[A-Za-z]{2,4}"

    if let emailTest = NSPredicate(format:"SELF MATCHES %@", emailRegEx) {
        return emailTest.evaluateWithObject(testStr)
    }
    return false
}
可能是[检查UIAlertController TextField是否启用按钮]的重复问题(https://dev59.com/MGAf5IYBdhLWcg3wmzpL) - Duyen-Hoa
10个回答

34

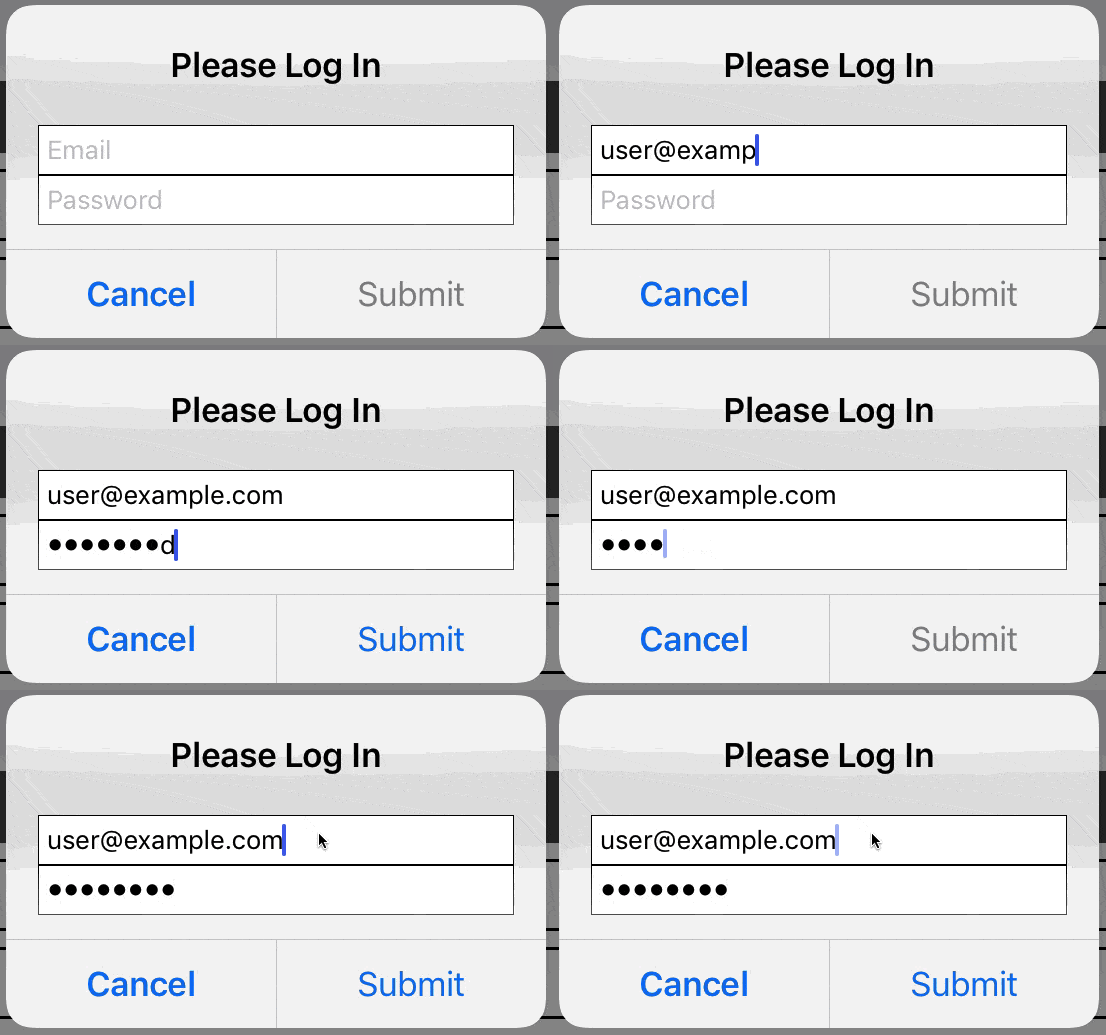
这可以通过扩展 UIAlertViewController 来完成:

extension UIAlertController {

    func isValidEmail(_ email: String) -> Bool {
        return email.characters.count > 0 && NSPredicate(format: "self matches %@", "[a-zA-Z0-9._%+-]+@[a-zA-Z0-9.-]+\\.[a-zA-Z]{2,64}").evaluate(with: email)
    }

    func isValidPassword(_ password: String) -> Bool {
        return password.characters.count > 4 && password.rangeOfCharacter(from: .whitespacesAndNewlines) == nil
    }

    func textDidChangeInLoginAlert() {
        if let email = textFields?[0].text,
            let password = textFields?[1].text,
            let action = actions.last {
            action.isEnabled = isValidEmail(email) && isValidPassword(password)
        }
    }
}

// ViewController
override func viewDidLoad() {
    super.viewDidLoad()

    let alert = UIAlertController(title: "Please Log In", message: nil, preferredStyle: .alert)

    alert.addTextField {
        $0.placeholder = "Email"
        $0.addTarget(alert, action: #selector(alert.textDidChangeInLoginAlert), for: .editingChanged)
    }

    alert.addTextField {
        $0.placeholder = "Password"
        $0.isSecureTextEntry = true
        $0.addTarget(alert, action: #selector(alert. textDidChangeInLoginAlert), for: .editingChanged)
    }

    alert.addAction(UIAlertAction(title: "Cancel", style: .cancel))

    let loginAction = UIAlertAction(title: "Submit", style: .default) { [unowned self] _ in
        guard let email = alert.textFields?[0].text,
            let password = alert.textFields?[1].text
            else { return } // Should never happen

        // Perform login action
    }

    loginAction.isEnabled = false
    alert.addAction(loginAction)
    present(alert, animated: true)
}

在此输入图片描述


1
很棒的回答,唯一需要更改的是在 textDidChangeInLoginAlert() 函数之前添加 @objc。 - Swinny89

31

最优雅的方法是使用

NotificationCenter.default.addObserver(forName: NSNotification.Name.UITextFieldTextDidChange...

Swift 3.0 示例

let alert = UIAlertController(title: nil, message: nil, preferredStyle: .alert)
    alert.addAction(UIAlertAction(title: "Cancel", style: .cancel, handler: nil))
    let saveAction = UIAlertAction(title:"Save", style: .destructive, handler: { (action) -> Void in

    })
    alert.addAction(saveAction)
    alert.addTextField(configurationHandler: { (textField) in
        textField.placeholder = "Enter something"
        NotificationCenter.default.addObserver(forName: NSNotification.Name.UITextFieldTextDidChange, object: textField, queue: OperationQueue.main) { (notification) in
            saveAction.isEnabled = textField.text!.length > 0
        }
    })
    present(alert, animated: true, completion: nil)

3
你不需要在某个时刻移除观察者吗?或者说,即使有观察者存在,文本框也会正常释放吗? - BadPirate
如果您的应用程序针对iOS 9.0及更高版本或macOS 10.11及更高版本,则无需在其dealloc方法中注销观察者。 (耶!)请参阅此处的文档:https://developer.apple.com/documentation/foundation/notificationcenter/1413994-removeobserver - Yohst

9

Swift 4.0 示例

这是基于Mihael Isaev的答案。我不得不稍微改变一下,才能使保存按钮不立即激活。我尝试了带和不带占位符文本。最后,必须明确地停用保存以开始。在我的情况下,我选择使用警报标题而不是占位符文本。但是,无论哪种方式都可以起作用。

let alert = UIAlertController(title: "Enter Username", message: nil, preferredStyle: .alert)

alert.addAction(UIAlertAction(title: "Cancel", style: .cancel, handler: { (action) -> Void in}))
let saveAction = UIAlertAction(title:"Save", style: .destructive, handler: { (action) -> Void in
})
alert.addAction(saveAction)
alert.addTextField(configurationHandler: { (textField) in
    textField.text = ""
    saveAction.isEnabled = false
    NotificationCenter.default.addObserver(forName: NSNotification.Name.UITextFieldTextDidChange, object: textField, queue: OperationQueue.main) { (notification) in
        saveAction.isEnabled = textField.text!.length > 0
    }
})
self.present(alert, animated: true, completion: nil)

对于Swift 5,只需从“forName”参数中删除“NSNotification.Name.”。我还建议将“textField”和“saveAction”都传递为弱引用,以防止循环。 - Allison

6

针对Swift 4.2 (NSNotification.Name.UITextFieldTextDidChange)的更新:

let alert = UIAlertController(title: nil, message: nil, preferredStyle: .alert)
    alert.addAction(UIAlertAction(title: "Cancel", style: .cancel, handler: nil))
    let saveAction = UIAlertAction(title:"Save", style: .destructive, handler: { (action) -> Void in

    })
    alert.addAction(saveAction)
    alert.addTextField(configurationHandler: { (textField) in
        textField.placeholder = "Enter something"
        NotificationCenter.default.addObserver(forName: UITextField.textDidChangeNotification, object: textField, queue: OperationQueue.main) { (notification) in
            saveAction.isEnabled = textField.text?.count > 0
        }
    })
    present(alert, animated: true, completion: nil)

3
在显示警告控制器之前,可以通过NSNotificationCenter实现此操作。您只需要求通知中心观察UITextFieldTextDidChangeNotification的通知,就可以了。下面是相应的实现代码:
@IBAction func showAlert(sender: AnyObject) {

    var alert = UIAlertController(title: "New user",
        message: "Add a new user",
        preferredStyle: .Alert)

    let saveAction = UIAlertAction(title: "Save",
        style: .Default) { (action: UIAlertAction!) -> Void in

            println("do your stuff here")
    }

    saveAction.enabled = false

    let cancelAction = UIAlertAction(title: "Cancel",
        style: .Default) { (action: UIAlertAction!) -> Void in
    }


    alert.addTextFieldWithConfigurationHandler {
        (textFieldName: UITextField!) in
        textFieldName.placeholder = "Enter full name"
    }

    alert.addTextFieldWithConfigurationHandler {
        (textFieldEmail: UITextField!) in
        textFieldEmail.placeholder = "Enter valid email adress"
        textFieldEmail.keyboardType = .EmailAddress

    }
// adding the notification observer here
 NSNotificationCenter.defaultCenter().addObserverForName(UITextFieldTextDidChangeNotification, object:alert.textFields?[0],
        queue: NSOperationQueue.mainQueue()) { (notification) -> Void in

            let textFieldName = alert.textFields?[0] as! UITextField
            let textFieldEmail = alert.textFields![1] as! UITextField
            saveAction.enabled = self.isValidEmail(textFieldEmail.text) &&  !textFieldName.text.isEmpty
    }


    NSNotificationCenter.defaultCenter().addObserverForName(UITextFieldTextDidChangeNotification, object:alert.textFields?[1],
        queue: NSOperationQueue.mainQueue()) { (notification) -> Void in

            let textFieldEmail = alert.textFields?[1] as! UITextField
            let textFieldName = alert.textFields?[0] as! UITextField
            saveAction.enabled = self.isValidEmail(textFieldEmail.text) &&  !textFieldName.text.isEmpty
    }


    alert.addAction(saveAction)
    alert.addAction(cancelAction)

    presentViewController(alert,
        animated: true,
        completion: nil)

}

 //  email validation code method
func isValidEmail(testStr:String) -> Bool {
    let emailRegEx = "[A-Z0-9a-z._%+-]+@[A-Za-z0-9.-]+\\.[A-Za-z]{2,4}"
    if let emailTest = NSPredicate(format:"SELF MATCHES %@", emailRegEx) as NSPredicate? {
        return emailTest.evaluateWithObject(testStr)
    }
    return false
}

非常感谢,这很有帮助,但是它的表现有点奇怪。如果我先输入姓名再输入电子邮件,那么就没问题,但如果我先输入电子邮件再输入姓名,就什么也不会发生。而且,当我输入电子邮件并从姓名字段中删除文本时,它仍然允许我发送信息:S - MarkoDeveloper
@MarkoMiletić:嗯,我刚刚给了你一个关于如何完成保存按钮的想法,等我更新我的答案。 - NSDumb
@MarkoMiletić 编辑完成,将按照您的需求进行操作,请查看并告知。 - NSDumb
@MarkoMiletić:代码存在缺陷,因此重新编辑了代码,请确认。 - NSDumb
是的,这就是解决方案,但是像@keithbhunter在下面写的那样,两个文本字段都需要在两个通知中进行验证。非常感谢 :) - MarkoDeveloper
是的,但另一种选择是使用委托方法,但目前NSNotificationCenter也可以。 - NSDumb

3
你可以使用以下代码来验证UIAlertController中的TextFields:-
步骤1:
Declare "email_TF" to your viewcontroller.h 

for example: 
    @property(strong,nonatomic)UITextField *email_TF;

步骤2:
UIAlertController *alert= [UIAlertController alertControllerWithTitle:@"Forgot Password?" message:nil preferredStyle:UIAlertControllerStyleAlert];
[alert addTextFieldWithConfigurationHandler: ^(UITextField *textField){
    textField.placeholder= @"Enter Your Valid Email";
    textField.autocorrectionType= UITextAutocorrectionTypeYes;
    textField.keyboardType= UIKeyboardTypeEmailAddress;

    email_TF= textField;
}];

步骤三:

UIAlertAction *noButton= [UIAlertAction actionWithTitle:@"No, thanks" style:UIAlertActionStyleDestructive handler:^(UIAlertAction *action){
    //Handel no, thanks button
}];
[alert addAction:noButton];

UIAlertAction *yesButton= [UIAlertAction actionWithTitle:@"Yes, please" style:UIAlertActionStyleDefault handler:^(UIAlertAction *action){
    //Handel your yes please button action here
    NSLog(@"%@", email_TF.text);

    if(email_TF.text.length>0){//

        NSString *emailString= email_TF.text;
        NSString *emailReg= @"[A-Z0-9a-z._%+-]+@[A-Za-z0-9.-]+\\.[A-Za-z]{2,4}";
        NSPredicate *emailTest= [NSPredicate predicateWithFormat:@"SELF MATCHES %@",emailReg];

        if(([emailTest evaluateWithObject:emailString]!=YES) || [emailString isEqualToString:@""]){

            UIAlertView *loginalert= [[UIAlertView alloc] initWithTitle:@"Forgot Password !" message:@"\nPlease enter valid Email (example@example.com format) ." delegate:self cancelButtonTitle:@"Ok" otherButtonTitles: nil];
            [loginalert show];

        }else{

            NSLog(@"your TextField successfully validated");

        }
    }else{

        UIAlertView *alert= [[UIAlertView alloc] initWithTitle:@"Forgot Password !" message:@"\nPlease Enter Your Email..." delegate:nil cancelButtonTitle:@"OK" otherButtonTitles:nil];
        [alert show];

    }

}];

[alert addAction:yesButton];

第四步:

[self presentViewController:alert animated:YES completion:nil];

1

注册文本字段更改通知并在那里验证文本字段:

//...
alert.addTextFieldWithConfigurationHandler {
    (textFieldEmail: UITextField!) in
    textFieldEmail.placeholder = "Enter valid email adress"
    textFieldEmail.keyboardType = .EmailAddress
}   

let textFieldValidationObserver: (NSNotification!) -> Void = { _ in
    let textFieldName = alert.textFields![0] as! UITextField
    let textFieldEmail = alert.textFields![1] as! UITextField
    saveAction.enabled = self.isValidEmail(textFieldEmail.text) && textFieldName.text.length > 0
}

// Notifications for textFieldName changes
NSNotificationCenter.defaultCenter().addObserverForName(UITextFieldTextDidChangeNotification,
    object: alert.textFields![0],  // textFieldName
    queue: NSOperationQueue.mainQueue(), usingBlock: textFieldValidationObserver)

// Notifications for textFieldEmail changes
NSNotificationCenter.defaultCenter().addObserverForName(UITextFieldTextDidChangeNotification,
    object: alert.textFields![1],  // textFieldEmail
    queue: NSOperationQueue.mainQueue(), usingBlock: textFieldValidationObserver)

alert.addAction(saveAction)
//...

我对这个很新,所以我不太理解,请你能否在我的代码中实现它?我在“object: alert.textFields[1]”行上遇到了一个错误,它说“'[AnyObject]'没有名为'subscript'的成员”。 - MarkoDeveloper
更新了我的答案。请注意隐式解包可选项。这就是我之前错过的,也是导致你错误的原因。 - keithbhunter
哦,谢谢老兄!!!这个解决了问题 :) 我通常从事前端开发,所以这些东西对我来说有点像中文 :D - MarkoDeveloper

0

根据@Kupendiran提供的使用UIAlertController进行电子邮件输入验证的方法,这里是一个使用Objective-C和新的UIAlertController格式的版本,因为UIAlertView现在已经过时。

步骤1. 在.h和.m文件中添加以下内容,与其他属性和变量一起使用

.h

@property(strong,nonatomic)UITextField *emailAddressField;

.m

UITextField *emailAddressField;

第二步。创建警报消息、按钮和验证过程。

UIAlertController * alertView =   [UIAlertController
                                           alertControllerWithTitle:@"E-Mail Address"
                                           message:@"Enter your email address:"
                                           preferredStyle:UIAlertControllerStyleAlert];

        [alertView addTextFieldWithConfigurationHandler:^(UITextField *emailTextField) {
            emailTextField.placeholder = @"E-Mail Address";
            emailTextField.autocorrectionType= UITextAutocorrectionTypeYes;
            emailTextField.keyboardType= UIKeyboardTypeEmailAddress;

            emailAddressField = emailTextField;
        }];

第三步。创建警报操作

        UIAlertAction * ok= [UIAlertAction actionWithTitle:@"OK" style:UIAlertActionStyleDefault handler:^(UIAlertAction *action){
            //Handel your OK button action here
            NSLog(@"Email Address Entered is: %@", emailAddressField.text);

            //Validate email address is correct format
            if(emailAddressField.text.length>0){//

                NSString *emailString= emailAddressField.text;
                NSString *emailReg= @"[A-Z0-9a-z._%+-]+@[A-Za-z0-9.-]+\\.[A-Za-z]{2,4}";
                NSPredicate *emailTest= [NSPredicate predicateWithFormat:@"SELF MATCHES %@",emailReg];

                if(([emailTest evaluateWithObject:emailString]!=YES) || [emailString isEqualToString:@""]){

                    NSLog(@"Email Address Entered is not valid: %@", emailAddressField.text);

                    UIAlertController *badEmailAlert = [UIAlertController
                                                     alertControllerWithTitle:@"Email Address"
                                                                      message:@"\nPlease enter valid Email (example@example.com format) ."
                                                               preferredStyle:UIAlertControllerStyleAlert];
                    [self presentViewController:badEmailAlert animated:YES completion:nil];

                    UIAlertAction* cancel = [UIAlertAction actionWithTitle:@"Cancel" style:UIAlertActionStyleDefault
                                                                   handler:^(UIAlertAction * action) {
                                                                       [badEmailAlert dismissViewControllerAnimated:YES completion:nil];
                                                                       [self presentViewController:alertView animated:YES completion:nil];
                                                                   }];
                    [badEmailAlert addAction:cancel];


                }else{

                    NSLog(@"your TextField successfully validated");

                }
            }else{

                [self presentViewController:alertView animated:YES completion:nil];

            }

        }];
        [alertView addAction:ok];


        //Handel your Cancel button action here
        UIAlertAction* cancel = [UIAlertAction actionWithTitle:@"Cancel" style:UIAlertActionStyleDefault
                                                       handler:^(UIAlertAction * action) {
                                                           [alertView dismissViewControllerAnimated:YES completion:nil];
                                                       }];
        [alertView addAction:cancel];

步骤4. 在屏幕上显示警报消息

[self presentViewController:alertView animated:YES completion:nil];

0
我实现了一个 UIAlertController子类,当你将其添加到警告框中时,它允许你在文本字段更改时添加处理程序:
public class TextEnabledAlertController: UIAlertController {
  private var textFieldActions = [UITextField: ((UITextField)->Void)]()

  func addTextField(configurationHandler: ((UITextField) -> Void)? = nil, textChangeAction:((UITextField)->Void)?) {
    super.addTextField(configurationHandler: { (textField) in
        configurationHandler?(textField)

        if let textChangeAction = textChangeAction {
            self.textFieldActions[textField] = textChangeAction
            textField.addTarget(self, action: #selector(self.textFieldChanged), for: .editingChanged)

        }
    })
  }

  @objc private func textFieldChanged(sender: UITextField) {
    if let textChangeAction = textFieldActions[sender] {
        textChangeAction(sender)
    }
  }
}

所以针对您的情况,唯一需要添加的额外内容是在textChangeAction处理程序中调用isValidEmail函数:

    alert.addTextField(configurationHandler: { (textField) in
        // things you want to configure on the textfield
    }) { (textField) in
        saveAction.isEnabled = isValidEmail(textField.text ?? "")
    }

-1

首先,您需要向您的类添加一些变量:

private weak var saveAction : UIAlertAction?
private weak var textFieldName : UITextField?
private weak var textFieldEmail : UITextField?
private var validName = false
private var validEmail = false

然后,当您想要配置警报控制器时(我只粘贴需要更改的内容):

    alert.addTextFieldWithConfigurationHandler {
        (textFieldName: UITextField!) in
        textFieldName.placeholder = "Enter full name"
        textFieldName.delegate = self
        self.textFieldName = textFieldName
    }
    alert.addTextFieldWithConfigurationHandler {
        (textFieldEmail: UITextField!) in
        textFieldEmail.placeholder = "Enter valid email adress"
        textFieldEmail.keyboardType = .EmailAddress
        textFieldEmail.delegate = self
        self.textFieldEmail = textFieldEmail
    }

    let saveAction = UIAlertAction(title: "Save",
        style: .Default) { (action: UIAlertAction!) -> Void in
        // here you are sure the name and email are correct
        let name = (alert.textFields[0] as! UITextField).text
        let email = (alert.textFields[1] as! UITextField).text
    }

    saveAction.enabled = false
    self.saveAction = saveAction

最后,您应该实现这个委托方法:

func textField(textField: UITextField, shouldChangeCharactersInRange range: NSRange, replacementString string: String) -> Bool {

    let newText = NSString(string: textField.text).stringByReplacingCharactersInRange(range, withString: string)

    if textField == self.textFieldName {
        // validate newText for the name requirements
        validName = self.validateName(newText)
    } else if textField == self.textFieldEmail {
        // validate newText for the email requirements
        validEmail = self.validateEmail(newText)
    }

    self.saveAction?.enabled = validEmail && validName

    return true
}

网页内容由stack overflow 提供, 点击上面的
可以查看英文原文,
原文链接