我该如何在Python中向终端输出彩色文本?
65个回答
70
我最喜欢的方法是使用Blessings库(完全透明:我写了它)。例如:
from blessings import Terminal

t = Terminal()
print t.red('This is red.')
print t.bold_bright_red_on_black('Bright red on black')
要打印彩色砖块,最可靠的方法是使用带有背景颜色的空格进行打印。我使用这种技术在nose-progressive中绘制进度条:
print t.on_green(' ')
您可以在特定的位置打印:
```html
您也可以在特定位置打印:
```with t.location(0, 5):
print t.on_yellow(' ')
如果您在游戏过程中需要与其他终端功能打交道,也可以这样做。您可以使用Python的标准字符串格式化使其更易读:
print '{t.clear_eol}You just cleared a {t.bold}whole{t.normal} line!'.format(t=t)
- Erik Rose
9
75将颜色作为函数名而不是参数的做法存在问题。 - LtWorf
1@LtWorf:如果需要,你可以使用
getattr将其轻松地变成一个参数。或者更有可能的是,动态创建格式字符串。 - jfs10你能做某件事并不意味着你应该去做它。如果颜色可以作为参数传递,这就更加通用了。 - LtWorf
3你可以直接传递一个Python函数。 - MaxNoe
2请注意,在 Windows 上导入 blessings 模块是无效的,因此如果您的脚本需要跨平台,请勿使用它。 - Adversus
显示剩余4条评论
66
我使用 for 循环生成了一个包含所有颜色的类,迭代了每种颜色的组合,最多到100种,并使用 Python 颜色编写了一个类。可按需复制粘贴,版权归我所有:GPLv2。
class colors:
    '''Colors class:
    Reset all colors with colors.reset
    Two subclasses fg for foreground and bg for background.
    Use as colors.subclass.colorname.
    i.e. colors.fg.red or colors.bg.green
    Also, the generic bold, disable, underline, reverse, strikethrough,
    and invisible work with the main class
    i.e. colors.bold
    '''
    reset='\033[0m'
    bold='\033[01m'
    disable='\033[02m'
    underline='\033[04m'
    reverse='\033[07m'
    strikethrough='\033[09m'
    invisible='\033[08m'
    class fg:
        black='\033[30m'
        red='\033[31m'
        green='\033[32m'
        orange='\033[33m'
        blue='\033[34m'
        purple='\033[35m'
        cyan='\033[36m'
        lightgrey='\033[37m'
        darkgrey='\033[90m'
        lightred='\033[91m'
        lightgreen='\033[92m'
        yellow='\033[93m'
        lightblue='\033[94m'
        pink='\033[95m'
        lightcyan='\033[96m'
    class bg:
        black='\033[40m'
        red='\033[41m'
        green='\033[42m'
        orange='\033[43m'
        blue='\033[44m'
        purple='\033[45m'
        cyan='\033[46m'
        lightgrey='\033[47m'
- GI Jack
64
试试这个简单的代码
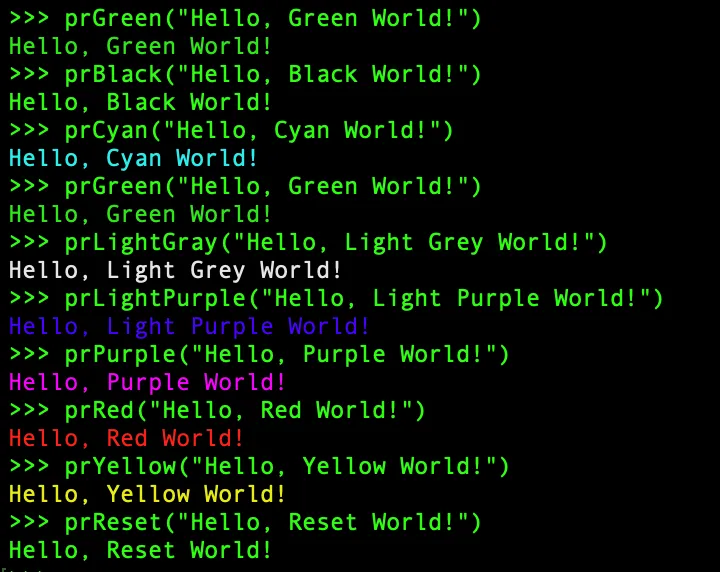
def prRed(prt):
    print(f"\033[91m{prt}\033[00m")

def prGreen(prt):
    print(f"\033[92m{prt}\033[00m")

def prYellow(prt):
    print(f"\033[93m{prt}\033[00m")

def prLightPurple(prt):
    print(f"\033[94m{prt}\033[00m")

def prPurple(prt):
    print(f"\033[95m{prt}\033[00m")

def prCyan(prt):
    print(f"\033[96m{prt}\033[00m")

def prLightGray(prt):
    print(f"\033[97m{prt}\033[00m")

def prBlack(prt):
    print(f"\033[98m{prt}\033[00m")

def prReset(prt):
    print(f"\033[0m{prt}\033[00m")

prGreen("Hello, Green World!")
prBlack("Hello, Black World!")
prCyan("Hello, Cyan World!")
prGreen("Hello, Green World!")
prLightGray("Hello, Light Grey World!")
prLightPurple("Hello, Light Purple World!")
prPurple("Hello, Purple World!")
prRed("Hello, Red World!")
prYellow("Hello, Yellow World!")
prReset("Hello, Reset World!")
Python 3 示例
# python2
    def prRed(prt): print("\033[91m {}\033[00m" .format(prt))
    def prGreen(prt): print("\033[92m {}\033[00m" .format(prt))
    def prYellow(prt): print("\033[93m {}\033[00m" .format(prt))
    def prLightPurple(prt): print("\033[94m {}\033[00m" .format(prt))
    def prPurple(prt): print("\033[95m {}\033[00m" .format(prt))
    def prCyan(prt): print("\033[96m {}\033[00m" .format(prt))
    def prLightGray(prt): print("\033[97m {}\033[00m" .format(prt))
    def prBlack(prt): print("\033[98m {}\033[00m" .format(prt))

    prGreen("Hello, World!")
- gauravds
2
30建议:定义一个返回着色字符串的lambda表达式,而不是直接将其打印出来,这样它可以与其他字符串一起使用。 - gustafbstrom
1感谢 @gustafbstron。这是我决定使用的内容:
def prGreen: return '"\033[91m {}\033[00m" .format(prt),它的使用方法如下:print(f'This will turn {prGreen("Hello world")} and change back')。 - MACE45
# Pure Python 3.x demo, 256 colors
# Works with bash under Linux and MacOS

fg = lambda text, color: "\33[38;5;" + str(color) + "m" + text + "\33[0m"
bg = lambda text, color: "\33[48;5;" + str(color) + "m" + text + "\33[0m"

def print_six(row, format, end="\n"):
    for col in range(6):
        color = row*6 + col - 2
        if color>=0:
            text = "{:3d}".format(color)
            print (format(text,color), end=" ")
        else:
            print(end="    ")   # four spaces
    print(end=end)

for row in range(0, 43):
    print_six(row, fg, " ")
    print_six(row, bg)

# Simple usage: print(fg("text", 160))
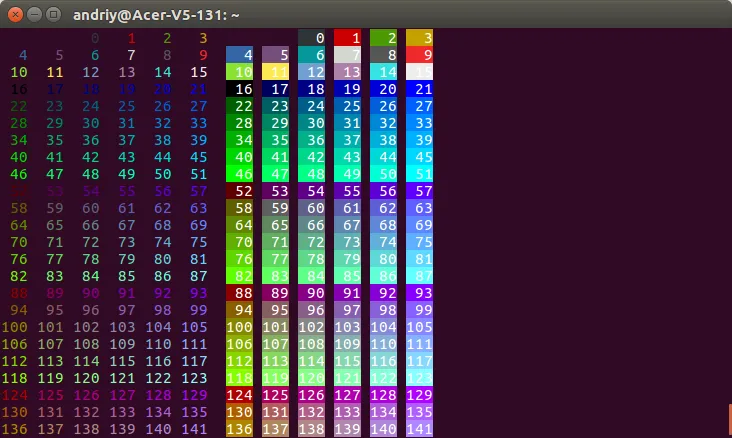
- Andriy Makukha
4
格式非常好,而且颜色范围很广。我一直回来看这个,谢谢! - Shane Smiskol
非常好,你能否给我一些关于
"\33[38;5;" 的解释? - Jay优秀的纯Python解决方案。 - n1c9
45
我有一个名为colorit的库,它非常简单。
以下是一些示例:
这将给你:
你可能想试试它:https://github.com/SuperMaZingCoder/colorit
以下是一些示例:
from colorit import *

# Use this to ensure that ColorIt will be usable by certain command line interfaces
# Note: This clears the terminal
init_colorit()

# Foreground
print(color("This text is red", Colors.red))
print(color("This text is orange", Colors.orange))
print(color("This text is yellow", Colors.yellow))
print(color("This text is green", Colors.green))
print(color("This text is blue", Colors.blue))
print(color("This text is purple", Colors.purple))
print(color("This text is white", Colors.white))

# Background
print(background("This text has a background that is red", Colors.red))
print(background("This text has a background that is orange", Colors.orange))
print(background("This text has a background that is yellow", Colors.yellow))
print(background("This text has a background that is green", Colors.green))
print(background("This text has a background that is blue", Colors.blue))
print(background("This text has a background that is purple", Colors.purple))
print(background("This text has a background that is white", Colors.white))

# Custom
print(color("This color has a custom grey text color", (150, 150, 150)))
print(background("This color has a custom grey background", (150, 150, 150)))

# Combination
print(
    background(
        color("This text is blue with a white background", Colors.blue), Colors.white
    )
)

# If you are using Windows Command Line, this is so that it doesn't close immediately
input()
这将给你:

你可能想试试它:https://github.com/SuperMaZingCoder/colorit
colorit现在可以通过PyPi安装!在Windows上,你可以使用pip install color-it进行安装,在macOS和Linux上则使用pip3 install color-it。- BeastCoder
8
什么时候可以使用pip安装它? - ncopiy
现在可以使用
pip3(或pip)安装它。命令是pip3 install color-it或pip install color-it,并且可以通过import colorit导入。 - BeastCoder我不知道为什么,但是我的文本没有按照Colors.etc提供的颜色进行着色。所有的文本都变成了灰色文本,但是色调不同(浅/深)... - Victor
@Victor 另一个可能是你使用的终端不支持 RGB 颜色,在这种情况下,我可以努力添加解决方案。 - BeastCoder
@Victor 好的,如果你还感兴趣的话,我已经解决了这个问题,它与我如何初始化
colorit 有关,最终我回到了之前的方式并删除了 colorama 的 init 方法。 - BeastCoder显示剩余3条评论
41
在Windows上,您可以使用模块'win32console'(在某些Python发行版中可用)或模块'ctypes'(Python 2.5及以上版本)来访问Win32 API。
要查看支持两种方式的完整代码,请参见Testoob中的color console reporting code。
ctypes示例:
要查看支持两种方式的完整代码,请参见Testoob中的color console reporting code。
ctypes示例:
import ctypes

# Constants from the Windows API
STD_OUTPUT_HANDLE = -11
FOREGROUND_RED    = 0x0004 # text color contains red.

def get_csbi_attributes(handle):
    # Based on IPython's winconsole.py, written by Alexander Belchenko
    import struct
    csbi = ctypes.create_string_buffer(22)
    res = ctypes.windll.kernel32.GetConsoleScreenBufferInfo(handle, csbi)
    assert res

    (bufx, bufy, curx, cury, wattr,
    left, top, right, bottom, maxx, maxy) = struct.unpack("hhhhHhhhhhh", csbi.raw)
    return wattr


handle = ctypes.windll.kernel32.GetStdHandle(STD_OUTPUT_HANDLE)
reset = get_csbi_attributes(handle)

ctypes.windll.kernel32.SetConsoleTextAttribute(handle, FOREGROUND_RED)
print "Cherry on top"
ctypes.windll.kernel32.SetConsoleTextAttribute(handle, reset)
- orip
4
3说实话,这是唯一在Windows系统下有效的解决方案。其他所有答案都只是互相抄袭。 - Danilo
就 Winodws 平台而言,使用支持 ANSI 序列的 ConEmu 可能会更加轻松(除了本地终端的许多其他优点)。尽管如此,拥有本地解决方案仍然很棒。 - Endre Both
1我和Danilo在一起。 - Sorry IwontTell
2@Danilo 注意这个答案:https://dev59.com/U3VC5IYBdhLWcg3wcw0m#3332860 - Ekrem Dinçel
38
我已经将joeld的回答封装为一个模块,并提供了全局函数,我可以在代码的任何位置使用它。
文件:log.py
def enable():
    HEADER = '\033[95m'
    OKBLUE = '\033[94m'
    OKGREEN = '\033[92m'
    WARNING = '\033[93m'
    FAIL = '\033[91m'
    ENDC = '\033[0m'
    BOLD = "\033[1m"

def disable():
    HEADER = ''
    OKBLUE = ''
    OKGREEN = ''
    WARNING = ''
    FAIL = ''
    ENDC = ''

def infog(msg):
    print(OKGREEN + msg + ENDC)

def info(msg):
    print(OKBLUE + msg + ENDC)

def warn(msg):
    print(WARNING + msg + ENDC)

def err(msg):
    print(FAIL + msg + ENDC)

enable()
使用方式如下:
import log
log.info("Hello, World!")
log.err("System Error")
- mms
34
这是我的现代(2021年)解决方案:yachalk
它是为数不多的能够正确支持嵌套样式的库之一:
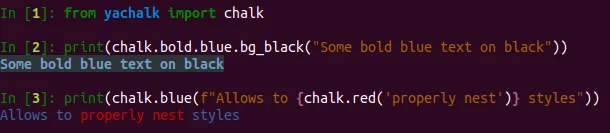
除此之外,yachalk 支持自动补全,支持 256 / 真彩色,带有终端能力检测,并且是完全类型化的。
以下是一些设计决策,您可以考虑选择您的解决方案。
高级库 vs 低级库/手动风格处理?
对这个问题的许多回答展示了如何直接使用 ANSI 转义码,或者建议需要手动启用/禁用样式的低级库。
这些方法存在微妙的问题:
- 语法上更冗长,因为必须显式指定重置,
- 更容易出错,因为您可能会不小心忘记重置样式,
- 不能正确处理边缘情况:例如,在某些终端上,在换行符之前必须重置样式,并在换行后重新激活它们。此外,某些终端在仅覆盖互斥样式时存在问题,并需要插入“不必要”的重置代码。如果开发人员的本地终端没有这些怪癖,那么开发人员将无法立即发现这些怪癖。该问题仅会由其他人报告,或者在CI终端上引起问题。
为什么需要另一个库?
在JavaScript中,用于此任务的事实上的标准库是chalk,在JS项目中使用它一段时间后,Python世界中可用的解决方案相比之下不足。不仅chalk API更方便使用(完全自动完成兼容),而且它也正确处理了所有边缘情况。
yachalk的想法是将相同的便利带到Python生态系统中。如果您对其他库进行比较感兴趣,我已经在项目页面上开始了功能比较。此外,这里是一个长(但仍然不完整)的替代品列表,在我的研究过程中出现了很多选择:)
- bluenote10
1
1但是你似乎错过了 colorful,https://github.com/timofurrer/colorful - Qiulang
33
def black(text):
    print('\033[30m', text, '\033[0m', sep='')

def red(text):
    print('\033[31m', text, '\033[0m', sep='')

def green(text):
    print('\033[32m', text, '\033[0m', sep='')

def yellow(text):
    print('\033[33m', text, '\033[0m', sep='')

def blue(text):
    print('\033[34m', text, '\033[0m', sep='')

def magenta(text):
    print('\033[35m', text, '\033[0m', sep='')

def cyan(text):
    print('\033[36m', text, '\033[0m', sep='')

def gray(text):
    print('\033[90m', text, '\033[0m', sep='')


black("BLACK")
red("RED")
green("GREEN")
yellow("YELLOW")
blue("BLACK")
magenta("MAGENTA")
cyan("CYAN")
gray("GRAY")
- Vishal
2
1这只适用于Python3吗?在Python2中使用sep=''时出现了错误。 - ScipioAfricanus
1这应该是Python3的可接受答案。运行完美。 - vfxdev
29
我最终选择了这样做,感觉这是最干净的方法:
formatters = {
    'RED': '\033[91m',
    'GREEN': '\033[92m',
    'END': '\033[0m',
}

print 'Master is currently {RED}red{END}!'.format(**formatters)
print 'Help make master {GREEN}green{END} again!'.format(**formatters)
- Ben174
1
这样做而不使用第三方包真的很好。 - Jamie Counsell
网页内容由stack overflow 提供, 点击上面的可以查看英文原文,
原文链接
原文链接
█唯一的问题是它属于扩展 ASCII,也许你可以使用http://stackoverflow.com/questions/8465226/using-extended-ascii-codes-with-python来解决它。 - Samie Bencherif