我有一张白色的图像,想要用渐变来着色。我不想生成很多用特定渐变着色的图像,而是想在代码中完成这个过程(而不是通过xml)。
为了改变图像的颜色,我使用:
imageView.setColorFilter(Color.GREEN);
这个方法可以成功运行。但是,如何应用渐变颜色而不是纯色呢?LinearGradient无法帮助,因为Shader对象不能应用setColorFilter。
编辑:这是我所拥有的图片:

这是我想要的效果:
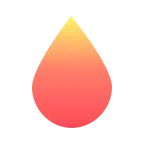
这是我的实际效果:

我有一张白色的图像,想要用渐变来着色。我不想生成很多用特定渐变着色的图像,而是想在代码中完成这个过程(而不是通过xml)。
为了改变图像的颜色,我使用:
imageView.setColorFilter(Color.GREEN);
这个方法可以成功运行。但是,如何应用渐变颜色而不是纯色呢?LinearGradient无法帮助,因为Shader对象不能应用setColorFilter。
编辑:这是我所拥有的图片:
这是我想要的效果:
这是我的实际效果:
public void clickButton(View v){
    Bitmap myBitmap = ((BitmapDrawable)myImageView.getDrawable()).getBitmap();

    Bitmap newBitmap = addGradient(myBitmap);
    myImageView.setImageDrawable(new BitmapDrawable(getResources(), newBitmap));
}


public Bitmap addGradient(Bitmap originalBitmap) {
    int width = originalBitmap.getWidth();
    int height = originalBitmap.getHeight();
    Bitmap updatedBitmap = Bitmap.createBitmap(width, height, Bitmap.Config.ARGB_8888);
    Canvas canvas = new Canvas(updatedBitmap);

    canvas.drawBitmap(originalBitmap, 0, 0, null);

    Paint paint = new Paint();
    LinearGradient shader = new LinearGradient(0, 0, 0, height, 0xFFF0D252, 0xFFF07305, Shader.TileMode.CLAMP);
    paint.setShader(shader);
    paint.setXfermode(new PorterDuffXfermode(PorterDuff.Mode.SRC_IN));
    canvas.drawRect(0, 0, width, height, paint);

    return updatedBitmap;
}
更新3:
我更改了渐变的颜色、线性渐变宽度为0和PorterDuffXfermode。
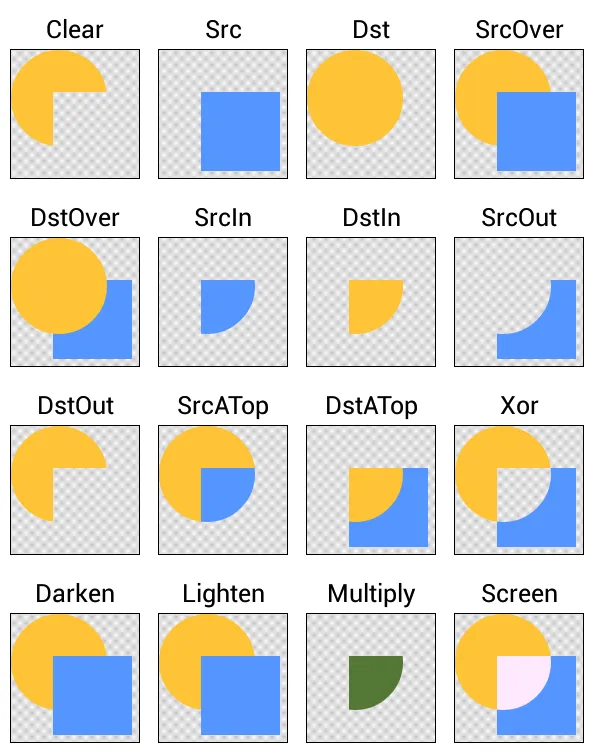
这里有一张好图片来理解PorterDuffXfermode:
canvas.density = originalBitmap.density才能正常工作。我不知道为什么。 - rtsketo你可以使用选择器
main_header.xml:
<?xml version="1.0" encoding="utf-8"?>
<LinearLayout         xmlns:android="http://schemas.android.com/apk/res/.    android"
    android:layout_width="fill_parent"
    android:layout_height="50dip"
    android:orientation="horizontal"
    android:background="@drawable/main_header_selector">
</LinearLayout>
main_header_selector.xml:
<?xml version="1.0" encoding="utf-8"?>
<selector     xmlns:android="http://schemas.android.com/apk/res/.     android">
<item>
    <shape>
        <gradient
        android:angle="90"
        android:startColor="#FFFF0000"
        android:endColor="#FF00FF00"
        android:type="linear" />
    </shape>
</item>
</selector>
同样的背景也可以应用到 ImageView 上。
要动态定义和使用选择器,请参考此链接: 动态定义和使用选择器
gradient.xml
<?xml version="1.0" encoding="utf-8"?>
<shape xmlns:android="http://schemas.android.com/apk/res/android"
android:shape="rectangle">
<gradient
    android:startColor="#CCb1e7fa"
    android:centerColor="#B3ffffff"
    android:endColor="#CCb1e7fa"
    android:angle="180" />
<corners android:radius="5dp" />

</shape>
接下来将这个作为你的图片视图的背景
    <ImageView
            android:id="@+id/umageview1"
            android:layout_width="100dp"
            android:layout_height="100dp"
            android:background="@drawable/gradient"
            android:layout_centerHorizontal="true"
            />