我想在iOS7上设置NSString的背景cornerRadius,但是NSString没有图层...
请告诉我,在iOS7上如何设置NSString的背景cornerRadius?
示例
请告诉我,在iOS7上如何设置NSString的背景cornerRadius?
示例
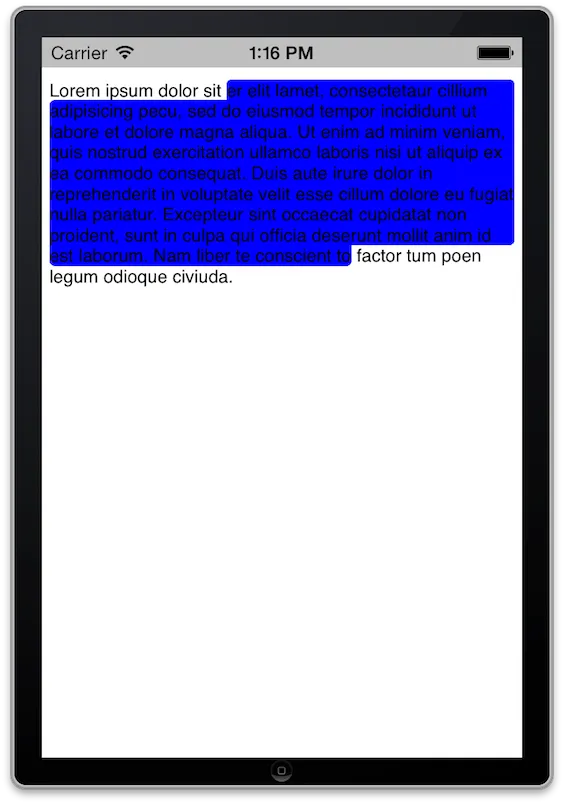
NSLayoutManager 子类的 UITextView,重写 -fillBackgroundRectArray:count:forCharacterRange:color: 方法来实现这个功能。
这是一个简单的示例:@implementation ViewController
- (void)viewDidLoad
{
[super viewDidLoad];
// setup text handling
NSTextStorage *textStorage = [[NSTextStorage alloc] initWithString:@"Lorem ipsum dolor sit er elit lamet, consectetaur cillium adipisicing pecu, sed do eiusmod tempor incididunt ut labore et dolore magna aliqua. Ut enim ad minim veniam, quis nostrud exercitation ullamco laboris nisi ut aliquip ex ea commodo consequat. Duis aute irure dolor in reprehenderit in voluptate velit esse cillum dolore eu fugiat nulla pariatur. Excepteur sint occaecat cupidatat non proident, sunt in culpa qui officia deserunt mollit anim id est laborum. Nam liber te conscient to factor tum poen legum odioque civiuda."];
// use our subclass of NSLayoutManager
MyLayoutManager *textLayout = [[MyLayoutManager alloc] init];
[textStorage addLayoutManager:textLayout];
NSTextContainer *textContainer = [[NSTextContainer alloc] initWithSize:self.view.bounds.size];
[textLayout addTextContainer:textContainer];
UITextView *textView = [[UITextView alloc] initWithFrame:CGRectMake(0,20,self.view.bounds.size.width,self.view.bounds.size.height-20)
textContainer:textContainer];
[self.view addSubview:textView];
// set some background color to our text
[textView.textStorage setAttributes:[NSDictionary dictionaryWithObject:[UIColor blueColor] forKey:NSBackgroundColorAttributeName] range:NSMakeRange(22, textView.text.length - 61)];
}
@end
@interface MyLayoutManager : NSLayoutManager
@end
- (void)fillBackgroundRectArray:(const CGRect *)rectArray count:(NSUInteger)rectCount forCharacterRange:(NSRange)charRange color:(UIColor *)color
{
CGFloat halfLineWidth = 4.; // change this to change corners radius
CGMutablePathRef path = CGPathCreateMutable();
if (rectCount == 1
|| (rectCount == 2 && (CGRectGetMaxX(rectArray[1]) < CGRectGetMinX(rectArray[0])))
)
{
// 1 rect or 2 rects without edges in contact
CGPathAddRect(path, NULL, CGRectInset(rectArray[0], halfLineWidth, halfLineWidth));
if (rectCount == 2)
CGPathAddRect(path, NULL, CGRectInset(rectArray[1], halfLineWidth, halfLineWidth));
}
else
{
// 2 or 3 rects
NSUInteger lastRect = rectCount - 1;
CGPathMoveToPoint(path, NULL, CGRectGetMinX(rectArray[0]) + halfLineWidth, CGRectGetMaxY(rectArray[0]) + halfLineWidth);
CGPathAddLineToPoint(path, NULL, CGRectGetMinX(rectArray[0]) + halfLineWidth, CGRectGetMinY(rectArray[0]) + halfLineWidth);
CGPathAddLineToPoint(path, NULL, CGRectGetMaxX(rectArray[0]) - halfLineWidth, CGRectGetMinY(rectArray[0]) + halfLineWidth);
CGPathAddLineToPoint(path, NULL, CGRectGetMaxX(rectArray[0]) - halfLineWidth, CGRectGetMinY(rectArray[lastRect]) - halfLineWidth);
CGPathAddLineToPoint(path, NULL, CGRectGetMaxX(rectArray[lastRect]) - halfLineWidth, CGRectGetMinY(rectArray[lastRect]) - halfLineWidth);
CGPathAddLineToPoint(path, NULL, CGRectGetMaxX(rectArray[lastRect]) - halfLineWidth, CGRectGetMaxY(rectArray[lastRect]) - halfLineWidth);
CGPathAddLineToPoint(path, NULL, CGRectGetMinX(rectArray[lastRect]) + halfLineWidth, CGRectGetMaxY(rectArray[lastRect]) - halfLineWidth);
CGPathAddLineToPoint(path, NULL, CGRectGetMinX(rectArray[lastRect]) + halfLineWidth, CGRectGetMaxY(rectArray[0]) + halfLineWidth);
CGPathCloseSubpath(path);
}
[color set]; // set fill and stroke color
CGContextRef ctx = UIGraphicsGetCurrentContext();
CGContextSetLineWidth(ctx, halfLineWidth * 2.);
CGContextSetLineJoin(ctx, kCGLineJoinRound);
CGContextAddPath(ctx, path);
CGPathRelease(path);
CGContextDrawPath(ctx, kCGPathFillStroke);
}
@end
更新到Swift 3.1 Emmanuel的Swift代码已经升级到版本3.1。
class TagLayoutManager: NSLayoutManager {

override func fillBackgroundRectArray(_ rectArray: UnsafePointer<CGRect>, count rectCount: Int, forCharacterRange charRange: NSRange, color: UIColor) {

    let cornerRadius:CGFloat = 5
    let path = CGMutablePath.init()


    if rectCount == 1 || (rectCount == 2 && (rectArray[1].maxX < rectArray[0].maxX)) {

        path.addRect(rectArray[0].insetBy(dx: cornerRadius, dy: cornerRadius))

        if rectCount == 2 {
            path.addRect(rectArray[1].insetBy(dx: cornerRadius, dy: cornerRadius))
        }

    } else {

        let lastRect = rectCount - 1

        path.move(to: CGPoint(x: rectArray[0].minX + cornerRadius, y: rectArray[0].maxY + cornerRadius))

        path.addLine(to: CGPoint(x: rectArray[0].minX + cornerRadius, y: rectArray[0].minY + cornerRadius))
        path.addLine(to: CGPoint(x: rectArray[0].maxX - cornerRadius, y: rectArray[0].minY + cornerRadius))

        path.addLine(to: CGPoint(x: rectArray[0].maxX - cornerRadius, y: rectArray[lastRect].minY - cornerRadius))
        path.addLine(to: CGPoint(x: rectArray[lastRect].maxX - cornerRadius, y: rectArray[lastRect].minY - cornerRadius))

        path.addLine(to: CGPoint(x: rectArray[lastRect].maxX - cornerRadius, y: rectArray[lastRect].maxY - cornerRadius))
        path.addLine(to: CGPoint(x: rectArray[lastRect].minX + cornerRadius, y: rectArray[lastRect].maxY - cornerRadius))

        path.addLine(to: CGPoint(x: rectArray[lastRect].minX + cornerRadius, y: rectArray[0].maxY + cornerRadius))

        path.closeSubpath()

    }

    color.set()

    let ctx = UIGraphicsGetCurrentContext()
    ctx!.setLineWidth(cornerRadius * 2.0)
    ctx!.setLineJoin(.round)

    ctx!.setAllowsAntialiasing(true)
    ctx!.setShouldAntialias(true)

    ctx!.addPath(path)
    ctx!.drawPath(using: .fillStroke)
}
}
Emmanuel的Swift代码:
class TagLayoutManager : NSLayoutManager {

override func fillBackgroundRectArray(rectArray: UnsafePointer<CGRect>, count rectCount: Int, forCharacterRange charRange: NSRange, color: UIColor) {

    let cornerRadius:CGFloat = 3.0
    let path = CGPathCreateMutable()

    if rectCount == 1 || (rectCount == 2 && (CGRectGetMaxX(rectArray[1]) < CGRectGetMaxX(rectArray[0]))) {

        CGPathAddRect(path, nil, CGRectInset(rectArray[0], cornerRadius, cornerRadius))
        if rectCount == 2 {
            CGPathAddRect(path, nil, CGRectInset(rectArray[1], cornerRadius, cornerRadius))
        }

    } else {
            let lastRect = rectCount - 1

            CGPathMoveToPoint(path, nil, CGRectGetMinX(rectArray[0]) + cornerRadius, CGRectGetMaxY(rectArray[0]) + cornerRadius);

            CGPathAddLineToPoint(path, nil, CGRectGetMinX(rectArray[0]) + cornerRadius, CGRectGetMinY(rectArray[0]) + cornerRadius);
            CGPathAddLineToPoint(path, nil, CGRectGetMaxX(rectArray[0]) - cornerRadius, CGRectGetMinY(rectArray[0]) + cornerRadius);

            CGPathAddLineToPoint(path, nil, CGRectGetMaxX(rectArray[0]) - cornerRadius, CGRectGetMinY(rectArray[lastRect]) - cornerRadius);
            CGPathAddLineToPoint(path, nil, CGRectGetMaxX(rectArray[lastRect]) - cornerRadius, CGRectGetMinY(rectArray[lastRect]) - cornerRadius);

            CGPathAddLineToPoint(path, nil, CGRectGetMaxX(rectArray[lastRect]) - cornerRadius, CGRectGetMaxY(rectArray[lastRect]) - cornerRadius);
            CGPathAddLineToPoint(path, nil, CGRectGetMinX(rectArray[lastRect]) + cornerRadius, CGRectGetMaxY(rectArray[lastRect]) - cornerRadius);

            CGPathAddLineToPoint(path, nil, CGRectGetMinX(rectArray[lastRect]) + cornerRadius, CGRectGetMaxY(rectArray[0]) + cornerRadius);

            CGPathCloseSubpath(path);
        }

        color.set()

        let ctx = UIGraphicsGetCurrentContext()
        CGContextSetLineWidth(ctx, cornerRadius * 2.0)
        CGContextSetLineJoin(ctx, .Round)

        CGContextAddPath(ctx, path)

        CGContextDrawPath(ctx, .FillStroke)
    }

}
CGContextSetAllowsAntialiasing(ctx, YES);
CGContextSetShouldAntialias(ctx, YES);
使它看起来更好。
NSString没有这个功能。NSAttributedString有一个backgroundColor属性,但是如果没有自定义渲染,您将无法为文本片段的选择设置圆角半径。
因此,您需要编写一个自定义UIView来呈现您的文本。
NSString 只是定义了一串文本字符串,它并没有定义如何呈现的属性。通常使用 UILabel 或 UITextView 来显示屏幕上的文本。但是,在您的示例中展示的选择行为需要自己进行绘制。此外,它还更改所选文本的文本颜色,因此您需要自己处理。
如果您创建了一个自定义的 UIView,允许您绘制蓝色选择区域,您可以将其放置在 UILabel 的后面,并使用 NSAttributedString 在“选定”文本为白色而不是黑色的标签上设置文本。这可能是最简单的方法来实现这个功能。