从XML获取自定义TextView的自定义属性

4
如何获取自定义TextView的自定义字体名称属性以设置字体到TextView中。 根据属性值在TextView中设置字体。
public class MyTextView extends TextView
{
    public MyTextView(Context context, AttributeSet attrs, int defStyle)
    {
        super(context, attrs, defStyle);
        init();
    }

    public MyTextView(Context context, AttributeSet attrs)
    {
        super(context, attrs);
        init();
    }

    public MyTextView(Context context)
    {
        super(context);
        init();
    }

    public void init()
    {
          // set font_name based on attribute value of textview in xml file
          String font_name = "";
        if (!isInEditMode())
        {
            Typeface tf = Typeface.createFromAsset(getContext().getAssets(),
                    "fonts/"+font_name);
            setTypeface(tf);
        }
    }

在Xml文件中

<com.Example.MyTextView 
            android:id="@+id/header"
            android:layout_width="wrap_content"
            android:layout_height="wrap_content"
            fontname="font.ttf"
            android:text="Header"   
/>

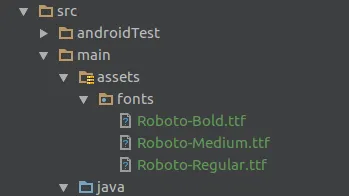
我也将font.ttf文件放在assets->fonts中 谢谢

3个回答

6

1. 在您的构造函数中添加readAttr(context, attrs)方法,如下所示。

public MyTextView(Context context, AttributeSet attrs, int defStyle)
{
    super(context, attrs, defStyle);
    readAttr(context,attrs);
    init();
}

public MyTextView(Context context, AttributeSet attrs)
{
    super(context, attrs);
    readAttr(context,attrs)
    init();
}

public MyTextView(Context context)
{
    super(context);
    init();
}

2. 在同一类中定义readAttr()方法。

private void readAttr(Context context, AttributeSet attrs) {
    TypedArray a = context.obtainStyledAttributes(attrs, R.styleable.MyTextView);

    // Read the title and set it if any
    String fontName = a.getString(R.styleable.MyTextView_fontname) ;
    if (fontName != null) {
        // We have a attribute value and set it to proper value as you want
    }

    a.recycle();
}

3. 修改attrs.xml文件(res/values/attrs.xml),并将以下内容添加到文件中:

<declare-styleable name="MyTextView">
  <attr name="fontname" format="string" />
</declare-styleable>

4. 在XML文件中。

<com.Example.MyTextView 
   android:id="@+id/header"
   android:layout_width="wrap_content"
   android:layout_height="wrap_content"
   custom:fontname="font.ttf"
   android:text="Header" />

5. 将此行添加到xml文件的顶部容器中。

xmlns:custom="http://schemas.android.com/apk/res/com.yourpackage.name"

这是全部内容。

4

首先,您需要定义一个declarable-styleable,其应如下所示:

<declare-styleable name="MyTextView">
    <attr name="fontname" format="string"/>
</declare-styleable>

在你的布局中,你可以“访问”这个属性,但首先你需要定义一个命名空间

xmlns:myPrefix="http://schemas.android.com/apk/res-auto"

注意:namespace是任意的。因此,您也可以将其命名为xmlns:whatever

然后,您可以像这样设置字体名称

<com.Example.MyTextView 
    android:id="@+id/header"
    android:layout_width="wrap_content"
    android:layout_height="wrap_content"
    myPrefix:fontname="font.ttf"
    android:text="Header"   
/>

为了获取值,您需要在MyTextView的构造函数中执行以下操作:
TypedArray values = context.obtainStyledAttributes(attrs, R.styleable.MyTextView);
String font = values.getString(R.styleable.MyTextView_fontname);

// set the typeface etc.

注意:MyTextView_fontname这个属性总是由下划线分隔的组合。因此,基本结构为StyleableName_AttrName。

当我们使用构建变体和产品风味时,res-auto比包名更重要,否则我们将会遇到错误并且无法编译。感谢@reVerse的答案。 - Smeet

1

首先将您的自定义字体添加到assets->fonts目录中(就像这张图片)

然后将此代码添加到attrs.xml文件值文件夹中

 <declare-styleable name="TextViewCustomFont">
    <attr name="showText" format="boolean" />
    <attr name="custom_font" format="enum">
        <enum name="roboto_Regular" value="0"/>
        <enum name="roboto_bold" value="1"/>
        <enum name="roboto_medium" value="2"/>

    </attr>
</declare-styleable>

现在添加这个自定义类扩展TextView。一个要注意的事情是默认字体是机器人常规字体,它的默认值为0。因此,当custom:custom_font属性未设置时,a.getInteger(R.styleable.TextViewCustomFont_custom_font, 0)将返回0。
public class CustomFontTextView extends TextView {


    public CustomFontTextView(Context context) {
        super(context);


    }

    public CustomFontTextView(Context context, AttributeSet attrs, int defStyleAttr) {
        super(context, attrs, defStyleAttr);
        init(context,attrs);

    }

    public CustomFontTextView(Context context, AttributeSet attrs) {
        super(context, attrs);
        init(context,attrs);


    }

    private void init(Context context, AttributeSet attrs) {
        int fontFlag;
        TypedArray a = context.getTheme().obtainStyledAttributes(
                attrs,
                R.styleable.TextViewCustomFont,
                0, 0);

        try {

            fontFlag = a.getInteger(R.styleable.TextViewCustomFont_custom_font, 0);
            Log.v("fontFlag", fontFlag + "");
        } finally {
            a.recycle();
        }

        Typeface tf = null;

        if (fontFlag == 0)
            tf = Typeface.createFromAsset(getContext().getAssets(), "fonts/Roboto-Regular.ttf");
        else if (fontFlag == 1)
            tf = Typeface.createFromAsset(getContext().getAssets(), "fonts/Roboto-Bold.ttf");
        else if (fontFlag == 2)
            tf = Typeface.createFromAsset(getContext().getAssets(), "fonts/Roboto-Medium.ttf");


        setTypeface(tf);

    }
}

现在在您的布局文件中使用这个类

 <com.example.tomal.CustomFontTextView
                    android:layout_width="match_parent"
                    android:layout_height="wrap_content"
                    android:gravity="center_vertical"

                    android:text="@string/title"
                    your_choice:custom_font="roboto_medium"


                    />

将一行代码添加到父布局中。
xmlns:your_choice="http://schemas.android.com/apk/res-auto"

网页内容由stack overflow 提供, 点击上面的
可以查看英文原文,
原文链接