Xamarin.Forms中是否已经包含一个控件/布局可以根据屏幕方向或大小对其内容进行排序?
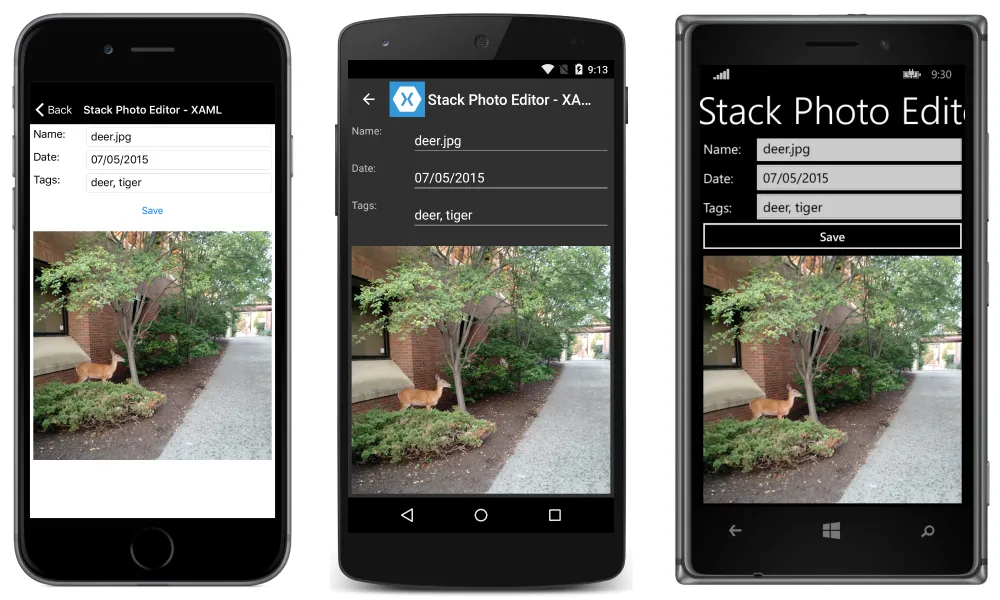
我的要求: 如果屏幕有足够的空间,应该有两个水平排列的stacklayouts。 当屏幕尺寸变化时,如果屏幕没有足够的水平空间,则应该将这两个stacklayouts垂直排列。
我不想在代码后台完成它。
我正在寻找一个只使用xaml的解决方案。
Xamarin.Forms中是否已经包含一个控件/布局可以根据屏幕方向或大小对其内容进行排序?
我的要求: 如果屏幕有足够的空间,应该有两个水平排列的stacklayouts。 当屏幕尺寸变化时,如果屏幕没有足够的水平空间,则应该将这两个stacklayouts垂直排列。
我不想在代码后台完成它。
我正在寻找一个只使用xaml的解决方案。
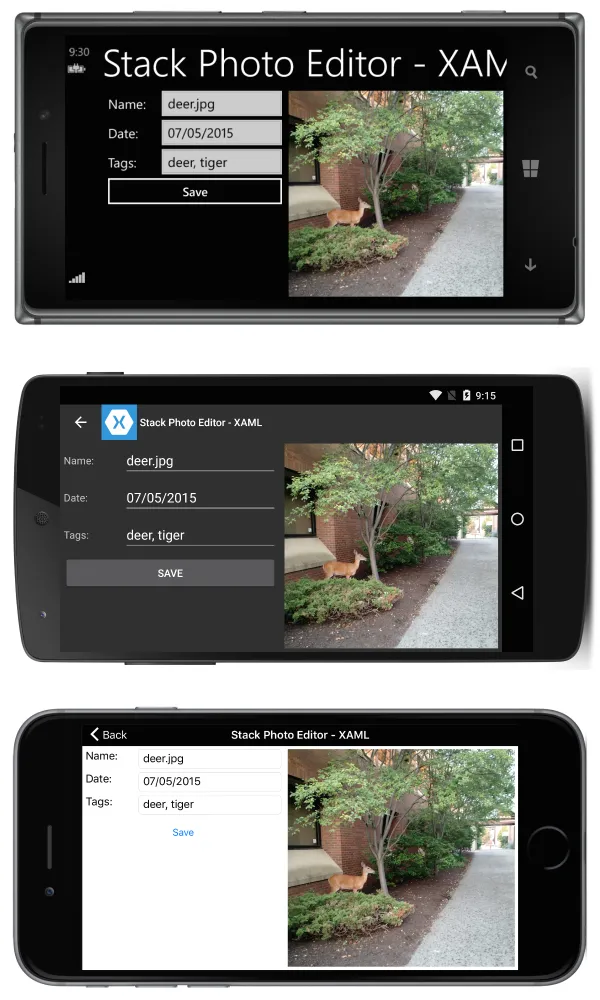
 横屏模式下的屏幕:
以下是实现此操作的XAML:
<?xml version="1.0" encoding="UTF-8"?>
<ContentPage xmlns="http://xamarin.com/schemas/2014/forms"
xmlns:x="http://schemas.microsoft.com/winfx/2009/xaml"
x:Class="ResponsiveLayout.StackLayoutPageXaml"
Title="Stack Photo Editor - XAML">
    <ContentPage.Content>
        <StackLayout Spacing="10" Padding="5" Orientation="Vertical"
        x:Name="outerStack"> <!-- can change orientation to make responsive -->
            <ScrollView>
                <StackLayout Spacing="5" HorizontalOptions="FillAndExpand"
                    WidthRequest="1000">
                    <StackLayout Orientation="Horizontal">
                        <Label Text="Name: " WidthRequest="75"
                            HorizontalOptions="Start" />
                        <Entry Text="deer.jpg"
                            HorizontalOptions="FillAndExpand" />
                    </StackLayout>
                    <StackLayout Orientation="Horizontal">
                        <Label Text="Date: " WidthRequest="75"
                            HorizontalOptions="Start" />
                        <Entry Text="07/05/2015"
                            HorizontalOptions="FillAndExpand" />
                    </StackLayout>
                    <StackLayout Orientation="Horizontal">
                        <Label Text="Tags:" WidthRequest="75"
                            HorizontalOptions="Start" />
                        <Entry Text="deer, tiger"
                            HorizontalOptions="FillAndExpand" />
                    </StackLayout>
                    <StackLayout Orientation="Horizontal">
                        <Button Text="Save" HorizontalOptions="FillAndExpand" />
                    </StackLayout>
                </StackLayout>
            </ScrollView>
            <Image  Source="deer.jpg" />
        </StackLayout>
    </ContentPage.Content>
</ContentPage>
protected override void OnSizeAllocated (double width, double height){
    base.OnSizeAllocated (width, height);
    if (width != this.width || height != this.height) {
        this.width = width;
        this.height = height;
        if (width > height) {
            outerStack.Orientation = StackOrientation.Horizontal;
        } else {
            outerStack.Orientation = StackOrientation.Vertical;
        }
    }
}
我希望它能帮到你。
StackLayout中。<ContentPage xmlns="http://xamarin.com/schemas/2014/forms"
xmlns:x="http://schemas.microsoft.com/winfx/2009/xaml"
x:Class="App.Views.TestPage">
<ContentPage.Content>
<StackLayout x:Name="OuterStackLayout">
<StackLayout>
<!-- Inner stack layout 1 -->
</StackLayout>
<StackLayout>
<!-- Inner stack layout 2 -->
</StackLayout>
</StackLayout>
</ContentPage.Content>
</ContentPage>
OnSizeAllocated并根据屏幕方向设置外部OuterStackLayout.Orientation。protected override void OnSizeAllocated(double width, double height)
{
base.OnSizeAllocated(width, height);
if (SizeHasChanged(width, height)) // elided, just compare width, height with the stored values
{
StoreSize(width, height); // store in private members
if (IsLandscape)
{
this.OuterStackLayout.Orientation = StackOrientation.Horizontal;
}
else
{
this.OuterStackLayout.Orientation = StackOrientation.Vertical;
}
}
}
public bool IsLandscape => _width > _height;
StackLayout的水平选项或其他布局参数,但基本上这样做就可以了。选项#1 '方向状态' - 竖屏和横屏。在可视状态管理器中使用'OrientationStates',如下所示:
在.XAML文件中
<Grid x:Name="myGrid"
        Margin="10,30,10,10">
    <VisualStateManager.VisualStateGroups>
        <VisualStateGroup x:Name="OrientationStates">

            <!-- Row & Column Definitions of Grid - [2 Rows, 1 Col = Portrait] & [1 Row, 2 Cols = Landscape] -->
            <VisualState x:Name="Portrait">
                <VisualState.Setters>
                    <Setter Property="Grid.RowDefinitions"
                            Value="*,*" />
                    <Setter Property="Grid.ColumnDefinitions"
                            Value="*" />
                </VisualState.Setters>
            </VisualState>

            <VisualState x:Name="Landscape">
                <VisualState.Setters>
                    <Setter Property="Grid.RowDefinitions"
                            Value="*" />
                    <Setter Property="Grid.ColumnDefinitions"
                            Value="*,*" />
                </VisualState.Setters>
            </VisualState>

        </VisualStateGroup>
    </VisualStateManager.VisualStateGroups>

    <!-- Change position of stack layouts in grid, to match above stated orientation requirement -->
    <StackLayout x:Name="firstStackLayout">
        <Entry Placeholder="Enter first words" />
        <Button Text="Nothing Happens" />

        <VisualStateManager.VisualStateGroups>
            <VisualStateGroup>

                <VisualState x:Name="Portrait">
                    <VisualState.Setters>
                        <Setter Property="Grid.Row" Value="0" />
                        <Setter Property="Grid.Column" Value="0" />
                    </VisualState.Setters>
                </VisualState>

                <VisualState x:Name="Landscape">
                    <VisualState.Setters>
                        <Setter Property="Grid.Row" Value="0" />
                        <Setter Property="Grid.Column" Value="0" />
                    </VisualState.Setters>
                </VisualState>

            </VisualStateGroup>
        </VisualStateManager.VisualStateGroups>
    </StackLayout>

    <StackLayout x:Name="secondStackLayout">
        <Entry Placeholder="Enter last words" />
        <Button Text="Still Nothing Happens" />

        <VisualStateManager.VisualStateGroups>
            <VisualStateGroup>

                <VisualState x:Name="Portrait">
                    <VisualState.Setters>
                        <Setter Property="Grid.Row" Value="1" />
                        <Setter Property="Grid.Column" Value="0" />
                    </VisualState.Setters>
                </VisualState>

                <VisualState x:Name="Landscape">
                    <VisualState.Setters>
                        <Setter Property="Grid.Row" Value="0" />
                        <Setter Property="Grid.Column" Value="1" />
                    </VisualState.Setters>
                </VisualState>

            </VisualStateGroup>
        </VisualStateManager.VisualStateGroups>
    </StackLayout>
</Grid>
在 CodeBehind 中添加 'OnSizeAllocated()' 函数,如下所示:
在 .XAML.CS 文件中
public partial class RegisterPage : ContentPage
{
    public RegisterPage()
    {
        InitializeComponent();
    }

    protected override void OnSizeAllocated(double width, double height)
    {
        base.OnSizeAllocated(width, height);

        var state = (width > height) ? "Landscape" : "Portrait";

        // Call the 'Portrait' & 'Landscape' States in .XAML File
        VisualStateManager.GoToState(myGrid, state);
        VisualStateManager.GoToState(firstStackLayout, state);
        VisualStateManager.GoToState(secondStackLayout, state);
    }
}
[或者]
选项 #2 魔法子弹 - 您的唯一 .XAML 文件解决方案。
'方向触发器' - 竖屏和横屏。
在可视状态中使用 '状态触发器' 中的 '方向状态触发器',如下所示:
在 .XAML 文件内部
<Grid Margin="10,30,10,10">
    <VisualStateManager.VisualStateGroups>
        <VisualStateGroup>

            <!-- Row & Column Definitions of Grid - [2 Rows, 1 Col = Portrait] & [1 Row, 2 Cols = Landscape] -->
            <VisualState x:Name="gridPortrait">

                <VisualState.StateTriggers>
                    <OrientationStateTrigger Orientation="Portrait" />
                </VisualState.StateTriggers>

                <VisualState.Setters>
                    <Setter Property="Grid.RowDefinitions"
                            Value="*,*" />
                    <Setter Property="Grid.ColumnDefinitions" Value="*" />
                </VisualState.Setters>

            </VisualState>

            <VisualState x:Name="gridLandscape">

                <VisualState.StateTriggers>
                    <OrientationStateTrigger Orientation="Landscape" />
                </VisualState.StateTriggers>

                <VisualState.Setters>
                    <Setter Property="Grid.RowDefinitions"
                            Value="*" />
                    <Setter Property="Grid.ColumnDefinitions"
                            Value="*,*" />
                </VisualState.Setters>

            </VisualState>

        </VisualStateGroup>
    </VisualStateManager.VisualStateGroups>

    <!-- Change position of stack layouts in grid, to match above stated orientation requirement -->
    <StackLayout>
        <Entry Placeholder="Enter first words" />
        <Button Text="Nothing Happens" />

        <VisualStateManager.VisualStateGroups>
            <VisualStateGroup>

                <VisualState x:Name="myPortraitState">

                    <VisualState.StateTriggers>
                        <OrientationStateTrigger Orientation="Portrait" />
                    </VisualState.StateTriggers>

                    <VisualState.Setters>
                        <Setter Property="Grid.Row" Value="0" />
                        <Setter Property="Grid.Column" Value="0" />
                    </VisualState.Setters>

                </VisualState>

                <VisualState x:Name="myLandscapeState">

                    <VisualState.StateTriggers>
                        <OrientationStateTrigger Orientation="Landscape" />
                    </VisualState.StateTriggers>

                    <VisualState.Setters>
                        <Setter Property="Grid.Row" Value="0" />
                        <Setter Property="Grid.Column" Value="0" />
                    </VisualState.Setters>

                </VisualState>

            </VisualStateGroup>
        </VisualStateManager.VisualStateGroups>
    </StackLayout>

    <StackLayout>
        <Entry Placeholder="Enter last words" />
        <Button Text="Still Nothing Happens" />

        <VisualStateManager.VisualStateGroups>
            <VisualStateGroup>
                <VisualState x:Name="myPortraitState">
                    <VisualState.StateTriggers>
                        <OrientationStateTrigger Orientation="Portrait" />
                    </VisualState.StateTriggers>
                    <VisualState.Setters>
                        <Setter Property="Grid.Row" Value="1" />
                        <Setter Property="Grid.Column" Value="0" />
                    </VisualState.Setters>
                </VisualState>
                <VisualState x:Name="myLandscapeState">
                    <VisualState.StateTriggers>
                        <OrientationStateTrigger Orientation="Landscape" />
                    </VisualState.StateTriggers>
                    <VisualState.Setters>
                        <Setter Property="Grid.Row" Value="0" />
                        <Setter Property="Grid.Column" Value="1" />
                    </VisualState.Setters>
                </VisualState>

            </VisualStateGroup>
        </VisualStateManager.VisualStateGroups>
    </StackLayout>
</Grid>
Xamarin.Essentials 是一个更简单的解决方案。
Model.cs
using Xamarin.Essentials;
.
.
.
private DisplayOrientation orientation = DeviceDisplay.MainDisplayInfo.Orientation;
public DisplayOrientation Orientation
{
    get => orientation;
    set => orientation = value;
}
View.xaml.cs
using Xamarin.Essentials;
.
.
.
protected override void OnSizeAllocated(double width, double height)
{
    base.OnSizeAllocated(width, height);
    model.Orientation = DeviceDisplay.MainDisplayInfo.Orientation;
}
View.xaml
<ContentPage xmlns:ess="clr-namespace:Xamarin.Essentials;assembly=Xamarin.Essentials">
    <ContentPage.BindingContext>
        <!--Model here-->
    </ContentPage.BindingContext>
    <DataTrigger TargetType="..."
        Binding="{Binding Orientation}"
        Value="{x:Static ess:DisplayOrientation.Portrait}">
            <Setter Property="..." Value="..." />
    </DataTrigger>
    <DataTrigger TargetType="..."
        Binding="{Binding Orientation}"
        Value="{x:Static ess:DisplayOrientation.Landscape}">
            <Setter Property="..." Value="..." />
    </DataTrigger>
</ContentPage>
不要忘记 INotifyPropertyChanged 的影响。