PIL - 在图像上绘制多行文本

53

我试图在图片底部添加文本,实际上我已经做到了,但是如果我的文本长度超过了图片宽度,它会从两边被截断。为了简化,如果文本长度超过图片宽度,我希望文本可以换行。这是我的代码:

FOREGROUND = (255, 255, 255)
WIDTH = 375
HEIGHT = 50
TEXT = 'Chyba najwyższy czas zadać to pytanie na śniadanie \n Chyba najwyższy czas zadać to pytanie na śniadanie'
font_path = '/Library/Fonts/Arial.ttf'
font = ImageFont.truetype(font_path, 14, encoding='unic')
text = TEXT.decode('utf-8')
(width, height) = font.getsize(text)

x = Image.open('media/converty/image.png')
y = ImageOps.expand(x,border=2,fill='white')
y = ImageOps.expand(y,border=30,fill='black')

w, h = y.size
bg = Image.new('RGBA', (w, 1000), "#000000")

W, H = bg.size
xo, yo = (W-w)/2, (H-h)/2
bg.paste(y, (xo, 0, xo+w, h))
draw = ImageDraw.Draw(bg)
draw.text(((w - width)/2, w), text, font=font, fill=FOREGROUND)


bg.show()
bg.save('media/converty/test.png')
9个回答

71
你可以使用textwrap.wraptext分成一个字符串列表,每个字符串的长度最多为width个字符:
import textwrap
lines = textwrap.wrap(text, width=40)
y_text = h
for line in lines:
    width, height = font.getsize(line)
    draw.text(((w - width) / 2, y_text), line, font=font, fill=FOREGROUND)
    y_text += height

3
非常感谢!只需复制粘贴,它就可以完美地运行。你是最棒的 :) - user985541
1
40 代表什么? - User
3
@User 40 表示最大字符数。这意味着它将允许在换行之前最多输入 40 个字符。但如果一个单词有 10 个字符,下一个单词有 31 个字符,它会在第一个单词后面就换行了,因为无法将第一个单词和第二个单词放在同一行上。 - teewuane
3
@teewuane,基于像素来做怎么样?我们并不总是使用等宽字体。 - User
2
@用户 如果您想获取文本字符串的大小,可以使用PIL.ImageDraw.ImageDraw.textsize函数,它返回一个像素元组(宽度,高度)。您可以使用此函数实现一种解决方案,在宽度超过某个阈值之前尝试最长可能的字符串。 - Seabass77

26

被接受的答案在不测量字体的情况下换行(最多40个字符,无论字体大小和盒子宽度如何),因此结果仅是近似值,并且可能会过度填充或未填满框。

这里有一个简单的库可以正确解决这个问题: https://gist.github.com/turicas/1455973


3
这是最佳答案。我们应该尝试更改已被接受的答案,因为它是6年前被接受的。 - Boris Suvorov

18

使用unutbu技巧进行完整的工作示例(已测试使用Python 3.6和Pillow 5.3.0):

from PIL import Image, ImageDraw, ImageFont
import textwrap

def draw_multiple_line_text(image, text, font, text_color, text_start_height):
    '''
    From unutbu on [python PIL draw multiline text on image](https://dev59.com/Smsz5IYBdhLWcg3wuKa6#7698300)
    '''
    draw = ImageDraw.Draw(image)
    image_width, image_height = image.size
    y_text = text_start_height
    lines = textwrap.wrap(text, width=40)
    for line in lines:
        line_width, line_height = font.getsize(line)
        draw.text(((image_width - line_width) / 2, y_text), 
                  line, font=font, fill=text_color)
        y_text += line_height


def main():
    '''
    Testing draw_multiple_line_text
    '''
    #image_width
    image = Image.new('RGB', (800, 600), color = (0, 0, 0))
    fontsize = 40  # starting font size
    font = ImageFont.truetype("arial.ttf", fontsize)
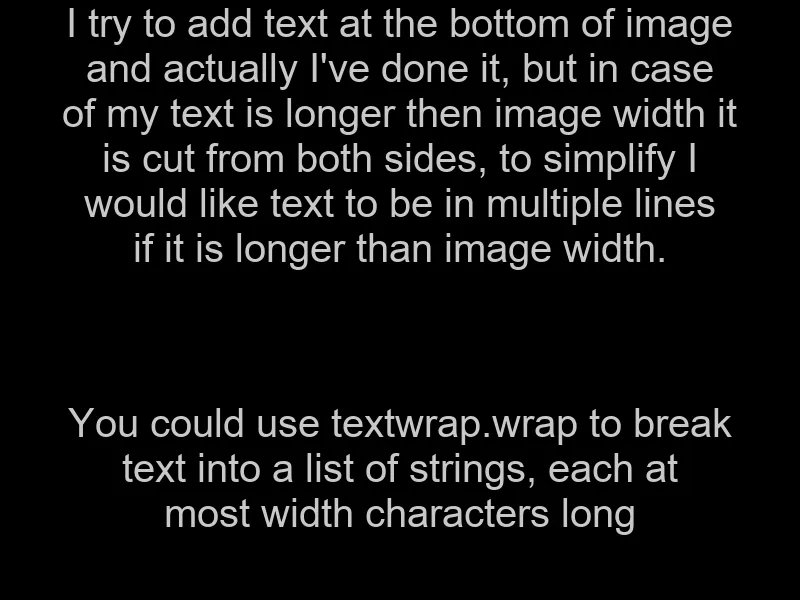
    text1 = "I try to add text at the bottom of image and actually I've done it, but in case of my text is longer then image width it is cut from both sides, to simplify I would like text to be in multiple lines if it is longer than image width."
    text2 = "You could use textwrap.wrap to break text into a list of strings, each at most width characters long"

    text_color = (200, 200, 200)
    text_start_height = 0
    draw_multiple_line_text(image, text1, font, text_color, text_start_height)
    draw_multiple_line_text(image, text2, font, text_color, 400)
    image.save('pil_text.png')

if __name__ == "__main__":
    main()
    #cProfile.run('main()') # if you want to do some profiling

结果:

在此输入图片描述


2
应该是最佳答案 - Gal_M

11
所有关于textwrap使用的建议都无法确定非等宽字体(例如在主题示例代码中使用的Arial)的正确宽度。
我编写了一个简单的辅助类来根据实际字母大小来换行文本:
from PIL import Image, ImageDraw

class TextWrapper(object):
    """ Helper class to wrap text in lines, based on given text, font
        and max allowed line width.
    """

    def __init__(self, text, font, max_width):
        self.text = text
        self.text_lines = [
            ' '.join([w.strip() for w in l.split(' ') if w])
            for l in text.split('\n')
            if l
        ]
        self.font = font
        self.max_width = max_width

        self.draw = ImageDraw.Draw(
            Image.new(
                mode='RGB',
                size=(100, 100)
            )
        )

        self.space_width = self.draw.textsize(
            text=' ',
            font=self.font
        )[0]

    def get_text_width(self, text):
        return self.draw.textsize(
            text=text,
            font=self.font
        )[0]

    def wrapped_text(self):
        wrapped_lines = []
        buf = []
        buf_width = 0

        for line in self.text_lines:
            for word in line.split(' '):
                word_width = self.get_text_width(word)

                expected_width = word_width if not buf else \
                    buf_width + self.space_width + word_width

                if expected_width <= self.max_width:
                    # word fits in line
                    buf_width = expected_width
                    buf.append(word)
                else:
                    # word doesn't fit in line
                    wrapped_lines.append(' '.join(buf))
                    buf = [word]
                    buf_width = word_width

            if buf:
                wrapped_lines.append(' '.join(buf))
                buf = []
                buf_width = 0

        return '\n'.join(wrapped_lines)

使用示例:

wrapper = TextWrapper(text, image_font_intance, 800)
wrapped_text = wrapper.wrapped_text()

它可能不是超级快的,因为它逐字逐句地呈现整个文本,以确定单词的宽度。但对于大多数情况来说,它应该是可以的。


1
最简单的解决方案是使用textwrap + multiline_text函数。
from PIL import Image, ImageDraw
import textwrap

lines = textwrap.wrap("your long text", width=20)
draw.multiline_text((x,y), '\n'.join(lines))

0
一个最小的例子,不断添加单词直到超过最大宽度限制。函数get_line返回当前行和剩余单词,可以再次在循环中使用,如下面的draw_lines函数所示。
def get_line(words, width_limit):
    # get text which can fit in one line, remains is list of words left over
    line_width = 0
    line = ''
    i = 0
    while i < len(words) and (line_width + FONT.getsize(words[i])[0]) < width_limit:
        if i == 0:
            line = line + words[i]
        else:
            line = line + ' ' + words[i]
        i = i + 1
        line_width = FONT.getsize(line)[0]
    remains = []
    if i < len(words):
        remains = words[i:len(words)]
    return line, remains


def draw_lines(text, text_box):
    # add some margin to avoid touching borders
    box_width = text_box[1][0] - text_box[0][0] - (2*MARGIN)
    text_x = text_box[0][0] + MARGIN
    text_y = text_box[0][1] + MARGIN
    words = text.split(' ')
    while words:
        line, words = get_line(words, box_width)
        width, height = FONT.getsize(line)
        im_draw.text((text_x, text_y), line, font=FONT, fill=FOREGROUND)
        text_y += height

0

该函数将根据字体font的设置,把text分割成每行不超过max长度的文本,然后创建一个透明图像并将文本放在其中。

def split_text(text, font, max)
    text=text.split(" ")
    total=0
    result=[]
    line=""
    for part in text:
        if total+font.getsize(f"{part} ")[0]<max:
            line+=f"{part} "
            total+=font.getsize(part)[0]
        else:
            line=line.rstrip()
            result.append(line)
            line=f"{part} "
            total=font.getsize(f"{part} ")[0]
    line=line.rstrip()
    result.append(line)
    image=new("RGBA", (max, font.getsize("gL")[1]*len(result)), (0, 0, 0, 0))
    imageDrawable=Draw(image)
    position=0
    for line in result:
        imageDrawable.text((0, position), line, font)
        position+=font.getsize("gL")[1]
    return image

0
你可以使用 PIL.ImageDraw.Draw.multiline_text()
draw.multiline_text((WIDTH, HEIGHT), TEXT, fill=FOREGROUND, font=font)

你甚至可以使用相同的参数名称设置spacingalign

注意:您需要根据图像大小和所需字体大小来包装文本。


不起作用,我刚试过了。你能详细说明使用情况吗?我将一个非常长的字符串作为“text”传递给它,但它没有换行到下一行。 - Hassan Baig
@HassanBaig 你在字符串中使用了换行符吗?例如:"Lorem Ipsum is simply dummy \n text of the printing \n and typesetting industry." - Zulfugar Ismayilzadeh
文本来自用户输入,因此他们没有使用换行符指定下一行。我必须自己处理溢出。 - Hassan Baig
2
multiline_text的第一个参数被记录为“xy-文本的左上角”。您需要自己进行换行。 - Quantum7
1
'\n'.join(textwrap.wrap(TEXT, width=15)) 将会给你带有换行符的文本 - 即使是来自用户输入的。 - Jarad

-2
text = textwrap.fill("test ",width=35)
self.draw.text((x, y), text, font=font, fill="Black")

2
欢迎来到 Stack Overflow!能否麻烦您解释一下这个如何解决问题?多写点额外的文字会对其他用户有很大帮助。 - Laur Ivan
这是@unutbu答案的更简洁版本。它是目前最好的代码建议,再加上一点解释就应该成为被接受的答案了。 - Quantum7

网页内容由stack overflow 提供, 点击上面的
可以查看英文原文,
原文链接