自定义带有按钮的MKAnnotation弹出气泡

26

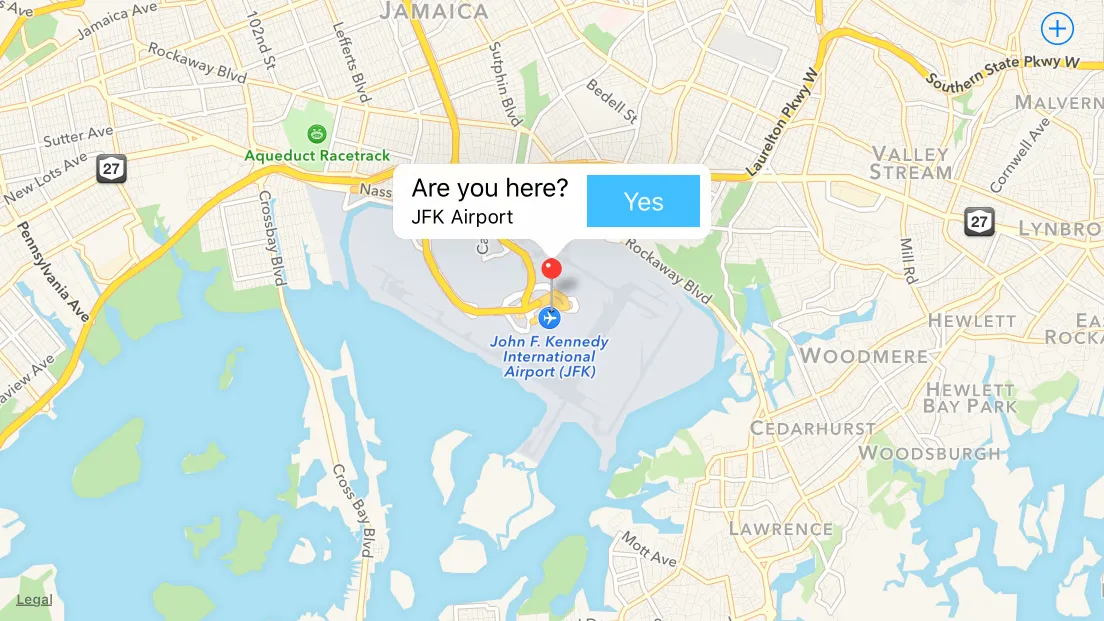
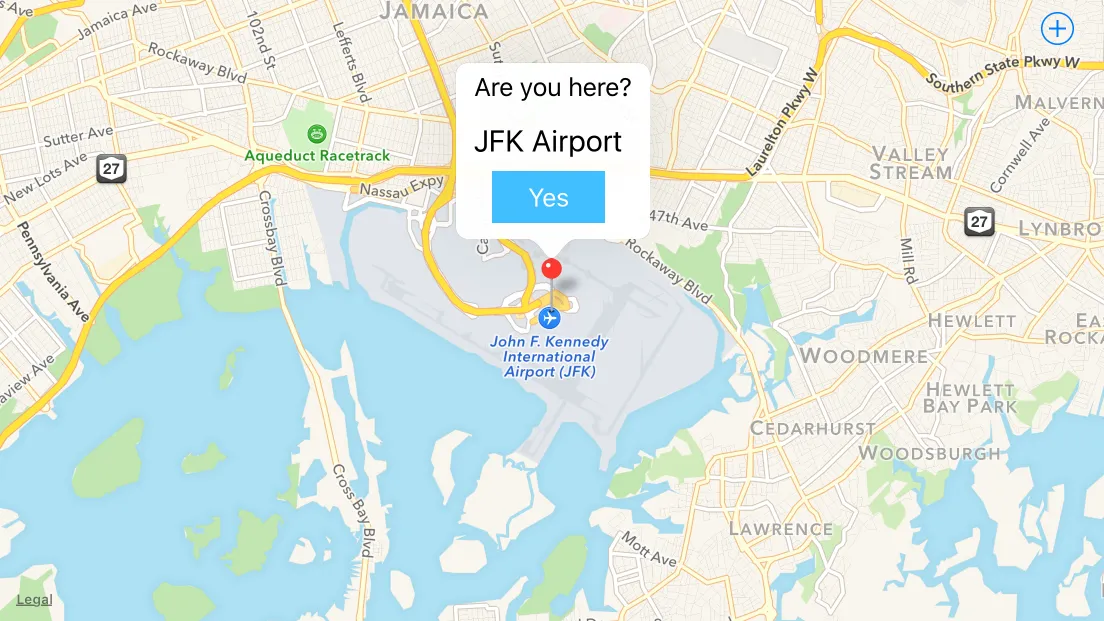
我正在开发一款应用程序,在该应用程序中,用户通过GPS定位,然后被问及是否位于特定位置。为了确认这一点,立即向他呈现一个气泡提示框,并询问他是否在特定位置。

由于有很多类似的问题,我能够做出自定义的气泡提示框:
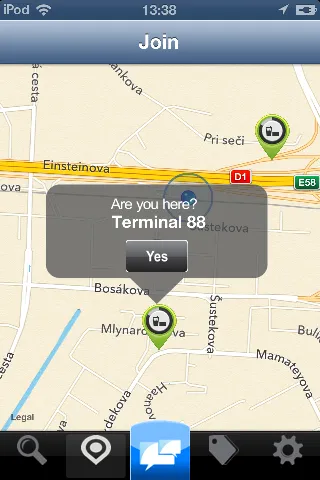
 Custom callout bubble

我的问题是:按钮无法“点击” 我的猜测是:由于这个自定义的气泡提示框比标准气泡提示框更高,我不得不将它放在一个负的“frame”中,因此按钮无法被点击。以下是我的didSelectAnnotationView方法

- (void)mapView:(MKMapView *)mapView didSelectAnnotationView:(MKAnnotationView *)view {
    if(![view.annotation isKindOfClass:[MKUserLocation class]]) {
        CalloutView *calloutView = (CalloutView *)[[[NSBundle mainBundle] loadNibNamed:@"callOutView" owner:self options:nil] objectAtIndex:0];
        CGRect calloutViewFrame = calloutView.frame;
        calloutViewFrame.origin = CGPointMake(-calloutViewFrame.size.width/2 + 15, -calloutViewFrame.size.height);
        calloutView.frame = calloutViewFrame;
        [calloutView.calloutLabel setText:[(MyLocation*)[view annotation] title]];
        [calloutView.btnYes addTarget:self
                               action:@selector(checkin)
                     forControlEvents:UIControlEventTouchUpInside];
        calloutView.userInteractionEnabled = YES;
        view.userInteractionEnabled = YES;
        [view addSubview:calloutView];
    }

}

CalloutView是一个简单的类,有两个属性(标签用于显示地点名称和按钮),使用xib创建。

我花了几天时间定制这个自定义的气泡。我尝试使用"asynchrony solutions" 解决方案,但我无法添加除披露按钮之外的任何其他类型的按钮。

我的下一步尝试是找到比asynchrony solutions更容易的东西,并将其修改为我的用途。这就是我发现tochi's自定义气泡的方式。

Tochi's custom callout

基于他的工作,我能够定制他的气泡并将信息按钮更改为我的自定义按钮。然而,我的问题仍然存在。为了将我的自定义气泡视图放在图钉的上方,我必须给它负框架,因此我的按钮只能在底部5个像素处“可点击”。似乎我需要深入挖掘iOS默认气泡,对其进行子类化并更改气泡的框架。但我现在真的感到绝望。

如果你们能指引我正确的方向,或者给我一些建议,我会很高兴。

3个回答

82

有几种定制呼出框的方法:

  1. The easiest approach is to use the existing right and left callout accessories, and put your button in one of those. For example:

    - (MKAnnotationView *)mapView:(MKMapView *)mapView viewForAnnotation:(id<MKAnnotation>)annotation {
        static NSString *identifier = @"MyAnnotationView";
    
        if ([annotation isKindOfClass:[MKUserLocation class]]) {
            return nil;
        }
    
        MKPinAnnotationView *view = (id)[mapView dequeueReusableAnnotationViewWithIdentifier:identifier];
        if (view) {
            view.annotation = annotation;
        } else {
            view = [[MKPinAnnotationView alloc] initWithAnnotation:annotation reuseIdentifier:identifier];
            view.canShowCallout = true;
            view.animatesDrop = true;
            view.rightCalloutAccessoryView = [self yesButton];
        }
    
        return view;
    }
    
    - (UIButton *)yesButton {
        UIImage *image = [self yesButtonImage];
    
        UIButton *button = [UIButton buttonWithType:UIButtonTypeCustom];
        button.frame = CGRectMake(0, 0, image.size.width, image.size.height); // don't use auto layout
        [button setImage:image forState:UIControlStateNormal];
        [button addTarget:self action:@selector(didTapButton:) forControlEvents:UIControlEventPrimaryActionTriggered];
    
        return button;
    }
    
    - (void)mapView:(MKMapView *)mapView annotationView:(MKAnnotationView *)view calloutAccessoryControlTapped:(UIControl *)control {
        NSLog(@"%s", __PRETTY_FUNCTION__);
    }
    

    That yields:

    enter image description here

  2. If you really don't like the button on the right, where accessories generally go, you can turn off that accessory, and iOS 9 offers the opportunity to specify the detailCalloutAccessoryView, which replaces the callout's subtitle with whatever view you want:

    - (MKAnnotationView *)mapView:(MKMapView *)mapView viewForAnnotation:(id<MKAnnotation>)annotation {
        static NSString *identifier = @"MyAnnotationView";
    
        if ([annotation isKindOfClass:[MKUserLocation class]]) {
            return nil;
        }
    
        MKPinAnnotationView *view = (id)[mapView dequeueReusableAnnotationViewWithIdentifier:identifier];
        if (view) {
            view.annotation = annotation;
        } else {
            view = [[MKPinAnnotationView alloc] initWithAnnotation:annotation reuseIdentifier:identifier];
            view.canShowCallout = true;
            view.animatesDrop = true;
        }
        view.detailCalloutAccessoryView = [self detailViewForAnnotation:annotation];
    
        return view;
    }
    
    - (UIView *)detailViewForAnnotation:(PlacemarkAnnotation *)annotation {
        UIView *view = [[UIView alloc] init];
        view.translatesAutoresizingMaskIntoConstraints = false;
    
        UILabel *label = [[UILabel alloc] init];
        label.text = annotation.placemark.name;
        label.font = [UIFont systemFontOfSize:20];
        label.translatesAutoresizingMaskIntoConstraints = false;
        label.numberOfLines = 0;
        [view addSubview:label];
    
        UIButton *button = [self yesButton];
        [view addSubview:button];
    
        NSDictionary *views = NSDictionaryOfVariableBindings(label, button);
    
        [view addConstraints:[NSLayoutConstraint constraintsWithVisualFormat:@"H:|[label]|" options:0 metrics:nil views:views]];
        [view addConstraint:[NSLayoutConstraint constraintWithItem:button attribute:NSLayoutAttributeCenterX relatedBy:NSLayoutRelationEqual toItem:view attribute:NSLayoutAttributeCenterX multiplier:1 constant:0]];
        [view addConstraints:[NSLayoutConstraint constraintsWithVisualFormat:@"V:|[label]-[button]|" options:0 metrics:nil views:views]];
    
        return view;
    }
    
    - (UIButton *)yesButton {
        UIImage *image = [self yesButtonImage];
    
        UIButton *button = [UIButton buttonWithType:UIButtonTypeCustom];
        button.translatesAutoresizingMaskIntoConstraints = false; // use auto layout in this case
        [button setImage:image forState:UIControlStateNormal];
        [button addTarget:self action:@selector(didTapButton:) forControlEvents:UIControlEventPrimaryActionTriggered];
    
        return button;
    }
    

    This yields:

    enter image description here

  3. If you really want to develop a custom callout yourself, the Location and Maps Programming Guide outlines the steps involved:

    In an iOS app, it’s good practice to use the mapView:annotationView:calloutAccessoryControlTapped: delegate method to respond when users tap a callout view’s control (as long as the control is a descendant of UIControl). In your implementation of this method you can discover the identity of the callout view’s annotation view so that you know which annotation the user tapped. In a Mac app, the callout view’s view controller can implement an action method that responds when a user clicks the control in a callout view.

    When you use a custom view instead of a standard callout, you need to do extra work to make sure your callout shows and hides appropriately when users interact with it. The steps below outline the process for creating a custom callout that contains a button:

    • Design an NSView or UIView subclass that represents the custom callout. It’s likely that the subclass needs to implement the drawRect: method to draw your custom content.

    • Create a view controller that initializes the callout view and performs the action related to the button.

    • In the annotation view, implement hitTest: to respond to hits that are outside the annotation view’s bounds but inside the callout view’s bounds, as shown in Listing 6-7.

    • In the annotation view, implement setSelected:animated: to add your callout view as a subview of the annotation view when the user clicks or taps it.

    • If the callout view is already visible when the user selects it, the setSelected: method should remove the callout subview from the annotation view (see Listing 6-8).

    • In the annotation view’s initWithAnnotation: method, set the canShowCallout property to NO to prevent the map from displaying the standard callout when the user selects the annotation.

    While it's in Swift, https://github.com/robertmryan/CustomMapViewAnnotationCalloutSwift illustrates an example of how you can do this complete customization of the callout (e.g. change shape of callout bubble, change background color, etc.).

  4. That previous point outlines a pretty complicated scenarios (i.e. you have to write your own code to detecting taps outside the view in order to dismiss the it). If you're supporting iOS 9, you might just use a popover view controller, e.g.:

    - (MKAnnotationView *)mapView:(MKMapView *)mapView viewForAnnotation:(id<MKAnnotation>)annotation {
        static NSString *identifier = @"MyAnnotationView";
    
        if ([annotation isKindOfClass:[MKUserLocation class]]) {
            return nil;
        }
    
        MKPinAnnotationView *view = (id)[mapView dequeueReusableAnnotationViewWithIdentifier:identifier];
        if (view) {
            view.annotation = annotation;
        } else {
            view = [[MKPinAnnotationView alloc] initWithAnnotation:annotation reuseIdentifier:identifier];
            view.canShowCallout = false;  // note, we're not going to use the system callout
            view.animatesDrop = true;
        }
    
        return view;
    }
    
    - (void)mapView:(MKMapView *)mapView didSelectAnnotationView:(MKAnnotationView *)view {
        PopoverController *controller = [self.storyboard instantiateViewControllerWithIdentifier:@"AnnotationPopover"];
        controller.modalPresentationStyle = UIModalPresentationPopover;
    
        controller.popoverPresentationController.sourceView = view;
    
        // adjust sourceRect so it's centered over the annotation
    
        CGRect sourceRect = CGRectZero;
        sourceRect.origin.x += [mapView convertCoordinate:view.annotation.coordinate toPointToView:mapView].x - view.frame.origin.x;
        sourceRect.size.height = view.frame.size.height;
        controller.popoverPresentationController.sourceRect = sourceRect;
    
        controller.annotation = view.annotation;
    
        [self presentViewController:controller animated:TRUE completion:nil];
    
        [mapView deselectAnnotation:view.annotation animated:true];  // deselect the annotation so that when we dismiss the popover, the annotation won't still be selected
    }
    

1
如果我没有在“CustomAnnotation”类中设置标题和副标题,那么气泡提示根本不会被调用。该怎么办? - Satyam
如果您将 canShowCallout 设置为 NO,则对 didSelectAnnotationView 的调用将不受 title/subtitle 的存在或缺失的影响。 - Rob
当我尝试使用这个解决方案时,标注的呼出框可能会出现在地图上其他标注的“下方”。 - techsMex
@TD2 当你说“这个解决方案”时,你是指第一个(我不建议的)还是第二个?在我的测试中,使用第二种方法,弹出窗口位于所选注释下方(通常不是问题,因为弹出窗口通常不会与底层注释重叠),但在其余部分上方。无论如何,我将我的第二个示例更改为在呈现弹出窗口时实际选择弹出窗口注释(从而确保它在其他注释前面),并将deselectAnnotationView更改为检查何时取消选择弹出窗口注释。 - Rob
@Rob,感谢你的解决方案,节省了我的时间。但当再次点击大头针时,如何取消选择 AnnotationView? - z22
显示剩余8条评论

2

我最终采用了不同的方法。我尝试了其他方法,但它们似乎过于臃肿,我不想添加更多的类或依赖于MKMapViewDelegate来处理交互。

相反,我重写了我的MKAnnotationView子类的setSelected:animated方法。诀窍是在选择后扩展注释视图的边界以完全包含呼出视图,然后在取消选择后将其返回到正常状态。这将允许您的自定义呼叫接受触摸和交互,超出MKAnnotationView的原始边界。

这里是一个简化的代码示例,供任何人开始使用:

#define kAnnotationCalloutBoxTag    787801
#define kAnnotationCalloutArrowTag  787802
#define kAnnotationTempImageViewTag 787803

-(void)setSelected:(BOOL)selected animated:(BOOL)animated
{
    if (selected == self.selected)
    {
        NSLog(@"annotation already selected, abort!");
        return;
    }
    if (selected)
    {
        self.image = nil; //hide default image otherwise it takes the shape of the entire bounds

        UIView* calloutBox = [self newCustomCallout];
        float imgW = [self unselectedSize].width;
        float imgH = [self unselectedSize].height;
        float arrowW = 20;
        float arrowH = 12;

        //Annotation frames wrap a center coordinate, in this instance we want the call out box to fall under the
        //central coordinate, so we need to adjust the height to be double what the callout box height would be
        //making the height *2, this is to make sure the callout view is inside of it.
        self.bounds = CGRectMake(0, 0, calloutBox.frame.size.width, calloutBox.frame.size.height*2 + arrowH*2 + imgH);
        CGPoint center = CGPointMake(self.bounds.size.width/2, self.bounds.size.height/2);

        UIView* imgView = [[UIImageView alloc] initWithImage:icon];
        [imgView setFrame:CGRectMake(center.x - imgW/2, center.y-imgH/2, imgW, imgH)];
        imgView.tag = kAnnotationTempImageViewTag;
        [self addSubview:imgView];

        UIView* triangle = [self newTriangleViewWithFrame:CGRectMake(center.x-arrowW/2, center.y+imgH/2, arrowW, arrowH)];
        triangle.tag = kAnnotationCalloutArrowTag;
        [self addSubview:triangle];

        [calloutBox setFrame:CGRectMake(0, center.y+imgH/2+arrowH, calloutBox.width, calloutBox.height)];
        calloutBox.tag = kAnnotationCalloutBoxTag;
        [self addSubview:calloutBox];
    }
    else
    {
        //return things back to normal
        UIView* v = [self viewWithTag:kAnnotationCalloutBoxTag];
        [v removeFromSuperview];
        v = [self viewWithTag:kAnnotationCalloutArrowTag];
        [v removeFromSuperview];
        v = [self viewWithTag:kAnnotationTempImageViewTag];
        [v removeFromSuperview];

        self.image = icon;
        self.bounds = CGRectMake(0, 0, [self unselectedSize].width, [self unselectedSize].height);
    }
    [super setSelected:selected animated:animated];
}

-(CGSize)unselectedSize
{
    return CGSizeMake(20,20);
}

-(UIView*)newCustomCallout
{
    //create your own custom call out view
    UIView* v = [[UIView alloc] initWithFrame:CGRectMake(0,0,250,250)];
    v.backgroundColor = [UIColor greenColor];
    return v;
}

-(UIView*)newTriangleWithFrame:(CGRect)frame
{
    //create your own triangle
    UIImageView* v = [[UIImageView alloc] initWithFrame:frame];
    [v setImage:[UIImage imageNamed:@"trianglePointedUp.png"]];
    return v;
}

0
(void)mapView:(MKMapView *)mapViewIn didSelectAnnotationView:(MKAnnotationView *)view {
    if(![view.annotation isKindOfClass:[MKUserLocation class]])
    {
        CustomeCalloutViewController *calloutView = [[CustomeCalloutViewController alloc]initWithNibName:@"CustomeCalloutViewController" bundle:nil];
        [calloutView setPopinTransitionStyle:BKTPopinTransitionStyleSlide];
        [calloutView setPopinTransitionDirection:BKTPopinTransitionDirectionTop];
        [self presentPopinController:calloutView animated:YES completion:^{
            NSLog(@"Popin presented !");
        }];
        [mapView deselectAnnotation:view.annotation animated:true];
    }
}

网页内容由stack overflow 提供, 点击上面的
可以查看英文原文,
原文链接