UITableViewCell使用separatorInset隐藏分割线在iOS 11上失败

5

在 iOS 11 之前,我使用以下代码隐藏单个 UITableViewCell 的分隔线:

- (void)tableView:(UITableView *)tableView willDisplayCell:(UITableViewCell *)cell forRowAtIndexPath:(NSIndexPath *)indexPath {

    if (indexPath.row == 0) {


        // Remove separator inset
        if ([cell respondsToSelector:@selector(setSeparatorInset:)]) {
            [cell setSeparatorInset:UIEdgeInsetsMake(0, tableView.frame.size.width, 0, 0)];
        }

        // Prevent the cell from inheriting the Table View's margin settings
        if ([cell respondsToSelector:@selector(setPreservesSuperviewLayoutMargins:)]) {
            [cell setPreservesSuperviewLayoutMargins:NO];
        }

        // Explictly set your cell's layout margins
        if ([cell respondsToSelector:@selector(setLayoutMargins:)]) {
            [cell setLayoutMargins:UIEdgeInsetsMake(0, tableView.frame.size.width, 0, 0)];
        }
    }
}

在这个例子中,分隔符在每个部分的第一行被隐藏。我不想完全摆脱分隔符 - 只是对于某些行而言。

iOS 11中,上述代码不起作用。单元格的内容被完全推到右边。

是否有一种方法可以在iOS 11中隐藏单个UITableViewCell的分隔符?

提前澄清一下,我知道我可以使用以下代码隐藏整个UITableView的分隔符(希望避免指导我执行此操作的答案):

self.tableView.separatorStyle = UITableViewCellSeparatorStyleNone;

编辑:根据下面的评论澄清一下,如果我包括setSeparatorInset行,代码会完全执行相同的操作。因此,即使只有那一行,单元格的内容也会被推到最右边。

可能与您设置布局边距的方式有关。您尝试过删除那段代码吗? - inorganik
如果我包括setSeparatorInset行,它会完全执行相同的操作。因此,即使只有那一行,单元格的内容也会被推到最右边。 - SAHM
@SAHM,你在tableView或cell方面还做了其他的事情吗?你的代码在我的模拟器iPhone8 iOS 11上完美运行。https://i.stack.imgur.com/F2WZ5.png - trungduc
我建议将separatorStyle设置为UITableViewCellSeparatorStyleNone,然后在自定义单元格中添加自定义分隔符,在.h文件中提供隐藏和显示自定义分隔符的方法。这非常容易,我总是这样做。 - Ali Omari
5个回答

3
如果您不想为UITableViewCell添加自定义分隔符,我可以向您展示另一种解决方法。
工作原理
由于分隔符的颜色是在UITableView级别上定义的,因此没有明确的方法可以针对每个UITableViewCell实例更改它。这并不是苹果公司的本意,您唯一能做的就是通过黑客手段来解决。
首先,您需要访问分隔视图。您可以使用此小扩展程序完成。
extension UITableViewCell {
    var separatorView: UIView? {
        return subviews .min { $0.frame.size.height < $1.frame.size.height }
    }
}

当您可以访问分隔符视图时,您需要适当配置您的UITableView。首先,将所有分隔线的全局颜色设置为.clear(但不要禁用它们!)
override func viewDidLoad() {
    super.viewDidLoad()
    tableView.separatorColor = .clear
}

接下来,为每个单元格设置分隔符颜色。您可以为它们中的每一个设置不同的颜色,取决于您。

func tableView(_ tableView: UITableView, cellForRowAt indexPath: IndexPath) -> UITableViewCell {
    let cell = tableView.dequeueReusableCell(withIdentifier: "SeparatorCell", for: indexPath)
    cell.separatorView?.backgroundColor = .red

    return cell
}

最后,对于每个部分中的第一行,将分隔符颜色设置为.clear

func tableView(_ tableView: UITableView, willDisplay cell: UITableViewCell, forRowAt indexPath: IndexPath) {
    if indexPath.row == 0 {
        cell.separatorView?.backgroundColor = .clear
    }
}

为什么它有效

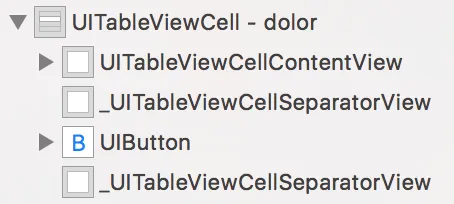
首先,让我们考虑 UITableViewCell 的结构。如果您打印出单元格的 subviews,您将看到以下输出。

<UITableViewCellContentView: 0x7ff77e604f50; frame = (0 0; 328 43.6667); opaque = NO; gestureRecognizers = <NSArray: 0x608000058d50>; layer = <CALayer: 0x60400022a660>>
<_UITableViewCellSeparatorView: 0x7ff77e4010c0; frame = (15 43.5; 360 0.5); layer = <CALayer: 0x608000223740>>
<UIButton: 0x7ff77e403b80; frame = (0 0; 22 22); opaque = NO; layer = <CALayer: 0x608000222500>>

作为您所见,有一个视图包含内容、分隔符和辅助按钮。从这个角度来看,您只需要访问分隔符视图并修改其背景色即可。不幸的是,这并不容易。
让我们在视图调试器中查看相同的UITableViewCell。如您所见,有两个分隔符视图。您需要访问底部的那个,在调用"willDisplay:"时不存在。这就是第二个棘手部分的作用。

structorue of the table view cell

当您检查这两个元素时,您会发现从顶部开始的第一个元素的背景颜色设置为nil,而第二个元素的背景颜色设置为整个UITableView指定的值。在这种情况下,具有颜色的分隔符覆盖了没有颜色的分隔符。
要解决这个问题,我们必须“反转”情况。我们可以将所有分隔符的颜色设置为.clear,这将揭示我们可以访问的分隔符。最后,我们可以将可访问分隔符的背景颜色设置为所需颜色。

哇,太棒了!如果您找到一种使用插图来完成此操作的方法,我仍然会感兴趣,因为有时我需要显示整行而不是隐藏行,所以我认为通常具有这种灵活性是很好的。我想知道是否仍然可以以某种方式更改行宽而不破坏单元格的内容。但是您对这个问题的回答真的很聪明。谢谢。 - SAHM

1

我认为最好的方法就是添加一个高度为1pt的简单UIView。我编写了以下协议,使您可以在任何喜欢的UITableViewCell中使用它:

// Base protocol requirements
protocol SeperatorTableViewCellProtocol: class {
    var seperatorView: UIView! {get set}
    var hideSeperator: Bool! { get set }
    func configureSeperator()
}

// Specify the separator is of a UITableViewCell type and default separator configuration method
extension SeperatorTableViewCellProtocol where Self: UITableViewCell {
    func configureSeperator() {
        hideSeperator = true
        seperatorView = UIView()
        seperatorView.backgroundColor = UIColor(named: .WhiteThree)
        contentView.insertSubview(seperatorView, at: 0)

        // Just constraint seperatorView to contentView
        seperatorView.setConstant(edge: .height, value: 1.0)
        seperatorView.layoutToSuperview(.bottom)
        seperatorView.layoutToSuperview(axis: .horizontally)

        seperatorView.isHidden = hideSeperator
    }
}

你使用它的方式如下:

// Implement the protocol with custom cell
class CustomTableViewCell: UITableViewCell, SeperatorTableViewCellProtocol {

    // MARK: SeperatorTableViewCellProtocol impl'
    var seperatorView: UIView!
    var hideSeperator: Bool! {
        didSet {
            guard let seperatorView = seperatorView else {
                return
            }
            seperatorView.isHidden = hideSeperator
        }
    }


    override func awakeFromNib() {
        super.awakeFromNib()
        configureSeperator()
        hideSeperator = false
    }
}

这就是全部内容。您可以自定义任何UITableViewCell子类以使用分隔线。

通过tableView:willDisplayCell:forRowAtIndexPath设置分隔线的可见性:

cell.hideSeperator = false / true

谢谢Dan,我很感激。不过如果可能的话,我仍然更愿意找到一种抑制分隔符的方法。这将是最后的办法。 - SAHM
很高兴能帮忙。:-) 如果你最终找到了另一个解决方案,那会很有趣。 - DanielH

1

首先通过tableView.separatorStyle = .none隐藏所有分隔线。然后修改您的UITableViewCell子类如下:

class Cell: UITableViewCell {
    var separatorLine: UIView?
    ...
}

将以下内容添加到 tableView(_:cellForRowAt:) 方法体中:

if cell.separatorLine == nil {
    // Create the line.
    let singleLine = UIView()
    singleLine.backgroundColor = UIColor.lightGray.withAlphaComponent(0.5)
    singleLine.translatesAutoresizingMaskIntoConstraints = false

    // Add the line to the cell's content view.
    cell.contentView.addSubview(singleLine)

    let singleLineConstraints = [singleLine.leadingAnchor.constraint(equalTo: cell.contentView.leadingAnchor, constant: 8),
                                 singleLine.trailingAnchor.constraint(equalTo: cell.contentView.trailingAnchor),
                                 singleLine.topAnchor.constraint(equalTo: cell.contentView.bottomAnchor, constant: -1),
                                 singleLine.bottomAnchor.constraint(equalTo: cell.contentView.bottomAnchor, constant: 0)]
    cell.contentView.addConstraints(singleLineConstraints)

    cell.separatorLine = singleLine
}

cell.separatorLine?.isHidden = [Boolean which determines if separator should be displayed]

这段代码是用Swift编写的,因此在进行Objective-C翻译时请按照必要步骤,并确保继续版本检查。在我的测试中,我根本不需要使用tableView(_:willDisplayCell:forRowAt:)方法,而是所有内容都在cellForRowAtIndexPath:方法中。

刚刚发布了一个编辑版本,模仿了分隔符插入并提供了完整的单元格级别控制。如果您想要进行更快的实现,可能可以使用CoreGraphics来进行一些绘图,但这与UIKit实现相比并不太昂贵。 - DaveAMoore
谢谢 David,我很感激。尽管如此,如果可能的话,我仍然更喜欢找到一种抑制分隔符的方法。这将是最后的选择。 - SAHM
1
仍在寻找更好的解决方案。他们在iOS 11中更改了布局代码,特别是与边距等相关的内容。这就是为什么现在出现了问题。 - DaveAMoore
1
我尝试了几种不同的方法来处理安全区域,但是还没有成功。如果我成功了,我会发布出来的。 - SAHM

0

我也曾经遵循过这个模式。多年来,我对它进行了调整。就在今天,我不得不删除directionalLayoutMargins部分才能使其正常工作。现在我的函数看起来像这样:

    func adjustCellSeparatorInsets(at indexPath: IndexPath,
                                   for modelCollection: ModelCollection,
                                   numberOfLastSeparatorsToHide: Int) {

        guard modelCollection.isInBounds(indexPath) else { return }

        let model = modelCollection[indexPath]
        var insets = model.separatorInsets
        let lastSection = modelCollection[modelCollection.sectionCount - 1]
        let shouldHideSeparator = indexPath.section == modelCollection.sectionCount - 1
            && indexPath.row >= lastSection.count - numberOfLastSeparatorsToHide

        // Don't show the separator for the last N rows of the last section
        if shouldHideSeparator {
            insets = NSDirectionalEdgeInsets(top: 0, leading: 9999, bottom: 0, trailing: 0)
        }

        // removing separator inset
        separatorInset = insets.edgeInsets

        // prevent the cell from inheriting the tableView's margin settings
        preservesSuperviewLayoutMargins = false
    }

如果您喜欢在Github上检查它,请查看此链接

有关解释的删除PR可以在此处找到。


-1
其实,当我使用UITableView时,我总是创建自定义单元格类和分隔符,并通常将自己的分隔符作为高度为1的UIView,并具有左右约束。在您的情况下,请执行以下步骤: 1. 创建自定义单元格。 2. 添加UIView作为分隔符。 3. 将此分隔符链接到您的自定义类。 4. 在您的类中添加hideSeparator方法。
-(void)hideSeparator{
   self.separator.hidden == YES;
}

5. 隐藏任何您想要隐藏的单元格的分隔符。

希望这解决了您的问题。


网页内容由stack overflow 提供, 点击上面的
可以查看英文原文,
原文链接