在Android 7 / api24中以编程方式安装apk

16

我正在尝试让我的应用程序自动安装APK文件。对于api<24,这很好运行。但是对于24,则失败了。 Android已经实施了额外的安全措施:

针对Android 7.0的应用程序,Android框架执行StrictMode API策略,禁止在应用程序外部公开file:// URI。如果包含文件URI的意图离开您的应用程序,则应用程序将因FileUriExposedException异常而失败。

所以我尝试了这个:

    Uri myuri;
    if (Build.VERSION.SDK_INT < Build.VERSION_CODES.N){
        myuri = Uri.parse("file://"+outapk);
    } else {
        File o = new File(outapk);
        myuri = FileProvider.getUriForFile(con, con.getApplicationContext().getPackageName() + ".provider", o);
    }
    Intent promptInstall = new Intent(Intent.ACTION_VIEW).setDataAndType(myuri,"application/vnd.android.package-archive");
    con.startActivity(promptInstall);

但却遭遇致命异常:

com.android.packageinstaller "Caused by: java.lang.SecurityException: Permission Denial: opening provider android.support.v4.content.FileProvider from ProcessRecord{b42ee8a 6826:com.android.packageinstaller/u0a15} (pid=6826, uid=10015) that is not exported from uid 10066". 

我的清单文件中有export=true。

问题似乎是packageinstaller无法使用content:// uri。

是否有任何方法允许应用程序在API24上以编程方式安装apk?
9个回答

16

有没有办法允许应用程序使用API 24编程方式安装apk?

在您的promptInstall设置中添加addFlags(Intent.FLAG_GRANT_READ_URI_PERMISSION),以授予内容的读取权限。

我在清单文件中设置了export=true。

不要在您的FileProvider上这样做,否则您的应用程序将崩溃。

问题似乎是packageinstaller无法使用content:// uri。

不是的,问题在于您没有授予包安装器从该Uri中读取的权限。如果包安装程序无法使用content协议,则会收到ActivityNotFoundException错误。

需要注意的是,仅有Android 7.0开始支持content,而早期版本的Android必须使用file


太棒了,成功了。谢谢! - elsie
addFlags(Intent.FLAG_GRANT_READ_URI_PERMISSION) 对我也起作用了。 - Ispas Claudiu
嘿,CommonsWare。我们必须在N及更低版本的API中使用if...else吗?没有其他方法可以做到这一点吗? - David
@David:在旧设备上,请使用Uri.fromFile()。在新设备(Android 7.0+)上,请使用FileProvider - CommonsWare
"我在我的清单文件中有export=true。""不要在你的FileProvider上这样做,因为那会导致你的应用程序崩溃。" 你能解释一下吗?为什么在 FileProvider 上设置 export=true 会导致应用崩溃?你是指应该用 exported 而不是 export 吗? - LarsH
1
@LarsH:不,我的意思是,据我所知,如果您尝试导出FileProvider,它会抛出异常(请参见这些行)。 - CommonsWare

13

对于奥利奥(Oreo)系统,请在AndroidManifest中添加权限(否则它会无声地失败)

<uses-permission android:name="android.permission.REQUEST_INSTALL_PACKAGES"/>

现在将其添加到您的清单中

  <provider
    android:name="android.support.v4.content.FileProvider"
    android:authorities="${applicationId}.provider" 
    android:exported="false"
    android:grantUriPermissions="true">
    <meta-data
        android:name="android.support.FILE_PROVIDER_PATHS"
        android:resource="@xml/provider_paths"/>
</provider>

在 XML 目录中添加...

<?xml version="1.0" encoding="utf-8"?>
<paths xmlns:android="http://schemas.android.com/apk/res/android">
<external-path name="external_files" path="." /></paths>

然后在你想要的地方使用这些代码。

File directory = Environment.getExternalStoragePublicDirectory("myapp_folder"); 

 File file = new File(directory, "myapp.apk"); // assume refers to "sdcard/myapp_folder/myapp.apk"


    Uri fileUri = Uri.fromFile(file); //for Build.VERSION.SDK_INT <= 24

    if (Build.VERSION.SDK_INT >= 24) {

        fileUri = FileProvider.getUriForFile(context, BuildConfig.APPLICATION_ID + ".provider", file);
    }
    Intent intent = new Intent(Intent.ACTION_VIEW, fileUri);
    intent.putExtra(Intent.EXTRA_NOT_UNKNOWN_SOURCE, true);
    intent.setDataAndType(fileUri, "application/vnd.android.package-archive");
    intent.setFlags( Intent.FLAG_ACTIVITY_NEW_TASK);
    intent.addFlags(Intent.FLAG_GRANT_READ_URI_PERMISSION); //dont forget add this line
    context.startActivity(intent);
}

添加了这段代码后,还需要添加其他内容吗?因为我得到了“应用程序未安装”的错误。 :( - amit pandya
你遇到了什么确切的错误?你能否进入顶部提到的这个意图?=> [Intent intent = new Intent(Intent.ACTION_VIEW, fileUri)]然后选择取消或安装应用程序?如果你在一个活动中,请将context.startActivity(intent)更改为startActivity(intent)。 - smartmob
1
完美,它对我有用!我需要将此权限添加到清单中。 <uses-permission android:name="android.permission.REQUEST_INSTALL_PACKAGES"/> - Ali Soleimani

4

对于Oreo版本,在AndroidManifest.xml文件中添加权限。

<uses-permission android:name="android.permission.REQUEST_INSTALL_PACKAGES"/>

2

我找到的解决方案如下:

最初的回答:

val newFile = File(dirPath, "$fileNameWithoutExtn.apk")
                        var fileUri = Uri.fromFile(newFile)
                        //use the fileProvider to get the downloaded from sdcard
                        if (Build.VERSION.SDK_INT >= 24) {
                            fileUri = FileProvider.getUriForFile(this@SettingAcitivity, applicationContext.packageName + ".provider", newFile)
                         val intent=Intent(Intent.ACTION_VIEW)
                            intent.setDataAndType(fileUri, "application/vnd.android.package-archive")
                            intent.flags = Intent.FLAG_GRANT_READ_URI_PERMISSION
                            intent.addFlags(Intent.FLAG_GRANT_READ_URI_PERMISSION)
                            startActivity(intent)
                        }else{
                            newFile.setReadable(true, false)
                            val intent = Intent(Intent.ACTION_VIEW)
                            intent.flags = Intent.FLAG_ACTIVITY_CLEAR_TOP or Intent.FLAG_ACTIVITY_NEW_TASK
                            intent.setDataAndType(fileUri, "application/vnd.android.package-archive")
                            intent.addFlags(Intent.FLAG_GRANT_READ_URI_PERMISSION)
                            startActivity(intent)
                        }

最初的回答:在清单中编写并保存。而且请保留HTML标记。
<provider
            android:name="android.support.v4.content.FileProvider"
            android:authorities="${applicationId}.provider"
            android:exported="false"
            android:grantUriPermissions="true">
            <meta-data
                android:name="android.support.FILE_PROVIDER_PATHS"
                android:resource="@xml/paths"/>

and also set the permission

<uses-permission android:name="android.permission.REQUEST_INSTALL_PACKAGES" />

最初的回答:在xml文件夹中,路径将会是:
<paths>
    <external-path
        name="external_files"
        path="." />
</paths>

我不知道为什么,但只有你的代码对我起作用了,谢谢! - Alexandre Aragão

0

0

2022 年更新

您不能使用内部存储安装 APK,必须改用外部存储

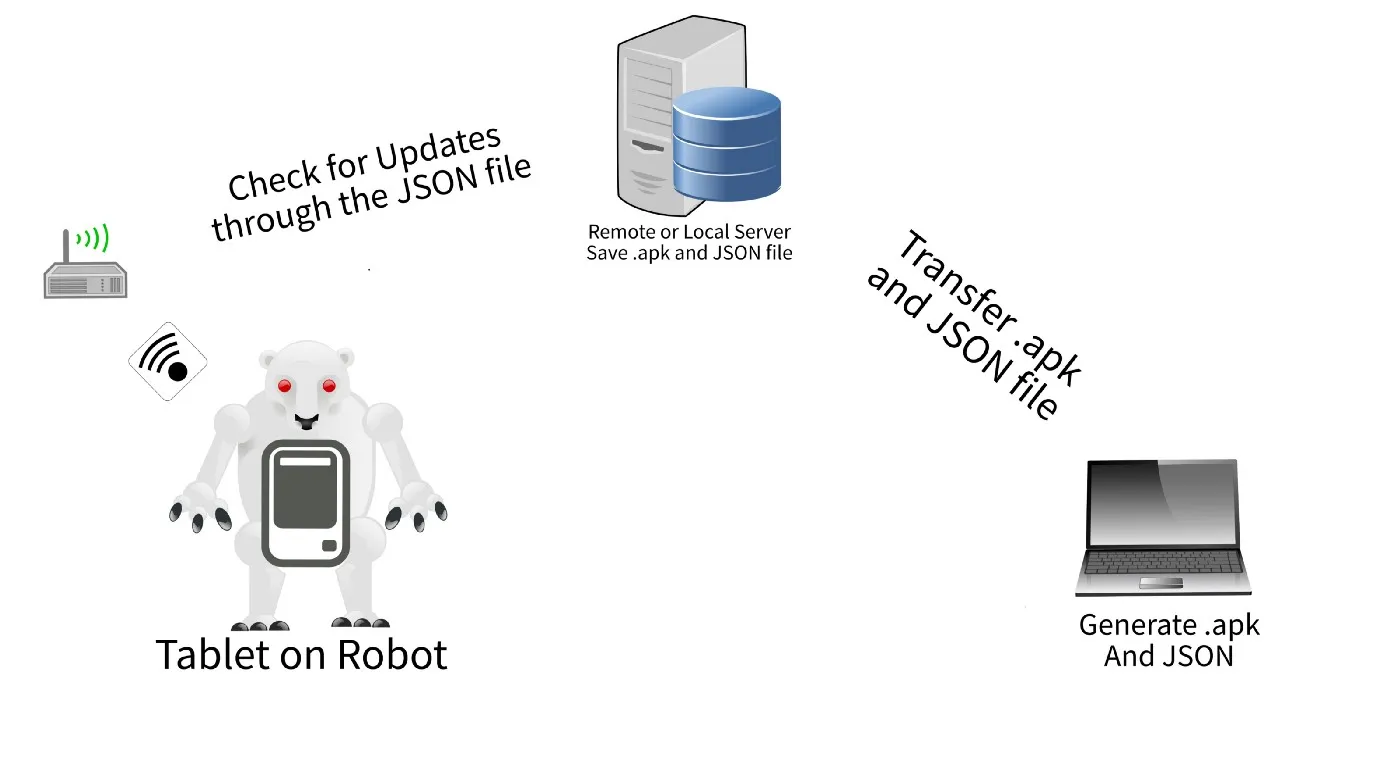
本教程是为了帮助需要逐步在远程 Android 设备上安装APK的人而编写的。此外,本教程还有一个NodeJS 服务器实现。

enter image description here

使用 APK 远程安装 Android 应用程序


0

res/xml 中添加文件 -> provider_paths.xml

<?xml version="1.0" encoding="utf-8"?>
<paths xmlns:android="http://schemas.android.com/apk/res/android">
    <external-path name="external_files" path="."/>
</paths>

将以下代码添加到AndroidManifest.xml文件中:
     <provider
        android:name="android.support.v4.content.FileProvider"
        android:authorities="com.example.provider" <-- change this with your package name
        android:exported="false"
        android:grantUriPermissions="true">
        <meta-data
            android:name="android.support.FILE_PROVIDER_PATHS"
            android:resource="@xml/provider_paths"/>
    </provider>

运行此代码以安装或打开您的应用程序

    public void installApk(String file) {
        Uri uri = FileProvider.getUriForFile(context, BuildConfig.APPLICATION_ID + ".provider",new File(file));
        Intent intent = new Intent(Intent.ACTION_VIEW);
        intent.setDataAndType(uri, "application/vnd.android.package-archive");
        intent.setFlags(Intent.FLAG_ACTIVITY_NEW_TASK);
        intent.addFlags(Intent.FLAG_GRANT_READ_URI_PERMISSION);
        context.startActivity(intent);
    }

0

只需按照以下步骤操作:

1- 将以下权限添加到清单文件中:

 <uses-permission android:name="android.permission.REQUEST_INSTALL_PACKAGES"/>

2- 将提供程序添加到清单文件(作为应用程序标记的子级):

 <provider
        android:name="android.support.v4.content.FileProvider"
        android:authorities="tatcomputer.ir.libraryapp.provider"
        android:exported="false"
        android:grantUriPermissions="true">
        <meta-data
            android:name="android.support.FILE_PROVIDER_PATHS"
            android:resource="@xml/paths"/>
    </provider>

3- 将paths.xml添加到xml目录中:
<?xml version="1.0" encoding="utf-8"?>
<paths xmlns:android="http://schemas.android.com/apk/res/android">
<files-path name="files" path="." />
<external-files-path name="external_files" path="." />
<external-path name="external_files" path="." />
<cache-path name="cached_files" path="." />
<external-cache-path name="cached_files" path="." />
</paths>

4- 使用以下代码显示安装APK页面(请注意,在我的情况下,APK位于名为tmp.apk的手机根目录中):

       String root = Environment.getExternalStorageDirectory().toString();

        Uri fileUri24 = FileProvider.getUriForFile(App.applicationContext, BuildConfig.APPLICATION_ID + ".provider", new File(root + "/tmp.apk"));
        Uri fileUri = Uri.fromFile(new File(root + "/tmp.apk"));

        Intent intent = new Intent(Intent.ACTION_VIEW);
        if (Build.VERSION.SDK_INT >= 24)
            intent.setDataAndType(fileUri24, "application/vnd.android.package-archive");
        else intent.setDataAndType(fileUri, "application/vnd.android.package-archive");
        intent.setFlags(Intent.FLAG_ACTIVITY_NEW_TASK);
        intent.addFlags(Intent.FLAG_GRANT_READ_URI_PERMISSION);
        App.applicationContext.startActivity(intent);

0

自动安装Apk

Intent intent1 = new Intent(Intent.ACTION_INSTALL_PACKAGE);
            intent1.addFlags(Intent.FLAG_GRANT_READ_URI_PERMISSION);
            intent1.setDataAndType(Uri.fromFile(new File(Environment.getExternalStorageDirectory() + "/download/" +filename)), "application/vnd.android.package-archive");
            intent1.setFlags(Intent.FLAG_ACTIVITY_NEW_TASK);

网页内容由stack overflow 提供, 点击上面的
可以查看英文原文,
原文链接