如何在Android对话框的XML布局文件中指定正确的对话框大小?

10

我使用XML布局文件创建了一个Android对话框,如下所示:

  final Dialog dialog = new Dialog(this);
        dialog.setContentView(R.layout.enabledialog);
        dialog.setTitle("Define message keys and setup");

        Switch locationSwitch = (Switch) dialog.findViewById(R.id.locationSwitch);
        Switch blareSwitch = (Switch) dialog.findViewById(R.id.blareSwitch);

        final EditText locationEdit = (EditText) dialog.findViewById(R.id.locationEdit);
        final EditText blareEdit = (EditText) dialog.findViewById(R.id.blareEdit);

        WindowManager.LayoutParams lp = new WindowManager.LayoutParams();
        lp.copyFrom(dialog.getWindow().getAttributes());
        lp.width = WindowManager.LayoutParams.MATCH_PARENT;
        lp.height = WindowManager.LayoutParams.MATCH_PARENT;

        dialog.show();

        dialog.getWindow().setAttributes(lp);
然而,我的XML文件仅占屏幕的一半,因此当我显示对话框时,会出现额外的空白区域,看起来不好看:

这是对话框的草图(R.layout.enabledialog):

enter image description here

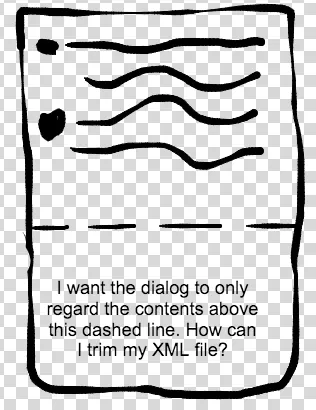
我该如何去掉这个额外的空白区域?在Android Studio中,布局编辑器默认认为XML文件要占据整个屏幕,但实际上,我只需要一个小弹出窗口。

谢谢,

Ruchir


编辑:这是我的布局资源文件:

<?xml version="1.0" encoding="utf-8"?>
<RelativeLayout xmlns:android="http://schemas.android.com/apk/res/android"
    android:layout_width="fill_parent"
    android:layout_height="fill_parent"
    android:background="#1dd1e9">


    <Switch
        android:layout_width="wrap_content"
        android:layout_height="wrap_content"
        android:id="@+id/locationSwitch"
        android:layout_marginTop="46dp"
        android:checked="false"
        android:layout_alignParentTop="true"
        android:layout_alignParentLeft="true"
        android:layout_alignParentStart="true" />

    <TextView
        android:layout_width="wrap_content"
        android:layout_height="wrap_content"
        android:textAppearance="?android:attr/textAppearanceLarge"
        android:text="Blah"
        android:id="@+id/textView"
        android:textSize="30sp"
        android:layout_alignTop="@+id/locationSwitch"
        android:layout_centerHorizontal="true"
        />

    <TextView
        android:layout_width="wrap_content"
        android:layout_height="wrap_content"
        android:textAppearance="?android:attr/textAppearanceSmall"
        android:text="Blah Blah Blah"
        android:id="@+id/textView2"
        android:gravity="center"
        android:textSize="20sp"
        android:layout_below="@+id/locationSwitch"
        android:layout_centerHorizontal="true"
        />

    <EditText
        android:layout_width="wrap_content"
        android:layout_height="wrap_content"
        android:id="@+id/locationEdit"
        android:layout_below="@+id/textView2"
        android:layout_alignLeft="@+id/textView"
        android:layout_alignStart="@+id/textView"
        android:layout_alignRight="@+id/textView"
        android:layout_alignEnd="@+id/textView"
        android:singleLine = "true"
        android:imeOptions="actionDone" />

    <Switch
        android:layout_width="wrap_content"
        android:layout_height="wrap_content"
        android:id="@+id/blareSwitch"
        android:layout_marginTop="40dp"
        android:checked="false"
        android:layout_below="@+id/locationEdit"
        android:layout_alignParentLeft="true"
        android:layout_alignParentStart="true" />

    <TextView
        android:layout_width="wrap_content"
        android:layout_height="wrap_content"
        android:textAppearance="?android:attr/textAppearanceLarge"
        android:text="Blah"
        android:id="@+id/textView3"
        android:textSize="30sp"
        android:layout_alignBottom="@+id/blareSwitch"
        android:layout_centerHorizontal="true" />

    <TextView
        android:layout_width="wrap_content"
        android:layout_height="wrap_content"
        android:textAppearance="?android:attr/textAppearanceSmall"
        android:text="Blah Blah Blah"
        android:id="@+id/textView4"
        android:textSize="20sp"
        android:layout_centerVertical="true"
        android:layout_alignParentLeft="true"
        android:layout_alignParentStart="true" />

    <EditText
        android:layout_width="wrap_content"
        android:layout_height="wrap_content"
        android:id="@+id/blareEdit"
        android:layout_below="@+id/textView4"
        android:layout_alignLeft="@+id/locationEdit"
        android:layout_alignStart="@+id/locationEdit"
        android:layout_alignRight="@+id/locationEdit"
        android:layout_alignEnd="@+id/locationEdit"
        android:singleLine = "true"
        android:imeOptions="actionDone" />
</RelativeLayout>

请发布布局资源文件。您还可以在Java代码中将'MATCH_PARENT'更改为'WRAP_CONTENT'。 - CommonsWare
@CommonsWare 编辑 :) - Ruchir Baronia
@CommonsWare 我实际上将其设置为MATCH_PARENT,因为当它是WRAP_CONTENT时,内容会重叠并且不适合。 - Ruchir Baronia
8个回答

3
尝试在您的根RelativeLayout中将fill_parent更改为wrap_content,并在您的Java代码中将MATCH_PARENT更改为WRAP_CONTENT(或者删除整个setAttributes())。

实际上,因为当它是WRAP_CONTENT时,内容会重叠并且无法正确适应,所以我把它设置为MATCH_PARENT

那么这是一个需要解决的单独问题。首先使对话框的大小大致符合您的要求。然后,使用某些检查工具(例如AS 2.2中的新工具、Hierarchy View、uiautomatorviewer等)开始解决布局问题,以避免重叠。

好的,我已经将所有的MATCH_PARENT更改为WRAP_CONTENT,但重叠问题仍然存在。我该如何使用你提到的检查工具?谢谢。 - Ruchir Baronia
@RuchirBaronia:uiautomatorviewer是您SDK中的命令行工具。层次结构视图在Android设备监视器中(从Android Studio主菜单中的“工具”>“Android”中提供)。两者都在文档中进行了介绍,至少轻微地。基本上,它们为您提供了一个查看UI实际内容的视图,从设备加载,因此您可以可视化规则,以便实际应用它们。 - CommonsWare

3

尝试将您的布局参数高度更改为:

lp.height = WindowManager.LayoutParams.WRAP_CONTENT;


(注:此代码段意为将布局参数的高度设置为自适应内容的高度)

2

我通常会以编程方式设置LayoutParams。 我认为你可以在onResume中使用以下代码尝试DialogFragment

/**
 * Setup position of dialog 
 */
protected void setupDialogPosition() {
    // setup the dialog
    WindowManager.LayoutParams p = getDialog().getWindow().getAttributes();
    p.width = ViewGroup.LayoutParams.MATCH_PARENT;
    p.y = 0;
    // change height of dailog
    if (mHeight == ViewGroup.LayoutParams.MATCH_PARENT) {
        p.height = mScreenHeight - p.y;
        if (isStatusBarVisible()) {
            p.height -= getStatusBarHeight();
        }
        } else {
        p.height = ViewGroup.LayoutParams.WRAP_CONTENT;
    }
    getDialog().getWindow().setGravity(mGravity);
    getDialog().getWindow().setAttributes(p);
}

2

将RelativeLayout更改为LinearLayout:

<LinearLayout
    android:layout_height="match_parent"
    android:layout_width="wrap_content"
</LinearLayout>

2

直接从资源值进行转换:

int width = getResources().getDimensionPixelSize(R.dimen.popup_width);
int height = getResources().getDimensionPixelSize(R.dimen.popup_height);        
getDialog().getWindow().setLayout(width, height);

现在在您对话框的布局中使用match_parent
android:layout_width="match_parent"
android:layout_height="match_parent"

android:layout_width="match_parent"
android:layout_height="match_parent"

希望这能帮到您。


2
在您的相对布局中,指定layout_height和layout_width的值,不要将其设置为fill_parent。 例如:
<RelativeLayout xmlns:android="http://schemas.android.com/apk/res/android"
android:layout_width="250dp"
android:layout_height="wrap_content">

<TextView
    android:id="@+id/customdia_text"
    android:layout_marginTop="20dp"
    android:layout_width="wrap_content"
    android:layout_height="40dp"
    android:layout_centerHorizontal="true"
    android:text="hello"
    />
<Button
    android:id="@+id/custdia_btn"
    android:layout_width="wrap_content"
    android:layout_height="wrap_content"
    android:text="Ok"
    android:layout_marginBottom="30dp"
    android:layout_marginTop="20dp"
    android:layout_below="@+id/customdia_text"
    android:layout_centerHorizontal="true"/>

</RelativeLayout>

2
按照以下步骤创建自定义对话框:
public class MyDialog extends Dialog {

    @Override
    public void onAttachedToWindow() {
        super.onAttachedToWindow();
        WindowManager.LayoutParams lp = new WindowManager.LayoutParams();
        lp.width = WindowManager.LayoutParams.MATCH_PARENT;
        lp.height = WindowManager.LayoutParams.WRAP_CONTENT;

        getWindow().setAttributes(lp);
    }

    public MyDialog(Context context) {
        super(context);
    }

    @Override
    protected void onCreate(Bundle savedInstanceState) {
        super.onCreate(savedInstanceState);
        setContentView(R.layout.dialog);
    }
}

看一下onAttachedToWindow()重写方法,这是你的技巧。在创建对话框之前,该方法会在onCreate()方法之前调用,因此您可以覆盖窗口属性(宽度和高度)。

从您的Activity中调用此对话框的方式如下:

new MyDialog(ActivityContext).show();

也要在dialog.xml文件中进行一些修改。
<?xml version="1.0" encoding="utf-8"?>

<LinearLayout xmlns:android="http://schemas.android.com/apk/res/android"
    android:layout_width="fill_parent"
    android:layout_height="wrap_content"
    android:gravity="center"
    android:orientation="vertical">

    <Switch
        android:id="@+id/locationSwitch"
        android:layout_width="wrap_content"
        android:layout_height="wrap_content"
        android:layout_alignParentLeft="true"
        android:layout_alignParentStart="true"
        android:layout_alignParentTop="true"
        android:layout_marginTop="46dp"
        android:checked="false" />

    <TextView
        android:id="@+id/textView"
        android:layout_width="wrap_content"
        android:layout_height="wrap_content"
        android:layout_alignTop="@+id/locationSwitch"
        android:layout_centerHorizontal="true"
        android:text="Blah"
        android:textAppearance="?android:attr/textAppearanceLarge"
        android:textSize="30sp" />

    <TextView
        android:id="@+id/textView2"
        android:layout_width="wrap_content"
        android:layout_height="wrap_content"
        android:layout_below="@+id/locationSwitch"
        android:layout_centerHorizontal="true"
        android:gravity="center"
        android:text="Blah Blah Blah"
        android:textAppearance="?android:attr/textAppearanceSmall"
        android:textSize="20sp" />

    <EditText
        android:id="@+id/locationEdit"
        android:layout_width="wrap_content"
        android:layout_height="wrap_content"
        android:layout_alignEnd="@+id/textView"
        android:layout_alignLeft="@+id/textView"
        android:layout_alignRight="@+id/textView"
        android:layout_alignStart="@+id/textView"
        android:layout_below="@+id/textView2"
        android:layout_marginBottom="50dp"
        android:imeOptions="actionDone"
        android:singleLine="true" />

</LinearLayout>

如果您想要进行额外的定制,可以编辑布局文件。


1
在xml文件中根据需求更改主要RelativeLayout的大小。像下面这样指定所需的高度。
<?xml version="1.0" encoding="utf-8"?>
<RelativeLayout xmlns:android="http://schemas.android.com/apk/res/android"
    android:layout_width="fill_parent"
    android:layout_height="100dp"
    android:background="#1dd1e9">

<Switch
    android:layout_width="wrap_content"
    android:layout_height="wrap_content"
    android:id="@+id/locationSwitch"
    android:layout_marginTop="46dp"
    android:checked="false"
    android:layout_alignParentTop="true"
    android:layout_alignParentLeft="true"
    android:layout_alignParentStart="true" />

<TextView
    android:layout_width="wrap_content"
    android:layout_height="wrap_content"
    android:textAppearance="?android:attr/textAppearanceLarge"
    android:text="Blah"
    android:id="@+id/textView"
    android:textSize="30sp"
    android:layout_alignTop="@+id/locationSwitch"
    android:layout_centerHorizontal="true"
    />

<TextView
    android:layout_width="wrap_content"
    android:layout_height="wrap_content"
    android:textAppearance="?android:attr/textAppearanceSmall"
    android:text="Blah Blah Blah"
    android:id="@+id/textView2"
    android:gravity="center"
    android:textSize="20sp"
    android:layout_below="@+id/locationSwitch"
    android:layout_centerHorizontal="true"
    />

<EditText
    android:layout_width="wrap_content"
    android:layout_height="wrap_content"
    android:id="@+id/locationEdit"
    android:layout_below="@+id/textView2"
    android:layout_alignLeft="@+id/textView"
    android:layout_alignStart="@+id/textView"
    android:layout_alignRight="@+id/textView"
    android:layout_alignEnd="@+id/textView"
    android:singleLine = "true"
    android:imeOptions="actionDone" />

<Switch
    android:layout_width="wrap_content"
    android:layout_height="wrap_content"
    android:id="@+id/blareSwitch"
    android:layout_marginTop="40dp"
    android:checked="false"
    android:layout_below="@+id/locationEdit"
    android:layout_alignParentLeft="true"
    android:layout_alignParentStart="true" />

<TextView
    android:layout_width="wrap_content"
    android:layout_height="wrap_content"
    android:textAppearance="?android:attr/textAppearanceLarge"
    android:text="Blah"
    android:id="@+id/textView3"
    android:textSize="30sp"
    android:layout_alignBottom="@+id/blareSwitch"
    android:layout_centerHorizontal="true" />

<TextView
    android:layout_width="wrap_content"
    android:layout_height="wrap_content"
    android:textAppearance="?android:attr/textAppearanceSmall"
    android:text="Blah Blah Blah"
    android:id="@+id/textView4"
    android:textSize="20sp"
    android:layout_centerVertical="true"
    android:layout_alignParentLeft="true"
    android:layout_alignParentStart="true" />

<EditText
    android:layout_width="wrap_content"
    android:layout_height="wrap_content"
    android:id="@+id/blareEdit"
    android:layout_below="@+id/textView4"
    android:layout_alignLeft="@+id/locationEdit"
    android:layout_alignStart="@+id/locationEdit"
    android:layout_alignRight="@+id/locationEdit"
    android:layout_alignEnd="@+id/locationEdit"
    android:singleLine = "true"
    android:imeOptions="actionDone" />
</RelativeLayout>

根据需求更改高度和宽度,不需要在Java中设置setAttributes(lp)。如果您要进行设置,请确保考虑xml RelativeLayout的高度和宽度。

我该如何知道哪个高度? - Ruchir Baronia
请检查父RelativeLaout中的代码,我已经将高度设为100dp,请使用它并根据需要进行更改。 - Maheswaran S
更改父布局的高度,请检查代码并进行试错。 - Maheswaran S

网页内容由stack overflow 提供, 点击上面的
可以查看英文原文,
原文链接