我尝试在谷歌上搜索并找到了以下内容。这些链接是关于jboss eap 6的。
1.如何在jboss eap 7中配置JMS?
2.Jboss eap 7是否内置JMS?还是需要手动配置?
3.使用Jboss eap 7的示例应用程序?
我尝试在谷歌上搜索并找到了以下内容。这些链接是关于jboss eap 6的。
1.如何在jboss eap 7中配置JMS?
2.Jboss eap 7是否内置JMS?还是需要手动配置?
3.使用Jboss eap 7的示例应用程序?
经过艰辛努力,我得到了答案。
在 JBoss EAP 7 服务器中支持 Apache ActiveMQ Artemis。这是内置于 JBoss EAP 7 服务器中的,但是有些下载的 JBoss EAP 7 服务器可能不包含 Apache ActiveMQ Artemis,因此您可能找不到 jboss 子系统中的 Messaging-ActiveMQ。为此,您需要手动在 standalone.xml 文件中进行配置。请按照以下步骤进行配置:
步骤 1:
启动 JBoss EAP 7 服务器
步骤 2:
• 在 cd /PATH/TO/JBoss-EAP-7.0/bin 中运行 add-user.bat 文件。
• 对于 Linux 服务器,则需要使用 ./add-user.sh 命令。运行后将出现一个命令提示符。
在这里,您需要添加新的应用程序用户。请设置:
用户名:jmsuser,密码:jmsuser@123,用户角色:guest
What type of user do you wish to add?
 a) Management User (mgmt-users.properties)
 b) Application User (application-users.properties)
(a): b

Enter the details of the new user to add.
Using realm 'ApplicationRealm' as discovered from the existing property files.
Username : jmsuser
User 'jmsuser' already exists and is enabled, would you like to...
 a) Update the existing user password and roles
 b) Disable the existing user
 c) Type a new username
(a): a
Password recommendations are listed below. To modify these restrictions edit the add-user.properties configuration file.
 - The password should be different from the username
 - The password should not be one of the following restricted values {root, admin, administrator}
 - The password should contain at least 8 characters, 1 alphabetic character(s), 1 digit(s), 1 non-alphanumeric symbol(s)
Password :
Re-enter Password :
What groups do you want this user to belong to? (Please enter a comma separated list, or leave blank for none)[guest]: guest
Updated user 'jmsuser' to file '/Users/jsensharma/NotBackedUp/Installed/wildfly-10.0.0.CR3-SNAPSHOT/standalone/configuration/application-users.properties'
Updated user 'jmsuser' to file '/Users/jsensharma/NotBackedUp/Installed/wildfly-10.0.0.CR3-SNAPSHOT/domain/configuration/application-users.properties'
Updated user 'jmsuser' with groups guest to file '/Users/jsensharma/NotBackedUp/Installed/wildfly-10.0.0.CR3-SNAPSHOT/standalone/configuration/application-roles.properties'
Updated user 'jmsuser' with groups guest to file '/Users/jsensharma/NotBackedUp/Installed/wildfly-10.0.0.CR3-SNAPSHOT/domain/configuration/application-roles.properties'
Is this new user going to be used for one AS process to connect to another AS process?
e.g. for a slave host controller connecting to the master or for a Remoting connection for server to server EJB calls.
yes/no? yes
To represent the user add the following to the server-identities definition <secret value="am1zdXNlckAxMjM=" />
步骤三 使用JBoss CLI命令行实用程序创建一个简单的JMS队列。注意,JNDI名称应包含“java:/ / jboss / exported”前缀,否则JMS队列无法在远程查找。 这里您的队列名称为TestQ
$ cd /PATH/TO/JBoss-eap-7.0/bin
$ ./jboss-cli.sh -c

[standalone@localhost:9990 /] /subsystem=messaging-activemq/server=default/jms-queue=TestQ/:add(entries=["java:/jboss/exported/jms/queue/TestQ"])
  {"outcome" => "success"}

[standalone@localhost:9990 /] :reload
  {
    "outcome" => "success",
    "result" => undefined
  }
步骤4 现在检查你的 standalone.xml 文件,是否生成以下 XML 代码,如果没有生成,则复制以下代码并粘贴。
<subsystem xmlns="urn:jboss:domain:messaging-activemq:1.0">
    <server name="default">
        <security-setting name="#">
            <role name="guest" delete-non-durable-queue="true" create-non-durable-queue="true" consume="true" send="true"/>
        </security-setting>
        <address-setting name="#" message-counter-history-day-limit="10" page-size-bytes="2097152" max-size-bytes="10485760" expiry-address="jms.queue.ExpiryQueue" dead-letter-address="jms.queue.DLQ"/>
        <http-connector name="http-connector" endpoint="http-acceptor" socket-binding="http"/>
        <http-connector name="http-connector-throughput" endpoint="http-acceptor-throughput" socket-binding="http">
            <param name="batch-delay" value="50"/>
        </http-connector>
        <in-vm-connector name="in-vm" server-id="0"/>
        <http-acceptor name="http-acceptor" http-listener="default"/>
        <http-acceptor name="http-acceptor-throughput" http-listener="default">
            <param name="batch-delay" value="50"/>
            <param name="direct-deliver" value="false"/>
        </http-acceptor>
        <in-vm-acceptor name="in-vm" server-id="0"/>
        <jms-queue name="ExpiryQueue" entries="java:/jms/queue/ExpiryQueue"/>
        <jms-queue name="DLQ" entries="java:/jms/queue/DLQ"/>

        <!-- Newly added JMS Queue is Here -->
        <jms-queue name="TestQ" entries="java:/jboss/exported/jms/queue/TestQ"/>

        <connection-factory name="InVmConnectionFactory" entries="java:/ConnectionFactory" connectors="in-vm"/>
        <connection-factory name="RemoteConnectionFactory" entries="java:jboss/exported/jms/RemoteConnectionFactory" connectors="http-connector"/>
        <pooled-connection-factory name="activemq-ra" transaction="xa" entries="java:/JmsXA java:jboss/DefaultJMSConnectionFactory" connectors="in-vm"/>
    </server>
</subsystem>
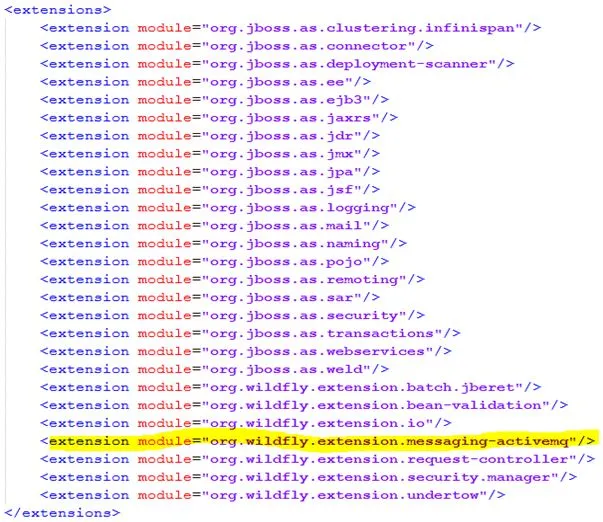
<extensions> 标签内不包含 <extension module="org.wildfly.extension.messaging-activemq"/>,则需要在 standalone.xml 文件中手动添加此内容。
步骤 5:
现在尝试访问管理控制台,以检查队列是否已添加。
URL - http://localhost:9990/console/App.html
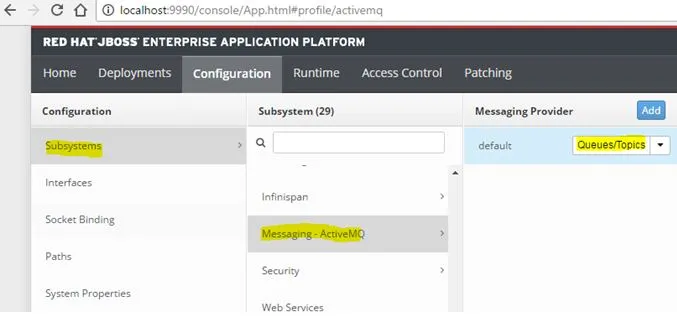
配置完成。
如何使用 JAVA 访问 JMS
正常 Standalone 程序所需的 Jars
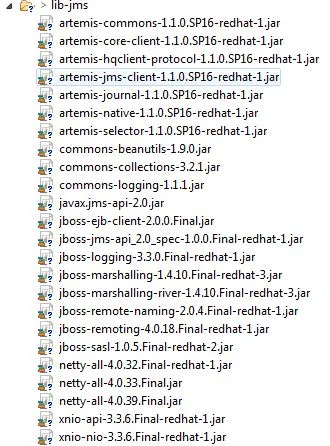
或者
Maven 项目所需的依赖 pom.xml
<?xml version="1.0" encoding="UTF-8" standalone="no"?>

<project xmlns="http://maven.apache.org/POM/4.0.0" xmlns:xsi="http://www.w3.org/2001/XMLSchema-instance" xsi:schemaLocation="http://maven.apache.org/POM/4.0.0 http://maven.apache.org/maven-v4_0_0.xsd">
    <modelVersion>4.0.0</modelVersion>
    <groupId>org.jboss.quickstarts.eap</groupId>
    <artifactId>jboss-helloworld-jms</artifactId>
    <version>7.0.0.GA</version>
    <packaging>jar</packaging>
    <name>JBoss EAP Quickstart: helloworld-jms</name>
    <description>helloworld-jms: Helloworld JMS external producer/consumer client</description>
    <url>http://www.jboss.org/products/eap</url>

    <licenses>
        <license>
            <name>Apache License, Version 2.0</name>
            <distribution>repo</distribution>
            <url>http://www.apache.org/licenses/LICENSE-2.0.html</url>
        </license>
    </licenses>

    <!-- Activate JBoss Product Maven repository.

        NOTE: Configuring the Maven repository in the pom.xml file is not a recommended procedure
        and is only done here to make it easier to use the quickstarts.

        For more information about how to configure Maven for your application,
        see the section entitled 'Use the Maven Repository'
        in the Development Guide for Red Hat JBoss Enterprise Application Platform located here:

        https://access.redhat.com/documentation/en/jboss-enterprise-application-platform/
    -->
    <repositories>
        <repository>
            <id>jboss-enterprise-maven-repository</id>
            <url>https://maven.repository.redhat.com/ga/</url>
            <releases>
                <enabled>true</enabled>
            </releases>
            <snapshots>
                <enabled>false</enabled>
            </snapshots>
        </repository>
    </repositories>

    <pluginRepositories>
        <pluginRepository>
            <id>jboss-enterprise-maven-repository</id>
            <url>https://maven.repository.redhat.com/ga/</url>
            <releases>
                <enabled>true</enabled>
            </releases>
            <snapshots>
                <enabled>false</enabled>
            </snapshots>
        </pluginRepository>
    </pluginRepositories>

    <properties>
        <!-- Explicitly declaring the source encoding eliminates the following message: -->
        <!-- [WARNING] Using platform encoding (UTF-8 actually) to copy filtered
            resources, i.e. build is platform dependent! -->
        <project.build.sourceEncoding>UTF-8</project.build.sourceEncoding>

        <!-- EAP component version management BOM -->
        <version.jboss.bom.eap>7.0.0.GA</version.jboss.bom.eap>

        <!-- WildFly Maven plug-in to deploy your WAR to a local JBoss EAP container -->
        <version.wildfly.maven.plugin>1.0.2.Final</version.wildfly.maven.plugin>

        <!-- other plug-in versions -->
        <version.jar.plugin>2.2</version.jar.plugin>
        <version.exec.plugin>1.2.1</version.exec.plugin>

        <!-- maven-compiler-plugin -->
        <maven.compiler.target>1.8</maven.compiler.target>
        <maven.compiler.source>1.8</maven.compiler.source>
    </properties>

    <dependencyManagement>
        <dependencies>
            <!-- JBoss distributes a complete set of Java EE APIs including a Bill
                of Materials (BOM). A BOM specifies the versions of a "stack" (or a collection)
                of artifacts. We use this here so that we always get the correct versions
                of artifacts. Here we use the jboss-eap-javaee7 stack (you can
                read this as the JBoss stack of the Java EE APIs and related components.  -->
            <dependency>
                <groupId>org.jboss.bom</groupId>
                <artifactId>jboss-eap-javaee7</artifactId>
                <version>${version.jboss.bom.eap}</version>
                <type>pom</type>
                <scope>import</scope>
            </dependency>
        </dependencies>
    </dependencyManagement>

    <dependencies>
        <dependency>
            <groupId>org.jboss.eap</groupId>
            <artifactId>wildfly-jms-client-bom</artifactId>
            <type>pom</type>
        </dependency>
    </dependencies>

    <build>
        <finalName>${project.artifactId}</finalName>
        <plugins>
            <plugin>
                <groupId>org.codehaus.mojo</groupId>
                <artifactId>exec-maven-plugin</artifactId>
                <version>${version.exec.plugin}</version>
                <configuration>
                    <mainClass>org.jboss.as.quickstarts.jms.HelloWorldJMSClient1</mainClass>
                    <systemProperties>
                        <systemProperty>
                            <key>java.logging.config.file</key>
                            <value>./helloworld-jms-logging.properties</value>
                        </systemProperty>
                    </systemProperties>
                </configuration>
            </plugin>
            <plugin>
                <artifactId>maven-jar-plugin</artifactId>
                <version>${version.jar.plugin}</version>
                <configuration>
                </configuration>
            </plugin>
            <!-- WildFly plug-in to deploy the WAR -->
            <plugin>
                <groupId>org.wildfly.plugins</groupId>
                <artifactId>wildfly-maven-plugin</artifactId>
                <version>${version.wildfly.maven.plugin}</version>
            </plugin>
        </plugins>
    </build>
</project>
HelloWorldJMSProducer.java
import java.util.Properties;
import java.util.logging.Logger;

import javax.jms.ConnectionFactory;
import javax.jms.Destination;
import javax.jms.JMSContext;
import javax.naming.Context;
import javax.naming.InitialContext;
import javax.naming.NamingException;

public class HelloWorldJMSProducer{

    private static final Logger log = Logger.getLogger(HelloWorldJMSProducer.class.getName());

    // Set up all the default values
    private static final String DEFAULT_MESSAGE = "Hello, World! successfull";
    private static final String DEFAULT_CONNECTION_FACTORY = "jms/RemoteConnectionFactory";
    private static final String DEFAULT_DESTINATION = "jms/queue/TestQ";
    private static final String DEFAULT_MESSAGE_COUNT = "1";
    private static final String DEFAULT_USERNAME = "jmsuser";
    private static final String DEFAULT_PASSWORD = "jmsuser@123";
    private static final String INITIAL_CONTEXT_FACTORY = "org.jboss.naming.remote.client.InitialContextFactory";
    private static final String PROVIDER_URL = "http-remoting://127.0.0.1:8888";

    public static void main(String[] args) {

        Context namingContext = null;

        try {
            String userName = System.getProperty("username", DEFAULT_USERNAME);
            String password = System.getProperty("password", DEFAULT_PASSWORD);

            // Set up the namingContext for the JNDI lookup
            final Properties env = new Properties();
            env.put(Context.INITIAL_CONTEXT_FACTORY, INITIAL_CONTEXT_FACTORY);
            env.put(Context.PROVIDER_URL, System.getProperty(Context.PROVIDER_URL, PROVIDER_URL));
            env.put(Context.SECURITY_PRINCIPAL, userName);
            env.put(Context.SECURITY_CREDENTIALS, password);
            namingContext = new InitialContext(env);

            // Perform the JNDI lookups
            String connectionFactoryString = System.getProperty("connection.factory", DEFAULT_CONNECTION_FACTORY);
            ConnectionFactory connectionFactory = (ConnectionFactory) namingContext.lookup(connectionFactoryString);

            String destinationString = System.getProperty("destination", DEFAULT_DESTINATION);
            Destination destination = (Destination) namingContext.lookup(destinationString);

            int count = Integer.parseInt(System.getProperty("message.count", DEFAULT_MESSAGE_COUNT));
            String content = System.getProperty("message.content", DEFAULT_MESSAGE);

            try (JMSContext context = connectionFactory.createContext(userName, password)) {
                // Send the specified number of messages
                for (int i = 0; i < count; i++) {
                    context.createProducer().send(destination, content);
                }

                System.out.println("Sent...");
            }
        } catch (NamingException e) {
            e.printStackTrace();
            log.severe(e.getMessage());
        } finally {
            if (namingContext != null) {
                try {
                    namingContext.close();
                } catch (NamingException e) {
                    log.severe(e.getMessage());
                }
            }
        }
    }
}
HelloWorldJMSConsumer.java
import java.util.Properties;
import java.util.logging.Logger;

import javax.jms.ConnectionFactory;
import javax.jms.Destination;
import javax.jms.JMSConsumer;
import javax.jms.JMSContext;
import javax.naming.Context;
import javax.naming.InitialContext;
import javax.naming.NamingException;

public class HelloWorldJMSConsumer {

    private static final Logger log = Logger.getLogger(HelloWorldJMSConsumer.class.getName());

    // Set up all the default values
    private static final String DEFAULT_CONNECTION_FACTORY = "jms/RemoteConnectionFactory";
    private static final String DEFAULT_DESTINATION = "jms/queue/TestQ";
    private static final String DEFAULT_USERNAME = "jmsuser";
    private static final String DEFAULT_PASSWORD = "jmsuser@123";
    private static final String INITIAL_CONTEXT_FACTORY = "org.jboss.naming.remote.client.InitialContextFactory";
    private static final String PROVIDER_URL = "http-remoting://127.0.0.1:8888";

    public static void main(String[] args) {

        Context namingContext = null;

        try {
            String userName = System.getProperty("username", DEFAULT_USERNAME);
            String password = System.getProperty("password", DEFAULT_PASSWORD);

            // Set up the namingContext for the JNDI lookup
            final Properties env = new Properties();
            env.put(Context.INITIAL_CONTEXT_FACTORY, INITIAL_CONTEXT_FACTORY);
            env.put(Context.PROVIDER_URL, System.getProperty(Context.PROVIDER_URL, PROVIDER_URL));
            env.put(Context.SECURITY_PRINCIPAL, userName);
            env.put(Context.SECURITY_CREDENTIALS, password);
            namingContext = new InitialContext(env);

            // Perform the JNDI lookups
            String connectionFactoryString = System.getProperty("connection.factory", DEFAULT_CONNECTION_FACTORY);
            ConnectionFactory connectionFactory = (ConnectionFactory) namingContext.lookup(connectionFactoryString);

            String destinationString = System.getProperty("destination", DEFAULT_DESTINATION);
            Destination destination = (Destination) namingContext.lookup(destinationString);

            try (JMSContext context = connectionFactory.createContext(userName, password)) {
                System.out.println("Received...");
                // Create the JMS consumer
                JMSConsumer consumer = context.createConsumer(destination);
                // Then receive the same number of messages that were sent
                for (int i = 0; i < count; i++) {
                    String text = consumer.receiveBody(String.class, 5000);
                    System.out.println(text);
                }

            }
        } catch (NamingException e) {
            e.printStackTrace();
            log.severe(e.getMessage());
        } finally {
            if (namingContext != null) {
                try {
                    namingContext.close();
                } catch (NamingException e) {
                    log.severe(e.getMessage());
                }
            }
        }
    }
}
./standalone.sh -c standalone-full.xml - smftr