Flutter:使用Navigator在推出新屏幕时保留BottomNavigationBar

57
在iOS中,我们有一个UITabBarController,当我们推到新的ViewController时,它会永久停留在屏幕底部。
在Flutter中,我们有一个Scaffold的bottomNavigationBar。但是,与iOS不同的是,当我们Navigator.push到一个新的屏幕时,这个bottomNavigationBar会消失。
在我的应用程序中,我想要实现这个要求:主屏幕有一个带有2个项目(ab)的bottomNavigationBar,呈现屏幕AB。默认情况下,显示屏幕A。在屏幕A内,有一个按钮。点击该按钮,Navigator.push到屏幕C。现在在屏幕C中,我们仍然可以看到bottomNavigationBar。点击b项目,在屏幕B中,再次点击bottomNavigationBar中的a项目,回到屏幕C(而不是AA当前位于导航层次结构下方)。
我该如何做到这一点?谢谢大家。
编辑:我包括一些演示图片:
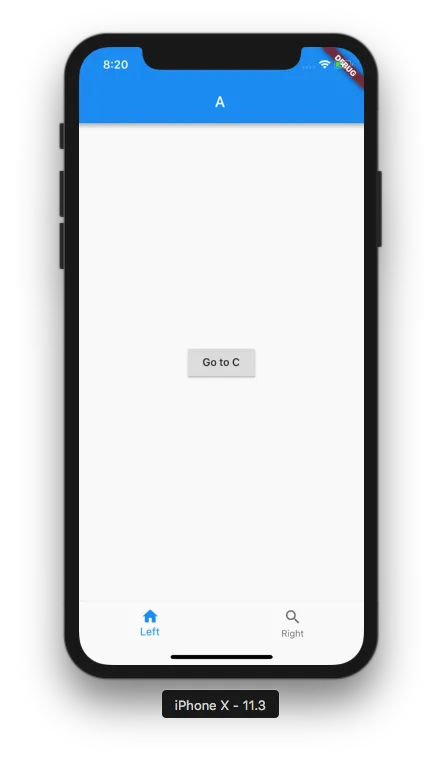
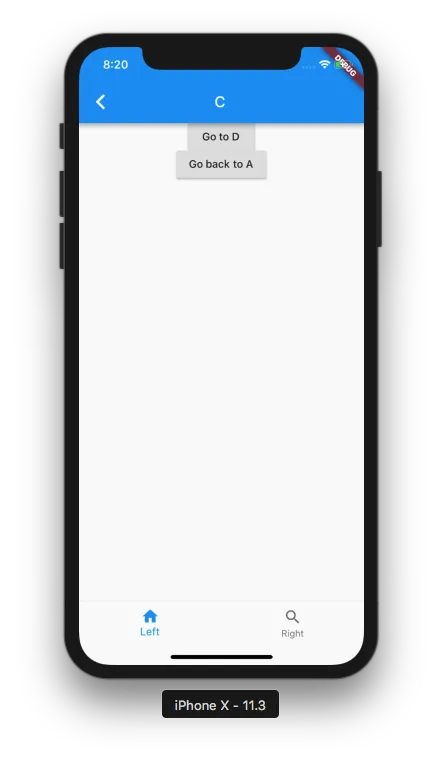
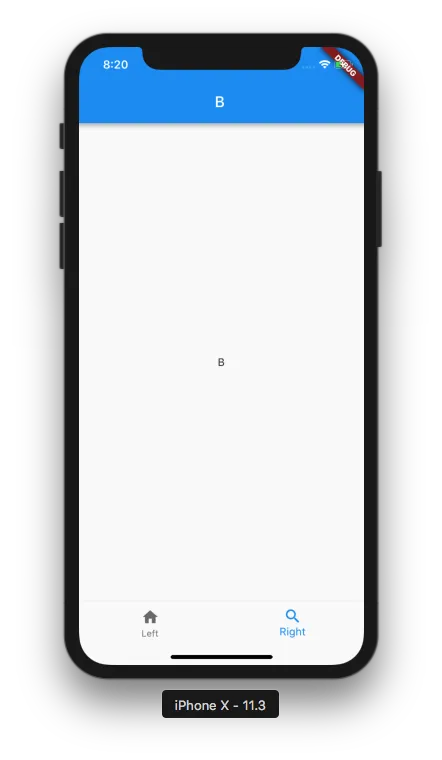
屏幕AScreen A 点击Go to C按钮,推到屏幕CScreen C 点击底部导航栏中的Right项目,进入屏幕BScreen B

你所说的 button 是不是在 BottomNavigationBar 里面? - Rémi Rousselet
不,按钮不在底部栏中。它在主屏幕内部。它只是用来触发“Navigator”推到新屏幕的东西。 - harry
2
我认为这更像是一个用户体验问题。因为你的 C 视图不应该有底部导航栏。或者,C 应该可以从底部栏中访问。 - Rémi Rousselet
同一层次结构中的屏幕能够拥有底部导航栏是很常见的,以 Twitter 为例(请打开 iOS Twitter 应用程序),点击一条推文,TweetViewController 就会被推出,底部栏仍然可见。我认为几乎所有流行的应用程序都具有这种行为。 - harry
1
我同意Harry的观点,这在iOS中是相当常见的事情。说实话,Flutter动画整个屏幕的方式实际上有点违反iOS处理导航栏的方式 - 尽管iOS在执行“模态弹出”类型屏幕时会覆盖导航栏。 - rmtmckenzie
使用persistent_bottom_nav_bar包,您可以维护各个选项卡的导航路线,并且当用户导航到任何屏幕时,BottomNavigationBar不会消失。 - 0917237
9个回答

45

截图:

在此输入图片描述


起点:

void main() => runApp(MaterialApp(home: HomePage()));

主页 [底部导航栏 + 页面1]

class HomePage extends StatelessWidget {
  @override
  Widget build(BuildContext context) {
    return Scaffold(
      bottomNavigationBar: BottomNavigationBar(
        backgroundColor: Colors.orange,
        items: [
          BottomNavigationBarItem(icon: Icon(Icons.call), label: 'Call'),
          BottomNavigationBarItem(icon: Icon(Icons.message), label: 'Message'),
        ],
      ),
      body: Navigator(
        onGenerateRoute: (settings) {
          Widget page = Page1();
          if (settings.name == 'page2') page = Page2();
          return MaterialPageRoute(builder: (_) => page);
        },
      ),
    );
  }
}

第一页:

class Page1 extends StatelessWidget {
  @override
  Widget build(BuildContext context) {
    return Scaffold(
      appBar: AppBar(title: Text('Page1')),
      body: Center(
        child: RaisedButton(
          onPressed: () => Navigator.pushNamed(context, 'page2'),
          child: Text('Go to Page2'),
        ),
      ),
    );
  }
}

第二页:

class Page2 extends StatelessWidget {
  @override
  Widget build(BuildContext context) => Scaffold(appBar: AppBar(title: Text('Page2')));
}

4
运作得很好。非常感谢。 - ThomasThiebaud
1
找不到RouteSettings路由的生成器。 - Guilherme Ferreira
3
还有如何在没有底部导航栏的情况下浏览某些屏幕,你也能解释一下吗? - Waqas Younis
2
你可以使用根导航器:Navigator.of(context, rootNavigator: true).pushFunction(...),但你还需要在根中配置路由,例如在MaterialApp中设置routes属性。 - batangaming
2
@KunYuTsai 在 BottomNavigationBar 小部件中添加 onChanged 属性,使用索引来跟踪当前页面,然后使用 if-else 条件语句来选择要显示的小部件。 - CopsOnRoad
显示剩余8条评论

34

简而言之:使用CupertinoTabBarCupertinoTabScaffold

问题不在Flutter中,而是在用户体验上,就像Rémi Rousselet所提到的那样。

事实证明,Material Design不建议在层次结构中使用子页面来访问底部导航栏。

然而,iOS人机界面指南推荐这样做。因此,为了使用这个功能,我必须使用Cupertino小部件而不是Material小部件。具体来说,在main函数中,返回一个包含的WidgetsApp/MaterialApp。 使用实现选项卡栏,并将每个屏幕作为。


Material Design现在建议在子页面中进行导航,参见https://github.com/flutter/flutter/issues/16221和https://material.io/components/bottom-navigation#behavior。但这还没有被实现... - giorgio79
现在已经实现了吗?我仍然只能找到笨拙的解决方法或使用第三方包。 - MwBakker

7
如果想要保留底部导航栏,只需要从主页面的body中返回一个Navigator,并为每个路由传递一个唯一的键值。
import 'package:bottomnavigation_sample/page1.dart';
import 'package:bottomnavigation_sample/page2.dart';
import 'package:bottomnavigation_sample/page3.dart';
import 'package:flutter/material.dart';

void main() {
  runApp(const MyApp());
}

class MyApp extends StatelessWidget {
  const MyApp({Key? key}) : super(key: key);

  @override
  Widget build(BuildContext context) {
    return MaterialApp(
      title: 'Flutter Demo',
      theme: ThemeData(
        primarySwatch: Colors.blue,
      ),
      home: const MyHomePage(title: 'Flutter Demo Home Page'),
    );
  }
}

class MyHomePage extends StatefulWidget {
  const MyHomePage({Key? key, required this.title}) : super(key: key);
  final String title;

  @override
  State<MyHomePage> createState() => _MyHomePageState();
}

class _MyHomePageState extends State<MyHomePage> {
  int _selectedIndex = 0;
  Map<int, GlobalKey<NavigatorState>> navigatorKeys = {
     0: GlobalKey<NavigatorState>(),
     1: GlobalKey<NavigatorState>(),
     2: GlobalKey<NavigatorState>(),
  };
    final List<Widget> _widgetOptions = <Widget>[
    const page1(),
    const page2(),
    const page3()
  ];

  void _onItemTapped(int index) {
    setState(() {
      _selectedIndex = index;
    });
  }

  @override
  Widget build(BuildContext context) {
    return Scaffold(
      appBar: AppBar(
        title: Text(widget.title),
      ),
       bottomNavigationBar: BottomNavigationBar(
         items: const <BottomNavigationBarItem>[
           BottomNavigationBarItem(
             icon: Icon(Icons.home),
             label: 'Home',
           ),
           BottomNavigationBarItem(
             icon: Icon(Icons.business),
             label: 'Business',
           ),
           BottomNavigationBarItem(
             icon: Icon(Icons.school),
             label: 'School',
           ),
         ],
         currentIndex: _selectedIndex,
         selectedItemColor: Colors.amber[800],
         onTap: _onItemTapped,
       ),
      body:  buildNavigator(),
    );
  }

   buildNavigator() {
     return Navigator(
       key: navigatorKeys[_selectedIndex],
       onGenerateRoute: (RouteSettings settings){
         return MaterialPageRoute(builder: (_) => _widgetOptions.elementAt(_selectedIndex));
       },
     );
  }
}

4

选项1:如果您只想保留BottomNavigationBar,请尝试使用此方法

选项2:对于静态的BottomNavigationBar,可以使用如下所示的CupertinoTabBar

import 'package:flutter/cupertino.dart';
import 'package:flutter/material.dart';
import 'package:mqttdemo/Screen2.dart';
import 'package:mqttdemo/Screen3.dart';

import 'Screen1.dart';

class Home extends StatefulWidget {
  @override
  _HomeState createState() => _HomeState();
}

class _HomeState extends State<Home> {
  int _currentIndex;
  List<Widget> _children;

  @override
  void initState() {
    _currentIndex = 0;
    _children = [
      Screen1(),
      Screen2(),
      Screen3(),
    ];
    super.initState();
  }

  @override
  Widget build(BuildContext context) {
    return CupertinoTabScaffold(
      tabBar: CupertinoTabBar(
        currentIndex: _currentIndex,
        onTap: onTabTapped,
        items: [
          BottomNavigationBarItem(
            icon: Icon(Icons.home),
            title: Text("Screen 1"),
          ),
          BottomNavigationBarItem(
            icon: Icon(Icons.home),
            title: Text("Screen 2"),
          ),
          BottomNavigationBarItem(
              icon: Icon(Icons.home), title: Text("Screen 3")),
        ],

      ),
        tabBuilder: (BuildContext context, int index) {
          return CupertinoTabView(
            builder: (BuildContext context) {
              return SafeArea(
                top: false,
                bottom: false,
                child: CupertinoApp(
                  home: CupertinoPageScaffold(
                    resizeToAvoidBottomInset: false,
                    child: _children[_currentIndex],
                  ),
                ),
              );
            },
          );
        }
    );
  }

  void onTabTapped(int index) {
    setState(() {
      _currentIndex = index;
    });
  }
}

按照下面所示的方法,从屏幕3导航到屏幕4:

    class Screen3 extends StatefulWidget {
      @override
      _Screen3State createState() => _Screen3State();
    }
    
    class _Screen3State extends State<Screen3> {
      @override
      Widget build(BuildContext context) {
        return Container(
          color: Colors.black,
          child: Center(
            child: RaisedButton(
              child: Text("Click me"),
              onPressed: () {
                Navigator.of(context, rootNavigator: false).push(MaterialPageRoute(
                    builder: (context) => Screen4(), maintainState: false));
              },
            ),
          ),
        );
      }

}

3
您可以在Stack小部件中创建Navigator小部件,以使用带有选项卡内导航的BottomNavigationBar。 您可以使用WillPopScope处理Android的返回按钮以弹出选项卡的内部屏幕。 另外,双击底部导航栏项目可弹出选项卡的所有内部屏幕。
我已经为此创建了一个示例应用程序
希望这能帮到您!

3

你实际上可以在body标签内部放置一个占位符,使结构像这样

- AppBar
- body (dynamic content from placeholder)
- BottomNavigationBar

然后您需要有另一个类作为占位符,这样每次点击BottomNavigationBar时它都会刷新正文内容。

我找到的一个例子在这里 https://willowtreeapps.com/ideas/how-to-use-flutter-to-build-an-app-with-bottom-navigation

还有这个,但有点复杂,对我来说不起作用 https://medium.com/@swav.kulinski/flutter-navigating-off-the-charts-e118562a36a5

以及这个 https://medium.com/coding-with-flutter/flutter-case-study-multiple-navigators-with-bottomnavigationbar-90eb6caa6dbf


2
另一种实现方式是(虽然这不是一个好的做法)将Material App嵌套在您的Scaffold主体中,并在那里处理所有“子导航”。因此,你的层级结构将如下所示:
Material App
  - home
     - Scaffold
       - body
         - Material App
              - Scaffold
                  - AppBar
                  - body
                  ...
         - routes (internal)
       - bottomNavigationBar
  - routes (external)

我尝试过这个方法,完美运行。不幸的是,我现在无法发布源代码。


如果您不介意的话,我在我的情况下也遇到了同样的问题,请帮忙看一下。 - LearnFlutter

1

我认为正确的做法是在两种情况下都使用相同标记包装BottomNavigationBar,以Hero的形式呈现。这样,在页面之间的动画发生时,它们将被排除。

这只是一个简短的示例,但我强烈建议进行清理,即传递hero字符串,使用小部件而不是大块的构建,为BottomNavigationBar创建自己的小部件。

请注意,在hero转换期间,在我的手机上它会溢出0.0000191像素,但在发布模式下,我认为这不应该是问题。

import 'package:flutter/material.dart';

void main() => runApp(new MaterialApp(
      home: new Builder(
        builder: (context) => new Scaffold(
              bottomNavigationBar: new Hero(
                tag: "bottomNavigationBar",
                child: new BottomNavigationBar(items: [
                  new BottomNavigationBarItem(icon: new Icon(Icons.home), title: new Text("Home")),
                  new BottomNavigationBarItem(icon: new Icon(Icons.ac_unit), title: new Text("AC Unit"))
                ]),
              ),
              body: new SafeArea(
                child: new Container(
                  constraints: new BoxConstraints.expand(),
                  color: Colors.green,
                  child: new Column(
                    children: <Widget>[
                      new RaisedButton(
                          child: new Text("Press me"),
                          onPressed: () {
                            Navigator.push(
                                context,
                                new MaterialPageRoute(
                                    builder: (context) => new Scaffold(
                                          bottomNavigationBar: new Hero(
                                            tag: "bottomNavigationBar",
                                            child: new BottomNavigationBar(items: [
                                              new BottomNavigationBarItem(icon: new Icon(Icons.home), title: new Text("Home")),
                                              new BottomNavigationBarItem(icon: new Icon(Icons.ac_unit), title: new Text("AC Unit"))
                                            ]),
                                          ),
                                          body: new SafeArea(
                                            child: new Container(
                                              constraints:
                                                  new BoxConstraints.expand(),
                                              color: Colors.red,
                                              child: new Column(
                                                children: <Widget>[
                                                  new RaisedButton(
                                                    onPressed: () =>
                                                        Navigator.pop(context),
                                                    child: new Text("Back"),
                                                  )
                                                ],
                                              ),
                                            ),
                                          ),
                                        )));
                          })
                    ],
                  ),
                ),
              ),
            ),
      ),
    ));

我不知道hero系统如何处理多个英雄等情况,如果您想要动画导航栏,可能效果不佳。
还有另一种方法可以允许您动画底部导航栏;实际上,这已经是一个被回答过的问题了:Flutter: Hero transition + widget animation at the same time?

0

使用 GoRouter (https://pub.dev/packages/go_router) 作为导航时非常容易。 它有一个 ShellRoute 选项 - 您可以使用此 Shell 包装您希望具有持久导航栏(或任何其他元素,如应用栏和其他)的路由。 https://www.youtube.com/watch?v=b6Z885Z46cU

示例:

ShellRoute(
      builder: (context, state, child) {
        return BottomNavigationPage(
          child: child,
        );
      },
      routes: [
        GoRoute(
          path: '/home',
          builder: (BuildContext context, GoRouterState state) {
            return const HomePage();
          },
        ),
        GoRoute(
          path: '/settings',
          builder: (BuildContext context, GoRouterState state) {
            return const SettingsPage();
          },
        ),
      ],
    ),

网页内容由stack overflow 提供, 点击上面的
可以查看英文原文,
原文链接