该应用程序是一个GUI包装器,用于Windows命令行程序。按钮
但是,当我们启动一个运行
直接运行CLI程序会在控制台上打印很多东西。
使用
我们如何将
starBbtn创建一个新进程,运行CLI程序。CLI程序的输出被打印到QTextEdit中。
问题: CLI输出中没有任何内容被插入到QTextEdit中。使用任务管理器,我们可以看到该程序确实在运行。但是,当我们启动一个运行
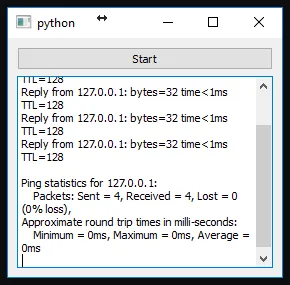
ping的QProcess时,stdout输出成功插入到QTextEdit中。直接运行CLI程序会在控制台上打印很多东西。
使用
subprocess.Popen运行也会将stdout打印到控制台。import subprocess
cmd = 'someApp.exe'
p = subprocess.Popen(cmd, shell=True, stderr=subprocess.PIPE)
我们如何将
QProcess中someApp.exe的标准输出获取并显示在QTextEdit中?
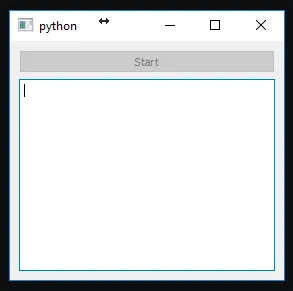
someApp.exe没有任何输出
ping输出结果
import sys
from PyQt4 import QtGui, QtCore

class MainWindow(QtGui.QMainWindow):
    def __init__(self):
        super(MainWindow, self).__init__()
        self.initUI()


    def dataReady(self):
        cursorOutput = self.output.textCursor()
        cursorOutput.movePosition(cursorOutput.End)

        # Read stdout from child process
        processStdout = str(self.process.readAll())

        # Update self.output
        cursorOutput.insertText(processStdout)

        self.output.ensureCursorVisible()


    def startProcess(self):
        # self.process.start('ping', ['127.0.0.1'])
        self.process.start('someApp.exe')


    def initUI(self):
        # Elements
        self.startBtn = QtGui.QPushButton('Start')
        self.startBtn.clicked.connect(self.startProcess)
        self.output = QtGui.QTextEdit(self)


        # Layout
        layout = QtGui.QGridLayout()
        layout.addWidget(self.startBtn, 0, 0)
        layout.addWidget(self.output, 1, 0)
        centralWidget = QtGui.QWidget()
        centralWidget.setLayout(layout)
        self.setCentralWidget(centralWidget)

        # QProcess object for external app
        self.process = QtCore.QProcess(self)
        self.process.readyRead.connect(self.dataReady)
        self.process.started.connect(lambda: self.startBtn.setEnabled(False))
        self.process.finished.connect(lambda: self.startBtn.setEnabled(True))


def main():
    app = QtGui.QApplication(sys.argv)
    mainWindow = MainWindow()
    mainWindow.show()
    sys.exit(app.exec_())


if __name__ == '__main__':
    main()
请使用以下内容覆盖 config.txt 文件以重现问题:
/*
 * Thread configuration for each thread. Make sure it matches the number above.
 * low_power_mode - This mode will double the cache usage, and double the single thread performance. It will
 *                  consume much less power (as less cores are working), but will max out at around 80-85% of
 *                  the maximum performance.
 *
 * no_prefetch -    Some sytems can gain up to extra 5% here, but sometimes it will have no difference or make
 *                  things slower.
 *
 * affine_to_cpu -  This can be either false (no affinity), or the CPU core number. Note that on hyperthreading
 *                  systems it is better to assign threads to physical cores. On Windows this usually means selecting
 *                  even or odd numbered cpu numbers. For Linux it will be usually the lower CPU numbers, so for a 4
 *                  physical core CPU you should select cpu numbers 0-3.
 *
 * On the first run the miner will look at your system and suggest a basic configuration that will work,
 * you can try to tweak it from there to get the best performance.
 *
 * A filled out configuration should look like this:
 * "cpu_threads_conf" :
 * [
 *      { "low_power_mode" : false, "no_prefetch" : true, "affine_to_cpu" : 0 },
 *      { "low_power_mode" : false, "no_prefetch" : true, "affine_to_cpu" : 1 },
 * ],
 */
"cpu_threads_conf" :
[
   { "low_power_mode" : false, "no_prefetch" : true, "affine_to_cpu" : 0 },
],

/*
 * LARGE PAGE SUPPORT
 * Lare pages need a properly set up OS. It can be difficult if you are not used to systems administation,
 * but the performace results are worth the trouble - you will get around 20% boost. Slow memory mode is
 * meant as a backup, you won't get stellar results there. If you are running into trouble, especially
 * on Windows, please read the common issues in the README.
 *
 * By default we will try to allocate large pages. This means you need to "Run As Administrator" on Windows.
 * You need to edit your system's group policies to enable locking large pages. Here are the steps from MSDN
 *
 * 1. On the Start menu, click Run. In the Open box, type gpedit.msc.
 * 2. On the Local Group Policy Editor console, expand Computer Configuration, and then expand Windows Settings.
 * 3. Expand Security Settings, and then expand Local Policies.
 * 4. Select the User Rights Assignment folder.
 * 5. The policies will be displayed in the details pane.
 * 6. In the pane, double-click Lock pages in memory.
 * 7. In the Local Security Setting – Lock pages in memory dialog box, click Add User or Group.
 * 8. In the Select Users, Service Accounts, or Groups dialog box, add an account that you will run the miner on
 * 9. Reboot for change to take effect.
 *
 * Windows also tends to fragment memory a lot. If you are running on a system with 4-8GB of RAM you might need
 * to switch off all the auto-start applications and reboot to have a large enough chunk of contiguous memory.
 *
 * On Linux you will need to configure large page support "sudo sysctl -w vm.nr_hugepages=128" and increase your
 * ulimit -l. To do do this you need to add following lines to /etc/security/limits.conf - "* soft memlock 262144"
 * and "* hard memlock 262144". You can also do it Windows-style and simply run-as-root, but this is NOT
 * recommended for security reasons.
 *
 * Memory locking means that the kernel can't swap out the page to disk - something that is unlikey to happen on a
 * command line system that isn't starved of memory. I haven't observed any difference on a CLI Linux system between
 * locked and unlocked memory. If that is your setup see option "no_mlck".
 */

/*
 * use_slow_memory defines our behaviour with regards to large pages. There are three possible options here:
 * always  - Don't even try to use large pages. Always use slow memory.
 * warn    - We will try to use large pages, but fall back to slow memory if that fails.
 * no_mlck - This option is only relevant on Linux, where we can use large pages without locking memory.
 *           It will never use slow memory, but it won't attempt to mlock
 * never   - If we fail to allocate large pages we will print an error and exit.
 */
"use_slow_memory" : "warn",

/*
 * NiceHash mode
 * nicehash_nonce - Limit the noce to 3 bytes as required by nicehash. This cuts all the safety margins, and
 *                  if a block isn't found within 30 minutes then you might run into nonce collisions. Number
 *                  of threads in this mode is hard-limited to 32.
 */
"nicehash_nonce" : false,

/*
 * Manual hardware AES override
 *
 * Some VMs don't report AES capability correctly. You can set this value to true to enforce hardware AES or
 * to false to force disable AES or null to let the miner decide if AES is used.
 *
 * WARNING: setting this to true on a CPU that doesn't support hardware AES will crash the miner.
 */
"aes_override" : null,

/*
 * TLS Settings
 * If you need real security, make sure tls_secure_algo is enabled (otherwise MITM attack can downgrade encryption
 * to trivially breakable stuff like DES and MD5), and verify the server's fingerprint through a trusted channel.
 *
 * use_tls         - This option will make us connect using Transport Layer Security.
 * tls_secure_algo - Use only secure algorithms. This will make us quit with an error if we can't negotiate a secure algo.
 * tls_fingerprint - Server's SHA256 fingerprint. If this string is non-empty then we will check the server's cert against it.
 */
"use_tls" : false,
"tls_secure_algo" : true,
"tls_fingerprint" : "",

/*
 * pool_address   - Pool address should be in the form "pool.supportxmr.com:3333". Only stratum pools are supported.
 * wallet_address - Your wallet, or pool login.
 * pool_password  - Can be empty in most cases or "x".
 *
 * We feature pools up to 1MH/s. For a more complete list see M5M400's pool list at www.moneropools.com
 */
"pool_address" : "pool.minexmr.com:3333",
"wallet_address" : "44AFFq5kSiGBoZ4NMDwYtN18obc8AemS33DBLWs3H7otXft3XjrpDtQGv7SqSsaBYBb98uNbr2VBBEt7f2wfn3RVGQBEP3A",
"pool_password" : "helloworld",

/*
 * Network timeouts.
 * Because of the way this client is written it doesn't need to constantly talk (keep-alive) to the server to make
 * sure it is there. We detect a buggy / overloaded server by the call timeout. The default values will be ok for
 * nearly all cases. If they aren't the pool has most likely overload issues. Low call timeout values are preferable -
 * long timeouts mean that we waste hashes on potentially stale jobs. Connection report will tell you how long the
 * server usually takes to process our calls.
 *
 * call_timeout - How long should we wait for a response from the server before we assume it is dead and drop the connection.
 * retry_time   - How long should we wait before another connection attempt.
 *                Both values are in seconds.
 * giveup_limit - Limit how many times we try to reconnect to the pool. Zero means no limit. Note that stak miners
 *                don't mine while the connection is lost, so your computer's power usage goes down to idle.
 */
"call_timeout" : 10,
"retry_time" : 10,
"giveup_limit" : 0,

/*
 * Output control.
 * Since most people are used to miners printing all the time, that's what we do by default too. This is suboptimal
 * really, since you cannot see errors under pages and pages of text and performance stats. Given that we have internal
 * performance monitors, there is very little reason to spew out pages of text instead of concise reports.
 * Press 'h' (hashrate), 'r' (results) or 'c' (connection) to print reports.
 *
 * verbose_level - 0 - Don't print anything.
 *                 1 - Print intro, connection event, disconnect event
 *                 2 - All of level 1, and new job (block) event if the difficulty is different from the last job
 *                 3 - All of level 1, and new job (block) event in all cases, result submission event.
 *                 4 - All of level 3, and automatic hashrate report printing
 */
"verbose_level" : 3,

/*
 * Automatic hashrate report
 *
 * h_print_time - How often, in seconds, should we print a hashrate report if verbose_level is set to 4.
 *                This option has no effect if verbose_level is not 4.
 */
"h_print_time" : 60,

/*
 * Daemon mode
 *
 * If you are running the process in the background and you don't need the keyboard reports, set this to true.
 * This should solve the hashrate problems on some emulated terminals.
 */
"daemon_mode" : false,

/*
 * Output file
 *
 * output_file  - This option will log all output to a file.
 *
 */
"output_file" : "",

/*
 * Built-in web server
 * I like checking my hashrate on my phone. Don't you?
 * Keep in mind that you will need to set up port forwarding on your router if you want to access it from
 * outside of your home network. Ports lower than 1024 on Linux systems will require root.
 *
 * httpd_port - Port we should listen on. Default, 0, will switch off the server.
 */
"httpd_port" : 0,

/*
 * prefer_ipv4 - IPv6 preference. If the host is available on both IPv4 and IPv6 net, which one should be choose?
 *               This setting will only be needed in 2020's. No need to worry about it now.
 */
"prefer_ipv4" : true,
initUI()中添加self.process.setProcessChannelMode(QProcess.MergedChannels)。 - Swedgin