使用CIFilter和CISpotColor正确地过滤NSImage/CIImage

6
请注意:这是在Mac OSX上运行的Cocoa命令行应用程序,而不是iOS应用程序。
我正在尝试理解苹果为CISpotColor过滤器(使用CIFilter)提供的Limited Documentation,但遇到了一些困难。

简而言之;

1) 是否有更多关于CIFilter的文档,特别是关于CISpotColor的?

2) 鉴于我想要实现的目标(如下图所示,但简单来说:用白色替换所有“看起来不红”的东西,并强制所有“看起来红色(ish)”的东西变成纯红色或黑色),CISpotColor是否是我应该使用的正确滤镜?

3) 如果不是,您建议使用哪些滤镜(或者我应该尝试编写自定义的滤镜)?

4) 如果CISSpotColor是正确的滤镜,那么我应该使用什么参数来实现我的目标。如果我需要使用多个CISpotColor CIFilter的通道,那也没关系,我不希望你为我编码,只需指引我方向即可。


以上问题的更多细节和背景:

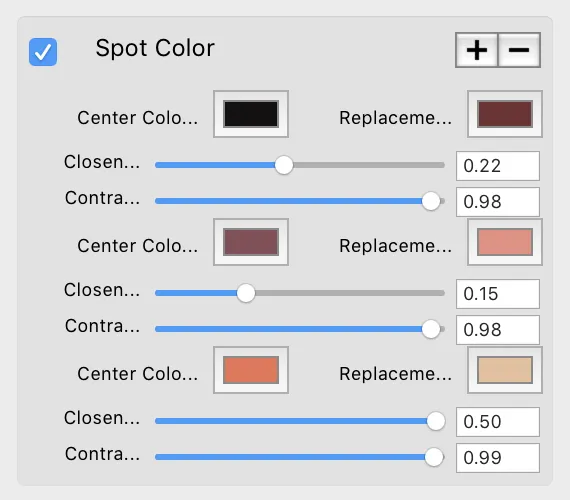
上面链接提供了一系列参数、一些默认值以及一个示例的前后图片,但没有生成示例后图像的样本代码,并且没有解释这些参数实际意义或它们的有效范围。

说实话,我不完全确定CISpotColor是我需要的过滤器,除了它的名称和句子“使用专色替换一个或多个颜色范围”之外,没有解释它是如何做到的。

由于它似乎描述了我所需要的过滤器,我选择它作为开始学习如何使用这种方式处理过滤器的起点。
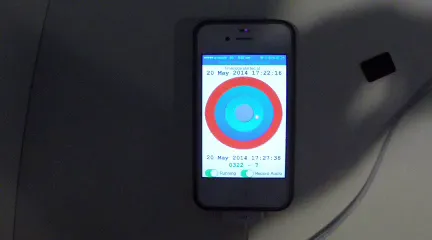
输入图片(视频帧) enter image description here

期望输出(选项1 - 纯红色 - 使用GIMP创建) enter image description here

期望的输出(选项2-纯黑色-也是使用GIMP创建的)
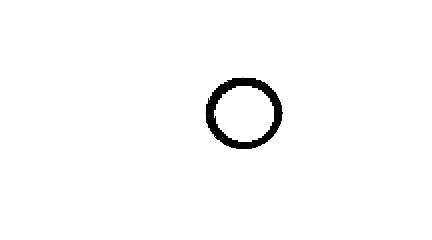
 enter image description here

我的代码输出(请参见下面的清单) enter image description here

这接近我所需要的,但似乎没有考虑到原始图像中灰色或“白色”的区域将具有类似数量的红色、绿色和蓝色,而不是主要是红色,这会使它“看起来是红色的”。如果它过滤掉右下角看到的区域,那就可以使用它,因为显然只包括一些红色像素(以及一些绿色和蓝色),使其在原始图像中普遍呈灰色。

以下是用于Cocoa命令行应用程序(Mac OSX)的完整“main.m”

#import <Foundation/Foundation.h>
#import <CoreGraphics/CoreGraphics.h>
#import <AppKit/AppKit.h>
#import <QuartzCore/QuartzCore.h>


@interface NSImage(saveAsJpegWithName)
- (void) saveAsPNGWithName:(NSString*) fileName;
- (NSImage*) filterEverythingButRed ;
@end

@implementation NSImage(saveAsJpegWithName)

- (void) saveAsPNGWithName:(NSString*) fileName
{
    NSData *imageData = [self TIFFRepresentation];
    NSBitmapImageRep *imageRep = [NSBitmapImageRep imageRepWithData:imageData];
    NSDictionary *imageProps = nil;
    imageData = [imageRep representationUsingType:NSPNGFileType properties:imageProps];
    [imageData writeToFile:fileName atomically:NO];
}

-(NSImage*) filterEverythingButRed {

    CIImage *inputImage = [[CIImage alloc] initWithData:[self TIFFRepresentation]];

    CIFilter *hf = [CIFilter filterWithName:@"CISpotColor"];
    [hf setDefaults];
    [hf setValue:inputImage forKey:@"inputImage"];
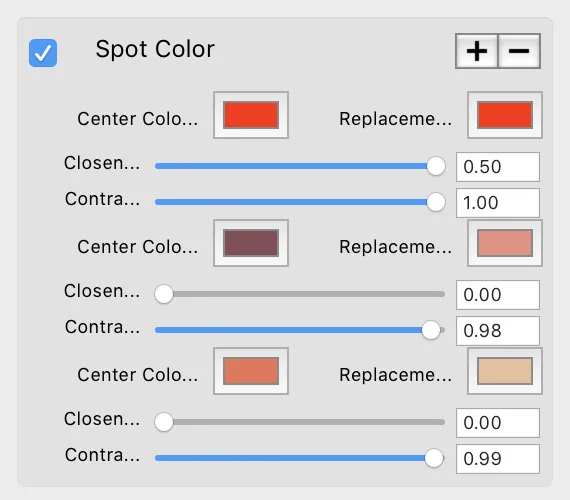
    [hf setValue:[CIColor colorWithRed:1.0 green:0.0 blue:0.0] forKey: @"inputCenterColor1"];
    [hf setValue:[CIColor colorWithRed:1.0 green:0.0 blue:0.0] forKey: @"inputReplacementColor1"];
    [hf setValue:[NSNumber numberWithFloat:0.1] forKey: @"inputCloseness1"];
    [hf setValue:[NSNumber numberWithFloat:1.0] forKey: @"inputContrast1"];

    CIImage *outputImage = [hf valueForKey: @"outputImage"];

    NSImage *resultImage = [[NSImage alloc] initWithSize:[outputImage extent].size];
    NSCIImageRep *rep = [NSCIImageRep imageRepWithCIImage:outputImage];
    [resultImage addRepresentation:rep];

    return resultImage;
}

@end


int main(int argc, const char * argv[]) {


    NSAutoreleasePool *pool = [[NSAutoreleasePool alloc] init];

    if (argc == 1) {

        NSString * appname = [NSString stringWithFormat: @"%s", argv[0]];

        NSLog(@"Usage: %@ filename", appname);

    }  else {

        NSString * filename = [NSString stringWithFormat: @"%s", argv[1]];

        NSFileManager *fm = [NSFileManager defaultManager];

        if ([fm fileExistsAtPath:filename]) {

            NSLog(@"opening file:%@", filename);


            NSImage *img = [[NSImage alloc] initWithContentsOfFile:filename];

            [[img filterEverythingButRed]
             saveAsPNGWithName:[[filename stringByDeletingPathExtension] stringByAppendingString:@"-red.png"]];


        } else {

            NSLog(@"file not found:%@", filename);
        }

    }


    [pool release];
    return 0;
}

1
我找到了一个解决方法,似乎可以工作,但不清楚为什么-如果你为所有的inputCenterColor1、inputCenterColor2和inputCenterColor1设置相同的设置(使用color=[1.0,0.0,0.0],closeness=0.5和contrast=1.0),它就可以工作。不确定为什么需要做所有3个,如果您有任何见解,将会很有帮助。它还允许您对绿色和蓝色进行相同的操作,并且似乎可以正确地过滤所需内容(对于我的情况使用)。我会让这个问题开放给其他搜索者/发布者。 - unsynchronized
2个回答

3

CISpotColor本质上执行四种颜色操作:

  1. inputReplacementColor1替换所有接近inputCenterColor1的颜色。
  2. inputReplacementColor2替换所有接近inputCenterColor2的颜色。
  3. inputReplacementColor3替换所有接近inputCenterColor3的颜色。
  4. 将其他所有颜色替换为白色。

默认情况下,输入颜色设置为各种红色/粉色调。您可以通过在构建后调用setDefaults并检查代码中的这些过滤器值来找到它们,但为了便于说明,以下是Core Image Fun House示例代码应用程序中所有默认值的屏幕截图:

CISpotColor defaults

使用默认选项应用过滤器会得到以下结果:

filtered with defaults

请注意,红色环(您要尝试使其成为图像中仅剩的元素)看起来像默认的inputReplacementColor3,右下角的亮区域看起来像默认的inputReplacementColor2...就像在您的输出图像中一样。这是因为您只配置了第一对中心/替换颜色,并将其他两个保留在它们的红色/粉色默认值。

如果您想禁用第二和第三种颜色替换,请将它们的接近度参数降至0.0和/或将它们的对比度参数提高至1.0。为了安全起见,您可能还应将它们的中心颜色设置为图像中不存在的某些内容。在您的测试图像中,我发现仅降低接近度就足够了:

new settings

这将得到以下输出:

new output

顺便说一下,像这样的专色替换是一种简单形式的颜色查找表(CLUT)操作,由CIColorCube过滤器实现。如果您想要超越CISpotColor所提供的精细调整颜色替换,则颜色立方体选项可能是一个不错的选择。在苹果的编程指南中,有一个使用它进行绿幕效果的教程。

TLDR:

  1. 设置适当的值以用于所有滤镜参数,而不仅仅是前几个,否则其他默认值可能会产生意外的结果。将inputCloseness2inputCloseness3设置为零并保留其他所有内容的默认值(除了您已经设置的input...1参数),似乎适用于您的测试图像。
  2. 拥有实时的滤镜测试环境真正帮助您微调参数(并确保默认值符合您的预期)。Core Image Fun House非常适合这个。

-1

你是正确的,仍然没有文档。例如仅使用“核心图像Fun House”作为您的信息来源将不会告诉您向输入点1放置哪种颜色,向输入点2放置哪种颜色非常重要...交换它们会给您带来截然不同的结果,在这个特定的滤镜中我发现了更多的问题。例如一些参数的“最大”值,代码更像是… “指导原则”而不是实际规则。:)使用“Fun House”作为参考会让您进入一个有大约10个出口的兔子洞,没有任何标志告诉您这些出口在哪里。

以下是我通过将疯狂的数字投入此过滤器并观察其效果而保留的一些备注(如果有人选择,需增加)。

            //-------------------------  picked up a red ski helmet in full sun,  included all shadows on helmet, and some yellow from sun..  near perfect mask,  but also picked up most skin tones.
        //--------------------------  used a color from the helmet color: 0.662745 0.188235 0.223529 1.0  then stretched values to normalize to have one color 1.0 --------------
        CIFilter *clampFilter1 = [CIFilter filterWithName:@"CISpotColor"];


        [clampFilter1 setValue:[CIColor colorWithRed:1.0 green:0.09 blue:0.33] forKey: @"inputCenterColor1"];
        [clampFilter1 setValue:[CIColor colorWithRed:1.0 green:0.0 blue:0.0 alpha:1.0] forKey: @"inputReplacementColor1"];
        [clampFilter1 setValue:@(0.86) forKey: @"inputCloseness1"];
        [clampFilter1 setValue:@(1.00) forKey: @"inputContrast1"];

        [clampFilter1 setValue:@(0.00) forKey: @"inputCloseness2"];
        [clampFilter1 setValue:@(1.00) forKey: @"inputContrast2"];

        [clampFilter1 setValue:[CIColor colorWithRed:0.00 green:1.0 blue:0.56] forKey: @"inputCenterColor3"];
        [clampFilter1 setValue:[CIColor colorWithRed:1.0 green:1.0 blue:1.0 alpha:1.0] forKey: @"inputReplacementColor3"];
        [clampFilter1 setValue:@(1.00) forKey: @"inputCloseness3"];
        [clampFilter1 setValue:@(1.00) forKey: @"inputContrast3"];


        //---------------------------- picked up a blue jacket total, including all the shadows, a near perfect mask of a fairly blue jacket all ranges  ---------------------------
        [clampFilter1 setValue:[CIColor colorWithRed:0.01 green:0.165 blue:1.0] forKey: @"inputCenterColor1"];
        [clampFilter1 setValue:[CIColor colorWithRed:0.0 green:0.0 blue:1.0 alpha:1.0] forKey: @"inputReplacementColor1"];
        [clampFilter1 setValue:@(0.86) forKey: @"inputCloseness1"];
        [clampFilter1 setValue:@(1.0) forKey: @"inputContrast1"];

        //---------------------------- did not need this input but experimenting and left it in to add other changes,  same with below experiments  ---------------------------
        [clampFilter1 setValue:[CIColor colorWithRed:0.01 green:0.165 blue:1.0] forKey: @"inputCenterColor2"];
        [clampFilter1 setValue:[CIColor colorWithRed:0.0 green:0.0 blue:1.0 alpha:1.0] forKey: @"inputReplacementColor2"];
        [clampFilter1 setValue:@(0.86) forKey: @"inputCloseness2"];
        [clampFilter1 setValue:@(1.0) forKey: @"inputContrast2"];

        [clampFilter1 setValue:[CIColor colorWithRed:1.0 green:0.5 blue:0.5] forKey: @"inputCenterColor3"];
        [clampFilter1 setValue:[CIColor colorWithRed:1.0 green:1.0 blue:1.0 alpha:1.0] forKey: @"inputReplacementColor3"];
        [clampFilter1 setValue:@(0.99) forKey: @"inputCloseness3"];
        [clampFilter1 setValue:@(0.99) forKey: @"inputContrast3"];


        //---------------------------- picked up all reds,  total,  including some purples,  also picked up all skin tones  -----------------------------------------------------------
        [clampFilter1 setValue:[CIColor colorWithRed:1.0 green:0.0 blue:0.0] forKey: @"inputCenterColor1"];
        [clampFilter1 setValue:[CIColor colorWithRed:1.0 green:0.0 blue:0.0 alpha:1.0] forKey: @"inputReplacementColor1"];
        [clampFilter1 setValue:@(0.90) forKey: @"inputCloseness1"];
        [clampFilter1 setValue:@(1.00) forKey: @"inputContrast1"];

        [clampFilter1 setValue:[CIColor colorWithRed:1.0 green:0.0 blue:0.0] forKey: @"inputCenterColor2"];
        [clampFilter1 setValue:[CIColor colorWithRed:1.0 green:0.0 blue:0.0 alpha:1.0] forKey: @"inputReplacementColor2"];
        [clampFilter1 setValue:@(0.90) forKey: @"inputCloseness2"];
        [clampFilter1 setValue:@(1.00) forKey: @"inputContrast2"];

        [clampFilter1 setValue:[CIColor colorWithRed:1.0 green:0.0 blue:0.0] forKey: @"inputCenterColor3"];
        [clampFilter1 setValue:[CIColor colorWithRed:1.0 green:0.0 blue:0.0 alpha:1.0] forKey: @"inputReplacementColor3"];
        [clampFilter1 setValue:@(0.90) forKey: @"inputCloseness3"];
        [clampFilter1 setValue:@(1.00) forKey: @"inputContrast3"];


        //---------------------------- removed all reds,  total,  turned all blues all ranges.. to green  -----------------------------------------------------------
        [clampFilter1 setValue:[CIColor colorWithRed:0.0 green:1.0 blue:0.0] forKey: @"inputCenterColor1"];
        [clampFilter1 setValue:[CIColor colorWithRed:0.0 green:1.0 blue:0.0 alpha:1.0] forKey: @"inputReplacementColor1"];
        [clampFilter1 setValue:@(0.90) forKey: @"inputCloseness1"];
        [clampFilter1 setValue:@(1.00) forKey: @"inputContrast1"];

        [clampFilter1 setValue:[CIColor colorWithRed:0.0 green:1.0 blue:0.0] forKey: @"inputCenterColor2"];
        [clampFilter1 setValue:[CIColor colorWithRed:0.0 green:1.0 blue:0.0 alpha:1.0] forKey: @"inputReplacementColor2"];
        [clampFilter1 setValue:@(0.90) forKey: @"inputCloseness2"];
        [clampFilter1 setValue:@(1.00) forKey: @"inputContrast2"];

        [clampFilter1 setValue:[CIColor colorWithRed:0.0 green:1.0 blue:0.0] forKey: @"inputCenterColor3"];
        [clampFilter1 setValue:[CIColor colorWithRed:0.0 green:1.0 blue:0.0 alpha:1.0] forKey: @"inputReplacementColor3"];
        [clampFilter1 setValue:@(0.90) forKey: @"inputCloseness3"];
        [clampFilter1 setValue:@(1.00) forKey: @"inputContrast3"];


        //---------------------------- removed most reds,   but skin still some tint,  turned all blues all ranges to green  -----------------------------------------------------------
        [clampFilter1 setValue:[CIColor colorWithRed:0.0 green:1.0 blue:0.0] forKey: @"inputCenterColor1"];
        [clampFilter1 setValue:[CIColor colorWithRed:0.0 green:1.0 blue:0.0 alpha:1.0] forKey: @"inputReplacementColor1"];
        [clampFilter1 setValue:@(0.90) forKey: @"inputCloseness1"];
        [clampFilter1 setValue:@(1.00) forKey: @"inputContrast1"];

        [clampFilter1 setValue:[CIColor colorWithRed:0.0 green:1.0 blue:0.0] forKey: @"inputCenterColor2"];
        [clampFilter1 setValue:[CIColor colorWithRed:0.0 green:1.0 blue:0.0 alpha:1.0] forKey: @"inputReplacementColor2"];
        [clampFilter1 setValue:@(0.90) forKey: @"inputCloseness2"];
        [clampFilter1 setValue:@(0.80) forKey: @"inputContrast2"];

        [clampFilter1 setValue:[CIColor colorWithRed:0.0 green:1.0 blue:0.0] forKey: @"inputCenterColor3"];
        [clampFilter1 setValue:[CIColor colorWithRed:0.0 green:1.0 blue:0.0 alpha:1.0] forKey: @"inputReplacementColor3"];
        [clampFilter1 setValue:@(0.90) forKey: @"inputCloseness3"];
        [clampFilter1 setValue:@(0.99) forKey: @"inputContrast3"];


        //---------------------------- picked up  shadow blue/purple replaced with green  -----------------------------------------------------------
        [clampFilter1 setValue:[CIColor colorWithRed:0.0 green:1.0 blue:0.0] forKey: @"inputCenterColor1"];
        [clampFilter1 setValue:[CIColor colorWithRed:0.0 green:1.0 blue:0.0 alpha:1.0] forKey: @"inputReplacementColor1"];
        [clampFilter1 setValue:@(0.90) forKey: @"inputCloseness1"];
        [clampFilter1 setValue:@(1.00) forKey: @"inputContrast1"];

        [clampFilter1 setValue:[CIColor colorWithRed:0.0 green:1.0 blue:0.0] forKey: @"inputCenterColor2"];
        [clampFilter1 setValue:[CIColor colorWithRed:0.0 green:1.0 blue:0.0 alpha:1.0] forKey: @"inputReplacementColor2"];
        [clampFilter1 setValue:@(0.90) forKey: @"inputCloseness2"];
        [clampFilter1 setValue:@(0.80) forKey: @"inputContrast2"];

        [clampFilter1 setValue:[CIColor colorWithRed:1.0 green:0.0 blue:0.0] forKey: @"inputCenterColor3"];
        [clampFilter1 setValue:[CIColor colorWithRed:1.0 green:0.0 blue:0.0 alpha:1.0] forKey: @"inputReplacementColor3"];
        [clampFilter1 setValue:@(0.90) forKey: @"inputCloseness3"];
        [clampFilter1 setValue:@(0.99) forKey: @"inputContrast3"];

网页内容由stack overflow 提供, 点击上面的
可以查看英文原文,
原文链接