Android数值选择器在Jelly Bean和Ice Cream Sandwich中的默认设计变化

3
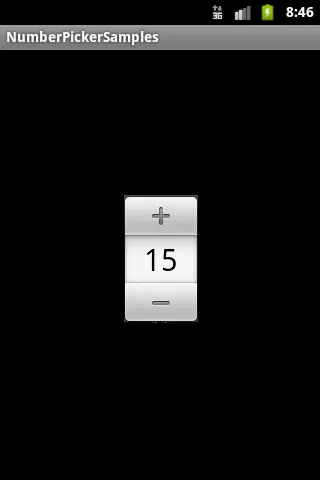
我创建了一个安卓应用程序,其中显示一个数字选择器,一切正常...但问题在于设计...当我在Gingerbread中运行应用程序时,数字选择器看起来很好...但是当我在Ice-Cream Sandwich和Jelly Bean中运行相同的应用程序时,数字选择器的设计已经发生改变,如下所示。请问有人可以告诉我如何在Jelly Bean中保留Gingerbread中默认的数字选择器设计吗?
在 Ice-Cream Sandwich 和 Jelly Bean 中运行时:
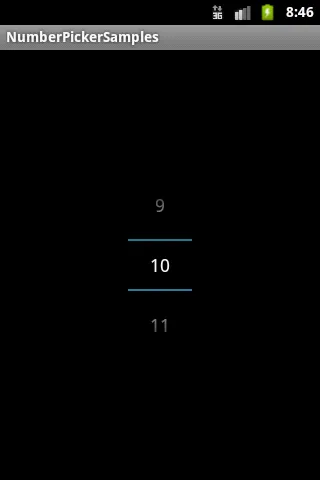
 enter image description here 在 Gingerbread 中运行时: enter image description here 我正在使用一个自定义对话框框,在其中放置了数字选择器,请参考以下代码。
import android.app.Activity; 
import android.app.Dialog; 
import android.graphics.drawable.ColorDrawable; 
import android.os.Bundle; 
import android.view.View; 
import android.view.Window; 
import android.widget.Button; 
import android.widget.NumberPicker; 

public class QuantityChangeDialog extends Dialog implements android.view.View.OnClickListener { 

public Activity c; 
public Dialog d; 
public Button save, cancel; 
NumberPicker np; 

public QuantityChangeDialog(Activity a) { 
super(a); 
// TODO Auto-generated constructor stub 
this.c = a; 
} 


@Override 
protected void onCreate(Bundle savedInstanceState) { 
super.onCreate(savedInstanceState); 

requestWindowFeature(Window.FEATURE_NO_TITLE); 
this.getWindow().setBackgroundDrawable(new ColorDrawable(android.graphics.Color.TRANSPARENT)); 
setContentView(R.layout.selecteditem_dialog); 
save = (Button) findViewById(R.id.btn_save); 
cancel = (Button) findViewById(R.id.btn_cancel); 
save.setOnClickListener(this); 
cancel.setOnClickListener(this); 
np = (NumberPicker) findViewById(R.id.qntypicker); 
np.setMaxValue(120); 
np.setMinValue(1); 
np.setValue(3); 

} 

@Override 
public void onClick(View v) { 
switch (v.getId()) { 
case R.id.btn_save: 
c.finish(); 
break; 
case R.id.btn_cancel: 
dismiss(); 
break; 
default: 
break; 
} 
dismiss(); 
} 
}
2个回答

3

引用自文档

如果当前主题是从Theme派生的,则该小部件将以可编辑的输入字段形式呈现当前值,上方有增量按钮,下方有减量按钮。长按按钮可以快速更改当前值。点击输入字段可以输入所需值。

您需要设置从Theme派生的主题,例如 Theme.NoTitleBar.Fullscreen

activity_main.xml

<RelativeLayout xmlns:android="http://schemas.android.com/apk/res/android"
    xmlns:tools="http://schemas.android.com/tools"
    android:layout_width="match_parent"
    android:layout_height="match_parent"
    android:paddingBottom="@dimen/activity_vertical_margin"
    android:paddingLeft="@dimen/activity_horizontal_margin"
    android:paddingRight="@dimen/activity_horizontal_margin"
    android:paddingTop="@dimen/activity_vertical_margin"
    tools:context=".MainActivity" >


    <TextView
        android:id="@+id/textView1"
        android:layout_width="wrap_content"
        android:layout_height="wrap_content"
        android:text="@string/hello_world" />

    <Button
        android:id="@+id/button11"
        android:layout_width="wrap_content"
        android:layout_height="wrap_content"
        android:layout_alignParentBottom="true"
        android:layout_centerHorizontal="true"
        android:text="Open" />

</RelativeLayout>

dialog.xml

<RelativeLayout xmlns:android="http://schemas.android.com/apk/res/android"
    android:layout_width="fill_parent"
    android:theme = "@style/cust_dialog"
    android:layout_height="fill_parent" >

    <NumberPicker
        android:id="@+id/numberPicker1"
        android:layout_width="wrap_content"
        android:layout_height="wrap_content"
        android:layout_alignParentTop="true"
        android:layout_centerHorizontal="true"
        android:layout_marginTop="64dp" />

    <Button
        android:id="@+id/button2"
        android:layout_width="wrap_content"
        android:layout_height="wrap_content"
        android:layout_below="@+id/numberPicker1"
        android:layout_marginLeft="20dp"
        android:layout_marginTop="98dp"
        android:layout_toRightOf="@+id/numberPicker1"
        android:text="Cancel" />

    <Button
        android:id="@+id/button1"
        android:layout_width="wrap_content"
        android:layout_height="wrap_content"
        android:layout_alignBaseline="@+id/button2"
        android:layout_alignBottom="@+id/button2"
        android:layout_marginRight="16dp"
        android:layout_toLeftOf="@+id/numberPicker1"
        android:text="Set" />

</RelativeLayout>

然后显示自定义对话框。
public class MainActivity extends Activity implements NumberPicker.OnValueChangeListener
{
    private  TextView tv;
    static Dialog d ;
    @Override
    public void onCreate(Bundle savedInstanceState)
    {
        super.onCreate(savedInstanceState);
        setContentView(R.layout.activity_main);
        tv = (TextView) findViewById(R.id.textView1);
        tv.setOnTouchListener(new OnTouchListener() {

            @Override
            public boolean onTouch(View v, MotionEvent event) {
                if (event.getAction() == MotionEvent.ACTION_DOWN) {
                       tv.setTextColor(Color.RED);
                }
                else if (event.getAction() == MotionEvent.ACTION_UP) {
                        // set to normal color
                     tv.setTextColor(0);  
                }

                return true;
            }


            });
        Button b = (Button) findViewById(R.id.button11);
         b.setOnClickListener(new OnClickListener()
         {

            @Override
            public void onClick(View v) {
                 show();
            }
            });
           }
     @Override
    public void onValueChange(NumberPicker picker, int oldVal, int newVal) {

         Log.i("value is",""+newVal);

     }

    public void show()
    {


         final Dialog d=new Dialog(this,R.style.cust_dialog);
         d.setTitle("NumberPicker");
         d.setContentView(R.layout.dialog);
         Button b1 = (Button) d.findViewById(R.id.button1);
         Button b2 = (Button) d.findViewById(R.id.button2);
         final NumberPicker np = (NumberPicker) d.findViewById(R.id.numberPicker1);
         np.setMaxValue(100);
         np.setMinValue(0);
         np.setWrapSelectorWheel(false);
         np.setOnValueChangedListener(this);
         b1.setOnClickListener(new OnClickListener()
         {
          @Override
          public void onClick(View v) {
              tv.setText(String.valueOf(np.getValue()));
              d.dismiss();
           }    
          });
         b2.setOnClickListener(new OnClickListener()
         {
          @Override
          public void onClick(View v) {
              d.dismiss();
           }    
          });
       d.show();


    }
}

Styles.xml

</style>
  <style name="cust_dialog" parent="@android:style/Theme.NoTitleBar.Fullscreen"> 
</style>

快照

enter image description here


我已将主题设置为Theme.NoTitleBar.Fullscreen,但在数字选择器中仍然找不到任何设计更改......它仍然显示如上面第一张图片所示...... - Denny
是的,先生,它可以工作,但现在的问题是我的整个应用程序设计已经改变了。 - Denny
@Denny 只在具有数字选择器的活动中使用它。在具有数字选择器的清单中设置活动的主题。 - Raghunandan
@Denny 你只能为对话框设置主题。 - Raghunandan
让我们在聊天中继续这个讨论 - Denny
显示剩余3条评论

2
您可以将这个属性添加到您的NumberPicker中。
android:theme="@android:style/Theme.Dialog"

例如。
<NumberPicker   android:theme="@android:style/Theme.Dialog"
                android:layout_width="wrap_content"
                android:layout_height="wrap_content" />

这将仅限制对数字选择器小部件的影响,而不是整个活动页面。

是的,但如何在主题中设置选举分隔符和文本颜色? - Mike6679
我指的是“选择分隔符”。 - Mike6679

网页内容由stack overflow 提供, 点击上面的
可以查看英文原文,
原文链接