WPF中使用C#调整弹出窗口位置

7
我已经在按钮鼠标悬停时放置了一个弹出窗口。每次当我将鼠标悬停在那个按钮上时,我的自定义设计的弹出窗口会完美地显示出来。但它无法完美地指向该按钮。如何解决这个问题呢?现在我的弹出窗口看起来像这样: enter image description here 我想让箭头指向帮助按钮。如何实现呢?
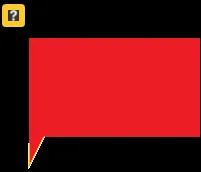
以下是我的XAML代码中有关按钮和弹出窗口的内容:
<telerik:RadButton Name="btnH" Grid.Column="1" HorizontalAlignment="Left" Margin="444,56,0,0" Grid.Row="2" VerticalAlignment="Top" 
                 Width="23" Height="23" BorderThickness="6" BorderBrush="#4E4E4E">
            <Image Source="Images/help.png" />
            <telerik:RadButton.Triggers>
                    <EventTrigger RoutedEvent="MouseEnter">
                        <BeginStoryboard>
                        <Storyboard TargetName="TooltipPopup" TargetProperty="IsOpen">
                                <BooleanAnimationUsingKeyFrames  FillBehavior="HoldEnd">
                                    <DiscreteBooleanKeyFrame KeyTime="00:00:00"  Value="True" />
                                </BooleanAnimationUsingKeyFrames>
                            </Storyboard>
                        </BeginStoryboard>
                    </EventTrigger>

以下是我在弹出窗口中使用的自定义用户控件XAML代码。
<UserControl
         xmlns="http://schemas.microsoft.com/winfx/2006/xaml/presentation"
         xmlns:x="http://schemas.microsoft.com/winfx/2006/xaml"
         xmlns:mc="http://schemas.openxmlformats.org/markup-compatibility/2006" 
         xmlns:d="http://schemas.microsoft.com/expression/blend/2008" 
         xmlns:telerik="http://schemas.telerik.com/2008/xaml/presentation" x:Class="WPFTest.UCToolTip" 
         mc:Ignorable="d" Height="231.493" Width="362.075"
         Background="Transparent"  >
<UserControl.Resources>
    <Style TargetType="{x:Type Hyperlink}">
                 <Setter Property="TextBlock.TextDecorations" Value="{x:Null}" />
    </Style>
</UserControl.Resources>
<Grid Margin="10,0,0,0">
    <Grid.RowDefinitions>
        <RowDefinition/>
        <RowDefinition Height="Auto"/>
    </Grid.RowDefinitions>
    <Grid Background="red" Margin="0,0,182,133">            

    </Grid>
    <Polygon
    Points="0.5,0 15,0, 0,30" Stroke="Orange" Fill="Orange" Margin="0,98,0,101" />
</Grid>


嘿,这个答案有帮助吗?还是你还遇到了一些问题? - Kylo Ren
3个回答

4

使用这个样式来为您的Popup窗口:

<Style TargetType="Popup">
                <Style.Triggers>
                    <Trigger Property="IsOpen" Value="true">
                        <Setter Property="PlacementTarget" Value="{Binding ElementName=btnH }" />
                        <Setter Property="Placement" Value="Top" />
                        <Setter Property="VerticalOffset" Value="-5" />
                        <Setter Property="HorizontalOffset" Value="5" />
                    </Trigger>
                </Style.Triggers>
            </Style>

0

我认为Kylo给出了正确的答案。如果你去掉用户控件中的边距,它应该可以工作。

这是用户控件的代码。

<UserControl
         xmlns="http://schemas.microsoft.com/winfx/2006/xaml/presentation"
         xmlns:x="http://schemas.microsoft.com/winfx/2006/xaml"
         xmlns:mc="http://schemas.openxmlformats.org/markup-compatibility/2006" 
         xmlns:d="http://schemas.microsoft.com/expression/blend/2008" 
         xmlns:telerik="http://schemas.telerik.com/2008/xaml/presentation" x:Class="WpfTest.UCToolTip" 
         mc:Ignorable="d" Height="130" Width="180"
         Background="Transparent"  >
    <UserControl.Resources>
        <Style TargetType="{x:Type Hyperlink}">
            <Setter Property="TextBlock.TextDecorations" Value="{x:Null}" />
        </Style>
    </UserControl.Resources>
    <Grid Margin="10,0,0,0">
        <Grid.RowDefinitions>
            <RowDefinition/>
            <RowDefinition Height="Auto"/>
        </Grid.RowDefinitions>
        <Grid Background="red" Margin="0,0,0,32">

        </Grid>
        <Polygon Points="0.5,0 15,0, 0,30" Stroke="Orange" Fill="Orange" Margin="0,98,0,0" />
    </Grid>
</UserControl>

还有窗口的代码。

<Window x:Class="WpfTest.MainWindow"
        xmlns="http://schemas.microsoft.com/winfx/2006/xaml/presentation"
        xmlns:x="http://schemas.microsoft.com/winfx/2006/xaml"
        xmlns:telerik="http://schemas.telerik.com/2008/xaml/presentation"
        xmlns:uc="clr-namespace:WpfTest"
        Title="MainWindow" Height="350" Width="525">
    <Window.Resources>
        <Style TargetType="Popup">
            <Style.Triggers>
                <Trigger Property="IsOpen" Value="true">
                    <Setter Property="PlacementTarget" Value="{Binding ElementName=btnH }" />
                    <Setter Property="Placement" Value="Top" />
                    <Setter Property="VerticalOffset" Value="0" />
                    <Setter Property="HorizontalOffset" Value="145" />
                </Trigger>
            </Style.Triggers>
        </Style>        
    </Window.Resources>    
    <Grid>
        <telerik:RadButton Name="btnH" Grid.Column="1" HorizontalAlignment="Left" Margin="300,175,0,0" Grid.Row="2" VerticalAlignment="Top" 
                 Width="50" Height="23" BorderThickness="6" BorderBrush="#4E4E4E">
            <Image Source="Images/help.png" />
            <telerik:RadButton.Triggers>
                <EventTrigger RoutedEvent="MouseEnter">
                    <BeginStoryboard>
                        <Storyboard TargetName="TooltipPopup" TargetProperty="IsOpen">
                            <BooleanAnimationUsingKeyFrames  FillBehavior="HoldEnd">
                                <DiscreteBooleanKeyFrame KeyTime="00:00:00"  Value="True" />
                            </BooleanAnimationUsingKeyFrames>
                        </Storyboard>
                    </BeginStoryboard>
                </EventTrigger>

                <EventTrigger RoutedEvent="MouseLeave">
                    <BeginStoryboard>
                        <Storyboard TargetName="TooltipPopup" TargetProperty="IsOpen">
                            <BooleanAnimationUsingKeyFrames  FillBehavior="HoldEnd">
                                <DiscreteBooleanKeyFrame KeyTime="00:00:00"  Value="False" />
                            </BooleanAnimationUsingKeyFrames>
                        </Storyboard>
                    </BeginStoryboard>
                </EventTrigger>
            </telerik:RadButton.Triggers>

        </telerik:RadButton>

        <Popup x:Name="TooltipPopup" AllowsTransparency="True">
            <StackPanel>
                <uc:UCToolTip></uc:UCToolTip>
            </StackPanel>
        </Popup>

    </Grid>
</Window>

0

这里有一个我认为可以满足你需求的WPF气球小库。

使用方法:

<geometry:Balloon ConnectorAngle="25"
                  CornerRadius="15"
                  PlacementOptions="Bottom, Center"
                  PlacementTarget="{Binding ElementName=Target}">
     <!--  content here  -->
</geometry:Balloon>

网页内容由stack overflow 提供, 点击上面的
可以查看英文原文,
原文链接