WPF网格行高自动,但最大为星号(*)

4

我有一个包含以下代码的用户控件(为了方便理解做了简化):

<Grid>
    <Grid.RowDefinitions>
        <RowDefinition Height="Auto" />
        <RowDefinition Height="Auto" />
        <RowDefinition Height="Auto" />
        <RowDefinition Height="Auto" />
    </Grid.RowDefinitions>

    <TextBlock Grid.Row="0" />
    <TextBlock Grid.Row="1" />
    <DataGrid Grid.Row="2" />
    <TextBlock Grid.Row="3" />
</Grid>

现在我想把所有控件都显示在一个堆栈中,但只限于窗口的大小。

问题是当DataGrid中有很多数据时,它会超出边界,最后的TextBlock不可见,也没有DataGrid的滚动条显示。

当我为第三行定义Star (*)时,对于大量的项目,DataGrid的大小是合适的,但是如果DataGrid中只有几个项目,那么最后一个TextBlock会显示在屏幕底部(而不是直接在DataGrid之后,这是需要的)。

当我使用StackPanel而非Grid时,看起来与上面的代码相同。如果我使用DockPanel,DataGrid可以滚动,但是最后一个TextBlock根本不可见。

我想象中的解决方案是将第三行定义为Height="Auto"MaxHeight="*",但显然这是不可能的。

你能帮忙吗?


我不太确定我理解你想要实现什么。你想要:1. 总是显示4个控件。2. 使最后一个TextBlock正好位于DataGrid底部,但不一定位于父网格的底部吗? - Thế Long
3个回答

2

@Tam Bui --- 抱歉没有在评论区回复,但是我已经用完了字符 :/

你的解决方案可行,谢谢。但是对于DataGrid中大量数据的情况,它似乎不够高效 - 看起来它一次性加载所有行(就像Auto设置一样)。

基于你的解决方案,我提出了更有效和更简单的解决方案:

private void OnSizeChanged(object sender, RoutedEventArgs e)
{
    if (!IsLoaded) return;

    AdjustGridSize();
}

private void AdjustGridSize()
{
    GridRowDefinition.Height = new GridLength(1, GridUnitType.Star);
    UpdateLayout();

    ExpensesGrid.MaxHeight = GridRowDefinition.ActualHeight;
    GridRowDefinition.Height = GridLength.Auto;
}

GridRowDefinition是DataGrid所在行的定义,ExpensesGrid是我的DataGrid。

此外,在Loaded事件调用中还应该调用AdjustGridSize方法来初始调整大小。

如果您发现这种解决方案有任何缺点,请告诉我。


看起来不错!很高兴我的建议帮助你找到了更好的解决方案。 - Tam Bui

1
你需要以编程的方式完成此操作,而不是在xaml中进行。这是因为你想要它做两件不同的事情:
  1. 如果只有少量项目,则将最后一个TextBlock保持靠近DataGrid。
  2. 如果DataGrid有大量项目,则保持最后一个TextBlock可见。
要实现这一点,你需要在代码后台中钩入事件,确定最后一个TextBlock是否消失,然后相应地调整RowDefinition上的Height="Auto"或Height="*",然后UpdateLayout。
这是一个示例项目。我用TextBlock替换了你的DataGrid,以简化问题。 XAML:
    <Grid>
        <Grid.RowDefinitions>
            <RowDefinition Height="Auto"/>
            <RowDefinition/>
        </Grid.RowDefinitions>
        <Button Content="Make Grid.Row=2 Long, But Keep Text 3 Visible" Click="Button_Click" HorizontalAlignment="Center" Margin="5" Padding="5,10"/>
        <Grid Grid.Row="1" x:Name="myGrid">
            <Grid.RowDefinitions>
                <RowDefinition Height="Auto"/>
                <RowDefinition Height="Auto"/>
                <RowDefinition x:Name="myRowDefinition" Height="Auto"/>
                <RowDefinition Height="Auto"/>
            </Grid.RowDefinitions>
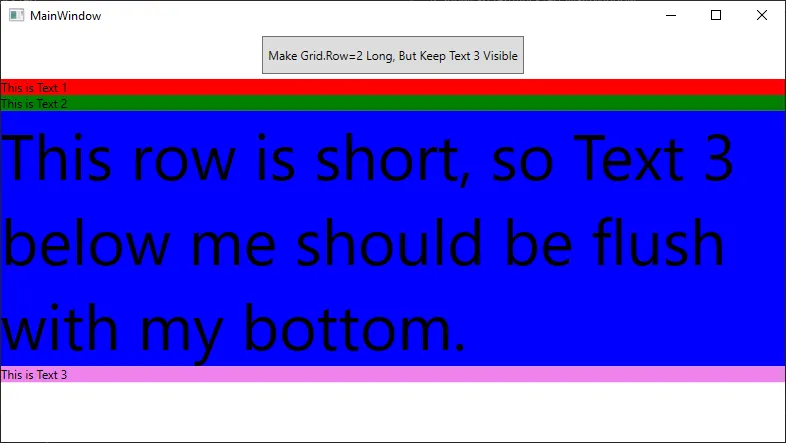
            <TextBlock Grid.Row="0" Text="This is Text 1" Background="Red"/>
            <TextBlock Grid.Row="1" Text="This is Text 2" Background="Green"/>
            <TextBlock Grid.Row="2" x:Name="myDataGrid" FontSize="64" Text="{Binding Output}" TextWrapping="Wrap" Background="Blue"/>
            <TextBlock Grid.Row="3" x:Name="lastTextBlock" Text="This is Text 3" Background="Violet"/>
        </Grid>
    </Grid>

代码后台:

    public partial class MainWindow : Window, INotifyPropertyChanged
    {
        private string output;

        public MainWindow()
        {
            InitializeComponent();
            this.Loaded += OnLoaded;
            this.DataContext = this;
        }

        /// <summary>
        /// Handles the SizeChanged event of your data grid.
        /// </summary>
        /// <param name="sender"></param>
        /// <param name="e"></param>
        private void MyDataGrid_SizeChanged(object sender, SizeChangedEventArgs e)
        {
            if (!IsUserVisible(lastTextBlock, this))
            {
                if (this.myRowDefinition.Height == GridLength.Auto)
                {
                    // Edit the row definition and redraw it
                    this.myRowDefinition.Height = new GridLength(1, GridUnitType.Star);
                }
            }
            else
            {
                if (this.myRowDefinition.Height != GridLength.Auto && CanDataGridBeSmaller(this.myRowDefinition.ActualHeight))
                {
                    // If the datagrid can be smaller, change the row definition back to Auto
                    this.myRowDefinition.Height = GridLength.Auto;
                }
            }
            this.UpdateLayout();
        }

        /// <summary>
        /// It is possible for the DataGrid to take on more space than it actually needs.  This can happen if you are messing with the window resizing.
        /// So always check to make sure that if you can make the DataGrid smaller, that it stays small.
        /// </summary>
        /// <param name="actualHeight">the actual height of the DataGrid's row definition</param>
        /// <returns></returns>
        private bool CanDataGridBeSmaller(double actualHeight)
        {
            // Create a dummy control that is equivalent to your datagrid (for my purposes, I used a Textblock for simplicity, so I will recreate it fully here.
            TextBlock dummy = new TextBlock() { TextWrapping = TextWrapping.Wrap, FontSize = 64, Text = this.Output };
            dummy.Measure(new Size(this.myGrid.ActualWidth, this.myGrid.ActualHeight));

            // Get the dummy height and compare it to the actual height
            if (dummy.DesiredSize.Height < myRowDefinition.ActualHeight)
                return true;
            return false;
        }

        /// <summary>
        /// This method determines if the control is fully visible to the user or not.
        /// </summary>
        private bool IsUserVisible(FrameworkElement element, FrameworkElement container)
        {
            if (!element.IsVisible)
                return false;

            Rect bounds = element.TransformToAncestor(container).TransformBounds(new Rect(0.0, 0.0, element.ActualWidth, element.ActualHeight));
            Rect rect = new Rect(0.0, 0.0, container.ActualWidth, container.ActualHeight);
            return rect.Contains(bounds);
        }

        /// <summary>
        /// This is purely for setup.
        /// </summary>
        private void OnLoaded(object sender, RoutedEventArgs e)
        {
            this.myDataGrid.SizeChanged += MyDataGrid_SizeChanged;
            this.Output = "This row is short, so Text 3 below me should be flush with my bottom.";
        }

        public event PropertyChangedEventHandler PropertyChanged;

        public string Output { get => this.output; set { this.output = value; this.PropertyChanged?.Invoke(this, new PropertyChangedEventArgs(nameof(Output))); } }

        private void Button_Click(object sender, RoutedEventArgs e)
        {
            this.Output = "Lorem ipsum dolor sit amet, consectetur adipiscing elit, sed do eiusmod tempor incididunt ut labore et dolore magna aliqua. Ut enim ad minim veniam, quis nostrud exercitation ullamco laboris nisi ut aliquip ex ea commodo consequat. Duis aute irure dolor in reprehenderit in voluptate velit esse cillum dolore eu fugiat nulla pariatur. Excepteur sint occaecat cupidatat non proident, sunt in culpa qui officia deserunt mollit anim id est laborum.";
        }
    }

当你开始时的示例输出:

enter image description here

点击顶部按钮后的示例输出:

enter image description here


0

我建议您使用一个DockPanel,其中DataGrid是填充的最后一个子元素。将DockPanel.MaxHeight设置为父级ActualHeight作为约束条件,但不要设置Height,这样当列表只有少量项目时,整个DockPanel会收缩。

完整示例:

<Window x:Class="WpfApplication1.MainWindow"
        xmlns="http://schemas.microsoft.com/winfx/2006/xaml/presentation"
        xmlns:x="http://schemas.microsoft.com/winfx/2006/xaml"
        xmlns:d="http://schemas.microsoft.com/expression/blend/2008"
        xmlns:mc="http://schemas.openxmlformats.org/markup-compatibility/2006"
        mc:Ignorable="d"
        Title="MainWindow" Height="450" Width="800">
    <Window.Resources>
        <!-- TEST data for demonstration -->
        <XmlDataProvider x:Key="MockList" XPath="/MockObjects/*" >
            <x:XData >
                <MockObjects xmlns="">
                    <MockObject Name="Test 1" />
                    <MockObject Name="Test 2" />
                    <MockObject Name="Test 3" />
                    <MockObject Name="Test 4" />
                    <MockObject Name="Test 5" />
                    <MockObject Name="Test 6" />
                    <MockObject Name="Test 7" />
                    <MockObject Name="Test 8" />
                    <MockObject Name="Test 9" />
                </MockObjects>
            </x:XData>
        </XmlDataProvider>
    </Window.Resources>
    <!-- Stretching Parent-->
    <Grid Name="parentGrid">
        <DockPanel Width="200" MaxHeight="{Binding ElementName=parentGrid,Path=ActualHeight}" VerticalAlignment="Top" HorizontalAlignment="Left">
            <TextBlock DockPanel.Dock="Top">Test</TextBlock>
            <TextBlock DockPanel.Dock="Top">Test</TextBlock>
            <!-- Notice change of order here -->
            <TextBlock DockPanel.Dock="Bottom" Background="LightBlue">Test</TextBlock>
            
            <DataGrid ItemsSource="{Binding Source={StaticResource MockList}, XPath=/MockObjects/MockObject}" AutoGenerateColumns="False">
                <DataGrid.Columns>
                    <DataGridTextColumn Header="Text" Binding="{Binding XPath=@Name}"/>
                </DataGrid.Columns>
            </DataGrid>
        </DockPanel>
    </Grid>
</Window>

网页内容由stack overflow 提供, 点击上面的
可以查看英文原文,
原文链接