在Flutter中,Sliver Appbar[Collapseing Toolbar]可以实现标题从左侧动态移动到居中位置的动画效果。

10

这是我用于折叠工具栏的构建方法:

     @override
  Widget build(BuildContext context) {
    return SafeArea(
      child: CustomScrollView(
        controller: controller,
        slivers: <Widget>[
          SliverAppBar(
            pinned: true,
            expandedHeight: appBarHeight,
            leading: IconButton(
              icon: Icon(
                Icons.arrow_back_ios,
                color: Colors.black,
              ),
              onPressed: () => null,
            ),
            floating: true,
            flexibleSpace: FlexibleSpaceBar(

          titlePadding: EdgeInsets.only(left:leftV , bottom:bottomV ),
          title: Text(
            "Title ",
            style: TextStyle(
              color: Colors.black,
              fontSize: 16.0,
            ),
          ),
        ),
      ),
      SliverList(delegate:
          SliverChildBuilderDelegate((BuildContext context, int index) {
        return ListTile(title: Text("Flutter / $index"));
      }))
    ],
  ),
);
}

根据我得到的文档,我找到了去除填充的解决方案:-
/// 默认情况下,如果标题未居中,则此属性的值为EdgeInsetsDirectional.only(start: 72, bottom: 16), /// 否则为EdgeInsetsDirectional.only(start: 0, bottom: 16)。 final EdgeInsetsGeometry titlePadding;
但是我得到的输出结果是:-

enter image description here

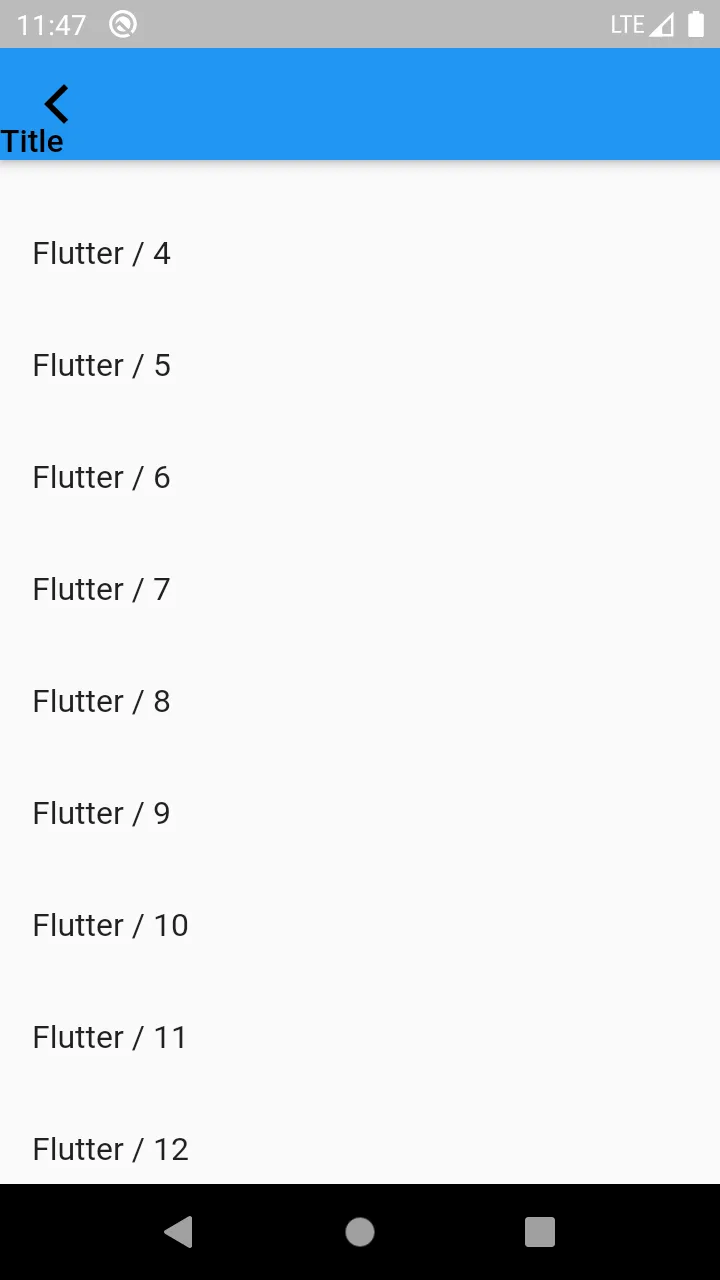
当应用栏完全折叠时,我希望能够将标题居中。

在 Github 上已经提交了问题 请在此处查看。

5个回答

6

编辑:

最终我创建了一个更好的解决方案,它利用了FlexibleSpaceBar内已经发生的转换。将代码从要点中复制到您的项目中后,用MyFlexibleSpaceBar替换FlexibleSpaceBar并提供一个titlePaddingTween,例如:

titlePaddingTween: EdgeInsetsTween(begin: EdgeInsets.only(left: 16.0, bottom: 16), end: EdgeInsets.only(left: 72.0, bottom: 16))

而非使用titlePadding,Tween将从完全展开时应用栏的“开始”EdgeInsets动画到折叠时的“结束”EdgeInsets

我还添加了一个foreground参数,它会显示在标题和背景之上,但不会像它们一样变换。

原始回答:

其他回答很好,但是重新构建的小部件比必要的要多。我的解决方案基于其他答案,但只会重建ValueListenableBuilder中的内容:

class SamplePage extends StatelessWidget {
  static const _kBasePadding = 16.0;
  static const kExpandedHeight = 250.0;

  final ValueNotifier<double> _titlePaddingNotifier = ValueNotifier(_kBasePadding);

  final _scrollController = ScrollController();

  double get _horizontalTitlePadding {
    const kCollapsedPadding = 60.0;

    if (_scrollController.hasClients) {
      return min(_kBasePadding + kCollapsedPadding,
          _kBasePadding + (kCollapsedPadding * _scrollController.offset)/(kExpandedHeight - kToolbarHeight));
    }

    return _kBasePadding;
  }

  @override
  Widget build(BuildContext context) {
    _scrollController.addListener(() {
      _titlePaddingNotifier.value = _horizontalTitlePadding;
    });

    return Scaffold(

      body: NestedScrollView(
          controller: _scrollController,
          headerSliverBuilder: (context, innerBoxIsScrolled) {
            return <Widget>[
              SliverAppBar(
                  expandedHeight: kExpandedHeight,
                  floating: false,
                  pinned: true,
                  flexibleSpace: FlexibleSpaceBar(
                      collapseMode: CollapseMode.pin,
                      centerTitle: false,
                      titlePadding: EdgeInsets.symmetric(vertical: 16, horizontal: 0),
                      title: ValueListenableBuilder(
                        valueListenable: _titlePaddingNotifier,
                        builder: (context, value, child) {
                          return Padding(
                            padding: EdgeInsets.symmetric(horizontal: value),
                            child: Text(
                              "Title"),
                          );
                        },
                      ),
                      background: Container(color: Colors.green)
                  )
              ),
            ];
          },
          body: Text("Body text")
        ),
    );
  }
}

1
我最终改变了我在自己的应用程序中发布的代码,以进行性能优化,只有在必要时重建确实更好。 - Jon
如果有人能够正确理解这个人所做的事情,那么与其他答案相比,这个答案是最好的。 - RuslanBek
1
谢谢,修改后的答案可行。我使用了MyFlexibleSpaceBar,效果非常好。你救了我的一天。 - Yogesh Alai
那个gist非常好用。 - Lemayzeur
@Peter Keefe 如何将可伸缩标题移动到AppBar的中心? - nagendra nag

3

我自己找到了解决方案!!!

将以下代码添加到您的滑动应用栏中......

 flexibleSpace: LayoutBuilder(
                builder:
                    (BuildContext context, BoxConstraints constraints) {
                  double percent =
                      ((constraints.maxHeight - kToolbarHeight) *
                          100 /
                          (appBarHeight - kToolbarHeight));
                  double dx = 0;

                  dx = 100 - percent;
                  if (constraints.maxHeight == 100) {
                    dx = 0;
                  }

                  return Stack(
                    children: <Widget>[
                      Padding(
                        padding: const EdgeInsets.only(
                            top: kToolbarHeight / 4, left: 0.0),
                        child: Transform.translate(
                          child: Text(
                            title,
                            style: MyTextStyle.getAppBarTextStyle(
                                screenUtil, appColors),
                          ),
                          offset: Offset(
                              dx, constraints.maxHeight - kToolbarHeight),
                        ),
                      ),
                    ],
                  );
                },
              ),

百分比是基于滚动计算的,相应的动画已经放置好了。

enter image description here


这个代码不能正常工作,也许你可以留下一些注释来解释它。 - daddycool
@umni4ek 你可能想要使用MediaQuery.of(context).size.width和MediaQuery.of(context).size.height来设置你的银色高度和其他计算。这样所有屏幕尺寸都会适当调整。 - Kennedy Nyaga

2

我使用了一个ScrollController来解决问题。

示例结果 GIF

我使用了下面这个函数:

double get _horizontalTitlePadding {
    const kBasePadding = 15.0;
    const kMultiplier = 0.5;

    if (_scrollController.hasClients) {
      if (_scrollController.offset < (kExpandedHeight / 2)) {
        // In case 50%-100% of the expanded height is viewed
        return kBasePadding;
      }

      if (_scrollController.offset > (kExpandedHeight - kToolbarHeight)) {
        // In case 0% of the expanded height is viewed
        return (kExpandedHeight / 2 - kToolbarHeight) * kMultiplier +
            kBasePadding;
      }

      // In case 0%-50% of the expanded height is viewed
      return (_scrollController.offset - (kExpandedHeight / 2)) * kMultiplier +
          kBasePadding;
    }

    return kBasePadding;
}

我把它用在了我的SilverAppBartitlePadding中:

  child: Scaffold(
      body: CustomScrollView(
    controller: _scrollController,
    slivers: <Widget>[
      SliverAppBar(
        pinned: true,
        expandedHeight: kExpandedHeight,
        flexibleSpace: FlexibleSpaceBar(
          titlePadding: EdgeInsets.symmetric(
              vertical: 16.0, horizontal: _horizontalTitlePadding),

请确保在initState()中初始化控制器:

_scrollController = ScrollController()..addListener(() => setState(() {}));

这是一个很好的观点,但这个过程会稍微减慢滚动速度。 - Lemayzeur

1

我曾经遇到过同样的问题,我使用LayoutBuilder作为SliverAppBarflexibleSpace组件的子组件来解决它。 LayoutBuilder的作用是让我知道appBar当前的位置(高度)。

我使用MediaQuery.of(context).size自动获取屏幕大小。

var top = 0.0;
var appbarThreshold = 140.0;

class _MySliverAppBarState extends State<MySliverAppBar> {
  @override
  Widget build(BuildContext context) {
    Size size = MediaQuery.of(context).size;

    return SliverAppBar(
      centerTitle: true,
      pinned: true,
      leading: TextButton(
        child: CircleAvatar(
          radius: size.width / 4,
          backgroundColor: Colors.blue.withOpacity(0.3),
        ),
        onPressed: () {
          print("Hello");
        },
      ),
      leadingWidth: size.width / 4,
      collapsedHeight: size.height / 11.5,
      expandedHeight: size.height / 5,
      backgroundColor: Colors.white,
      foregroundColor: Colors.black,

      flexibleSpace: LayoutBuilder(
        builder: (BuildContext context, BoxConstraints constraints) {
          top = constraints.biggest.height;

          return FlexibleSpaceBar(
            title: AnimatedOpacity(
              duration: const Duration(milliseconds: 300),
              opacity: 1.0,
              child: Text(
                top < appbarThreshold ? "Bloom" : "Welcome, Iremide",
                style: TextStyle(
                    fontSize: top < appbarThreshold
                        ? size.height / 30
                        : size.height / 40,
                    color: Colors.black87,
                    fontFamily: 'SourceSansSerif',
                    fontWeight: FontWeight.w700),
              ),
            ),
            titlePadding: top < appbarThreshold
                ? EdgeInsets.fromLTRB(
                    size.width / 4.9, 0.0, 0.0, size.height / 18)
                : EdgeInsets.fromLTRB(
                    size.width / 14, 0.0, 0.0, size.height / 30),
          );
        },
      ),
    );
  }
}

当应用栏折叠时,您可以通过在此处编辑左填充大小来调整标题的位置

//
                titlePadding: top < appbarThreshold
                    ? EdgeInsets.fromLTRB(
                        size.width / 4.9, 0.0, 0.0, size.height / 18)
                    : EdgeInsets.fromLTRB(
                        size.width / 14, 0.0, 0.0, size.height / 30),
              

敬礼。


0
          late ScrollController _scrollController;
          static const kExpandedHeight = 300.0;
        
          @override
          void initState() {
            super.initState();
            _scrollController = ScrollController()..addListener(() => setState(() {}));
          }
        
          double get _horizontalTitlePadding {
            const kBasePadding = 15.0;
            const kMultiplier = 0.5;
        
            if (_scrollController.hasClients) {
              if (_scrollController.offset < (kExpandedHeight / 2)) {
                // In case 50%-100% of the expanded height is viewed
                return kBasePadding;
              }
        
              if (_scrollController.offset > (kExpandedHeight - kToolbarHeight)) {
                // In case 0% of the expanded height is viewed
                return (kExpandedHeight / 2 - kToolbarHeight) * kMultiplier +
                    kBasePadding;
              }
        
              // In case 0%-50% of the expanded height is viewed
              return (_scrollController.offset - (kExpandedHeight / 2)) * kMultiplier +
                  kBasePadding;
            }
        
            return kBasePadding;
          }
    
    
    CustomScrollView(
            controller: _scrollController,
            slivers: [
              SliverAppBar(
                expandedHeight: kExpandedHeight,
                pinned: true,
                flexibleSpace: FlexibleSpaceBar(
                  title: Text(product.title),
                  titlePadding: EdgeInsets.symmetric(
                      vertical: 16.0, horizontal: _horizontalTitlePadding),
                  background: Hero(
                    tag: product.id,
                    child: Image.network(
                      product.imageUrl,
                      fit: BoxFit.cover,
                    ),
                  ),
                ),
              ),
              SliverList(
                  delegate: SliverChildListDelegate([
//add your widgets here
])
        ]
) //end of CustomScrollView

网页内容由stack overflow 提供, 点击上面的
可以查看英文原文,
原文链接