我希望在Storyboard中的多个视图控制器中使用同一个视图。因此,我考虑在外部XIB中设计视图,以便更改可以反映在每个视图控制器中。但是如何从Storyboard中加载外部XIB中的视图?这是否可行?如果不行,还有哪些其他替代方案可用以适应上述情况?
在Storyboard中从外部XIB文件加载视图
158
- Sebastian Hoffmann
2
2可能是重复的问题:如何创建自定义iOS视图类并在IB中实例化多个副本? - Abizern
1请查看此视频:http://www.youtube.com/watch?v=o3MawJVxTgk - malhobayyeb
11个回答
168
我的完整示例在这里,但我将在下面提供摘要。
布局
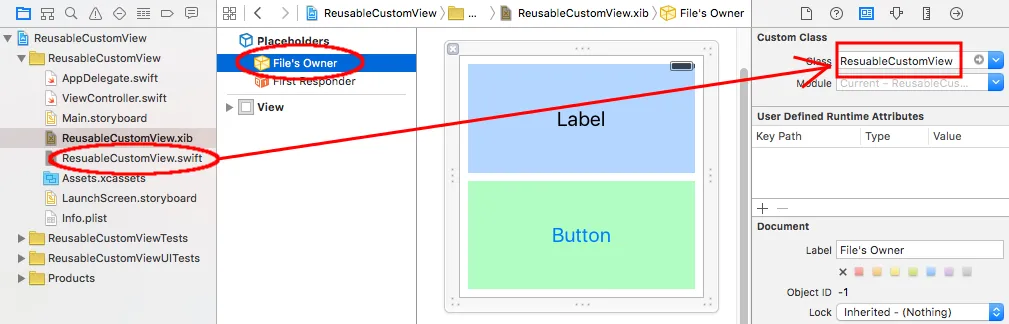
向项目中添加一个同名的.swift和.xib文件。.xib文件包含自定义视图布局(最好使用自动布局约束)。
将swift文件设置为xib文件的所有者。
 代码
代码
将以下代码添加到.swift文件中,并从.xib文件中连接输出和操作。
import UIKit
class ResuableCustomView: UIView {

    let nibName = "ReusableCustomView"
    var contentView: UIView?

    @IBOutlet weak var label: UILabel!
    @IBAction func buttonTap(_ sender: UIButton) {
        label.text = "Hi"
    }

    required init?(coder aDecoder: NSCoder) {
        super.init(coder: aDecoder)

        guard let view = loadViewFromNib() else { return }
        view.frame = self.bounds
        self.addSubview(view)
        contentView = view
    }

    func loadViewFromNib() -> UIView? {
        let bundle = Bundle(for: type(of: self))
        let nib = UINib(nibName: nibName, bundle: bundle)
        return nib.instantiate(withOwner: self, options: nil).first as? UIView
    }
}
使用方法
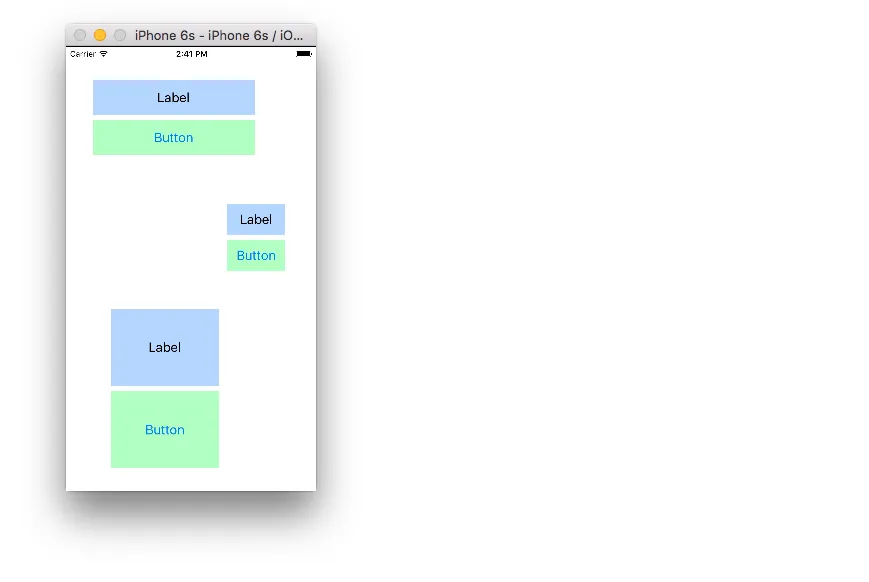
您可以在故事板中的任何地方使用自定义视图。只需添加一个UIView并将类名设置为您的自定义类名即可。
- Suragch
13
7loadNibNamed不是调用init(coder:)方法吗?我试着使用你的方法,但出现了崩溃。 - Fishman
8崩溃的另一个常见原因是没有将自定义视图设置为“文件所有者”。请参考我的回答中的红色圆圈。 - Suragch
9我曾将根视图的类设置为文件所有者,导致了一个无限循环。 - devios1
2在self.addSubview(view)之前添加view.autoresizingMask = [.flexibleWidth, .flexibleHeight]这一行代码后,它完美地工作了。 - Pramod Tapaniya
显示剩余8条评论
104
有一段时间,Christopher Swasey的方法是我发现的最好的方法。我向我的团队中的几位高级开发人员询问后,其中一位提供了完美的解决方案!它满足了Christopher Swasey所优雅解决的所有问题,并且不需要锅炉板子子类代码(这是我对他的方法的主要担忧)。除此之外,有一个陷阱,但除此之外,它相当直观和易于实现。
- 在一个.swift文件中创建一个自定义的UIView类来控制你的xib,例如
MyCustomClass.swift - 创建一个.xib文件并按你想要的方式进行样式设置,例如
MyCustomClass.xib - 将.xib文件的
File's Owner设置为你的自定义类(MyCustomClass) - 陷阱: 在.xib文件中,将自定义视图的
class值(在identity Inspector下)留空。因此,你的自定义视图将没有指定的类,但它将有一个指定的File's Owner。 - 像通常使用
Assistant Editor一样连接你的输出。 - 注意:如果你查看
Connections Inspector,你会发现你的引用输出不是引用你的自定义类(例如MyCustomClass),而是引用了File's Owner。由于指定了File's Owner为你的自定义类,因此输出将正确连接并工作。 - 确保你的自定义类在类声明前有@IBDesignable。
- 让你的自定义类符合下面所提到的
NibLoadable协议。- 注意:如果你的自定义类
.swift文件名与你的.xib文件名不同,则将nibName属性设置为你的.xib文件名。
- 注意:如果你的自定义类
- 实现
required init?(coder aDecoder: NSCoder)和override init(frame: CGRect)来调用setupFromNib(),就像下面的示例一样。 - 向你想要的storyboard添加一个UIView,并将类设置为你的自定义类名(例如
MyCustomClass)。 - 看IBDesignable在操作中以它所有的威严和奇迹绘制你的.xib在故事板上。
下面是你需要参考的协议:
public protocol NibLoadable {
    static var nibName: String { get }
}

public extension NibLoadable where Self: UIView {

    public static var nibName: String {
        return String(describing: Self.self) // defaults to the name of the class implementing this protocol.
    }

    public static var nib: UINib {
        let bundle = Bundle(for: Self.self)
        return UINib(nibName: Self.nibName, bundle: bundle)
    }

    func setupFromNib() {
        guard let view = Self.nib.instantiate(withOwner: self, options: nil).first as? UIView else { fatalError("Error loading \(self) from nib") }
        addSubview(view)
        view.translatesAutoresizingMaskIntoConstraints = false
        view.leadingAnchor.constraint(equalTo: self.safeAreaLayoutGuide.leadingAnchor, constant: 0).isActive = true
        view.topAnchor.constraint(equalTo: self.safeAreaLayoutGuide.topAnchor, constant: 0).isActive = true
        view.trailingAnchor.constraint(equalTo: self.safeAreaLayoutGuide.trailingAnchor, constant: 0).isActive = true
        view.bottomAnchor.constraint(equalTo: self.safeAreaLayoutGuide.bottomAnchor, constant: 0).isActive = true
    }
}
这里是一个示例 MyCustomClass 的实现,它实现了该协议(.xib 文件名为 MyCustomClass.xib):
@IBDesignable
class MyCustomClass: UIView, NibLoadable {

    @IBOutlet weak var myLabel: UILabel!

    required init?(coder aDecoder: NSCoder) {
        super.init(coder: aDecoder)
        setupFromNib()
    }

    override init(frame: CGRect) {
        super.init(frame: frame)
        setupFromNib()
    }

}
注意:如果您错过了“Gotcha”并将class值设置为您的自定义类,则它不会在Storyboard中绘制,并且当您运行应用程序时,您会收到一个EXC_BAD_ACCESS错误,因为它会陷入无限循环,尝试使用init?(coder aDecoder: NSCoder)方法从nib初始化类,然后调用Self.nib.instantiate并再次调用init。
- Ben Patch
12
2这里还有另一种很棒的方法,但我觉得上面那个仍然更好:https://medium.com/zenchef-tech-and-product/how-to-visualize-reusable-xibs-in-storyboards-using-ibdesignable-c0488c7f525d - Ben Patch
4你上面提到的方法完美地运作,并且可以在storyboard中实时预览。非常方便和棒极了,太赞了! - Igor Leonovich
1FYI:这个解决方案使用
setupFromNib()中的约束定义,似乎可以修复包含XIB创建视图的自动调整大小表格视图单元格的某些奇怪的自动布局问题。 - Gary1迄今为止最好的解决方案!我喜欢
@IBDesignable 的兼容性。无法理解为什么在添加 UIView 文件时,Xcode 或 UIKit 没有提供类似于此的默认功能。 - heyfrank1似乎无法使这个工作。每次我在.xib文件中设置文件所有者时,它也会设置自定义类。 - drewster
显示剩余7条评论
32
假设您已经创建了一个想要使用的xib:
1)创建一个UIView的自定义子类(您可以转到文件->新建->文件...->Cocoa Touch Class。确保"Subclass of:"是"UIView")。
2)在初始化时将基于xib的视图添加为此视图的子视图。
使用Obj-C
-(id)initWithCoder:(NSCoder *)aDecoder{
    if (self = [super initWithCoder:aDecoder]) {
        UIView *xibView = [[[NSBundle mainBundle] loadNibNamed:@"YourXIBFilename"
                                                              owner:self
                                                            options:nil] objectAtIndex:0];
        xibView.frame = self.bounds;
        xibView.autoresizingMask = UIViewAutoresizingFlexibleWidth | UIViewAutoresizingFlexibleHeight;
        [self addSubview: xibView];
    }
    return self;
}
在Swift 2中
required init?(coder aDecoder: NSCoder) {
    super.init(coder: aDecoder)
    let xibView = NSBundle.mainBundle().loadNibNamed("YourXIBFilename", owner: self, options: nil)[0] as! UIView
    xibView.frame = self.bounds
    xibView.autoresizingMask = [.FlexibleWidth, .FlexibleHeight]
    self.addSubview(xibView)
}
在Swift 3中
required init?(coder aDecoder: NSCoder) {
    super.init(coder: aDecoder)
    let xibView = Bundle.main.loadNibNamed("YourXIBFilename", owner: self, options: nil)!.first as! UIView
    xibView.frame = self.bounds
    xibView.autoresizingMask = [.flexibleWidth, .flexibleHeight]
    self.addSubview(xibView)
}
3) 在storyboard中想要使用的任何位置,按照通常的方式添加一个UIView, 选择新添加的视图,在Identity检查器中(位于右上角的第三个图标,看起来像带有线条的矩形),将你的子类名称作为“Custom Class”下的“Class”输入。
- user1021430
5
xibView.frame = self.frame; 应该改为 xibView.frame = CGRectMake(0, 0, self.frame.size.width, self.frame.size.height);,否则当视图添加到故事板时,xibView 将会有一个偏移量。 - BabyPanda来晚了,但他好像把它改成了xibView.frame = self.bounds,这是一个没有偏移的框架。 - Heavy_Bullets
24因为无限递归导致崩溃。加载nib文件会创建这个子类的另一个实例。 - David
2xib视图的类别不应该与这个新子类相同。如果xib是MyClass,你可以将这个新类命名为MyClassContainer。 - user1021430
1上述解决方案会崩溃成无限递归。 - JBarros35
30
我一直认为“将其添加为子视图”的解决方案不令人满意,因为它会影响(1)自动布局、(2)
我们可以在我们的视图的“硬纸板剪影”子类中使用它,其唯一目的是从NIB加载视图并将其返回以在Storyboard中使用。嵌入式子类然后在Storyboard视图的身份检查器中指定,而不是原始类。为了使IB能够看到任何IBInspectable/IBOutlet属性,它实际上不需要成为子类,但使它成为子类是使其正常工作的关键。
这种额外的样板可能看起来不太理想,并且在某种程度上,它确实是,因为理想情况下
注意:在NIB文件中设置的视图类保持不变。嵌入式子类仅在Storyboard中使用。子类不能用于在代码中实例化视图,因此它不应该具有任何额外的逻辑本身。它应该只包含
⚠️ 这里唯一的显著缺点是,如果在storyboard中定义了宽度、高度或纵横比约束条件,而这些条件与其他视图无关,则必须手动复制。涉及两个视图的约束会安装在最近的公共祖先上,并且视图是从内向外从storyboard中唤醒的,因此在超级视图上填充这些约束时,交换已经发生了。仅涉及该视图的约束直接安装在该视图上,因此在交换发生时被丢弃,除非它们被复制。
请注意,这里发生的情况是在故事板中安装在视图上的约束被复制到新实例化的视图上,而后者可能已经有自己在nib文件中定义的约束。那些不受影响。
@IBInspectable和(3)插座。相反,让我向您介绍awakeAfter:的神奇之处,这是一个NSObject方法。
awakeAfter允许您交换从NIB/Storyboard实际唤醒的对象,用完全不同的对象替换它。然后将“那个”对象放入水合过程中,在其上调用awakeFromNib,将其添加为视图等等。我们可以在我们的视图的“硬纸板剪影”子类中使用它,其唯一目的是从NIB加载视图并将其返回以在Storyboard中使用。嵌入式子类然后在Storyboard视图的身份检查器中指定,而不是原始类。为了使IB能够看到任何IBInspectable/IBOutlet属性,它实际上不需要成为子类,但使它成为子类是使其正常工作的关键。
这种额外的样板可能看起来不太理想,并且在某种程度上,它确实是,因为理想情况下
UIStoryboard将无缝处理这个问题,但它具有将原始NIB和UIView子类完全保持不变的优点。它扮演的角色基本上是一个适配器或桥接类,并且作为附加类,在设计上是完全有效的,即使有些令人遗憾。另一方面,如果您想节约珍贵的类库,则@BenPatch的解决方案通过实现某些其他次要更改来实现。哪种解决方案更好的问题归结为程序员风格的问题:是否偏爱对象组合还是多重继承。注意:在NIB文件中设置的视图类保持不变。嵌入式子类仅在Storyboard中使用。子类不能用于在代码中实例化视图,因此它不应该具有任何额外的逻辑本身。它应该只包含
awakeAfter钩子。class MyCustomEmbeddableView: MyCustomView {
override func awakeAfter(using aDecoder: NSCoder) -> Any? {
return (UIView.instantiateViewFromNib("MyCustomView") as MyCustomView?)! as Any
}
}
⚠️ 这里唯一的显著缺点是,如果在storyboard中定义了宽度、高度或纵横比约束条件,而这些条件与其他视图无关,则必须手动复制。涉及两个视图的约束会安装在最近的公共祖先上,并且视图是从内向外从storyboard中唤醒的,因此在超级视图上填充这些约束时,交换已经发生了。仅涉及该视图的约束直接安装在该视图上,因此在交换发生时被丢弃,除非它们被复制。
请注意,这里发生的情况是在故事板中安装在视图上的约束被复制到新实例化的视图上,而后者可能已经有自己在nib文件中定义的约束。那些不受影响。
class MyCustomEmbeddableView: MyCustomView {
  override func awakeAfter(using aDecoder: NSCoder) -> Any? {
    let newView = (UIView.instantiateViewFromNib("MyCustomView") as MyCustomView?)!

    for constraint in constraints {
      if constraint.secondItem != nil {
        newView.addConstraint(NSLayoutConstraint(item: newView, attribute: constraint.firstAttribute, relatedBy: constraint.relation, toItem: newView, attribute: constraint.secondAttribute, multiplier: constraint.multiplier, constant: constraint.constant))
      } else {
        newView.addConstraint(NSLayoutConstraint(item: newView, attribute: constraint.firstAttribute, relatedBy: constraint.relation, toItem: nil, attribute: .notAnAttribute, multiplier: 1, constant: constraint.constant))
      }
    }

    return newView as Any
  }
}
instantiateViewFromNib 是 UIView 的类型安全扩展。它所做的仅仅是循环遍历 NIB 中的对象,直到找到与类型相匹配的一个为止。需要注意的是,泛型类型是返回值,所以必须在调用站点指定类型。
extension UIView {
  public class func instantiateViewFromNib<T>(_ nibName: String, inBundle bundle: Bundle = Bundle.main) -> T? {
    if let objects = bundle.loadNibNamed(nibName, owner: nil) {
      for object in objects {
        if let object = object as? T {
          return object
        }
      }
    }

    return nil
  }
}
- Christopher Swasey
13
1太好了!有一件事让我感到困惑,因为我对xib的经验很少(我只使用过storyboards和编程方法),在这里留下它以帮助其他人:在.xib文件中,您需要选择顶级视图,并将其类类型设置为
MyCustomView。在我的xib中,默认情况下缺少左侧内部边栏;要打开它,可以在底部/左侧附近的“查看为:iPhone 7”特性控制旁边找到一个按钮。 - xaphod5当另一个对象取代它时,它会违反约束。 :( - invoodoo
有可能您正在以破坏性的方式使用约束条件。此方法可透明地与在 IB 中定义的约束条件配合使用。 - Christopher Swasey
@ChristopherSwasey 我看到的一种情况是,直接添加到Storyboard中“MyCustomEmbeddableView”上的约束(例如,固定高度)似乎没有被传递到新视图中。 从“MyCustomEmbeddableView”到超级视图添加的约束是有效的。 在“MyCustomEmbeddableView”的“awakeAfter”方法中,“self.constraints”只有高度约束而没有到超级视图的约束,而新视图的“view.constraints”具有所有超级视图的约束而没有高度约束。您以前见过这种情况吗? - Evan R
我已经更新了答案,注明了宽度/高度约束的问题,并添加了复制粘贴解决方案。虽然不再那么优雅,但情况可能会更糟。 - Christopher Swasey
显示剩余8条评论
9
- Ingun전인건
1
完全没有关系,你没有解释为什么这是不好的。我看不出来为什么。也没有任何副作用。 - JBarros35
7
我在考虑使用独立的storyboard中的View Controller作为XIB视图的替代方案。
然后,在主storyboard中,可以使用容器视图和嵌入式Segue来代替自定义视图,并且将StoryboardReference指向这个自定义视图控制器,该视图应放置在主storyboard的其他视图内。
接下来,我们可以通过准备Segue来在嵌入的ViewController和主ViewController之间建立委托和通信。这种方法与显示UIView不同,但更简单和更有效(从编程角度)可用于实现相同的目标,即具有在主storyboard中可见的可重用自定义视图。
另一个优点是,您可以在CustomViewController类中实现逻辑并设置所有委托和视图准备工作,而无需创建单独的(在项目中难以找到的)控制器类,并且不需要将样板代码放置在主UIViewController中使用组件。我认为这对于可重用组件,例如嵌入在其他视图中的音乐播放器组件(小部件),非常有用。
- Michał Ziobro
3
确实,比起使用自定义视图xib,更简单的解决方案是:(translated text only) - Wilson
1在使用苹果的XIB生命周期创建自定义UIView时,我曾经走了很多弯路,最终采用了以下方式。 - LightningStryk
如果您想动态添加自定义视图,我们仍然需要使用单独的视图控制器(最好是XIB)。 - Satyam
6
目前最好的解决方案是使用自定义视图控制器,并在xib中定义其视图,然后在将视图控制器添加到storyboard中时删除Xcode创建的“view”属性(但不要忘记设置自定义类的名称)。
这将使运行时自动查找xib并加载它。您可以将此技巧用于任何类型的容器视图或内容视图。
- Ben G
1
根据Ben Patch的回答中描述的步骤,提供Objective-C的解决方案。
使用UIView的扩展:
@implementation UIView (NibLoadable)

- (UIView*)loadFromNib
{
    UIView *xibView = [[[NSBundle mainBundle] loadNibNamed:NSStringFromClass([self class]) owner:self options:nil] firstObject];
    xibView.translatesAutoresizingMaskIntoConstraints = NO;
    [self addSubview:xibView];
    [xibView.topAnchor constraintEqualToAnchor:self.topAnchor].active = YES;
    [xibView.bottomAnchor constraintEqualToAnchor:self.bottomAnchor].active = YES;
    [xibView.leftAnchor constraintEqualToAnchor:self.leftAnchor].active = YES;
    [xibView.rightAnchor constraintEqualToAnchor:self.rightAnchor].active = YES;
    return xibView;
}

@end
创建文件
MyView.h、MyView.m和MyView.xib。
首先按照Ben Patch的回答所说,准备好您的MyView.xib,将类MyView设置为文件所有者的类,而不是在此XIB内部设置主视图。
MyView.h:
#import <UIKit/UIKit.h>

IB_DESIGNABLE @interface MyView : UIView

@property (nonatomic, weak) IBOutlet UIView* someSubview;

@end
MyView.m:
#import "MyView.h"
#import "UIView+NibLoadable.h"

@implementation MyView

#pragma mark - Initializers

- (id)init
{
    self = [super init];
    if (self) {
        [self loadFromNib];
        [self internalInit];
    }
    return self;
}

- (id)initWithFrame:(CGRect)frame
{
    self = [super initWithFrame:frame];
    if (self) {
        [self loadFromNib];
        [self internalInit];
    }
    return self;
}

- (id)initWithCoder:(NSCoder *)aDecoder
{
    self = [super initWithCoder:aDecoder];
    if (self) {
        [self loadFromNib];
    }
    return self;
}

- (void)awakeFromNib
{
    [super awakeFromNib];
    [self internalInit];
}

- (void)internalInit
{
    // Custom initialization.
}

@end
然后,只需通过编程方式创建您的视图程序:
MyView* view = [[MyView alloc] init];
警告!如果您使用WatchKit Extension,由于Xcode >= 9.2中的这个错误,此视图的预览将无法在Storyboard中显示:https://forums.developer.apple.com/thread/95616
- Ariel Bogdziewicz
1
这是你一直想要的答案。您可以创建自己的
无需摆弄文件所有者,或将输出口连接到代理,或以奇特的方式修改xib,或将自定义视图的实例添加为其自身的子视图。
只需执行以下操作:
它甚至可以与IBDesignable一起使用,在故事板中的设计时间引用您的自定义视图(包括来自xib的子视图)。
您可以在此处阅读更多信息: https://medium.com/build-an-app-like-lego/embed-a-xib-in-a-storyboard-953edf274155
CustomView类,并在xib中拥有它的主实例以及所有子视图和输出口。然后,您可以将该类应用于故事板或其他xib中的任何实例。无需摆弄文件所有者,或将输出口连接到代理,或以奇特的方式修改xib,或将自定义视图的实例添加为其自身的子视图。
只需执行以下操作:
- 导入BFWControls框架
- 将超类从
UIView更改为NibView(或从UITableViewCell更改为NibTableViewCell)
它甚至可以与IBDesignable一起使用,在故事板中的设计时间引用您的自定义视图(包括来自xib的子视图)。
您可以在此处阅读更多信息: https://medium.com/build-an-app-like-lego/embed-a-xib-in-a-storyboard-953edf274155
您可以在这里获取开源的BFWControls框架:https://github.com/BareFeetWare/BFWControls
如果您感兴趣,这里是驱动它的NibReplaceable代码的简单提取:https://gist.github.com/barefeettom/f48f6569100415e0ef1fd530ca39f5b4
Tom
- barefeettom
2
当本来应该本机提供时,我不想安装框架。 - JBarros35
@JBarros35:我也希望它可以原生地提供,但不幸的是它没有。这就是为什么我创建了这个框架。你可以根据我上面发布的小代码片段编写自己的代码,或者通过挑选上面开源的BFWControls框架的源代码来实现。但是,那需要更多的工作。祝你好运。 - barefeettom
0
即使您的类名与XIB不同,也可以使用此解决方案。
例如,如果您有一个基础视图控制器类controllerA,它具有XIB名称controllerA.xib,并且您使用controllerB对其进行了子类化,并希望在storyboard中创建controllerB的实例,则可以执行以下操作:
- 在storyboard中创建视图控制器
- 将控制器的类设置为controllerB
- 删除storyboard中controllerB的视图
- 覆盖controllerA中的load view方法:
*
- (void) loadView
{
        //according to the documentation, if a nibName was passed in initWithNibName or
        //this controller was created from a storyboard (and the controller has a view), then nibname will be set
        //else it will be nil
        if (self.nibName)
        {
            //a nib was specified, respect that
            [super loadView];
        }
        else
        {
            //if no nib name, first try a nib which would have the same name as the class
            //if that fails, force to load from the base class nib
            //this is convenient for including a subclass of this controller
            //in a storyboard
            NSString *className = NSStringFromClass([self class]);
            NSString *pathToNIB = [[NSBundle bundleForClass:[self class]] pathForResource: className ofType:@"nib"];
            UINib *nib ;
            if (pathToNIB)
            {
                nib = [UINib nibWithNibName: className bundle: [NSBundle bundleForClass:[self class]]];
            }
            else
            {
                //force to load from nib so that all subclass will have the correct xib
                //this is convenient for including a subclass
                //in a storyboard
                nib = [UINib nibWithNibName: @"baseControllerXIB" bundle:[NSBundle bundleForClass:[self class]]];
            }

            self.view = [[nib instantiateWithOwner:self options:nil] objectAtIndex:0];
       }
}
- otusweb
网页内容由stack overflow 提供, 点击上面的可以查看英文原文,
原文链接
原文链接