我决定作为原始问题发布者完整回答这个问题。(感谢之前所有的贡献者。)
使用Vagrant和Oracle VirtualBox在Windows 64位主机上进行LAMP虚拟机的端到端设置。
我最初提出这个问题是因为尽管网上有很多指南和教程,但它们似乎没有做到以下几点:
- 明确定义起点和前提条件
- 为那些像我一样在企业环境中拥有能够托管虚拟机的Windows计算机的人提供说明。相反,他们假设主机机器是基于Linux的。
- 清楚地指出正在设置的文件在哪里:在主机上?在客户操作系统上?(如果主机和客户操作系统都是Linux或Unix-based,则特别难以确定 - 显示的命令行片段显然没有给出线索。)
说明使用的Vagrant版本。有两个(2)主要版本:API版本1是所有发布的版本(但不包括)v1.1.0之前的版本。另一个是API版本2 - 这是从v1.1.0开始的版本。因此,版本控制约定类似于Java。此API版本很重要,例如,除非在脚本开头放置一个条款来说明要使用哪个版本,否则v1 API脚本根本无法在Vagrant软件的API v2上运行。
个人认为Vagrant版本控制约定可以更简单。 注意:此指南适用于Vagrant 1。我被告知版本1具有广泛的已安装基础,而Vagrant 2在2013年中期仍处于草案状态。因此,我喜欢将版本1称为V1 LTS - 长期支持 - 就像Ubuntu一样,以显示这将在很长一段时间内存在。
这是一张图片,用于澄清哪个API属于Vagrant软件的哪个版本:
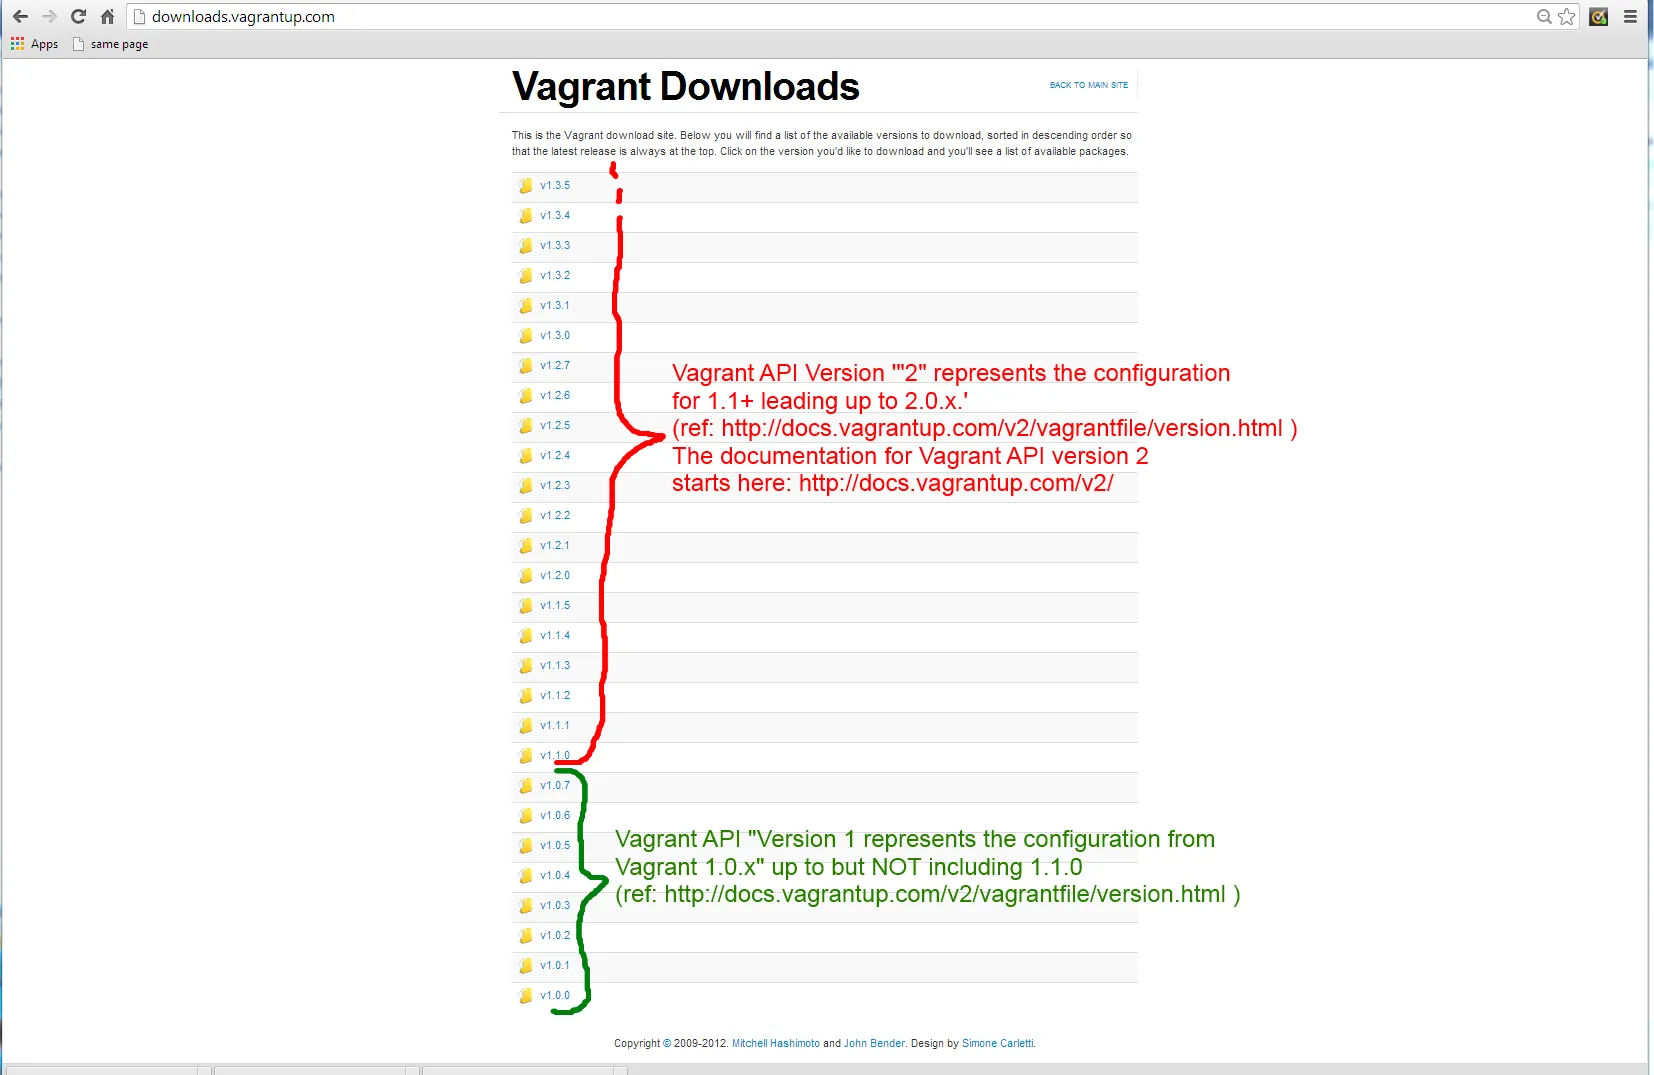
对于我在这里使用Vagrant的示例设置,建议使用V1.1.0之前的版本(即从vagrantup.com下载的Vagrant API 1),但是您应该能够使用上面提到的Vagrant软件的Vagrant 2 API版本,但是您需要在脚本开头添加一个“指令”,告诉Vagrant它们适用于Vagrant 1,否则脚本将失败并显示错误消息。 待办事项: 我将尝试获取该指令并将其放在此处以帮助。
(Mitchell Hashimoto,Vagrant创建者 - 请注意以上内容,以备将来出版您的O'Reilly图书:Vagrant: Up and Running: http://shop.oreilly.com/product/0636920026358.do)
这个答案中的指令应该做什么:
Get you a 32-bit Ubuntu Linux操作系统,使用Oracle VirtualBox在您的Windows 7 64位机器(或Mac或Linux机器,但主要在Windows上进行测试,但应该可以在Mac上正常工作,此解决方案旨在实现跨平台)上运行一个带有LAMP(Linux操作系统,Apache Web服务器,MySQL数据库,PHP)堆栈的虚拟机。我已经通过标准的phpinfo.php文件测试了PHP OK,并且看到MySQL正在运行,但尚未对此进行测试。
其他设置在Vagrant VM上运行LAMP堆栈的方法:
注意: 对于那些(像我一样)想要使用Drupal开源内容管理框架的LAMP堆栈的人,一个几乎开箱即用的替代方案在这里:
http://drupal.org/project/vagrant。您应该能够按照我的先决条件并从上面的URL下载.zip文件,然后按照那里的说明运行
vagrant up命令来启动虚拟机并等待其构建和启动(第一次有些是一次性的,因为一旦您设置了镜像,随后的启动应该更快)。您将获得许多其他开发人员工具“免费”(即为您节省安装它们的麻烦),如git、drush(我想)和性能分析工具。之后,转到[服务器地址]/install.php安装Drupal。这似乎很好地运作而没有问题-我已经尝试过但没有进行广泛测试。如果出现错误消息,您可能需要禁用xhprof的安装-请参阅
http://drupal.org/node/1940668获取详细信息。
另一个选项是使用这个配置工具:
https://puphpet.com/ - 这是一种可视化的点对点方法来配置您的Vagrant设置。它适用于Vagrant 2(我认为,更新是的,在至少Vagrant 1.2.2上)。
更新:实际上,我已经成功地将其工作,并基于此设置了在本地运行Drupal的设置 - 请参见我的指南:
https://drupal.org/node/2055947
更新
这里有一些其他开箱即用的Vagrant设置,我发现它们在Mac和Windows上都可以很好地工作:
如果您想在VM中作为LAMP堆栈的一部分本地使用Solr搜索引擎,您可能需要查看:
尽管这些替代方案很棒,但我的说明仍然有价值,可以帮助您了解这种设置的工作原理,或者如果您想要一个更简单基础的LAMP堆栈。
需要找出如何执行的一些小额外操作(将尝试在此处包含它们)。
设置完成后登录机器-这是通过标准的基于SSH的登录完成的。 您将需要免费工具putty.exe和puttygen.exe。
目前我还没有提供如何使用SSH登录的方法,但将来会尝试这样做。 您将在本答案结尾处找到参考资料。
请注意,登录将使用用户vagrant。
(在按照以下设置说明后)要使用root用户,您需要“解锁”该帐户以能够重置密码:
解锁root帐户:
vagrant@lucid32:~$ sudo passwd -u root
passwd: password expiry information changed.
然后更改根密码:
vagrant@lucid32:~$ sudo passwd root
Enter new UNIX password:
Retype new UNIX password:
passwd: password updated successfully
(密码不会在您输入时显示。)
通过使用新密码登录 root 用户来测试它:
vagrant@lucid32:~$ su root
Password:
root@lucid32:/home/vagrant
Credit:
https://scottlinux.com/2011/07/22/reset-or-change-user-password-in-linux/
(文章:"在Linux中重置或更改用户密码" - 这帮助我找出如何进行操作。)
有任何错误吗?
试一试 - 如果您遇到问题,请在回答中添加评论,我会尝试解决。另请查看结尾的故障排除。
未来任务
目前使用Puppet。尝试使用Chef而不是Puppet,以扩大工作方式。这两者都有不同的方法,因此我认为:据我所知,Puppet只是说出你想要什么,Puppet可能会做出一些任意决定来实现你的愿望。而使用Chef则需要您定义精确的步骤序列。同样,如果需要,请在此处发表评论并纠正我。
这些说明的先决条件:
- Windows 7 64位操作系统
- 已安装VirtualBox
- 已安装Vagrant
不需要单独安装Ruby和Puppet,因为它们似乎随Vagrant一起安装。说实话,我确实安装了这些软件来解决一些问题,但后来发现那些问题是其他原因引起的。所以我卸载了Ruby和Puppet并重新运行(vagrant up等),它仍然可以工作,因此我认为这些额外的、单独的安装Ruby和Puppet是不必要的。
建议使用的Vagrant和VirtualBox版本组合:VirtualBox 4.2.12版本和早期的Vagrant 1.2版本(如先前所讨论的)。某些其他组合也可能有效,但我没有测试过,所以我会坚持使用这个组合,除非我能看到使用较新版本的明显好处。一个明显的好处将是配置速度更快。我在puphpet.com设置虚拟机的路线上使用的这个组合至少可以工作,因此我认为它应该也适用于我在这里记录的简单设置。
(来源:这些指令基于:http://ox86.tumblr.com/post/23734821654/painless-development-environments-with-virtualbox,但不是完全复制,因为它们对我没有起作用。)
指示
(确保您已经拥有上述先决条件。)
主机设置工作在您的Windows用户文件夹中完成,例如对于我来说,这是C:\Users\rdavis。
mkdir lamp-project
cd lamp-project
mkdir configs
cd ..
cd lamp-project
mkdir manifests
(以下内容来自:http://docs.vagrantup.com/v1/docs/getting-started/index.html)
下载发行版安装镜像,例如 Ubuntu Lucid (10.04)。该镜像实际上相当于传统方式在计算机上安装操作系统所需的安装光盘(CD或DVD)。
C:\Users\rdavis\lamp-project>vagrant box add lucid32 http://files.vagrantup.com/lucid32.box
顺便提一下,在vagrantup.com上还有其他几个受欢迎的发行版,但如果你想从发行版.ISO生成.box文件,则有一个名为VeeWee的工具可以做到:https://github.com/jedi4ever/veewee
初始化它:
C:\Users\rdavis\lamp-project>vagrant init lucid32
(注意,我在撰写这些说明时只是使用了
vagrant init,因为我已经初始化了lucid32,但是第一次使用时,您将不得不执行上面的命令。)
C:\Users\rdavis\lamp-project>vagrant init
A `Vagrantfile` has been placed in this directory. You are now
ready to `vagrant up` your first virtual environment! Please read
the comments in the Vagrantfile as well as documentation on
`vagrantup.com` for more information on using Vagrant.

C:\Users\rdavis\lamp-project>
编辑C:\Users\rdavis\lamp-project\Vagrantfile
- 直接在Vagrant::Config.run do |config|之后插入以下内容
config.vm.box = "lucid32"
config.vm.provision :puppet do |puppet|
    puppet.manifests_path = File.expand_path("../manifests", __FILE__)
end
config.vm.forward_port 80, 8080
config.vm.share_folder "configs", "/configs", File.expand_path("../configs", __FILE__)
因此,您的Vagrantfile应该如下所示:
Vagrant::Config.run do |config|
config.vm.box = "lucid32"
config.vm.provision :puppet do |puppet|
puppet.manifests_path = File.expand_path("../manifests", __FILE__)
end
config.vm.forward_port 80, 8080
config.vm.share_folder "configs", "/configs", File.expand_path("../configs", __FILE__)
end
然后,在 C:\Users\rdavis\lamp-project\manifests 中创建文件 default.pp,并将以下内容放入其中:
$config_path = "/configs"
$vagrant_base_path = "/vagrant"
Exec { path => "/bin:/usr/bin:/usr/local/bin" }
group { "puppet": ensure => present }
exec { "apt-get update": command => "apt-get update" }
class apache {

    exec { "enable-mod_rewrite":
        require => Package["apache2"],
        before => Service["apache2"],
        command => "/usr/sbin/a2enmod rewrite"
    }
    package { "apache2":
        ensure => present
    }

    service { "apache2":
        ensure => running,
        require => Package["apache2"]
    }
}
class php {
    package { "libapache2-mod-php5": ensure => present }
    package { "php5": ensure => present }
    package { "php5-cli": ensure => present }
    package { "php5-dev": ensure => present }
    package { "php5-mysql": ensure => present }
    package { "php-pear": ensure => present }
    exec { "pear upgrade":
        command => "/usr/bin/pear upgrade",
require => Package["php-pear"],
    }
}
class mysql {
  package { "mysql-server":
    require => Exec["apt-get update"],
    ensure => present,
  }
  service { "mysql":
    enable => true,
    ensure => running,
    require => Package["mysql-server"],
  }
  exec { "Set MySQL server root password":
        require => Package["mysql-server"],
        unless => "/usr/bin/mysqladmin -uroot -proot status",
        command => "/usr/bin/mysqladmin -uroot password root",
  }
}
include apache
include php
include mysql
(提示(可选),我上面的 Vagrantfile 和 default.pp 版本(以及其他 Vagrant 辅助文件和文件夹结构)可以在我的 GitHub 存储库 VagrantVMSetups 中获取,网址为: https://github.com/therobyouknow/VagrantVMSetups
- 查看 justlamp 文件夹 - 这与本答案中使用的 lamp-project 内容相同。)
然后运行 Vagrant:
C:\Users\rdavis\lamp-project>vagrant up
请注意,这可能需要一些时间(5-15分钟) - 但请耐心等待。现在应该成功运行LAMP VM。然后您就完成了当前工作任务中的VM。如果您随后保留VM以供以后使用,但使用
vagrant halt关闭它(而不是使用
vagrant destroy删除VM镜像),那么我希望这种延迟只会是一次性的初始设置时间。我认为使用
vagrant up启动VM的后续启动应该会更快。
故障排除:
故障排除问题1:使用了错误/非法引号 - 在运行vagrant up后在主机上看到错误消息
背景:这发生在我身上,因为我将代码片段从指令来源的网页中粘贴过来。代码片段有开放和关闭引号 - 这些引号不被Vagrant使用的解释器/分析器(或者我想大多数脚本解释器和编译器)解释为正确的引号。
症状:
输出如下:
There is a syntax error in the following Vagrantfile. The syntax error
message is reproduced below for convenience:

C:/Users/rdavis/lamp-project/Vagrantfile:6: invalid multibyte char (US-ASCII)
C:/Users/rdavis/lamp-project/Vagrantfile:6: syntax error, unexpected $end
或者这个:
Could not parse for environment production: Could not match ?/configs? at /tmp/vagrant-puppet/manifests/default.pp:1 on node lucid32.hsd1.ca.comcast.net.

The following SSH command responded with a non-zero exit status.
Vagrant assumes that this means the command failed!
或者这个:
There was an error executing the following command with VBoxManage:

["list", "hostonlyifs"]
解决方法: 使用正确的双引号“。不要使用开闭引号。
故障排除问题2:在运行vagrant up后,主机上出现以下错误消息
←[1;35merr: /Stage[main]/Apache/File[/etc/apache2/sites-enabled/000-default]: Could not evaluate: Could not retrieve information from environment production source(s) file:/configs/000-default at /tmp
/vagrant-puppet/manifests/default.pp:11←[0m
解决方案:您不应该看到这个 - 原始脚本包含对包含
000-default路径的引用。我只是删除了所有涉及它的行和结构。
故障排除问题3:PHP文件被视为下载(在浏览器中下载文件),而不是被执行和显示。
需要在客户机上启用PHP。
解决方法:您可能需要或不需要这样做。
这个提示有效:(启用PHP,并防止文件被视为下载):
https://serverfault.com/questions/243435/getting-php-to-work-with-apache-to-run-php-files-through-browser
vagrant@lucid32:/etc/php5/cli$ a2enmod php5
Module php5 already enabled
vagrant@lucid32:/etc/php5/cli$ sudo apache2ctl restart
另一个提示:
PHP需要启用,建议在
http://galleryproject.org/node/55011中查看。
方法是:编辑
php.ini文件。这些是共享扩展(.so文件),您需要在php.ini中启用它们,然后重新启动PHP。
对我来说,我毕竟不需要编辑php.ini。顺便说一下,这是在这个lucid32 VM的
/etc/php5/cli/php.ini位置。
故障排除问题4:解决VirtualBox添加警告消息与版本不匹配的问题。
[default] The guest additions on this VM do not match the install version of
VirtualBox! This may cause things such as forwarded ports, shared
folders, and more to not work properly. If any of those things fail on
this machine, please update the guest additions and repackage the
box.

Guest Additions Version: 4.2.0
VirtualBox Version: 4.2.4
似乎并不是问题(它并不会阻止虚拟机成功运行),但如果你想要解决它:
http://automation.binarysage.net/?p=1198
https://unix.stackexchange.com/questions/58216/automate-installation-of-virtualbox-guest-additio
ns-via-command-line
https://serverfault.com/questions/243435/getting-php-to-work-with-apache-to-run-php-files-through-browser
(for Linux-like users:
http://www.pauloamgomes.net/blog/installing-vagrant)
故障排除问题5:在运行
vagrant up后看到错误消息“找不到'base'盒子”。
解决方法?检查包含语句
config.vm.box =等的
Vagrantfile中的行,确保它引用实际存在于您系统上的Vagrant box(操作系统安装映像) - 发出命令
vagrant box list以查看您拥有哪些盒子。
如果您按照我的指示操作,那么您应该已经拥有了
lucid32 盒子。请确保在您的
Vagrantfile 中没有多余的
config.vm.box = 等语句。坦白说: 当我实际上已经执行了
config.vm.box = "lucid32" 几行之前时,在我的
Vagrantfile 中存在一个多余的
config.vm.box = "base"。我现在已经纠正了这个错误。
常见问题解答
参考资料:
Vagrant 的通用资源:
Vagrant 命令到底是做什么的?
- 不错的描述
http://community.opscode.com/questions/81
http://deanstrezovski.com/setting-up-a-cagrant-lamp-stack/
http://www.jasongrimes.org/2012/06/managing-lamp-environments-with-chef-vagrant-and-ec2-1-of-3/
如何将Vagrant项目目录与现有的VirtualBox VM关联?
http://docs.vagrantup.com/v1/docs/getting-started/index.html
关于Vagrant Boxes的更多信息:
http://docs.vagrantup.com/v1/docs/boxes.html
Vagrant将更改保存到虚拟机的何处?
基于SSH密钥的登录(从主机或另一台机器外部登录到VM Box):
http://www.howtoforge.com/ssh_key_based_logins_putty_p2
http://docs.vagrantup.com/v1/docs/getting-started/ssh.html
http://en.wikipedia.org/wiki/Ssh-agent
针对Windows SSH登录VM:
PuTTY:免费的telnet/ssh客户端
www.chiark.greenend.org.uk/~sgtatham/putty/
puttygen:
www.chiark.greenend.org.uk/~sgtatham/putty/download.html
此答案的版本历史/更新
- 清理标记和标题
- 添加了如何运行
vagrant up以及可能需要花费一些时间的说明
- 添加了如何在虚拟机中设置root密码的步骤
- 添加了下载和初始化lucid32 box(相当于安装盘)的缺失步骤
- 添加了指向我的https://github.com/therobyouknow/VagrantVMSetups GitHub存储库的链接,其中包含此答案的Vagrant配置设置-为方便起见。
- 修改了
Vagrantfile,删除了多余的config.vm.box = "base",实际上,在几行之前,已经完成了config.vm.box = "lucid32"。如果您遇到错误The box 'base' could not be found.",这将有所帮助。还添加了一个新的故障排除项来解释同样的问题。
- 为那些想要基于Drupal的LAMP VM提供了另一种开箱即用的解决方案:http://drupal.org/project/vagrant请参见上面的更多注释。
- 2013-07-10:略微调整了编写本指南原因的语法。更新了O'Reilly的Vagrant书籍已经出版的信息。添加了https://puphpet.com/ -在线Vagrant配置脚本生成器(非常好!)的链接。添加了VeeWee工具的链接,该工具用于从任何.ISO Linux发行版(标准安装光盘)生成Vagrant .box文件。
- 2013-10-14 更新了“它们似乎不做什么”的项目,并说明了使用哪个版本的Vagrant-本指南使用Vagrant 1(以及原因)。使用puphpet.com使用Vagrant VM为Drupal设置的文档链接到Vagrant 2。
- 2013-10-21 更新了要使用的VirtualBox版本和Vagrant组合:VirtualBox版本4.2.12和Vagrant 1.2.2。某些其他组合可能有效,但我没有测试过这些组合,因此除非我可以看到明显的使用更高版本的好处,否则将坚持使用此组合。一个最明显的好处是提供速度。在Vagrant VM部分中放置了其他方法的标题。更新以表明此解决方案和其他解决方案与平台无关,应在PC、Mac或Linux上运行。
- 2013-10-23 更新了本指南要使用的Vagrant版本(即v1.2(也就是Vagrant 2)之前)和另一种方法puphpet.com(v1.2.2-相比之下是Vagrant 2发布)。
- 2013-12-03 更正了有关Vagrant API版本控制和哪个API版本在哪个Vagrant软件版本中的注释。添加了一些更多的替代全面的Vagrant设置。