基于NavigationView在SwiftUI的macOS应用中更改窗口大小

7
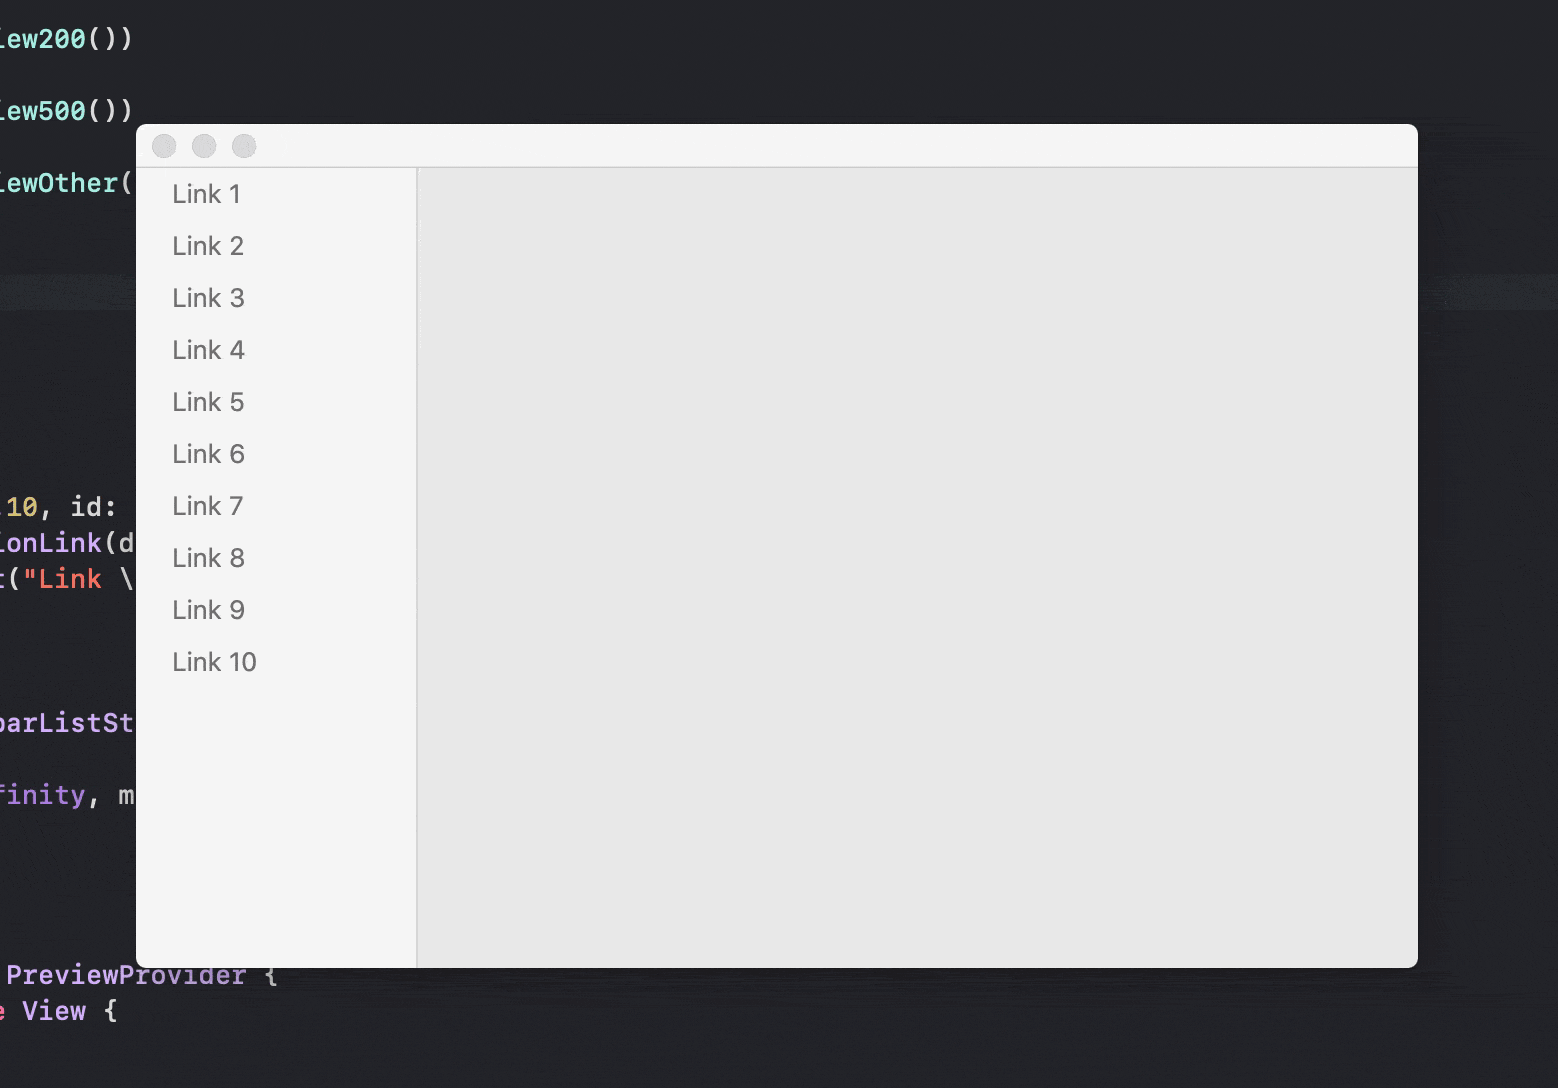
我正在为一个包含NavigationView的Mac应用程序使用SwiftUI,其中NavigationView包含侧边栏列表。当选择侧边栏中的项目时,它会更改在详细视图中显示的视图。详细视图中呈现的视图具有不同的大小,这应该导致在显示它们时窗口的大小发生变化。然而,当详细视图的大小发生变化时,窗口不会随之自动调整大小以适应新的详细视图。
如何使窗口大小根据NavigationView的大小变化而变化?
以下是我创建此应用程序的示例代码:
import SwiftUI

struct View200: View {
    var body: some View {
        Text("200").font(.title)
            .frame(width: 200, height: 400)
            .background(Color(.systemRed))
    }
}

struct View500: View {
    var body: some View {
        Text("500").font(.title)
            .frame(width: 500, height: 300)
            .background(Color(.systemBlue))
    }
}

struct ViewOther: View {
    let item: Int
    var body: some View {
        Text("\(item)").font(.title)
            .frame(width: 300, height: 200)
            .background(Color(.systemGreen))
    }
}

struct DetailView: View {

    let item: Int

    var body: some View {
        switch item {
        case 2:
            return AnyView(View200())
        case 5:
            return AnyView(View500())
        default:
            return AnyView(ViewOther(item: item))
        }
    }
}

struct ContentView: View {
    var body: some View {
        NavigationView {
             List {
                 ForEach(1...10, id: \.self) { index in
                     NavigationLink(destination: DetailView(item: index)) {
                         Text("Link \(index)")
                     }
                 }
             }
             .listStyle(SidebarListStyle())
        }
        .frame(maxWidth: .infinity, maxHeight: .infinity)
    }
}

struct ContentView_Previews: PreviewProvider {
    static var previews: some View {
        ContentView()
    }
}

当详细视图大小发生更改时,示例应用程序的外观如下:
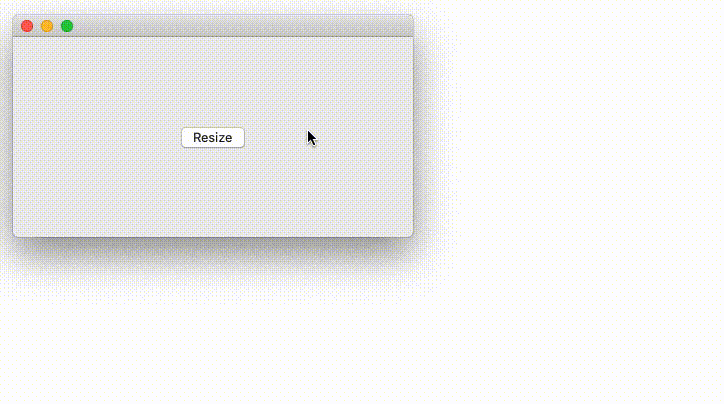
屏幕录制

3个回答

5
这里是一种可行的方法演示。我在一个不同的视图上实现了它,因为你需要重新设计你的解决方案来采用它。
演示 SwiftUI animate window frame 1)需要窗口动画调整大小的视图
struct ResizingView: View {
    public static let needsNewSize = Notification.Name("needsNewSize")

    @State var resizing = false
    var body: some View {
        VStack {
            Button(action: {
                self.resizing.toggle()
                NotificationCenter.default.post(name: Self.needsNewSize, object: 
                    CGSize(width: self.resizing ? 800 : 400, height: self.resizing ? 350 : 200))
            }, label: { Text("Resize") } )
        }
        .frame(minWidth: 400, maxWidth: .infinity, minHeight: 200, maxHeight: .infinity)
    }
}

2) 窗口的所有者(在这种情况下为AppDelegate

import Cocoa
import SwiftUI
import Combine

@NSApplicationMain
class AppDelegate: NSObject, NSApplicationDelegate {

    var window: NSWindow!
    var subscribers = Set<AnyCancellable>()

    func applicationDidFinishLaunching(_ aNotification: Notification) {

        let contentView = ResizingView()

        window = NSWindow(
            contentRect: NSRect(x: 0, y: 0, width: 480, height: 300), // just default
            styleMask: [.titled, .closable, .miniaturizable, .resizable, .fullSizeContentView],
            backing: .buffered, defer: false)
        window.center()
        window.setFrameAutosaveName("Main Window")
        window.contentView = NSHostingView(rootView: contentView)
        window.makeKeyAndOrderFront(nil)

        NotificationCenter.default.publisher(for: ResizingView.needsNewSize)
            .sink(receiveCompletion: {_ in}) { [unowned self] notificaiton in
                if let size = notificaiton.object as? CGSize {
                    var frame = self.window.frame
                    let old = self.window.contentRect(forFrameRect: frame).size

                    let dX = size.width - old.width
                    let dY = size.height - old.height

                    frame.origin.y -= dY // origin in flipped coordinates
                    frame.size.width += dX
                    frame.size.height += dY
                    self.window.setFrame(frame, display: true, animate: true)
                }
            }
            .store(in: &subscribers)
    }
    ...

在您的示例中,您使用按钮来发布通知。但在我的示例中,我使用了一个列表,其中每个项目都是一个NavigationLink,可以改变视图。因此,我不确定如何在我的特定示例中使用您的方法。请注意-我已更新我的问题,并附上了一个YouTube视频的链接,展示了我示例应用程序的屏幕录制。 - wigging
NavigationLink可以通过编程方式激活,参见此处的标签,以及此处的isActive - Asperi
如果我在NavigationLink中使用“tag”和“selection”参数,我的示例中的侧边栏将停止工作。 - wigging
我尝试的另一种方法是在DetailView中的switch语句中发布通知。但是这会出现警告:“NSHostingView正在重新布局其SwiftUI内容时被重入。这是不受支持的,当前的布局传递将被跳过。” - wigging
这是一个很棒的答案。需要注意的是,如果您使用SwiftUI窗口模板,则不必在AppDelegate中创建content view和window。您可以使用
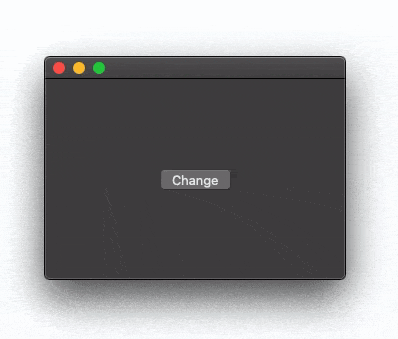
let window = NSApp.mainWindow来获取对AppDelegate中窗口的引用。那只是为了获得框架 - NotificationCenter代码并不关心ResizingView在哪里使用 - 您可以将其正常嵌入SwiftUI WindowGroup(或层次结构中的任何其他位置)。感谢Asperi提供如此好的答案! - Dominic Holmes
显示剩余2条评论

4

Asperi的回答对我有用,但在Big Sur 11.0.1、Xcode 12.2上动画不起作用。幸运的是,如果你将其包含在NSAnimationContext中,动画将正常工作:

NSAnimationContext.runAnimationGroup({ context in
    context.timingFunction = CAMediaTimingFunction(name: .easeIn)
    window!.animator().setFrame(frame, display: true, animate: true)
}, completionHandler: {
})

还应该提到的是,ResizingViewwindow不必在AppDelegate中初始化;您可以继续使用SwiftUI的App结构:
@main
struct MyApp: App {

    @NSApplicationDelegateAdaptor(AppDelegate.self) var appDelegate

    var body: some Scene {
        WindowGroup {
            ResizingView()
        }
    }
}

class AppDelegate: NSObject, NSApplicationDelegate {

    var window: NSWindow?
    var subscribers = Set<AnyCancellable>()

    func applicationDidBecomeActive(_ notification: Notification) {
        self.window = NSApp.mainWindow
    }

    func applicationDidFinishLaunching(_ aNotification: Notification) {
        setupResizeNotification()
    }

    private func setupResizeNotification() {
        NotificationCenter.default.publisher(for: ResizingView.needsNewSize)
            .sink(receiveCompletion: {_ in}) { [unowned self] notificaiton in
                if let size = notificaiton.object as? CGSize, self.window != nil {
                    var frame = self.window!.frame
                    let old = self.window!.contentRect(forFrameRect: frame).size
                    let dX = size.width - old.width
                    let dY = size.height - old.height
                    frame.origin.y -= dY // origin in flipped coordinates
                    frame.size.width += dX
                    frame.size.height += dY
                    NSAnimationContext.runAnimationGroup({ context in
                        context.timingFunction = CAMediaTimingFunction(name: .easeIn)
                        window!.animator().setFrame(frame, display: true, animate: true)
                    }, completionHandler: {
                    })
                }
            }
            .store(in: &subscribers)
    }
}

2
以下内容并不能解决你的问题,但是可能(需要一些额外的工作)帮助你找到解决方案。
我没有太多可以进一步调查的东西,但是可以通过子类化NSWindow来覆盖setContentSize方法。这样,您就可以覆盖默认行为,即在没有动画的情况下设置窗口框架。
您将需要解决的问题是,对于像您这样的复杂视图,setContentSize方法会被重复调用,导致动画无法正常工作。
以下示例效果良好,但这是因为我们正在处理一个非常简单的视图: enter image description here
@NSApplicationMain
class AppDelegate: NSObject, NSApplicationDelegate {

    var window: NSWindow!


    func applicationDidFinishLaunching(_ aNotification: Notification) {
        // Create the SwiftUI view that provides the window contents.
        let contentView = ContentView()

        // Create the window and set the content view. 
        window = AnimatableWindow(
            contentRect: NSRect(x: 0, y: 0, width: 480, height: 300),
            styleMask: [.titled, .closable, .miniaturizable, .resizable, .fullSizeContentView],
            backing: .buffered, defer: false)
        window.center()
        window.setFrameAutosaveName("Main Window")
        window.contentView = NSHostingView(rootView: contentView)
        window.makeKeyAndOrderFront(nil)
    }

    func applicationWillTerminate(_ aNotification: Notification) {
        // Insert code here to tear down your application
    }
}


class AnimatableWindow: NSWindow {
    var lastContentSize: CGSize = .zero

    override func setContentSize(_ size: NSSize) {

        if lastContentSize == size { return } // prevent multiple calls with the same size

        lastContentSize = size

        self.animator().setFrame(NSRect(origin: self.frame.origin, size: size), display: true, animate: true)
    }

}

struct ContentView: View {
    @State private var flag = false

    var body: some View {
        VStack {
            Button("Change") {
                self.flag.toggle()
            }
        }.frame(width: self.flag ? 100 : 300 , height: 200)
    }
}

正如您在回答中提到的那样,这种方法在我的示例中效果不佳。当 ThreeView 被显示时,侧边栏会消失。 - wigging

网页内容由stack overflow 提供, 点击上面的
可以查看英文原文,
原文链接