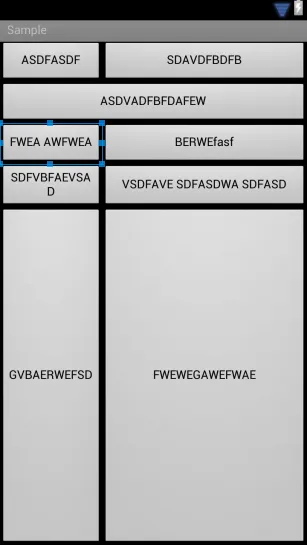
我阅读了这个帖子,意识到我想要比线性布局更平的解决方案。经过一些研究,我最终制作了自己的布局。它受GridLayout的启发,但有所不同。
请注意,如果您要复制粘贴代码,您需要在某些地方更改包名称。
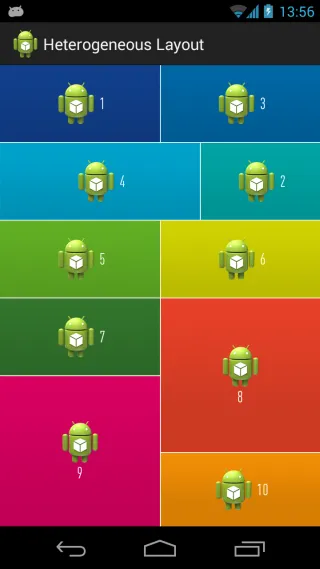
此布局具有4个布局参数,供子项使用以定位自身。这些是layout_left、layout_top、layout_right和layout_bottom。ICGridLayout本身有两个属性:layout_spacing和columns。
Columns告诉布局您想要包含多少列。然后它将计算与宽度/列相同高度的单元格的大小。这将是布局的宽度/列。
spacing是您希望每个子项之间的间距。
layout_left | top | right | bottom属性是每个侧面的坐标。布局不进行任何计算,以避免发生碰撞等情况。它只是把孩子放在他们想要的地方。
如果您想要更小的正方形,您只需增加columns属性即可。
请记住,这是一个快速原型,我将继续改进它,当我感觉它准备好时,我会将其上传到Github并在此处发表评论。
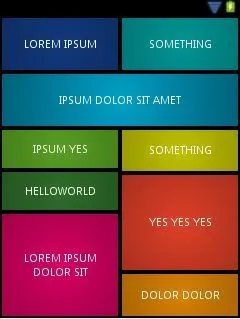
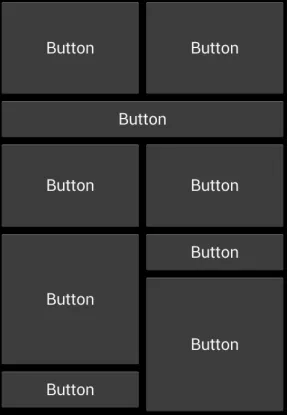
我的所有代码应该产生以下结果: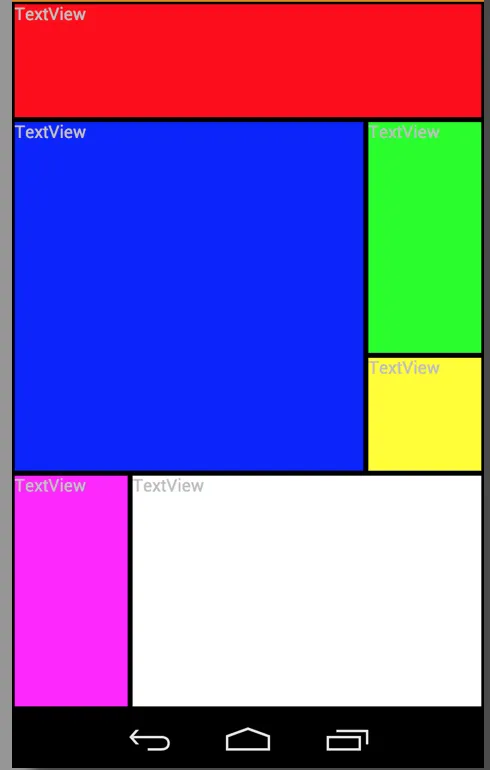
*****编辑*****
增加了孩子的度量调用,第一次忘记了。
结束编辑
ICGridLayout.java:
package com.risch.evertsson.iclib.layout;
import android.content.Context;
import android.content.res.TypedArray;
import android.util.AttributeSet;
import android.view.View;
import android.view.ViewGroup;
import com.risch.evertsson.iclib.R;
public class ICGridLayout extends ViewGroup {
private int mColumns = 4;
private float mSpacing;
public ICGridLayout(Context context) {
super(context);
}
public ICGridLayout(Context context, AttributeSet attrs) {
super(context, attrs);
init(attrs);
}
public ICGridLayout(Context context, AttributeSet attrs, int defStyle) {
super(context, attrs, defStyle);
init(attrs);
}
private void init(AttributeSet attrs) {
TypedArray a = getContext().obtainStyledAttributes(
attrs,
R.styleable.ICGridLayout_Layout);
this.mColumns = a.getInt(R.styleable.ICGridLayout_Layout_columns, 3);
this.mSpacing = a.getDimension(R.styleable.ICGridLayout_Layout_layout_spacing, 0);
a.recycle();
}
@Override
protected void onLayout(boolean changed, int l, int t, int r, int b) {
if (changed) {
int width = (int) (r - l);
int side = width / mColumns;
int children = getChildCount();
View child = null;
for (int i = 0; i < children; i++) {
child = getChildAt(i);
LayoutParams lp = (LayoutParams) child.getLayoutParams();
int left = (int) (lp.left * side + mSpacing / 2);
int right = (int) (lp.right * side - mSpacing / 2);
int top = (int) (lp.top * side + mSpacing / 2);
int bottom = (int) (lp.bottom * side - mSpacing / 2);
child.layout(left, top, right, bottom);
}
}
}
@Override
protected void onMeasure(int widthMeasureSpec, int heightMeasureSpec) {
measureVertical(widthMeasureSpec, heightMeasureSpec);
}
private void measureVertical(int widthMeasureSpec, int heightMeasureSpec) {
int widthMode = MeasureSpec.getMode(widthMeasureSpec);
int heightMode = MeasureSpec.getMode(heightMeasureSpec);
int width = 0;
int height = 0;
if (widthMode == MeasureSpec.AT_MOST || widthMode == MeasureSpec.EXACTLY) {
width = MeasureSpec.getSize(widthMeasureSpec);
} else {
throw new RuntimeException("widthMeasureSpec must be AT_MOST or " +
"EXACTLY not UNSPECIFIED when orientation == VERTICAL");
}
View child = null;
int row = 0;
int side = width / mColumns;
int childCount = getChildCount();
for (int i = 0; i < childCount; i++) {
child = getChildAt(i);
LayoutParams lp = (LayoutParams) child.getLayoutParams();
if (lp.bottom > row) {
row = lp.bottom;
}
int childHeight = (lp.bottom - lp.top)*side;
int childWidth = (lp.right-lp.left)*side;
int heightSpec = MeasureSpec.makeMeasureSpec(childHeight, LayoutParams.MATCH_PARENT);
int widthSpec = MeasureSpec.makeMeasureSpec(childWidth, LayoutParams.MATCH_PARENT);
child.measure(widthSpec, heightSpec);
}
height = row * side;
setMeasuredDimension(width, height);
}
@Override
public ViewGroup.LayoutParams generateLayoutParams(AttributeSet attrs) {
return new ICGridLayout.LayoutParams(getContext(), attrs);
}
@Override
protected boolean checkLayoutParams(ViewGroup.LayoutParams p) {
return p instanceof ICGridLayout.LayoutParams;
}
@Override
protected ViewGroup.LayoutParams
generateLayoutParams(ViewGroup.LayoutParams p) {
return new ICGridLayout.LayoutParams(p);
}
@Override
protected ViewGroup.LayoutParams generateDefaultLayoutParams() {
return new LayoutParams();
}
public static class LayoutParams extends ViewGroup.MarginLayoutParams {
int right = 1;
int bottom = 1;
int top = 0;
int left = 0;
int width = -1;
int height = -1;
public LayoutParams() {
super(MATCH_PARENT, MATCH_PARENT);
top = 0;
left = 1;
}
public LayoutParams(int width, int height) {
super(width, height);
top = 0;
left = 1;
}
public LayoutParams(Context context, AttributeSet attrs) {
super(context, attrs);
TypedArray a = context.obtainStyledAttributes(
attrs,
R.styleable.ICGridLayout_Layout);
left = a.getInt(R.styleable.ICGridLayout_Layout_layout_left, 0);
top = a.getInt(R.styleable.ICGridLayout_Layout_layout_top, 0);
right = a.getInt(R.styleable.ICGridLayout_Layout_layout_right, left + 1);
bottom = a.getInt(R.styleable.ICGridLayout_Layout_layout_bottom, top + 1);
height = a.getInt(R.styleable.ICGridLayout_Layout_layout_row_span, -1);
width = a.getInt(R.styleable.ICGridLayout_Layout_layout_col_span, -1);
if (height != -1) {
bottom = top + height;
}
if (width != -1) {
right = left + width;
}
a.recycle();
}
public LayoutParams(ViewGroup.LayoutParams params) {
super(params);
}
}
}
ICGridLayout.java非常直观,它获取子项提供的值并对其进行布局。
attrs.xml:
<?xml version="1.0" encoding="utf-8"?>
<resources>
    <declare-styleable name="ICGridLayout_Layout">
        <attr name="columns" format="integer"/>
        <attr name="layout_left" format="integer"/>
        <attr name="layout_top" format="integer"/>
        <attr name="layout_right" format="integer"/>
        <attr name="layout_bottom" format="integer"/>
        <attr name="layout_col_span" format="integer"/>
        <attr name="layout_row_span" format="integer"/>
        <attr name="layout_spacing" format="dimension"/>
    </declare-styleable>

</resources>
example_layout.xml:
<?xml version="1.0" encoding="utf-8"?>
<ScrollView xmlns:android="http://schemas.android.com/apk/res/android"
    xmlns:app="http://schemas.android.com/apk/res/com.rischit.projectlogger"
    android:id="@+id/scroller"
    android:layout_width="match_parent"
    android:layout_height="match_parent" >

    <com.risch.evertsson.iclib.layout.ICGridLayout
        android:id="@+id/ICGridLayout1"
        android:layout_width="match_parent"
        android:layout_height="match_parent"
        app:layout_spacing="4dp"
        app:columns="4" >


        <TextView
            android:id="@+id/textView1"
            android:layout_width="match_parent"
            android:layout_height="match_parent"
            app:layout_bottom="1"
            app:layout_left="0"
            app:layout_right="4"
            app:layout_top="0"
            android:background="#ff0000"
            android:text="TextView" />

        <TextView
            android:id="@+id/textView1"
            android:layout_width="match_parent"
            android:layout_height="match_parent"
            app:layout_bottom="3"
            app:layout_left="3"
            app:layout_right="4"
            app:layout_top="1"
            android:background="#00ff00"
            android:text="TextView" />

        <TextView
            android:id="@+id/textView1"
            android:layout_width="match_parent"
            android:layout_height="match_parent"
            app:layout_bottom="4"
            app:layout_left="0"
            app:layout_right="3"
            app:layout_top="1"
            android:background="#0000ff"
            android:text="TextView" />

        <TextView
            android:id="@+id/textView1"
            android:layout_width="match_parent"
            android:layout_height="match_parent"
            app:layout_bottom="4"
            app:layout_left="3"
            app:layout_right="4"
            app:layout_top="3"
            android:background="#ffff00"
            android:text="TextView" />

        <TextView
            android:id="@+id/textView1"
            android:layout_width="match_parent"
            android:layout_height="match_parent"
            app:layout_bottom="6"
            app:layout_left="0"
            app:layout_right="1"
            app:layout_top="4"
            android:background="#ff00ff"
            android:text="TextView" />

        <TextView
            android:id="@+id/textView1"
            android:layout_width="match_parent"
            android:layout_height="match_parent"
            app:layout_bottom="6"
            app:layout_left="1"
            app:layout_right="4"
            app:layout_top="4"
            android:background="#ffffff"
            android:text="TextView" />
    </com.risch.evertsson.iclib.layout.ICGridLayout>

</ScrollView>
-- Johan Risch
附言:
这是我第一次写的长篇回答,我尽力以正确的方式表达。如果我失败了,请告诉我,但请不要过于批评。
敬礼

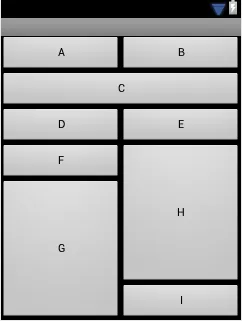
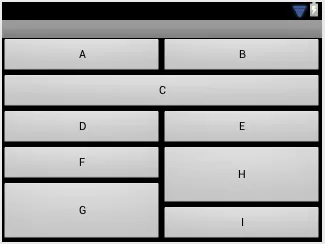
GridLayout没有提供类似“权重”的东西。你可以通过设置gravity属性告诉单元格填充剩余空间,但不能用它来均匀分配空间。至少在我花费的短时间内,我无法找到一种在不使用运行时设备参数的情况下创建两个等大小列以填充屏幕宽度的方法。我会继续关注这个问题 - 我很想看看其他人能想出什么办法。 - MH.