用波浪动画使CAShapeLayer动画化

7

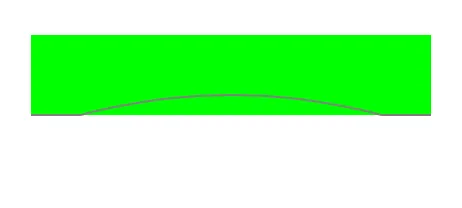
下面我附上了一张图片,我希望实现以下动画。我尝试过水波动画,但不知道如何像上面那样控制动画。

我有一个CAShapeLayer,我要实现这个动画。

enter image description here

初始化代码

UIBezierPath *leftPath = [UIBezierPath bezierPath];
// Set the starting point of the shape.
[leftPath moveToPoint:CGPointMake(0,self.bounds.size.height/2)];
// Draw the lines.


[leftPath addLineToPoint:CGPointMake(0,self.bounds.size.height/2)];
[leftPath addLineToPoint:CGPointMake(self.bounds.size.width,self.bounds.size.height/2)];


leftLayer.path = leftPath.CGPath;
leftLayer.strokeColor = [[UIColor whiteColor] CGColor];
leftLayer.fillColor = nil;
leftLayer.borderWidth = 3.0f;
leftLayer.lineCap = kCALineCapRound;
leftLayer.lineJoin = kCALineJoinRound;

leftLayer.borderColor=[UIColor blackColor].CGColor;
[self.layer addSublayer:leftLayer];

动画代码

-(void)animateCureve{

CABasicAnimation *pathAnimation = [CABasicAnimation animationWithKeyPath:@"path"];
pathAnimation.duration = 3.5;
pathAnimation.timingFunction = [CAMediaTimingFunction functionWithName:kCAMediaTimingFunctionEaseInEaseOut];
pathAnimation.fromValue = (id)leftLayer.path;
pathAnimation.toValue = (id)[self wavePath].CGPath;
pathAnimation.removedOnCompletion=NO;
[leftLayer addAnimation:pathAnimation forKey:@"path"];
}

曲线路径

- (UIBezierPath *)wavePath {
//set start and end accordingly

UIBezierPath *startPath = [UIBezierPath bezierPath];
[startPath moveToPoint:CGPointMake(0, self.bounds.size.height/2)];
[startPath addCurveToPoint:CGPointMake(self.bounds.size.width, self.bounds.size.height/2) controlPoint1:CGPointMake(50, self.bounds.size.height/2+0)  controlPoint2:CGPointMake(self.bounds.size.width/2, 20) ];


return startPath;
}

我已经编辑了,请检查。我使用NSTimer提供连续的波形。 - Mukesh
嘿 @ZevEisenberg,我已经编辑了代码,请你检查一下。 - Mukesh
1个回答

2

仔细观察这些框架,它们似乎是沿着路径移动的一个浅的二次曲线。您可以尝试定义曲线的开始和结束范围,比如start和end,然后在中间添加控制点。然后再在两端添加直线。以下是我快速写的代码:

CGFloat start;
CGFloat end;
CGFloat heightOfQuad;
CGFloat mid = (start + end)/2;

UIBezierPath *path = [UIBezierPath bezierPath];
[path moveToPoint:CGPointMake(start, 0)];
[path addQuadCurveToPoint:CGPointMake(end, 0) controlPoint:CGPointMake(mid, heightOfQuad)];

UIBezierPath *startPath = [UIBezierPath bezierPath];
[startPath moveToPoint:CGPointMake(0, 0)];
[startPath addLineToPoint:CGPointMake(start, 0)];

UIBezierPath *endPath = [UIBezierPath bezierPath];
[endPath moveToPoint:CGPointMake(end, 0)];
[endPath addLineToPoint:CGPointMake(lengthOfViewHere, 0)];

[startPath appendPath:path];
[startPath appendPath:endPath];

我还没有测试过这个,但你可以试一试。

更新:

- (UIBezierPath *)wavePath {

    CGFloat mid = (self.start + self.end)/2;
    CGFloat y = self.frame.size.height;

    UIBezierPath *curvePath = [UIBezierPath bezierPath];
    [curvePath moveToPoint:CGPointMake(self.start, y)];
    [curvePath addQuadCurveToPoint:CGPointMake(self.end, y) controlPoint:CGPointMake(mid, y - waveHeight)];

    UIBezierPath *startPath = [UIBezierPath bezierPath];
    [startPath moveToPoint:CGPointMake(0, y)];
    [startPath addLineToPoint:CGPointMake(self.start, y)];

    UIBezierPath *endPath = [UIBezierPath bezierPath];
    [endPath moveToPoint:CGPointMake(self.end, y)];
    [endPath addLineToPoint:CGPointMake(self.frame.size.width, y)];

    [startPath appendPath:curvePath];
    [startPath appendPath:endPath];

    return startPath;
}
- (void)setWavePosition:(CGFloat)wavePosition {

    //from 0.0 to 1.0
    _wavePosition = wavePosition;

    //set start and end accordingly
    CGFloat waveCoordinate = wavePosition * self.frame.size.width;
    self.start = waveCoordinate - waveWidth/2;
    self.end = waveCoordinate + waveWidth/2;

    self.path = [self wavePath].CGPath;
    [self setNeedsDisplay];
}

经过一些尝试,上面的代码在视图宽度为200.0时,将位置设置为0.5,波高设置为5.0,波宽设置为150.0,生成了以下内容:

enter image description here

您只需要设置wavePosition,然后wavePath将返回新路径。


你能告诉我们发生了什么事吗?你把这段代码放在哪里了? - David Cao
我创建了CAShapeLayer并使用CABasicAnimation来从路径属性的起始值和结束值进行动画处理。在起始路径中,它是一条直线路径,在终止路径中,我使用了您的路径。 - Mukesh
我写这个的时候认为你已经继承了CAShapeLayer。我的想法更像是你有一个属性来跟踪波浪,然后你会在动画属性中设置它。 - David Cao
哦,哇,我犯了一个愚蠢的错误,我已经更新了答案。我还在测试一些东西,很快会发布另一个更新。 - David Cao
谢谢@DavidCao,我也会在我的端尝试。 - Mukesh
你所做的曲线非常完美,但是当你进行动画时,它并不像图片所示那样工作。我已经发布了代码。 - Mukesh

网页内容由stack overflow 提供, 点击上面的
可以查看英文原文,
原文链接