当编辑DataGridView单元格时,如何在其周围绘制边框?

13

我希望在编辑DataGridView单元格时绘制一个红色边框。

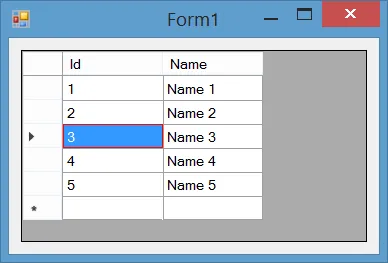
使用以下代码,我已成功在未编辑时绘制所选单元格的红色边框:

private void Form1_Load(object sender, EventArgs e)
{
    this.Width = 650;
    this.Height = 250;
    dataGridView1.Left = 5;
    dataGridView1.Top = 5;
    dataGridView1.Width = 600;
    dataGridView1.Height = 175;

    DataTable dt = new DataTable("Test Table");
    dt.Columns.Add("Column 1");
    dt.Columns.Add("Column 2");
    dt.Columns.Add("Column 3");
    dt.Columns.Add("Column 4");
    dt.Columns.Add("Column 5");
    dt.Rows.Add(dt.NewRow());
    dt.Rows.Add(dt.NewRow());
    dt.Rows.Add(dt.NewRow());
    dt.Rows.Add(dt.NewRow());
    dt.Rows.Add(dt.NewRow());
    dataGridView1.DataSource = dt;

    dataGridView1.AllowUserToAddRows = false;
    dataGridView1.AllowUserToDeleteRows = false;
    dataGridView1.MultiSelect = false;
    dataGridView1.SelectionMode = DataGridViewSelectionMode.CellSelect;
    dataGridView1.DefaultCellStyle.SelectionBackColor = Color.White;
    dataGridView1.CellPainting += new System.Windows.Forms.DataGridViewCellPaintingEventHandler(this.dataGridView1_CellPainting);
    dataGridView1.EditingControlShowing += new System.Windows.Forms.DataGridViewEditingControlShowingEventHandler(this.dataGridView1_EditingControlShowing);
}

private void dataGridView1_CellPainting(object sender, DataGridViewCellPaintingEventArgs e)
{
    if (e.ColumnIndex != -1 && e.RowIndex != -1 && dataGridView1[e.ColumnIndex, e.RowIndex].Selected)
    {
        using (Brush borderBrush = new SolidBrush(Color.Red))
        {
            using (Pen borderPen = new Pen(borderBrush, 2))
            {
                Rectangle rectDimensions = e.CellBounds;
                rectDimensions.Width -= 2;
                rectDimensions.Height -= 2;
                rectDimensions.X = rectDimensions.Left + 1;
                rectDimensions.Y = rectDimensions.Top + 1;

                e.Graphics.DrawRectangle(borderPen, rectDimensions);

                e.Handled = true;
            }
        }
    }
}

下面的代码会产生这个结果:

Image1

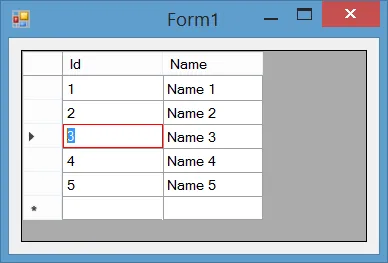
然而,当你编辑一个单元格时会发生这种情况:

Image2

似乎 EditingControl 将自己绘制在我的大部分红色边框上。不幸的是,我找不到一种方法来解决这个问题,使得我的红色边框始终保持完全显示。

我应该怎么做?


到目前为止我已经尝试过以下方法:

1. 处理 EditingControlShowing() 事件,手动重新绘制边框,像这样:

private void dataGridView1_EditingControlShowing(object sender, DataGridViewEditingControlShowingEventArgs e)
{
    Graphics gfx = e.Control.CreateGraphics();

    using (Brush borderBrush = new SolidBrush(Color.Red))
    {
        using (Pen borderPen = new Pen(borderBrush, 2))
        {
            Rectangle rectDimensions = e.Control.ClientRectangle;
            rectDimensions.Width -= 2;
            rectDimensions.Height -= 2;
            rectDimensions.X = rectDimensions.Left + 1;
            rectDimensions.Y = rectDimensions.Top + 1;

            gfx.DrawRectangle(borderPen, rectDimensions);
        }
    }
}

但是这并没有画出任何东西。我尝试了几种变化,但它们仍然无法在此处绘制。


2. 然后我尝试处理EditingControlPaint()事件,代码如下:

private void dataGridView1_EditingControlShowing(object sender, DataGridViewEditingControlShowingEventArgs e)
{
    e.Control.Paint -= new PaintEventHandler(dataGridView1_EditingControl_Paint);
    e.Control.Paint += new PaintEventHandler(dataGridView1_EditingControl_Paint);
}

void dataGridView1_EditingControl_Paint(object sender, PaintEventArgs e)
{
    MessageBox.Show("Starting EditingControl Paint() Event...");
}

但是这个事件甚至都不会触发。后来我在某处阅读到,EditingControl使用普通的TextBox,它没有触发Paint()事件,因为它由Windows处理。


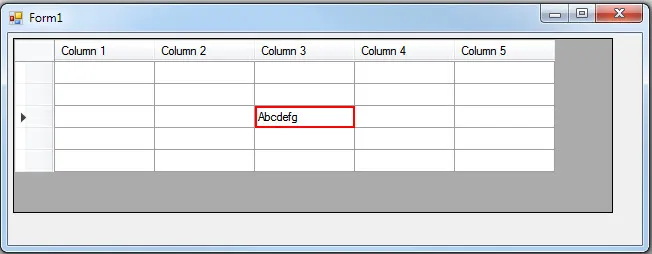
3. 最后,我决定不再尝试重新绘制另一个边框,而是试图通过将EditingControl的大小调整为小于我的边框,希望边框能够显示出来,就像这样:

private void dataGridView1_EditingControlShowing(object sender, DataGridViewEditingControlShowingEventArgs e)
{
    e.Control.Resize -= new EventHandler(dataGridView1_EditingControl_Resize);
    e.Control.Resize += new EventHandler(dataGridView1_EditingControl_Resize);
}

void dataGridView1_EditingControl_Resize(object sender, EventArgs e)
{
    dataGridView1.EditingControl.Left = 20;
}

然而,这只给了我这个结果:

Image3

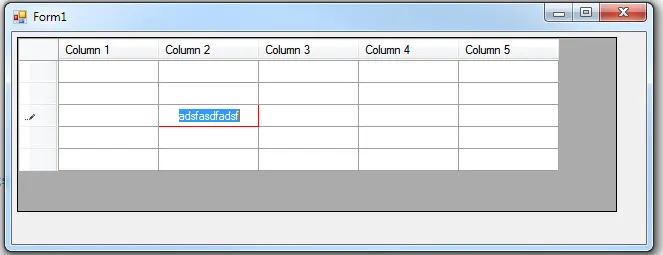
所以,TextBox虽然向左移动了,但似乎还有另一个控件在其下面阻挡着我的红色边框。 然而,我找不到任何方法访问该控件以调整其大小,因此对我来说这也行不通。


4. 我还尝试使用上述#1的代码在Resize()事件中重新绘制边框,但仍然没有效果。 尽管如此,在此处使用dataGridView1.EditingControl.BackColor = Color.Red;可以工作,因此我可以格式化控件的某些部分,但似乎尝试绘制边框不是其中之一。

我想做的就是在编辑时保持单元格周围显示红色边框。 您知道我该如何做吗?


你试过尝试解决边框样式的问题吗? - TaW
我确实查看了它们,但是我只能找到将BorderStyle设置为none、inset、raised等选项。但我不确定是否有办法也使用它们来设置边框颜色? - Calcolat
你是对的,颜色不是BorderStyles的一部分。 - TaW
2
最基本的问题是你没有足够的空间来显示那个红色边框。你需要缩小编辑控件,这已经在这个现有的问答中讨论过了。通常就到这里了。 - Hans Passant
3个回答

11

可以通过设置一些选项并绘制单元格的特定部分来完成。具体步骤如下:

首先,在设计器中或者在窗体加载代码中将CellBorderStyle设置为RaisedSunken

this.dataGridView1.CellBorderStyle = DataGridViewCellBorderStyle.Raised;

然后使用这些特定的有序规则绘制单元格:

  1. 仅绘制网格内容单元格,不包括列标题单元格或行标题单元格
  2. 绘制选定单元格时,首先使用e.Paint(...)绘制除边框之外的所有部分,然后自己绘制边框
  3. 设置e.Handled=true以防止默认绘制
  4. 在绘制非选定单元格时,首先使用e.Paint(...)绘制除边框之外的所有部分
  5. 使用网格背景颜色绘制第一行单元格的顶部边框和第一列单元格的左侧边框
  6. 使用网格线颜色绘制最后一行单元格的底部边框和最后一列单元格的右侧边框
  7. 使用网格背景颜色绘制非最后一行单元格的底部边框和非最后一列单元格的右侧边框
  8. 使用网格线颜色绘制非第一行单元格的顶部边框和非最后一列单元格的左侧边框 9.设置e.Handled=true以防止默认绘制

这是选择后的结果截图:

enter image description here

这是编辑单元格后的结果截图:

enter image description here

以下是单元格绘制事件的代码:

private void dataGridView1_CellPainting(object sender, DataGridViewCellPaintingEventArgs e)
{
    //Draw only grid content cells not ColumnHeader cells nor RowHeader cells
    if (e.ColumnIndex > -1 & e.RowIndex > -1)
    {
        //Pen for left and top borders
        using (var backGroundPen = new Pen(e.CellStyle.BackColor, 1))
        //Pen for bottom and right borders
        using (var gridlinePen = new Pen(dataGridView1.GridColor, 1))
        //Pen for selected cell borders
        using (var selectedPen = new Pen(Color.Red, 1))
        {
            var topLeftPoint = new Point(e.CellBounds.Left, e.CellBounds.Top);
            var topRightPoint = new Point(e.CellBounds.Right - 1, e.CellBounds.Top);
            var bottomRightPoint = new Point(e.CellBounds.Right - 1, e.CellBounds.Bottom - 1);
            var bottomleftPoint = new Point(e.CellBounds.Left, e.CellBounds.Bottom - 1);

            //Draw selected cells here
            if (this.dataGridView1[e.ColumnIndex, e.RowIndex].Selected)
            {
                //Paint all parts except borders.
                e.Paint(e.ClipBounds, DataGridViewPaintParts.All & ~DataGridViewPaintParts.Border);

                //Draw selected cells border here
                e.Graphics.DrawRectangle(selectedPen, new Rectangle(e.CellBounds.Left, e.CellBounds.Top, e.CellBounds.Width - 1, e.CellBounds.Height - 1));

                //Handled painting for this cell, Stop default rendering.
                e.Handled = true;
            }
            //Draw non-selected cells here
            else
            {
                //Paint all parts except borders.
                e.Paint(e.ClipBounds, DataGridViewPaintParts.All & ~DataGridViewPaintParts.Border);

                //Top border of first row cells should be in background color
                if (e.RowIndex == 0)
                    e.Graphics.DrawLine(backGroundPen, topLeftPoint, topRightPoint);

                //Left border of first column cells should be in background color
                if (e.ColumnIndex == 0)
                    e.Graphics.DrawLine(backGroundPen, topLeftPoint, bottomleftPoint);

                //Bottom border of last row cells should be in gridLine color
                if (e.RowIndex == dataGridView1.RowCount - 1)
                    e.Graphics.DrawLine(gridlinePen, bottomRightPoint, bottomleftPoint);
                else  //Bottom border of non-last row cells should be in background color
                    e.Graphics.DrawLine(backGroundPen, bottomRightPoint, bottomleftPoint);

                //Right border of last column cells should be in gridLine color
                if (e.ColumnIndex == dataGridView1.ColumnCount - 1)
                    e.Graphics.DrawLine(gridlinePen, bottomRightPoint, topRightPoint);
                else //Right border of non-last column cells should be in background color
                    e.Graphics.DrawLine(backGroundPen, bottomRightPoint, topRightPoint);

                //Top border of non-first row cells should be in gridLine color, and they should be drawn here after right border
                if (e.RowIndex > 0)
                    e.Graphics.DrawLine(gridlinePen, topLeftPoint, topRightPoint);

                //Left border of non-first column cells should be in gridLine color, and they should be drawn here after bottom border
                if (e.ColumnIndex > 0)
                    e.Graphics.DrawLine(gridlinePen, topLeftPoint, bottomleftPoint);

                //We handled painting for this cell, Stop default rendering.
                e.Handled = true;
            }
        }
    }
}

e.Handled 设置为 true 是危险的。设置 DataGridViewTextBoxCell 的值会覆盖它,调整大小不会重绘所有内容,留下一个大混乱。更好的解决方案在这里:https://dev59.com/XGMm5IYBdhLWcg3wTtfi#35553181 - rémy

3
您可以使用现有代码中最简单的方法是将CellBorderStyle设置为Sunken,如下所示:
dataGridView1.CellBorderStyle = System.Windows.Forms.DataGridViewCellBorderStyle.Sunken;

enter image description here

如果您不喜欢Sunken,则可以通过AdjustCellBorderStyleDataGridViewAdvancedBorderStyle来实现, 在单元格焦点事件中更改/自定义单元格边框样式。 另请参阅:如何:通过扩展其行为和外观来自定义Windows窗体DataGridView控件中的单元格和列

希望这能帮到您。


这是一种有趣的方法,它有点奏效。我的主要问题是我更喜欢保持尽可能平坦的样式,而这会使每个单元格都变成凹陷的外观。此外,如果我在单元格不处于编辑模式时使用较粗的笔宽来绘制边框,则在编辑模式下边框仍然会明显被截断。也许有一种方法可以仅将凹陷样式应用于当前选定的单元格而不是其余部分?如果有的话,我现在可能能够使用它作为解决方法。 - Calcolat

0

看起来EditingControl是托管在父级Panel中的,如果您将该面板的Opaque样式设置为true,则边框将被绘制。

例如:

void dataGridView1_EditingControlShowing(object sender, DataGridViewEditingControlShowingEventArgs e) {
    var c = e.Control;
    var p = c.Parent;
    SetStyles(p, ControlStyles.Opaque, true);
}

private static void SetStyles(Control c, ControlStyles styles, bool value) {
    MethodInfo mi = typeof(Control).GetMethod("SetStyle", BindingFlags.NonPublic | BindingFlags.Instance);
    mi.Invoke(c, new Object[] { styles, value });
}

谢谢您的评论,我尝试了您提供的方法,但是当您为控件设置不透明样式时,其背景不会绘制,因此在渲染时会出现一些问题。例如,当您最小化并还原窗口时,您将看到问题。我仍在使用的解决方案是我在这个答案中发布的,如果您能看一下并发现它有用的话,我会很高兴:) - Reza Aghaei

网页内容由stack overflow 提供, 点击上面的
可以查看英文原文,
原文链接