Swift SpriteKit反向遮罩在模拟器上可以正常工作,但在设备上无法正常工作。

3

实现这一点的代码相当简单:

var cropNode = SKCropNode()
var shape = SKShapeNode(rectOf: CGSize(width:100,height:100))
shape.fillColor = SKColor.orange

var shape2 = SKShapeNode(rectOf: CGSize(width:25,height:25))
shape2.fillColor = SKColor.red
shape2.blendMode = .subtract
shape.addChild(shape2)

cropNode.addChild(shape)
cropNode.position = CGPoint(x:150,y:170)
cropNode.maskNode=shape
container.addChild(cropNode)

同样的代码,同样的iOS版本,结果却不同 = 不好

image


我很惊讶模拟器“起作用”了。而且令人愉快的是,有人期望/希望进行反向遮罩。不幸的是,在SpriteKit中目前还不可能实现这一点。请参见此处:https://stackoverflow.com/questions/41004925/how-do-i-cut-a-hole-in-a-sprite-image-or-texture-to-show-what-is-behind-it-using/41007482#41007482 - Confused
感谢您的评论。请查看下面的答案。这是一个hack,但希望它能帮助其他遇到同样问题的人。 - OhMyGuin
2个回答

3

以下是一种使用着色器为您生成maskNode的方法:

func generateMaskNode(from mask:SKNode) -> SKNode
{
    var returningNode : SKNode!
    autoreleasepool
    {
        let view = SKView()
        //First let's flatten the node
        let texture = view.texture(from: mask) 
        let node = SKSpriteNode(texture:texture) 
        //Next apply the shader to the flattened node to allow for color swapping
        node.shader = SKShader(fileNamed: "shader.fsh")
        let texture2 = view.texture(from: node)
        returningNode = SKSpriteNode(texture:texture2)

    }
    return returningNode
}

您需要创建一个名为shader.fsh的文件,其中代码如下:

void main() {

    // Find the pixel at the coordinate of the actual texture
    vec4 val = texture2D(u_texture, v_tex_coord);

    // If the color value of that pixel is 0,0,0
    if (val.r == 0.0 && val.g == 0.0 && val.b == 0.0) {
        // Turn the pixel off
        gl_FragColor  = vec4(0.0,0.0,0.0,0.0);
    } 
    else {
        // Otherwise, keep the original color
        gl_FragColor = val;
    }
}

要使用它,需要使用黑色像素代替alpha通道来确定被裁剪的内容,因此您的代码应该如下所示:

var cropNode = SKCropNode()
var shape = SKShapeNode(rectOf: CGSize(width:100,height:100))
shape.fillColor = SKColor.orange

var shape2 = SKShapeNode(rectOf: CGSize(width:25,height:25))
shape2.fillColor = SKColor.orange
shape2.blendMode = .subtract
shape.addChild(shape2)

let mask = generateMaskNode(from:shape)

cropNode.addChild(shape)
cropNode.position = CGPoint(x:150,y:170)
cropNode.maskNode=mask
container.addChild(cropNode)

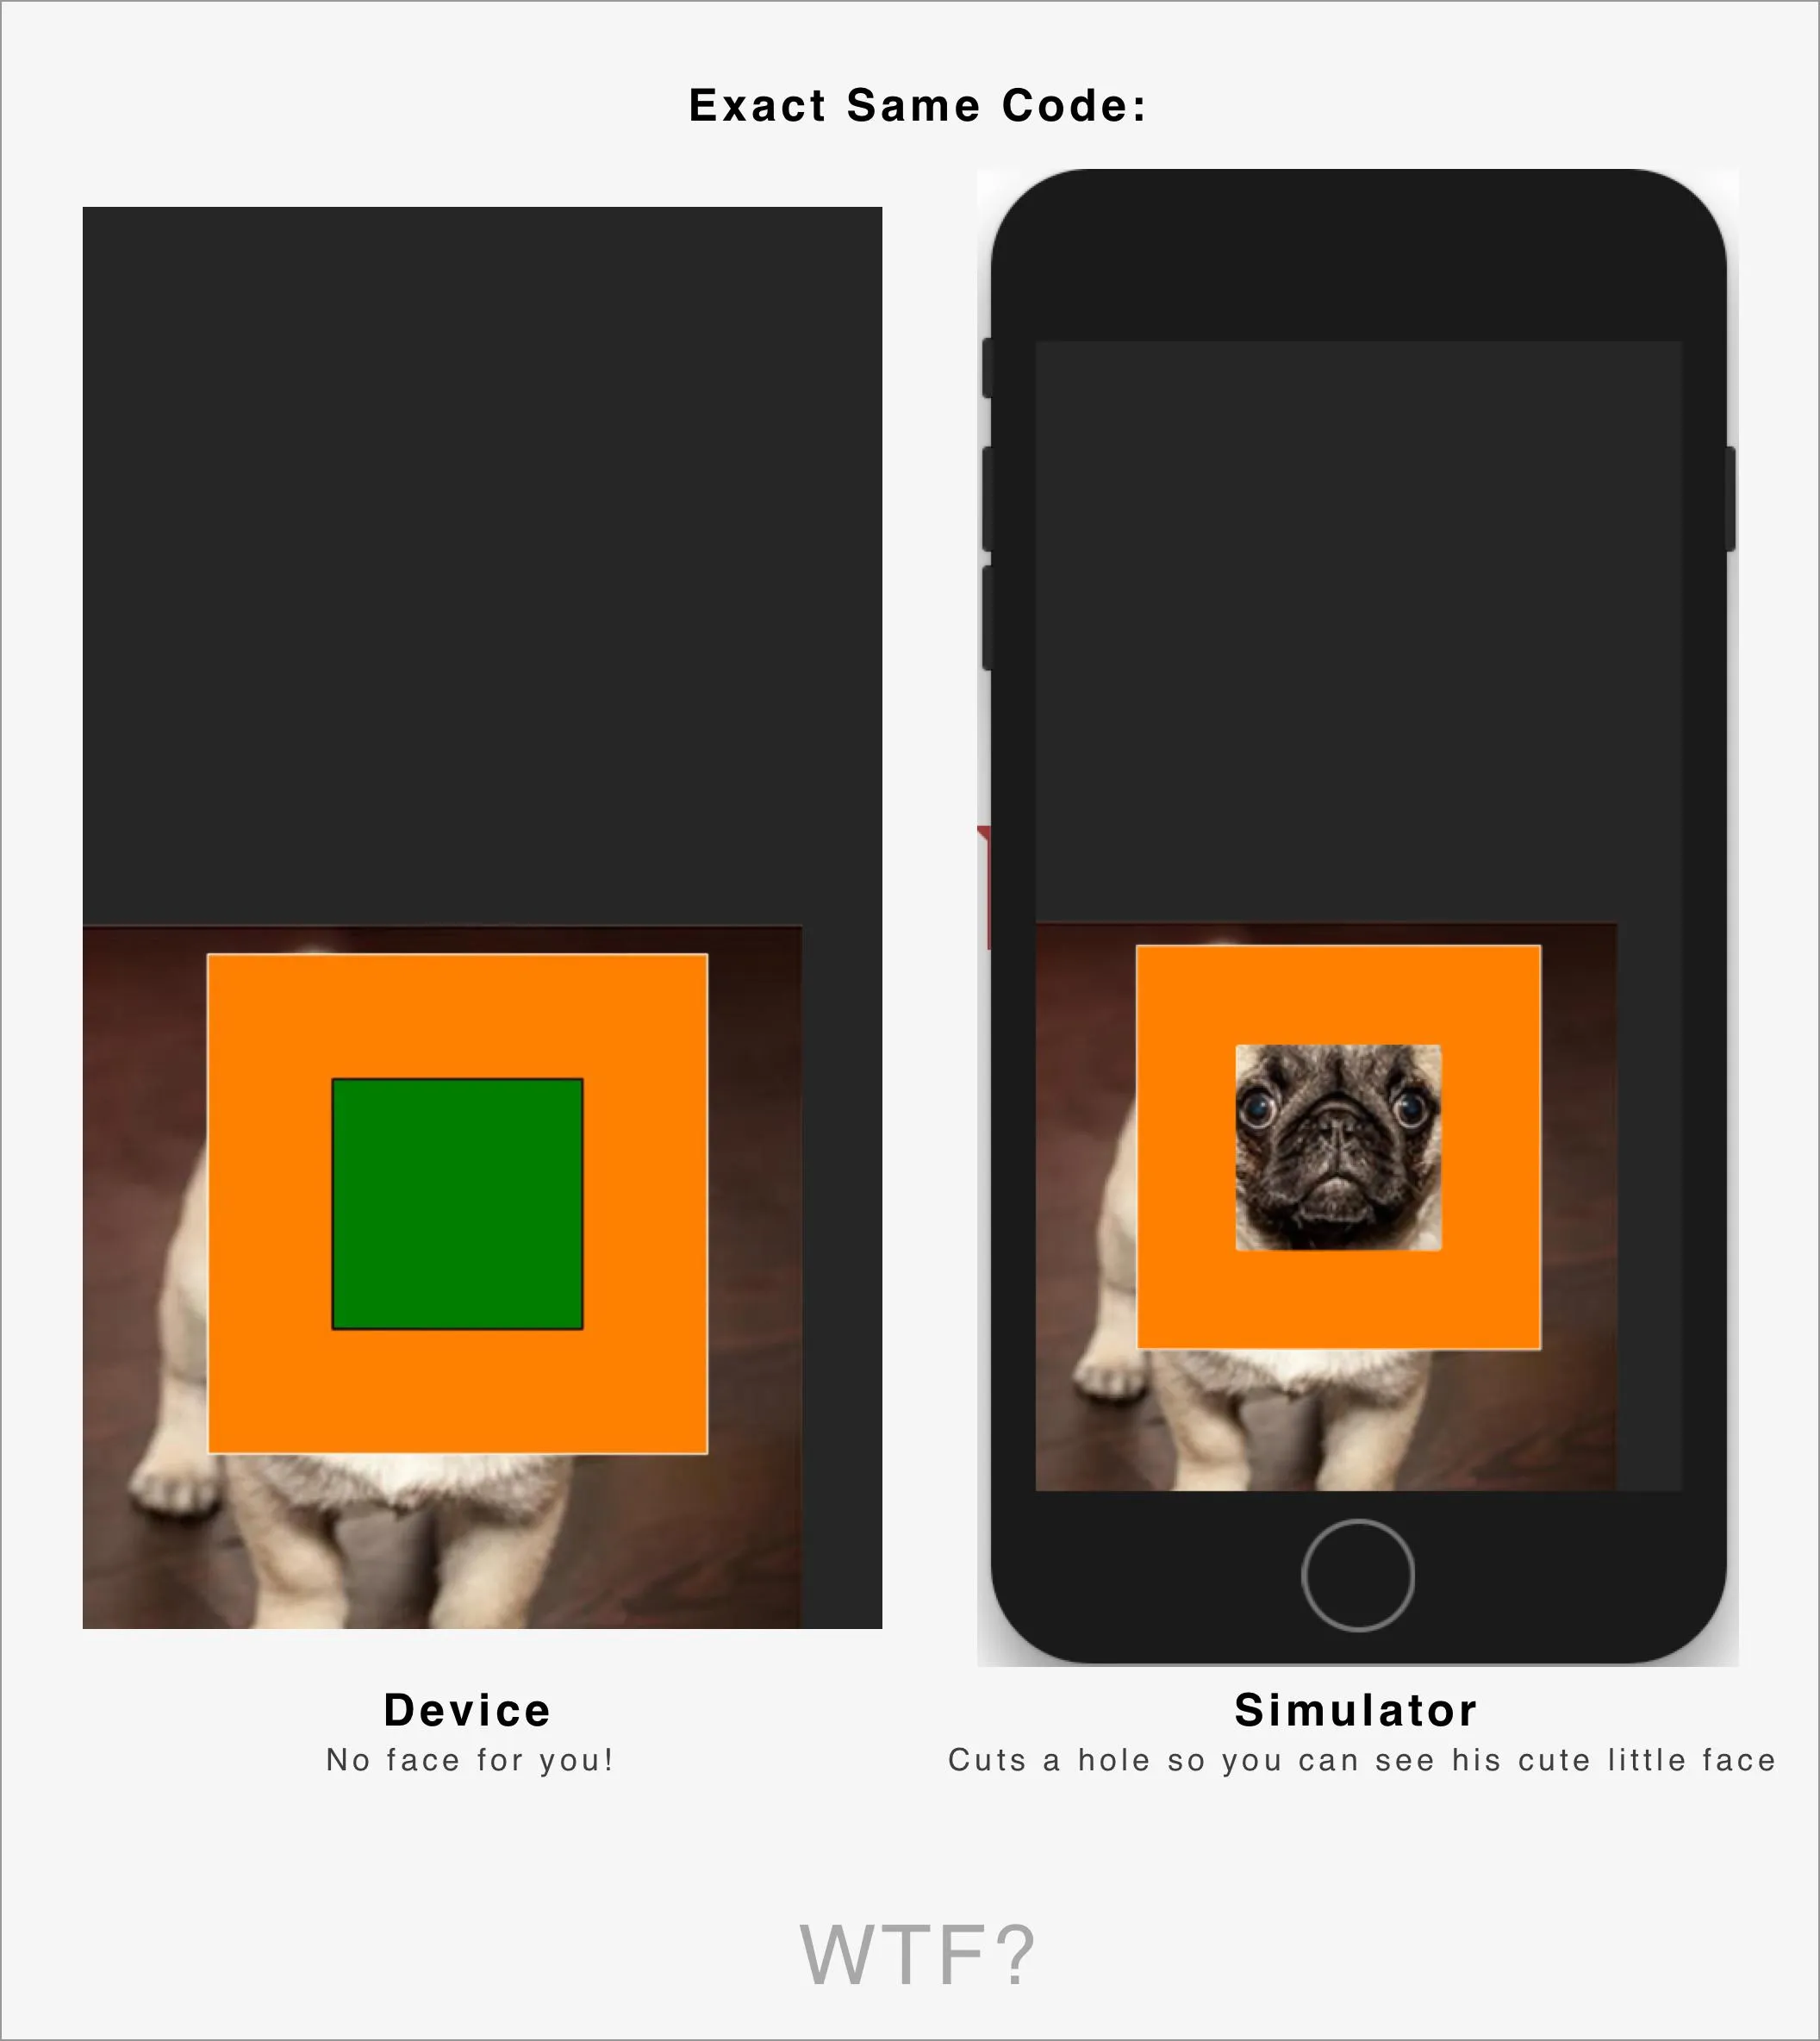
模拟器上的减法能够正常工作,而设备上不能是因为模拟器会减去阿尔法通道的值,而设备不会。事实上,设备的表现是正确的,因为阿尔法通道不应该被减去,而应该被忽略。
请注意,您不必选择黑色作为裁剪颜色,您可以更改着色器以允许选择任何颜色,只需更改以下行:
if (val.r == 0.0 && val.g == 0.0 && val.b == 0.0) 

将颜色修改为您想要的颜色(比如在你的情况下,你可以说r = 0 g = 1 b = 0只剪裁绿色部分)。
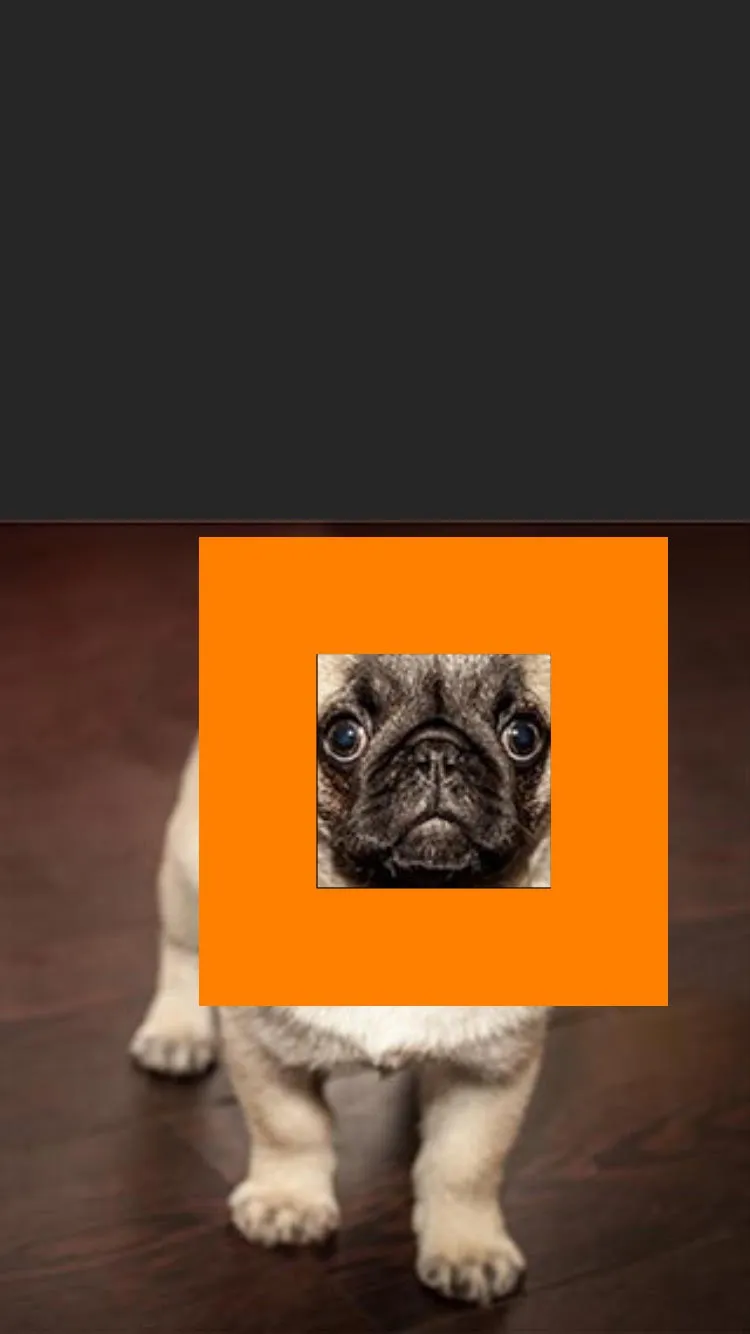
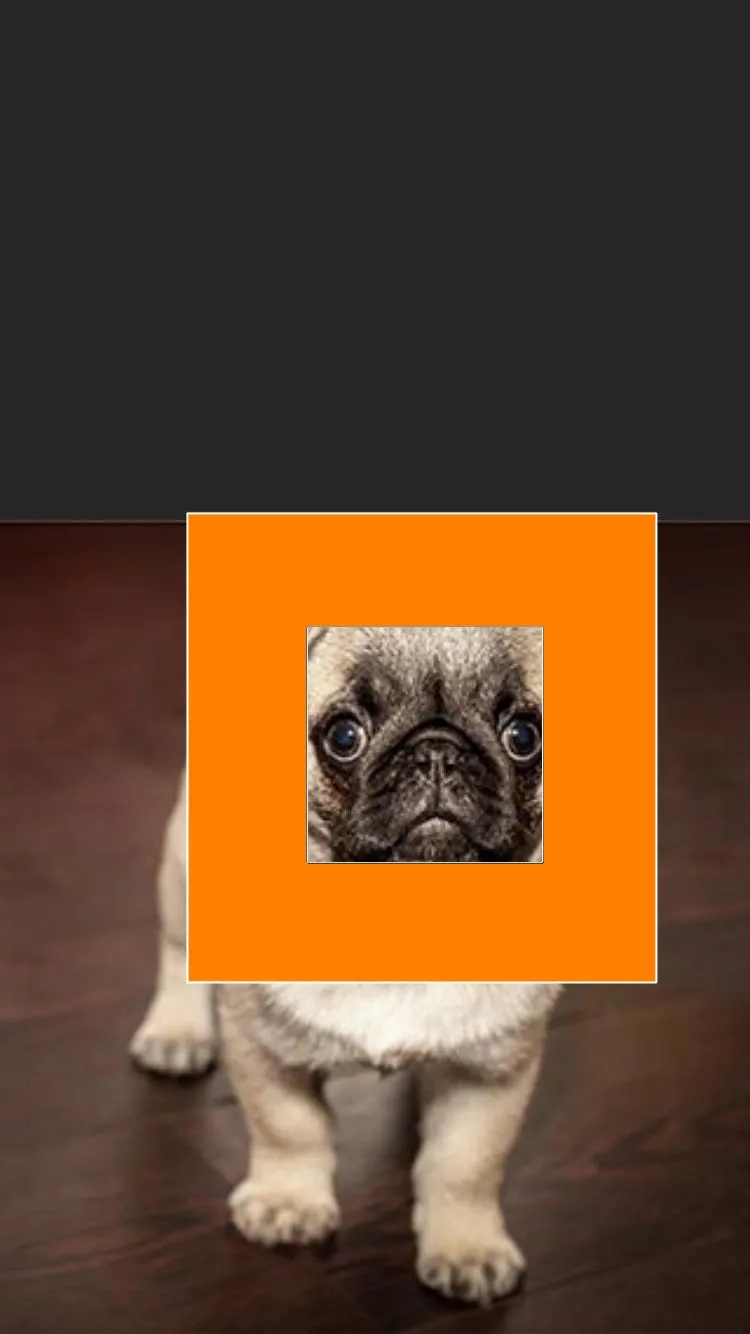
上述代码在设备上的结果

编辑:我想指出减法混合不是必需的,这也可以工作:

var cropNode = SKCropNode()
var shape = SKShapeNode(rectOf: CGSize(width:100,height:100))
shape.fillColor = SKColor.orange

var shape2 = SKShapeNode(rectOf: CGSize(width:25,height:25))
shape2.fillColor = SKColor.black
shape2.blendMode = .replace
shape.addChild(shape2)

let mask = generateMaskNode(from:shape)

cropNode.addChild(shape)
cropNode.position = CGPoint(x:150,y:170)
cropNode.maskNode=mask
container.addChild(cropNode)

现在有一个问题,我无法测试,那么我的功能是否还需要呢? 理论上下面的代码应该可以工作,因为它正在用上面的像素替换底层像素,所以理论上alpha值应该会传递过来。如果有人能够测试这个,请让我知道它是否有效。

var cropNode = SKCropNode()
var shape = SKShapeNode(rectOf: CGSize(width:100,height:100))
shape.fillColor = SKColor.orange

var shape2 = SKShapeNode(rectOf: CGSize(width:25,height:25))
shape2.fillColor = SKColor(red:0,green:0,blue:0,alpha:0)
shape2.blendMode = .replace
shape.addChild(shape2)

cropNode.addChild(shape)
cropNode.position = CGPoint(x:150,y:170)
cropNode.maskNode= shape.copy() as! SKNode
container.addChild(cropNode)

replace仅替换颜色而不是透明度。


这是否有效?并进行反向遮罩处理?如果是,那么您如何在着色器方面变得如此熟练?另外...干得好! - Confused
1
它不执行反向掩码,它只是交换颜色并将其 Alpha 值设为 0。根据我的了解,无法通过着色器进行混合。 - Knight0fDragon
唉,我还是希望苹果有一天能对Sprite Kit多加关注。还有反向遮罩。再加上一些抽象化,使其更像一个游戏引擎,而不仅仅是一个适合那些更喜欢编码而不是操作的框架。 - Confused
1
他们首先需要停止破坏东西,我甚至不会相信他们使用反掩码。既然他们显然不再关心它,那么是时候开源Sprite Kit了。 - Knight0fDragon
已在模拟器上测试过了,可是在设备上不起作用 :( - OhMyGuin
显示剩余8条评论

0

由于SpriteKit似乎没有内置反向遮罩(在设备上有效的方式),我认为以下是最接近答案的方法:

let background = SKSpriteNode(imageNamed:"stocksnap")
background.position = CGPoint(x:65, y:background.size.height/2)
addChild(background)

let container = SKNode()
let cropNode = SKCropNode()

let bgCopy = SKSpriteNode(imageNamed:"stocksnap")
bgCopy.position = background.position
cropNode.addChild(bgCopy)

let cover = SKShapeNode(rect: CGRect(x:0,y:0,width:200,height:200))
cover.position = CGPoint(x:80,y:150)
cover.fillColor = SKColor.orange
container.addChild(cover)

let highlight = SKShapeNode(rectOf: CGSize(width:100,height:100))
highlight.position = CGPoint(x:cover.position.x+cover.frame.size.width/2,y:cover.position.y+cover.frame.size.height/2)
highlight.fillColor = SKColor.red

cropNode.maskNode = highlight
container.addChild(cropNode)

addChild(container)

这里是使用上述技术的设备截图

这只是使用背景的副本,对其进行遮罩,并在相同位置上叠加它以创建反向遮罩效果。在想要复制屏幕上任何内容的情况下,您可以使用类似于这样的东西:

func captureScreen() -> SKSpriteNode {
    var image = UIImage()
    if let view = self.view {
        UIGraphicsBeginImageContextWithOptions(view.bounds.size, false, UIScreen.main.scale)

        view.drawHierarchy(in: view.bounds, afterScreenUpdates: true)

        if let imageFromContext = UIGraphicsGetImageFromCurrentImageContext() {
            image = imageFromContext
        }
        UIGraphicsEndImageContext()
    }
    let texture = SKTexture(image:image)
    let sprite = SKSpriteNode(texture:texture)
    //scale is applicable if using fixed screen sizes that aren't the actual width and height
    sprite.scale(to: CGSize(width:size.width,height:size.height))
    sprite.anchorPoint = CGPoint(x:0,y:0)
    return sprite
}

希望有人能找到更好的方法,或者SpriteKit更新以支持反向遮罩,但在此期间,这对于我的用例来说已经很好了。


网页内容由stack overflow 提供, 点击上面的
可以查看英文原文,
原文链接