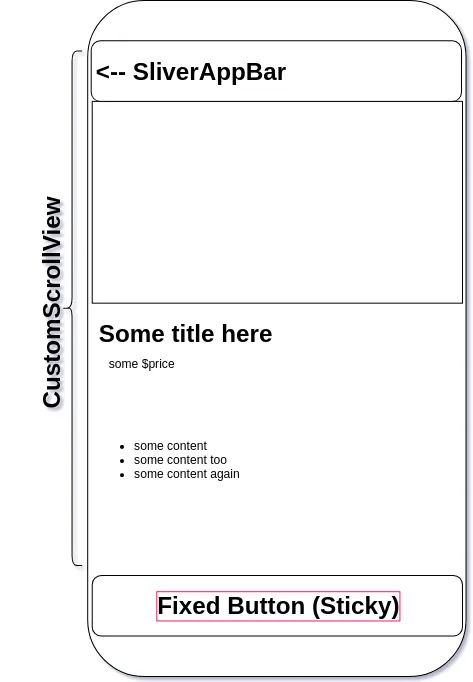
如何使按钮在CustomScrollView底部固定“粘性”
如何实现下面截图中的效果 https://istack.dev59.com/RDCn9.webp
如何使按钮在CustomScrollView底部固定“粘性”
如何实现下面截图中的效果 https://istack.dev59.com/RDCn9.webp
使用 BottomNavigationBar 的一种方法 - One Way of Doing it
  @override
  Widget build(BuildContext context) {
    return Scaffold(
      body: CustomScrollView(
        slivers: <Widget>\[
          SliverAppBar(
            title: Text('Sliver App Bar'),
            expandedHeight: 125.0,
          ),
          SliverList(
              delegate: SliverChildBuilderDelegate((context, int) {
            return Text('Boo');
          }, childCount: 65)),
          SliverFillRemaining(
            child: Text('Foo Text'),
          ),
        \],
      ),
      bottomNavigationBar: Padding(
        padding: EdgeInsets.all(8.0),
        child: RaisedButton(
          onPressed: () {},
          color: Colors.blue,
          textColor: Colors.white,
          child: Text('Fixed Button'),
        ),
      ),
    );
  }][1]][1]
输出:
floatingActionButton和floatingActionButtonLocation。import 'package:flutter/material.dart';
void main() => runApp(new MyApp());
class MyApp extends StatelessWidget {
@override
Widget build(BuildContext context) {
return new MaterialApp(
home: new MyHomePage(),
);
}
}
class MyHomePage extends StatefulWidget {
MyHomePage({Key key}) : super(key: key);
@override
_MyHomePageState createState() => new _MyHomePageState();
}
class _MyHomePageState extends State<MyHomePage> {
@override
Widget build(BuildContext context) {
return new Scaffold(
floatingActionButton: FloatingActionButton.extended(
onPressed: () {},
isExtended: true,
materialTapTargetSize: MaterialTapTargetSize.shrinkWrap,
icon: Icon(Icons.supervised_user_circle),
label: Text('Fixed Button'),
),
floatingActionButtonLocation: FloatingActionButtonLocation.centerFloat,
body: CustomScrollView(
slivers: <Widget>[
const SliverAppBar(
pinned: true,
expandedHeight: 250.0,
flexibleSpace: FlexibleSpaceBar(
title: Text('Demo'),
),
),
SliverGrid(
gridDelegate: SliverGridDelegateWithMaxCrossAxisExtent(
maxCrossAxisExtent: 200.0,
mainAxisSpacing: 10.0,
crossAxisSpacing: 10.0,
childAspectRatio: 4.0,
),
delegate: SliverChildBuilderDelegate(
(BuildContext context, int index) {
return Container(
alignment: Alignment.center,
color: Colors.teal[100 * (index % 9)],
child: Text('grid item $index'),
);
},
childCount: 20,
),
),
SliverFixedExtentList(
itemExtent: 50.0,
delegate: SliverChildBuilderDelegate(
(BuildContext context, int index) {
return Container(
alignment: Alignment.center,
color: Colors.lightBlue[100 * (index % 9)],
child: Text('list item $index'),
);
},
),
),
],
));
}
}
Scaffold(
      body:
      // list view here
      bottomNavigationBar: GestureDetector(
  child: Container(
    height: 50,
    width: 325,
    child: Center(
      child: Text(
        "title",
      ),
    onTap: (){},
  ),
);
Column(
            children: [
              //This is button 1
              Padding(
                padding: allPadding,
                child: GestureDetector(
                  onTap: () {
                    Navigator.of(context).push(
                      MaterialPageRoute(
                        builder: (context) => const myPage(),
                      ),
                    );
                  },
                  child: Container(
                    height: 40,
                    width: MediaQuery.of(context).size.width,
                    decoration: BoxDecoration(
                        color: Colors.green,
                        borderRadius: BorderRadius.circular(4)),
                    child: const Center(
                      child: Text(
                        "Button Name",
                        style: TextStyle(
                            color: Colors.white, fontWeight: FontWeight.bold),
                      ),
                    ),
                  ),
                ),
              ),

              //Here's my Scrollable widget
              Expanded(
                child: Center(
                  child: ListView.builder(
                    itemCount: provider.myList.length,
                    itemBuilder: (BuildContext context, index) {
                      return myCard(
                        provider: provider,
                        widgetTextStyle: widgetTextStyle,
                        index: index,
                      );
                    },
                  ),
                ),
              ),


             //this is the same button used as above
              Padding(
                padding: allPadding,
                child: GestureDetector(
                  onTap: () {
                    Navigator.of(context).push(
                      MaterialPageRoute(
                        builder: (context) => const myPage2(),
                      ),
                    );
                  },
                  child: Container(
                    height: 40,
                    width: MediaQuery.of(context).size.width,
                    decoration: BoxDecoration(
                        color: Colors.green,
                        borderRadius: BorderRadius.circular(4)),
                    child: const Center(
                      child: Text(
                        "Button 2",
                        style: TextStyle(
                            color: Colors.white, fontWeight: FontWeight.bold),
                      ),
                    ),
                  ),
                ),
              ),
            ],
          ),