我如何在没有购买价值99美元的苹果证书的情况下,从Xcode将iPhone应用程序部署到真正的iPhone设备上?
我该如何将Xcode中的iPhone应用程序部署到真实的iPhone设备上?
161
- DFG
3
查看我之前提出的问题的 此答案,它是如何将其安装到越狱 iPhone 上的非常好的指南。 - Dan Walker
6好的,请提供需要翻译的内容。 - philfreo
2Xcode 7现在具有免费的预配功能,因此无需注册Apple开发者帐户即可在真实设备上测试应用程序。有关更多详细信息,请参见此答案。 - Suragch
12个回答
92
我使用了两个教程的混合:Jason 和 alex。第二个教程有调试的优势。我将主要复制两者的内容(并简化alex的):
2012年1月更新:这仍然适用于SDK 4.2.1和iOS 5.0.1 - 我刚在新电脑和设备上测试了所有内容!
1. 创建自签名证书
修改您的iPhone SDK以允许使用该证书:
Launch Keychain Access.app. With no items selected, from the Keychain menu select Certificate Assistant, then Create a Certificate.
- Name: iPhone Developer
- Certificate Type: Code Signing
- Let me override defaults: Yes
Click Continue
- Validity: 3650 days
Click Continue
Blank out the Email address field.
Click Continue until complete.
You should see "This root certificate is not trusted". This is expected.
Set the iPhone SDK to allow the self-signed certificate to be used:
sudo /usr/bin/sed -i .bak 's/XCiPhoneOSCodeSignContext/XCCodeSignContext/' /Developer/Platforms/iPhoneOS.platform/Info.plistIf you have Xcode open, restart it for this change to take effect.
我对此感到非常惊讶,因为正如你应该知道的,我对所有这些黑客技术一无所知!我所做的只是改进了我在其他地方找到的一点东西,就像我所指出的那样。
所以是的,整个方法不再以同样的方式工作了,我也懒得去找新的方法...除了这个,它使用了一个叫做Theos的工具,但我无法完成整个过程。
最后,如果你需要卸载它,无论出于什么原因,请查看本文的结尾。在我的情况下,我必须这样做,因为我无法弄清楚为什么整个方法都停止工作了,而且我已经不再关心,因为我们已经拥有了期待已久的许可证。(该死的DUNS号码需要等很长时间...)
.
.
.
.
.
2. 启用Xcode在越狱设备上构建
On your jailbroken iPhone, install the app AppSync by adding source ** http://repo.hackyouriphone.org**
Remove SDK requirements for code sign and entitlements (I'm loving sed!):
sudo /usr/bin/sed -i .bak '/_REQUIRED/N;s/YES/NO/' /Developer/Platforms/iPhoneOS.platform/Developer/SDKs/iPhoneOS5.0.sdk/SDKSettings.plistPay attention to the
iPhoneOS5.0.sdkpart. If you're, for instance, using iOS 4.2 SDK, just replace it accordingly:sudo /usr/bin/sed -i .bak '/_REQUIRED/N;s/YES/NO/' /Developer/Platforms/iPhoneOS.platform/Developer/SDKs/iPhoneOS4.2.sdk/SDKSettings.plistConclude the requirement removal through patching Xcode. This means binary editing:
cd /Developer/Platforms/iPhoneOS.platform/Developer/Library/Xcode/Plug-ins/iPhoneOS\ Build\ System\ Support.xcplugin/Contents/MacOS/
dd if=iPhoneOS\ Build\ System\ Support of=working bs=500 count=255
printf "\xc3\x26\x00\x00" >> working
/bin/mv -n iPhoneOS\ Build\ System\ Support iPhoneOS\ Build\ System\ Support.original
/bin/mv working iPhoneOS\ Build\ System\ Support
chmod a+x iPhoneOS\ Build\ System\ Support
If you have Xcode open, restart it for this change (and last one) to take effect.
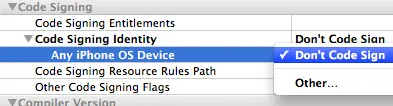
Open "Project>Edit Project Settings" (from the menu). Click on the "Build" tab. Find "Code Signing Identity" and its child "Any iPhoneOS Device" in the list, and set both to the entry "Don't Code Sign":
After this feel free to undo step 3. At least in my case it went just fine.
Setting Xcode to code sign with our custom made self-signed certificate (the first how-to). This step can probably be skipped if you don't want to be able to debug:
mkdir /Developer/iphoneentitlements401
cd /Developer/iphoneentitlements401
curl -O http://www.alexwhittemore.com/iphone/gen_entitlements.txt
mv gen_entitlements.txt gen_entitlements.py
chmod 777 gen_entitlements.py
Plug your iPhone in and open Xcode. Open Window>Organizer. Select the device from the list on the left hand side, and click "Use for development." You'll be prompted for a provisioning website login, click cancel. It's there to make legitimate provisioning easier, but doesn't make illegitimate not-provisioning more difficult.
Now You have to do this last part for every new project you make. Go to the menu Project > New Build Phase > New Run Script Build Phase. In the window, copy/paste this:
export CODESIGN_ALLOCATE=/Developer/Platforms/iPhoneOS.platform/Developer/usr/bin/codesign_allocate
if [ "${PLATFORM_NAME}" == "iphoneos" ]; then
/Developer/iphoneentitlements401/gen_entitlements.py "my.company.${PROJECT_NAME}" "${BUILT_PRODUCTS_DIR}/${WRAPPER_NAME}/${PROJECT_NAME}.xcent";
codesign -f -s "iPhone Developer" --entitlements "${BUILT_PRODUCTS_DIR}/${WRAPPER_NAME}/${PROJECT_NAME}.xcent" "${BUILT_PRODUCTS_DIR}/${WRAPPER_NAME}/"
fi
.
.
.
.
卸载
第一部分:
sudo mv -f /Developer/Platforms/iPhoneOS.platform/Info.plist.bak /Developer/Platforms/iPhoneOS.platform/Info.plist
第二部分:
sudo mv -f /Developer/Platforms/iPhoneOS.platform/Developer/SDKs/iPhoneOS5.0.sdk/SDKSettings.plist.bak /Developer/Platforms/iPhoneOS.platform/Developer/SDKs/iPhoneOS5.0.sdk/SDKSettings.plist
sudo mv -f iPhoneOS\ Build\ System\ Support.original iPhoneOS\ Build\ System\ Support
如果您在步骤2的位置执行了步骤3,请相应地进行修改:
sudo mv -f /Developer/Platforms/iPhoneOS.platform/Developer/SDKs/iPhoneOS4.2.sdk/SDKSettings.plist.bak /Developer/Platforms/iPhoneOS.platform/Developer/SDKs/iPhoneOS4.2.sdk/SDKSettings.plist
对于其余部分,只需撤销您在XCode上所做的操作并删除/Developer/iphoneentitlements401/gen_entitlements.py即可(如果需要):
sudo rm -f /Developer/iphoneentitlements401/gen_entitlements.py
- cregox
7
尝试按照这些指示操作,但现在“Scheme”是我的 Mac 64 位类型,我没有任何选项来运行模拟器或真实的 iPhone,所以我甚至无法测试代码。我之前使用的是 SDK 4.3,不确定是否有影响。 - nosatalian
1实际上,更新:在将项目设置中的基本SDK从iphoneos更改为iOS 4.3后,事情开始起作用。尽管Xcode显示“启动远程程序时出错:无法获取进程任务”,但我可以通过单击它来启动应用程序。 - nosatalian
1我遇到了这个错误:
用于签署可执行文件的标识不再有效... (0xE8008018) 即使我将过期时间设置为3650天。似乎手机本身正在进行检查。 - Stephen1第六点。在我的情况下,我必须更改/Developer/iphoneentitlements401/gen_entitlements.py文件的权限,以便普通用户可以执行它。这样,该过程就可以完美地运行。 - abidibo
@Oneiros AppSync是最受欢迎的调整之一。因此,它被列在许多存储库中:
http://repo.appvv.com,http://repocydia.com和http://repo.hackyouriphone.org。 - James Douglas显示剩余2条评论
56
看起来应用程序没有签名。 从Cydia下载ldid,然后像这样使用它:ldid -S /Applications/AccelerometerGraph.app/AccelerometerGraph
此外,请确保二进制文件已标记为可执行:chmod +x /Applications/AccelerometerGraph.app/AccelerometerGraph
- rpetrich
4
3是的,显然你需要越狱你的设备才能使用这种方法。 - esqew
你如何启动命令ldid -S ...?需要SSH控制台吗?有没有免费的方法在越狱的iPhone上获取SSH客户端? - Dan L.
tanderson:Cydia 中有一个 ldid 软件包,你也可以为 OS X 编译一个。 - rpetrich
rpetrich我认为他的问题是如何输入和使用命令,而不是如何获取包。@tanderson您可以通过Open SSH(然后从桌面连接到手机)或iPhone本身的终端进行操作。这两个应用程序都可以从Cydia免费下载。使用SSH的好处是您还可以使用它将应用程序简单地复制到手机上。如果您经常这样做,请务必查看其他答案-您可以让XCode为您完成所有工作,但这是一个麻烦的过程。 - cregox
49
Xcode 7之后的免费配置
为了在真实设备上测试你的应用程序,而不必支付苹果开发者费用(或越狱你的设备),你可以使用Xcode 7和iOS 9支持的新的免费配置。
以下步骤基本上摘自文档(非常好,建议阅读):
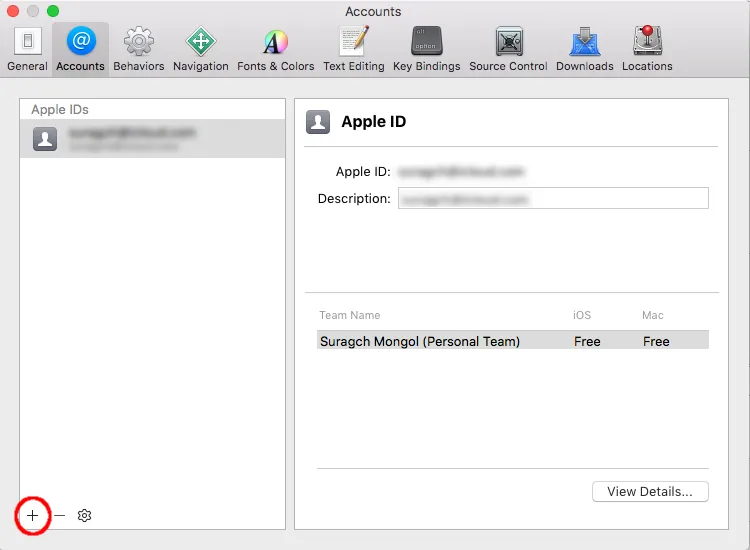
1. 在Xcode中添加你的Apple ID
进入XCode > 首选项 > 账户标签 > 添加按钮(+)> 添加Apple ID。更多帮助请参见文档。
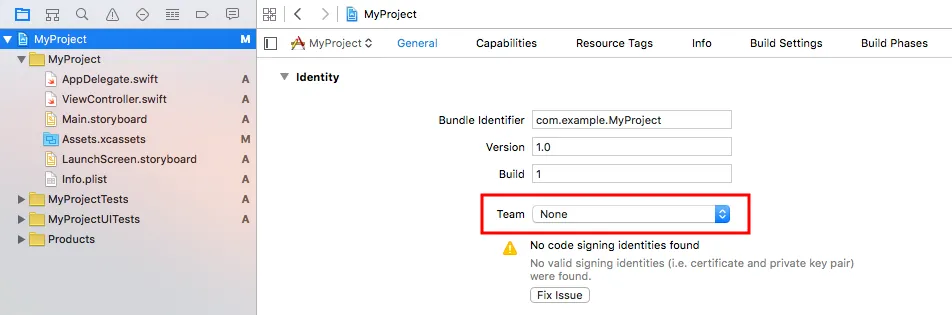
2. 在项目导航器中单击“常规”选项卡
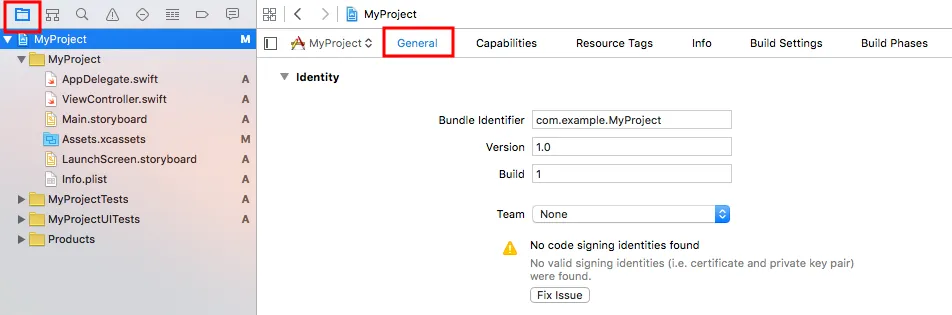
3. 从团队弹出菜单中选择您的 Apple ID。
5. 点击“修复问题”按钮

6. 运行您的应用程序
在 Xcode 中,点击构建和运行按钮。

7. 相信设备设置中的应用程序开发者
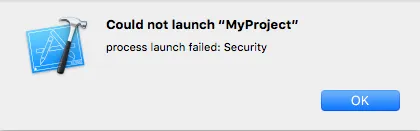
运行您的应用程序后,您会收到一个安全错误,因为您想要运行的应用程序不是来自App Store。
8. 再次在您的设备上运行您的应用程序。
就这样。现在,您可以运行自己的应用程序(或任何其他您拥有源代码的应用程序),而无需支付 99 美元。感谢苹果公司终于允许此操作。
- Suragch
4
2非常感谢。这个完美地运行了,而且不需要付费的苹果开发者许可证。 - kishorer747
2这确实存在一些问题 - 您一次只能安装最多3个应用程序,并且您需要每周更新证书。 - SilverWolf
2@seaturtle,感谢您的更新。我最终花了钱购买了开发者许可证,所以我没有关注这个答案的最新情况。限制太糟糕了。Android有一些比Apple更好的地方。 - Suragch
1在我运行iOS 15的iPhone上,步骤7的设置位于“设置”>“通用”>“VPN和设备管理”下。 - John
9
如果你是在谈论使用官方SDK构建应用程序并直接从Xcode部署的话,那么是不可能的。
- micmcg
8
你需要越狱你的设备。
- Can Berk Güder
1
1遵循 @rpetrich 的方法,将可执行文件通过SSH传输到设备的 /Applications 文件夹中,在重启或重新启动SpringBoard之后,它应该可以正常工作。 - esqew
6
有一种方法可以在不向苹果支付费用的情况下部署iPhone应用程序。你需要越狱你的设备,并按照http://www.alexwhittemore.com/?p=398中的说明进行操作。请注意,此方法可能违反苹果的使用条款。
- Leo
1
这也是一本完美的指南,与@Dan的方法不同......我都用过,虽然。 - cregox
5
我所见过的任何内容都表明,你无法在没有(付费的)证书的情况下即时部署到真实的iPhone上。
- Matthew Phillips
4
昨晚我在浏览苹果开发者网站时,发现在Provisioning Certificate中有一个“Signing Team Members”的选项。我认为可以通过某种方式将团队成员添加到付费配置文件中。
你可以向App ID的所有者(付费用户)请求将你添加为团队成员。我不确定,还在继续搜索相关信息。
- Akshay
3
是的,您可以添加团队成员。每年设备数量限制为200个。 - cregox
Cawas - 你知道如何添加成员到你的苹果ID吗? - Akshay
只有在名称前添加@符号,我们才会收到通知。正如您自己所说,您必须先获得付费帐户。然后应该非常简单,因为我找不到任何关于如何做到这一点的教程。不过我自己从未尝试过。 - cregox
4
不,这很容易做到。在Xcode中,将活动配置设置为“发布”。将设备从模拟器更改为设备 - 任何SDK。如果您想直接导出到iPhone,请将其连接到计算机。按下构建并运行。如果您的iPhone未连接到计算机,则会出现一条消息,说明您的iPhone未连接。
如果这适用于您:(iPhone未连接)
转到您的项目文件夹,然后进入内部的构建文件夹。进入Release-iphoneos文件夹,取出其中的应用程序,并将其拖放到iTunes图标上。当您同步iTouch设备时,它将复制到您的设备上。它也会显示在iTunes中作为iPhone的应用程序。
希望这可以帮助您!
附言:如果它说某个证书无效,只需在Xcode中单击项目,文件堆栈左侧的小项目图标,然后按Apple + I,或从菜单栏中获取信息。点击顶部的构建。在代码签名下,将代码签名身份 - 任何iPhone OS设备更改为不签名。
如果这适用于您:(iPhone未连接)
转到您的项目文件夹,然后进入内部的构建文件夹。进入Release-iphoneos文件夹,取出其中的应用程序,并将其拖放到iTunes图标上。当您同步iTouch设备时,它将复制到您的设备上。它也会显示在iTunes中作为iPhone的应用程序。
希望这可以帮助您!
附言:如果它说某个证书无效,只需在Xcode中单击项目,文件堆栈左侧的小项目图标,然后按Apple + I,或从菜单栏中获取信息。点击顶部的构建。在代码签名下,将代码签名身份 - 任何iPhone OS设备更改为不签名。
- Christian
1
7OP没有签名证书或配置文件。这些说明是针对99美元的iPhone开发者计划会员,但不涉及如何在未注册该计划的情况下在设备上运行的问题。 - cdespinosa
2
这真的取决于您使用的Xcode版本,因为不同版本使用不同的方法在没有配置文件的情况下部署到您的iPhone。
Xcode 3.2.1是一个很好的版本,并且很容易解决问题,但我们需要知道您正在使用哪个版本。
Xcode 3.2.1是一个很好的版本,并且很容易解决问题,但我们需要知道您正在使用哪个版本。
- Magnatek
网页内容由stack overflow 提供, 点击上面的可以查看英文原文,
原文链接
原文链接
- 相关问题
- 3 我该如何将 MAUI 的发布版本部署到 iPhone 模拟器?
- 17 Xamarin在使用Xcode 14时无法部署到iPhone上
- 5 XCode无法将iPhone应用部署到iPhone 3GS
- 24 在真实的iPhone上测试应用程序。
- 13 如何从Xcode获取ipa文件以在真实设备上运行iPhone应用程序?
- 10 自动构建、部署和测试iPhone设备上的应用程序
- 4 我可以用Appium - WebDriver在Mac笔记本电脑上运行一个应用程序到真实的iPhone设备上吗?
- 4 如何使用Xcode 6在真实的iPhone上测试应用程序?
- 7 没有真实设备,能否测试iPhone应用程序?
- 8 我该如何在XCode上检查我的iPhone应用程序的TARGET_NAME?