编辑: 此帖底部有原始解决方案。获得更实时的解决方案,请查看由Thraka发布的已接受答案。
给Get-Childitem(即dir或ls)上色并不是一个新想法,但我一直没有找到任何理想的方法来给Powershell中的输出上色。编写颜色-ls函数有两种常见方法:
拦截Get-Childitem的输出,并使用Write-Host和-ForegroundColor参数将其重新输出为文本。这种方法允许尽可能精细地处理输出,但会将Get-Childitem的输出减少为文本。正如大多数powershell用户所知道的那样,Get-Childitem不输出文本,而是输出对象。具体来说,是FileInfo和DirectoryInfo对象的列表。这允许在处理Get-Childitem输出时具有很大的灵活性。
通过Invoke-Expression将Get-Childitem的输出传递到ForEach-Object,然后在输出每个对象之前更改控制台前景色。这种方法保留了Get-Childitem输出的类型,是更好的选择。
function color-ls
{
    $regex_opts = ([System.Text.RegularExpressions.RegexOptions]::IgnoreCase `
          -bor [System.Text.RegularExpressions.RegexOptions]::Compiled)
    $fore = $Host.UI.RawUI.ForegroundColor
    $compressed = New-Object System.Text.RegularExpressions.Regex(
          '\.(zip|tar|gz|rar|jar|war)$', $regex_opts)
    $executable = New-Object System.Text.RegularExpressions.Regex(
          '\.(exe|bat|cmd|py|pl|ps1|psm1|vbs|rb|reg)$', $regex_opts)
    $text_files = New-Object System.Text.RegularExpressions.Regex(
          '\.(txt|cfg|conf|ini|csv|log|xml|java|c|cpp|cs)$', $regex_opts)

    Invoke-Expression ("Get-ChildItem $args") | ForEach-Object {
        if ($_.GetType().Name -eq 'DirectoryInfo')
        {
            $Host.UI.RawUI.ForegroundColor = 'Magenta'
            echo $_
            $Host.UI.RawUI.ForegroundColor = $fore
        }
        elseif ($compressed.IsMatch($_.Name))
        {
            $Host.UI.RawUI.ForegroundColor = 'darkgreen'
            echo $_
            $Host.UI.RawUI.ForegroundColor = $fore
        }
        elseif ($executable.IsMatch($_.Name))
        {
            $Host.UI.RawUI.ForegroundColor = 'Red'
            echo $_
            $Host.UI.RawUI.ForegroundColor = $fore
        }
        elseif ($text_files.IsMatch($_.Name))
        {
            $Host.UI.RawUI.ForegroundColor = 'Yellow'
            echo $_
            $Host.UI.RawUI.ForegroundColor = $fore
        }
        else
        {
            echo $_
        }
    }
}
这段代码基于文件扩展名分配不同的颜色,但几乎任何指标都可以替换以区分文件类型。上述代码产生以下输出:
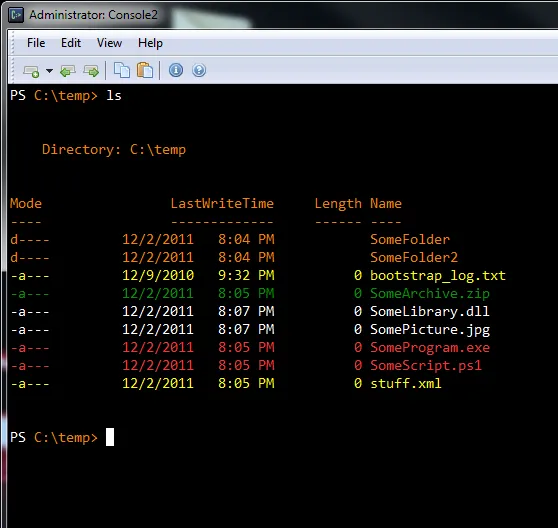
“我希望顶部的标题不总是与第一项相同的颜色,但我想不到任何方法。”
可惜,我也想不出。这就是 Stack Overflow 和它的 PowerShell 大师发挥作用的地方:我正在寻找一种在保留 cmdlet 输出类型的同时为 Get-Childitem 输出着色的方法,而不会破坏标题的颜色。我已经尝试过一些方法,但还没有成功,因为第一个单独的 echo 调用会输出整个标题和第一项。
欢迎提出任何问题、评论或更好的解决方案。
解决方案:感谢 Jon Z 和其他提供思路的人。
Jon Z提供了完美的解决方案,我稍微修改了一下以适应我的原始问题。对于任何感兴趣的人,这里是代码。请注意,这需要来自Powershell Cookbook的New-CommandWrapper cmdlet。 相关cmdlet已添加到本帖底部。所有这些代码都放在您的个人资料中。
function Write-Color-LS
    {
        param ([string]$color = "white", $file)
        Write-host ("{0,-7} {1,25} {2,10} {3}" -f $file.mode, ([String]::Format("{0,10}  {1,8}", $file.LastWriteTime.ToString("d"), $file.LastWriteTime.ToString("t"))), $file.length, $file.name) -foregroundcolor $color
    }

New-CommandWrapper Out-Default -Process {
    $regex_opts = ([System.Text.RegularExpressions.RegexOptions]::IgnoreCase)


    $compressed = New-Object System.Text.RegularExpressions.Regex(
        '\.(zip|tar|gz|rar|jar|war)$', $regex_opts)
    $executable = New-Object System.Text.RegularExpressions.Regex(
        '\.(exe|bat|cmd|py|pl|ps1|psm1|vbs|rb|reg)$', $regex_opts)
    $text_files = New-Object System.Text.RegularExpressions.Regex(
        '\.(txt|cfg|conf|ini|csv|log|xml|java|c|cpp|cs)$', $regex_opts)

    if(($_ -is [System.IO.DirectoryInfo]) -or ($_ -is [System.IO.FileInfo]))
    {
        if(-not ($notfirst))
        {
           Write-Host
           Write-Host "    Directory: " -noNewLine
           Write-Host " $(pwd)`n" -foregroundcolor "Magenta"
           Write-Host "Mode                LastWriteTime     Length Name"
           Write-Host "----                -------------     ------ ----"
           $notfirst=$true
        }

        if ($_ -is [System.IO.DirectoryInfo])
        {
            Write-Color-LS "Magenta" $_
        }
        elseif ($compressed.IsMatch($_.Name))
        {
            Write-Color-LS "DarkGreen" $_
        }
        elseif ($executable.IsMatch($_.Name))
        {
            Write-Color-LS "Red" $_
        }
        elseif ($text_files.IsMatch($_.Name))
        {
            Write-Color-LS "Yellow" $_
        }
        else
        {
            Write-Color-LS "White" $_
        }

    $_ = $null
    }
} -end {
    write-host ""
}
这将产生以下截图所示的输出:
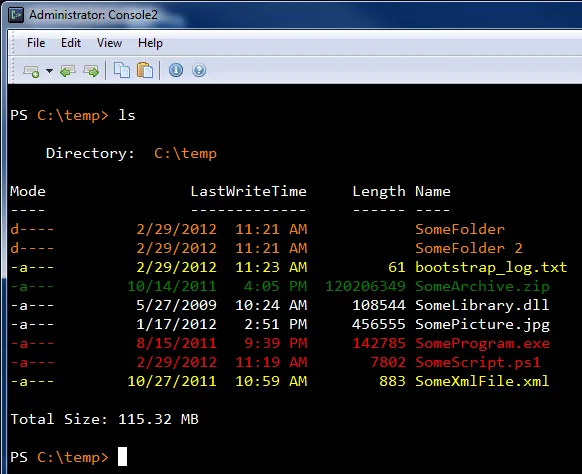 如果您想在底部添加总文件大小行,请添加以下代码:
Remove-Item alias:ls
Set-Alias ls LS-Padded

function LS-Padded
{
    param ($dir)
    Get-Childitem $dir
    Write-Host
    getDirSize $dir
}

function getDirSize
{
    param ($dir)
    $bytes = 0

    Get-Childitem $dir | foreach-object {

        if ($_ -is [System.IO.FileInfo])
        {
            $bytes += $_.Length
        }
    }

    if ($bytes -ge 1KB -and $bytes -lt 1MB)
    {
        Write-Host ("Total Size: " + [Math]::Round(($bytes / 1KB), 2) + " KB")
    }

    elseif ($bytes -ge 1MB -and $bytes -lt 1GB)
    {
        Write-Host ("Total Size: " + [Math]::Round(($bytes / 1MB), 2) + " MB")
    }

    elseif ($bytes -ge 1GB)
    {
        Write-Host ("Total Size: " + [Math]::Round(($bytes / 1GB), 2) + " GB")
    }

    else
    {
        Write-Host ("Total Size: " + $bytes + " bytes")
    }
}
正如评论中所指出的那样,PoshCode New-CommandWrapper链接已失效。以下是完整的相关cmdlet:
##############################################################################
##
## New-CommandWrapper
##
## From Windows PowerShell Cookbook (O'Reilly)
## by Lee Holmes (http://www.leeholmes.com/guide)
##
##############################################################################

<#

.SYNOPSIS

Adds parameters and functionality to existing cmdlets and functions.

.EXAMPLE

New-CommandWrapper Get-Process `
      -AddParameter @{
          SortBy = {
              $newPipeline = {
                  __ORIGINAL_COMMAND__ | Sort-Object -Property $SortBy
              }
          }
      }

This example adds a 'SortBy' parameter to Get-Process. It accomplishes
this by adding a Sort-Object command to the pipeline.

.EXAMPLE

$parameterAttributes = @'
          [Parameter(Mandatory = $true)]
          [ValidateRange(50,75)]
          [Int]
'@

New-CommandWrapper Clear-Host `
      -AddParameter @{
          @{
              Name = 'MyMandatoryInt';
              Attributes = $parameterAttributes
          } = {
              Write-Host $MyMandatoryInt
              Read-Host "Press ENTER"
         }
      }

This example adds a new mandatory 'MyMandatoryInt' parameter to
Clear-Host. This parameter is also validated to fall within the range
of 50 to 75. It doesn't alter the pipeline, but does display some
information on the screen before processing the original pipeline.

#>

param(
    ## The name of the command to extend
    [Parameter(Mandatory = $true)]
    $Name,

    ## Script to invoke before the command begins
    [ScriptBlock] $Begin,

    ## Script to invoke for each input element
    [ScriptBlock] $Process,

    ## Script to invoke at the end of the command
    [ScriptBlock] $End,

    ## Parameters to add, and their functionality.
    ##
    ## The Key of the hashtable can be either a simple parameter name,
    ## or a more advanced parameter description.
    ##
    ## If you want to add additional parameter validation (such as a
    ## parameter type,) then the key can itself be a hashtable with the keys
    ## 'Name' and 'Attributes'. 'Attributes' is the text you would use when
    ## defining this parameter as part of a function.
    ##
    ## The Value of each hashtable entry is a scriptblock to invoke
    ## when this parameter is selected. To customize the pipeline,
    ## assign a new scriptblock to the $newPipeline variable. Use the
    ## special text, __ORIGINAL_COMMAND__, to represent the original
    ## command. The $targetParameters variable represents a hashtable
    ## containing the parameters that will be passed to the original
    ## command.
    [HashTable] $AddParameter
)

Set-StrictMode -Version Latest

## Store the target command we are wrapping, and its command type
$target = $Name
$commandType = "Cmdlet"

## If a function already exists with this name (perhaps it's already been
## wrapped,) rename the other function and chain to its new name.
if(Test-Path function:\$Name)
{
    $target = "$Name" + "-" + [Guid]::NewGuid().ToString().Replace("-","")
    Rename-Item function:\GLOBAL:$Name GLOBAL:$target
    $commandType = "Function"
}

## The template we use for generating a command proxy
$proxy = @'

__CMDLET_BINDING_ATTRIBUTE__
param(
__PARAMETERS__
)
begin
{
    try {
        __CUSTOM_BEGIN__

        ## Access the REAL Foreach-Object command, so that command
        ## wrappers do not interfere with this script
        $foreachObject = $executionContext.InvokeCommand.GetCmdlet(
            "Microsoft.PowerShell.Core\Foreach-Object")

        $wrappedCmd = $ExecutionContext.InvokeCommand.GetCommand(
            '__COMMAND_NAME__',
            [System.Management.Automation.CommandTypes]::__COMMAND_TYPE__)

        ## TargetParameters represents the hashtable of parameters that
        ## we will pass along to the wrapped command
        $targetParameters = @{}
        $PSBoundParameters.GetEnumerator() |
            & $foreachObject {
                if($command.Parameters.ContainsKey($_.Key))
                {
                    $targetParameters.Add($_.Key, $_.Value)
                }
            }

        ## finalPipeline represents the pipeline we wil ultimately run
        $newPipeline = { & $wrappedCmd @targetParameters }
        $finalPipeline = $newPipeline.ToString()

        __CUSTOM_PARAMETER_PROCESSING__

        $steppablePipeline = [ScriptBlock]::Create(
            $finalPipeline).GetSteppablePipeline()
        $steppablePipeline.Begin($PSCmdlet)
    } catch {
        throw
    }
}

process
{
    try {
        __CUSTOM_PROCESS__
        $steppablePipeline.Process($_)
    } catch {
        throw
    }
}

end
{
    try {
        __CUSTOM_END__
        $steppablePipeline.End()
    } catch {
        throw
    }
}

dynamicparam
{
    ## Access the REAL Get-Command, Foreach-Object, and Where-Object
    ## commands, so that command wrappers do not interfere with this script
    $getCommand = $executionContext.InvokeCommand.GetCmdlet(
        "Microsoft.PowerShell.Core\Get-Command")
    $foreachObject = $executionContext.InvokeCommand.GetCmdlet(
        "Microsoft.PowerShell.Core\Foreach-Object")
    $whereObject = $executionContext.InvokeCommand.GetCmdlet(
        "Microsoft.PowerShell.Core\Where-Object")

    ## Find the parameters of the original command, and remove everything
    ## else from the bound parameter list so we hide parameters the wrapped
    ## command does not recognize.
    $command = & $getCommand __COMMAND_NAME__ -Type __COMMAND_TYPE__
    $targetParameters = @{}
    $PSBoundParameters.GetEnumerator() |
        & $foreachObject {
            if($command.Parameters.ContainsKey($_.Key))
            {
                $targetParameters.Add($_.Key, $_.Value)
            }
        }

    ## Get the argumment list as it would be passed to the target command
    $argList = @($targetParameters.GetEnumerator() |
        Foreach-Object { "-$($_.Key)"; $_.Value })

    ## Get the dynamic parameters of the wrapped command, based on the
    ## arguments to this command
    $command = $null
    try
    {
        $command = & $getCommand __COMMAND_NAME__ -Type __COMMAND_TYPE__ `
            -ArgumentList $argList
    }
    catch
    {

    }

    $dynamicParams = @($command.Parameters.GetEnumerator() |
        & $whereObject { $_.Value.IsDynamic })

    ## For each of the dynamic parameters, add them to the dynamic
    ## parameters that we return.
    if ($dynamicParams.Length -gt 0)
    {
        $paramDictionary = `
            New-Object Management.Automation.RuntimeDefinedParameterDictionary
        foreach ($param in $dynamicParams)
        {
            $param = $param.Value
            $arguments = $param.Name, $param.ParameterType, $param.Attributes
            $newParameter = `
                New-Object Management.Automation.RuntimeDefinedParameter `
                $arguments
            $paramDictionary.Add($param.Name, $newParameter)
        }
        return $paramDictionary
    }
}

<#

.ForwardHelpTargetName __COMMAND_NAME__
.ForwardHelpCategory __COMMAND_TYPE__

#>

'@

## Get the information about the original command
$originalCommand = Get-Command $target
$metaData = New-Object System.Management.Automation.CommandMetaData `
    $originalCommand
$proxyCommandType = [System.Management.Automation.ProxyCommand]

## Generate the cmdlet binding attribute, and replace information
## about the target
$proxy = $proxy.Replace("__CMDLET_BINDING_ATTRIBUTE__",
    $proxyCommandType::GetCmdletBindingAttribute($metaData))
$proxy = $proxy.Replace("__COMMAND_NAME__", $target)
$proxy = $proxy.Replace("__COMMAND_TYPE__", $commandType)

## Stores new text we'll be putting in the param() block
$newParamBlockCode = ""

## Stores new text we'll be putting in the begin block
## (mostly due to parameter processing)
$beginAdditions = ""

## If the user wants to add a parameter
$currentParameter = $originalCommand.Parameters.Count
if($AddParameter)
{
    foreach($parameter in $AddParameter.Keys)
    {
        ## Get the code associated with this parameter
        $parameterCode = $AddParameter[$parameter]

        ## If it's an advanced parameter declaration, the hashtable
        ## holds the validation and / or type restrictions
        if($parameter -is [Hashtable])
        {
            ## Add their attributes and other information to
            ## the variable holding the parameter block additions
            if($currentParameter -gt 0)
            {
                $newParamBlockCode += ","
            }

            $newParamBlockCode += "`n`n    " +
                $parameter.Attributes + "`n" +
                '    $' + $parameter.Name

            $parameter = $parameter.Name
        }
        else
        {
            ## If this is a simple parameter name, add it to the list of
            ## parameters. The proxy generation APIs will take care of
            ## adding it to the param() block.
            $newParameter =
                New-Object System.Management.Automation.ParameterMetadata `
                    $parameter
            $metaData.Parameters.Add($parameter, $newParameter)
        }

        $parameterCode = $parameterCode.ToString()

        ## Create the template code that invokes their parameter code if
        ## the parameter is selected.
        $templateCode = @"

        if(`$PSBoundParameters['$parameter'])
        {
            $parameterCode

            ## Replace the __ORIGINAL_COMMAND__ tag with the code
            ## that represents the original command
            `$alteredPipeline = `$newPipeline.ToString()
            `$finalPipeline = `$alteredPipeline.Replace(
                '__ORIGINAL_COMMAND__', `$finalPipeline)
        }
"@

        ## Add the template code to the list of changes we're making
        ## to the begin() section.
        $beginAdditions += $templateCode
        $currentParameter++
    }
}

## Generate the param() block
$parameters = $proxyCommandType::GetParamBlock($metaData)
if($newParamBlockCode) { $parameters += $newParamBlockCode }
$proxy = $proxy.Replace('__PARAMETERS__', $parameters)

## Update the begin, process, and end sections
$proxy = $proxy.Replace('__CUSTOM_BEGIN__', $Begin)
$proxy = $proxy.Replace('__CUSTOM_PARAMETER_PROCESSING__', $beginAdditions)
$proxy = $proxy.Replace('__CUSTOM_PROCESS__', $Process)
$proxy = $proxy.Replace('__CUSTOM_END__', $End)

## Save the function wrapper
Write-Verbose $proxy
Set-Content function:\GLOBAL:$NAME $proxy

## If we were wrapping a cmdlet, hide it so that it doesn't conflict with
## Get-Help and Get-Command
if($commandType -eq "Cmdlet")
{
    $originalCommand.Visibility = "Private"
}

Find-Module -Name '*color*'。这似乎就像你正在尝试做他们已经完成的事情? - postanote