如何在SceneKit中以较低分辨率渲染着色器?

3

我在我的应用中使用了SceneKit着色器修饰符来添加一些视觉元素,就像这样:

// A SceneKit scene with orthographic projection

let shaderBundle = Bundle(for: Self.self)
let shaderUrl = shaderBundle.url(forResource: "MyShader.frag", withExtension: nil)!
let shaderString = try! String(contentsOf: shaderUrl)

let plane = SCNPlane(width: 512, height: 512)  // 1024x1024 pixels on devices with x2 screen resolution
plane.firstMaterial!.shaderModifiers = [SCNShaderModifierEntryPoint.fragment: shaderString]

let planeNode = SCNNode(geometry: plane)
rootNode.addChildNode(planeNode)

问题在于性能缓慢,因为SceneKit正在耗费精力渲染屏幕上的每一个像素。如何降低着色器的分辨率,同时保持平面大小不变?
我已经尝试过缩小plane并在planeNode上使用放大比例变换,但是无效,着色器的渲染仍然像之前一样高度详细。
使用plane.firstMaterial!.diffuse.contentsTransform也没有帮助(或者可能我做错了)。
我知道如果该着色器是场景中唯一的节点,我可以使全局SCNView变小,然后应用仿射缩放变换,但事实并非如此,场景中还有其他节点(不是着色器),我宁愿避免以任何方式改变它们的外观。

1
你在材质上使用纹理吗?从我的理解来看,片段着色器是针对每个“片段”执行的,而片段可以理解为像素,所以如果你设置了一个 512x512 的纹理,它可能只在这些像素上执行。 - EmilioPelaez
1
@EmilioPelaez 将 plane.firstMaterial!.diffuse.contents 设置为一个 16x16 的 UIImage 没有任何效果(如果我禁用着色器修改器,我可以很好地看到低分辨率纹理)。 - Desmond Hume
1
@DesmondHume 你使用什么类型的着色器? - Hamid Yusifli
1
@0xBFE1A8 一个计算量较大的片段着色器。 - Desmond Hume
1
@DesmondHume,你能在这里发布你的着色器代码吗? - Hamid Yusifli
显示剩余3条评论
2个回答

2
似乎我使用一种“渲染到纹理”的方法解决了它,通过将一个SceneKit场景嵌套在由顶级SceneKit场景显示的SpriteKit场景中。

更详细地说,以下SCNNode子类将一个缩小的着色器平面放置在SpriteKit的SK3DNode内,然后将该SK3DNode放入SpriteKit场景作为SceneKit的SKScene,然后使用该SKScene作为放置在顶级SceneKit场景中的放大平面的扩散内容。

奇怪的是,为了保持本地分辨率,我需要使用scaleFactor*2,因此,为了减少渲染分辨率(通常为比例因子0.5),我实际上需要使用scaleFactor = 1

如果有人知道这种奇怪行为的原因或解决方法,请在评论中让我知道。

import Foundation
import SceneKit
import SpriteKit

class ScaledResolutionFragmentShaderModifierPlaneNode: SCNNode {

    private static let nestedSCNSceneFrustumLength: CGFloat = 8

    // For shader parameter input
    let shaderPlaneMaterial: SCNMaterial

    // shaderModifier: the shader
    // planeSize: the size of the shader on the screen
    // scaleFactor: the scale to be used for the shader's rendering resolution; the lower, the faster
    init(shaderModifier: String, planeSize: CGSize, scaleFactor: CGFloat) {
        let scaledSize = CGSize(width: planeSize.width*scaleFactor, height: planeSize.height*scaleFactor)

        // Nested SceneKit scene with orthographic projection
        let nestedSCNScene = SCNScene()
        let camera = SCNCamera()
        camera.zFar = Double(Self.nestedSCNSceneFrustumLength)
        camera.usesOrthographicProjection = true
        camera.orthographicScale = Double(scaledSize.height/2)
        let cameraNode = SCNNode()
        cameraNode.camera = camera
        cameraNode.simdPosition = simd_float3(x: 0, y: 0, z: Float(Self.nestedSCNSceneFrustumLength/2))
        nestedSCNScene.rootNode.addChildNode(cameraNode)
        let shaderPlane = SCNPlane(width: scaledSize.width, height: scaledSize.height)
        shaderPlaneMaterial = shaderPlane.firstMaterial!
        shaderPlaneMaterial.shaderModifiers = [SCNShaderModifierEntryPoint.fragment: shaderModifier]
        let shaderPlaneNode = SCNNode(geometry: shaderPlane)
        nestedSCNScene.rootNode.addChildNode(shaderPlaneNode)

        // Intermediary SpriteKit scene
        let nestedSCNSceneSKNode = SK3DNode(viewportSize: scaledSize)
        nestedSCNSceneSKNode.scnScene = nestedSCNScene
        nestedSCNSceneSKNode.position = CGPoint(x: scaledSize.width/2, y: scaledSize.height/2)
        nestedSCNSceneSKNode.isPlaying = true
        let intermediarySKScene = SKScene(size: scaledSize)
        intermediarySKScene.backgroundColor = .clear
        intermediarySKScene.addChild(nestedSCNSceneSKNode)
        let intermediarySKScenePlane = SCNPlane(width: scaledSize.width, height: scaledSize.height)
        intermediarySKScenePlane.firstMaterial!.diffuse.contents = intermediarySKScene
        let intermediarySKScenePlaneNode = SCNNode(geometry: intermediarySKScenePlane)
        let invScaleFactor = 1/Float(scaleFactor)
        intermediarySKScenePlaneNode.simdScale = simd_float3(x: invScaleFactor, y: invScaleFactor, z: 1)

        super.init()

        addChildNode(intermediarySKScenePlaneNode)
    }

    required init?(coder: NSCoder) {
        fatalError()
    }

}

1
一般情况下,如果没有使用Metal中的可变光栅化率或其他地方的可变速率着色这种相对较新的GPU功能,您无法使场景中的一个对象以不同于场景其余部分的分辨率运行其片段着色器。
对于这种情况,根据您的设置,您可能可以使用SCNTechnique在单独的通道中以不同的分辨率呈现平面,然后将其合成回场景中,就像某些游戏引擎以较低的分辨率呈现粒子以节省填充率一样。以下是一个示例。
首先,您需要在项目中添加一个Metal文件(如果已经有一个,请添加到其中),其中包含以下内容:
#include <SceneKit/scn_metal>

struct QuadVertexIn {
    float3 position [[ attribute(SCNVertexSemanticPosition) ]];
    float2 uv [[ attribute(SCNVertexSemanticTexcoord0) ]];
};

struct QuadVertexOut {
    float4 position [[ position ]];
    float2 uv;
};

vertex QuadVertexOut quadVertex(QuadVertexIn v [[ stage_in ]]) {
    QuadVertexOut o;
    o.position = float4(v.position.x, -v.position.y, 1, 1);
    o.uv = v.uv;
    return o;
}

constexpr sampler compositingSampler(coord::normalized, address::clamp_to_edge, filter::linear);

fragment half4 compositeFragment(QuadVertexOut v [[ stage_in ]], texture2d<half, access::sample> compositeInput [[ texture(0) ]]) {
    return compositeInput.sample(compositingSampler, v.uv);
}

然后,在您的SceneKit代码中,您可以像这样设置和应用该技术:
let technique = SCNTechnique(dictionary: [
    "passes": ["drawLowResStuff":
                  ["draw": "DRAW_SCENE",
                   // only draw nodes that are in this category
                   "includeCategoryMask": 2,
                   "colorStates": ["clear": true, "clearColor": "0.0"],
                   "outputs": ["color": "lowResStuff"]],
               "drawScene":
                  ["draw": "DRAW_SCENE",
                   // don’t draw nodes that are in the low-res-stuff category
                   "excludeCategoryMask": 2,
                   "colorStates": ["clear": true, "clearColor": "sceneBackground"],
                   "outputs": ["color": "COLOR"]],
               "composite":
                  ["draw": "DRAW_QUAD",
                   "metalVertexShader": "quadVertex",
                   "metalFragmentShader": "compositeFragment",
                   // don’t clear what’s currently there (the rest of the scene)
                   "colorStates": ["clear": false],
                   // use alpha blending
                   "blendStates": ["enable": true, "colorSrc": "srcAlpha", "colorDst": "oneMinusSrcAlpha"],
                   // supply the lowResStuff render target to the fragment shader
                   "inputs": ["compositeInput": "lowResStuff"],
                   // draw into the main color render target
                   "outputs": ["color": "COLOR"]]
    ],
    "sequence": ["drawLowResStuff", "drawScene", "composite"],
    "targets": ["lowResStuff": ["type": "color", "scaleFactor": 0.5]]
])

// mark the plane node as belonging to the category of stuff that gets drawn in the low-res pass
myPlaneNode.categoryBitMask = 2

// apply the technique to the scene view
mySceneView.technique = technique

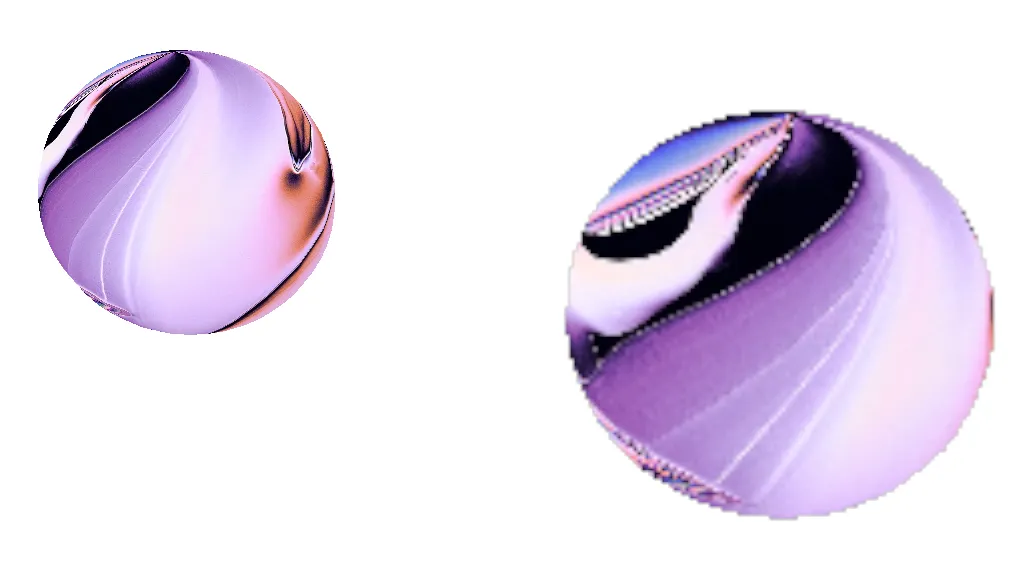
使用两个具有相同纹理的球体作为测试场景,并将 scaleFactor 设置为0.25而不是0.5以夸大效果,结果如下所示。

example screenshot of the result, showing two spheres using the same texture, one visibly rendered at a lower resolution

如果您更喜欢清晰的像素化而不是上面示例中的模糊调整大小,请在Metal代码中将filter::linear更改为filter::nearest。此外,请注意,合成的低分辨率内容未考虑深度缓冲区,因此,如果您的平面应该出现在其他对象“后面”,则需要在合成函数中进行更多的工作来修复这个问题。

1
感谢您详细的回答。让我感到困惑的是,“合成的低分辨率内容没有考虑深度缓冲区”。我有很多对象几乎随机需要在着色器平面后面和前面。您认为适应这个深度缓冲区复杂性有多难? - Desmond Hume
1
这要看情况——在那种情况下可能有一种类似的方法可以更好地解决问题。飞机上的昂贵着色器是什么样子的?它是否与视角相关,光照相关或者其他相关的因素有关? - Noah Witherspoon
1
除了一些浮点输入,它不依赖于场景中正在发生的任何事情。 - Desmond Hume
1
好的,我会在另一个答案中编写替代方案。 - Noah Witherspoon
2
可能不需要了。看起来我成功地解决了这个问题,通过将一个缩小的着色器平面放置到SpriteKit的SK3DNode中,然后将该SK3DNode放置在SpriteKit场景中作为SceneKit的SKScene,然后使用该SKScene作为根SceneKit场景内一个放大的平面的漫反射内容。稍后我可能会发布自己的答案。再次感谢。 - Desmond Hume
在我的答案中添加了一条备注,关于缩放因子的一些奇怪行为,也许你可以解释一下。 - Desmond Hume

网页内容由stack overflow 提供, 点击上面的
可以查看英文原文,
原文链接