在TextView中添加点,就像收据上的那样。

6
我想在收据中实现类似产品清单的功能:
面包 ......................................... 20
牛奶 ............................................ 10
果酱饼干 ...................... 15
智能手机 10GB 3GHz
1GB RAM NFC 10MPx
相机 .................................... 400

物品名称(面包,牛奶)我认为应该是一个TextView,我需要用点来填充。
金额(20,10)是另一个TextView,应该对齐到屏幕的右侧。

有什么好的建议吗?也许我需要继承TextView类并重写onDraw()方法?
非常感谢您的帮助!

尝试使用 textview.append() - Raghunandan
7个回答

3

我有解决方案。也许能帮到某些人。

  1. File check_info_item.xml:

    <LinearLayout xmlns:android="http://schemas.android.com/apk/res/android"
          android:layout_width="match_parent"
          android:layout_height="match_parent"
          android:orientation="horizontal">
    <RelativeLayout android:layout_width="match_parent"
              android:layout_height="wrap_content">
    
    <TextView android:layout_height="wrap_content"
              android:layout_width="wrap_content"
              android:id="@+id/txt_fake_value"
              android:textSize="18dp"
              android:textColor="@android:color/transparent"
              android:layout_alignParentRight="true"/>
    <example.com.CheckInfoTextView android:layout_height="wrap_content"
              android:layout_width="match_parent"
              android:id="@+id/txt_fake_info"
              android:textSize="18dp"
              android:textColor="@android:color/transparent"
              android:layout_alignParentLeft="true"
              android:layout_toLeftOf="@id/txt_fake_value"/>
    <TextView android:layout_height="wrap_content"
              android:layout_width="wrap_content"
              android:id="@+id/txt_check_info_value"
              android:text=""
              android:textSize="18dp"
              android:textColor="#000"
              android:layout_alignParentRight="true"
              android:layout_alignBottom="@id/txt_fake_info"/>
    <example.com.CheckInfoTextView
            android:layout_height="wrap_content"
            android:layout_width="match_parent"
            android:textSize="18dp"
            android:textColor="#000"
            android:id="@+id/txt_check_info"
            android:text=""
            android:layout_alignParentLeft="true"
            android:layout_toLeftOf="@id/txt_check_info_value"/>
    </RelativeLayout>
    </LinearLayout>
    
  2. Code to fill the info fields (in the Activity):

        View row = getLayoutInflater().inflate(R.layout.check_info_item, null);
        //Fake fields needed to align base fields in the xml file
        TextView txtFakeValue = (TextView) row.findViewById(R.id.txt_fake_value);
        txtFakeValue.setText(String.valueOf(pair.second));
    
        TextView txtFake = (TextView) row.findViewById(R.id.txt_fake_info);
        txtFake.setText(pair.first);
    
        TextView txtValue = (TextView) row.findViewById(R.id.txt_check_info_value);
        txtValue.setText(String.valueOf(pair.second));
    
        TextView txtTitle = (TextView) row.findViewById(R.id.txt_check_info);
        txtTitle.setText(pair.first);
    
  3. And the CheckInfoTextView:

    public class CheckInfoTextView extends TextView {
    
    
        public CheckInfoTextView(Context context) {
            super(context);
        }
    
        public CheckInfoTextView(Context context, AttributeSet attrs) {
            super(context, attrs);
        }
    
        public CheckInfoTextView(Context context, AttributeSet attrs, int defStyle) {
            super(context, attrs, defStyle);
        }
    
        @Override
        public void onWindowFocusChanged(boolean hasWindowFocus) {
            super.onWindowFocusChanged(hasWindowFocus);
            if(!hasWindowFocus) return;
    
            int requiredDots = getRequiredDotsNumber();
            if(requiredDots == 0) {
                String text = getText().toString();
                StringBuilder result = new StringBuilder();
                result.append(text.substring(0, text.lastIndexOf(' ')));
                result.append("\n");
                result.append(text.substring(text.lastIndexOf(' ') + 1));
                setText(result.toString());
    
                requiredDots = getRequiredDotsNumber();
            }
            String dots = "";
            for (int i = 0; i < requiredDots; ++i) {
                dots += " .";
            }
            setText(getText() + dots);
        }
    
        private int getRequiredDotsNumber() {
            final int width = getWidth();
            final int lastLineWidth = (int) getLayout().getLineWidth(getLineCount() - 1);
            final int availableWidthForDots = width - lastLineWidth;
            final int widthOfOneDot = getWidthOfOneDot();
            final int widthOfTwoDotsWithSpace = getWidthOfTwoDotsWithSpace();
            final int widthOfSpace = widthOfTwoDotsWithSpace - (widthOfOneDot * 2);
            final int widthOfDotWithSpace = widthOfSpace + widthOfOneDot;
            int numberOfDots = availableWidthForDots / widthOfDotWithSpace;
            return numberOfDots;
        }
    
        private int getWidthOfTwoDotsWithSpace() {
           return getStringWidth(". .");
        }
    
        private int getWidthOfOneDot() {
           return getStringWidth(".");
        }
    
        private int getStringWidth(String text) {
            Rect dotBounds = new Rect();
            getPaint().getTextBounds(text,0,text.length(),dotBounds);
            return dotBounds.width();
        }
    }
    

3
您应该为每一行创建三个TextView,依次布局在一起:
  1. 产品名称的TextView(例如“啤酒”)
  2. 带有点号的TextView
  3. 数字的TextView(例如“20”)
然后将一个产品放在一行中。该行应该是相对布局,其中:
  • TextView no.1与左边缘对齐,并将宽度设置为包裹内容
  • TextView no.3与右边缘对齐,并将宽度设置为包裹内容
  • TextView no.2位于TV no.3的左侧,位于TV no.1的右侧,并且应在XML文件中填充大量的点号。这永远不会改变。
这将起作用,因为TV no.2将具有可以收缩的宽度,并且将始终适合产品名称和价格之间。相信我 :)

但是如果TextView 1有多行(例如问题中的智能手机产品),textView将被拉伸到最宽行的宽度(在示例中是第一行 -“Smartphone 10GB 3GHz”),并且点将从此宽度开始放置,而不是从最后一行(“camera”)开始,这不符合我的需求。 - Sergio
对于我的解决方案来说,点号不会直接跟在“camera”一词后面,而是在第1个电视屏幕的右边缘。如果这对您不可接受,您可以使用view的onMeasure()方法,测量文本、TextView和屏幕的宽度,并在名称和数字之间放置尽可能多的点号以适应剩余空间(还要知道一个点的宽度)。然而,这可能会消耗大量的内存资源,因为可能需要进行大量的计算。您试过了吗? - Jacek Milewski

2
我修改了Serg_的CheckinfoTextView类,使其既能在Eclipse布局编辑器中工作,又能尽可能地添加空格,将页码放置在右侧。我还稍微改变了它的使用方式。
实现方法:
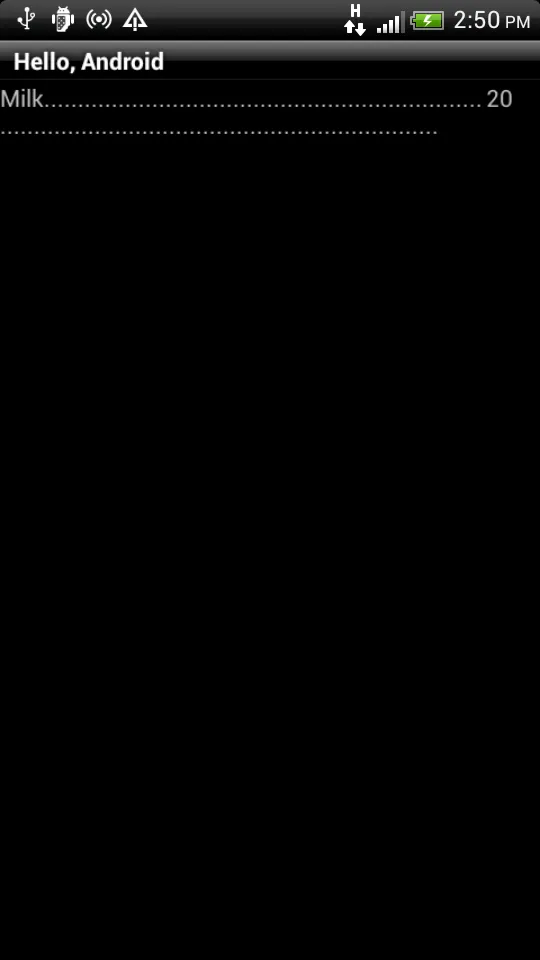
Milk...................23
Chocolate cookies......24

将文本分别设置为“牛奶23”和“巧克力曲奇24”

空格数四舍五入取整,因此最好将数字稍微向右移动一点而不是太靠左边。

public class DotAutofillTextView extends TextView {

private int availableWidthForDots;
private int widthOfSpace;
private int widthOfDotWithSpace;

public DotAutofillTextView(Context context) {
    super(context);
}

public DotAutofillTextView(Context context, AttributeSet attrs) {
    super(context, attrs);
}

public DotAutofillTextView(Context context, AttributeSet attrs, int defStyle) {
    super(context, attrs, defStyle);
}

@Override
protected void onLayout(boolean changed, int left, int top, int right, int bottom) {
    int width = getWidth() - getPaddingLeft() - getPaddingRight();
    int lastLineWidth = (int) getLayout().getLineWidth(getLineCount() - 1);
    availableWidthForDots = width - lastLineWidth;
    int widthOfOneDot = getWidthOfOneDot();
    int widthOfTwoDotsWithSpace = getWidthOfTwoDotsWithSpace();
    widthOfSpace = widthOfTwoDotsWithSpace - (widthOfOneDot * 2);
    widthOfDotWithSpace = widthOfSpace + widthOfOneDot;
    int requiredDots = getRequiredDotsNumber();
    if (requiredDots != 0) {
        int spaces = getRequiredSpacesNumber(requiredDots);
        StringBuilder result = new StringBuilder();
        String text = getText().toString();
        result.append(text.substring(0, text.lastIndexOf(' ')));
        setText(result.toString());
        StringBuilder dots = new StringBuilder();
        for (int i = 0; i < requiredDots; ++i) {
            dots.append(" .");
        }
        for (int i = 0; i < spaces; ++i) {
            dots.append(" ");
        }
        result.append(dots.toString());
        result.append(text.substring(text.lastIndexOf(' ') + 1));
        setText(result.toString());
    }
    super.onLayout(changed, left, top, right, bottom);
}

private int getRequiredSpacesNumber(int requiredDots) {
    float remain = (1f * availableWidthForDots) % (1f * widthOfDotWithSpace);
    return (int) ((remain / widthOfSpace) + 0.5f);
}

private int getRequiredDotsNumber() {
    if (getLayout() == null) {
        return 1;
    }
    int numberOfDots = availableWidthForDots / widthOfDotWithSpace;
    return numberOfDots;
}

private int getWidthOfTwoDotsWithSpace() {
    return getStringWidth(". .");
}

private int getWidthOfOneDot() {
    return getStringWidth(".");
}

private int getStringWidth(String text) {
    Rect dotBounds = new Rect();
    getPaint().getTextBounds(text, 0, text.length(), dotBounds);
    return dotBounds.width();
}

}


0

如果“.”(点)是您的基本需求,那么您可以尝试像这样。

我的建议是,仅使用一个 TextView 来适应啤酒...10(拴住)

像这样尝试。

    int label_len = 10;//Edit as per your requirement
     String MoneyValue = "20";
    TextView tv = (TextView)findViewById(your id);
    tv.setText("Beer");

    if(tv.getText().length() < label_len){
        for(int i = tv.getText().length(); i < label_len; i++){

           tv.setText(tv.getText()+".");
        }
    }
tv.setText(tv.getText() + MoneyValue);

这是一个带有硬编码值的示例,您可以尝试动态添加...

希望这能帮到您...


我怎样才能计算label_len? - Sergio
label_len 是一个可以影响你的 TextView 上点号数量的变量。例如,如果 label_len = 10,并且单词是 BEER,则 setText 将是 BEER......,如果单词是 Cookies,则为 Cookies...。因此,您可以增加 label_len 的值以获得更多的点而不会影响显示效果。 - CRUSADER
我不确定应该放多少个点。假设我有一个RelativeLayout,它有两个子元素:2个TextView(第一个用于带点的文本,第二个用于值),第二个TextView对齐到右侧,第一个TextView对齐在父元素的左侧和第二个TextView的左侧。我只需要在第二个TextView前用点来填充第一个TextView的空白区域。 - Sergio
你没有认真阅读我的回答,我说你可以用一个textView完成,在你的情况下,RelativeLayout现在只有一个子元素(textView)... - CRUSADER

0

输入图像描述你只需使用layout.xml即可实现此目标。

<?xml version="1.0" encoding="utf-8"?>
<LinearLayout xmlns:android="http://schemas.android.com/apk/res/android"    
    android:layout_width="fill_parent"
    android:![enter image description here][2]layout_height="fill_parent">
    <LinearLayout android:layout_width="fill_parent"
        android:layout_height="wrap_content"    
        android:weightSum="1">    
        <TextView android:layout_height="wrap_content"
            android:layout_width="0dp"
            android:layout_weight="0.9"          
          android:text="Milk.................................................................................................................................." />
        <TextView android:layout_height="wrap_content"
            android:layout_width="0dp"
            android:layout_weight="0.1"             
            android:text="20" />
    </LinearLayout>
</LinearLayout>

这个解决方案适用于所有具有不同分辨率的设备。


编辑答案。你可以动态添加文本。第二个文本视图将自动调整到底部。只需通过动态添加文本运行它。 - Brijesh Thakur
这就是你想要的对吧?如果不是,那么从第二个TextView中删除android:gravity="bottom"。 - Brijesh Thakur
移除 android:gravity="bottom" 没有帮助。 - Sergio
是的,就是这样。但我需要的是在不显示带有点的第二行的情况下进行显示。 - Sergio
让我们在聊天中继续这个讨论:http://chat.stackoverflow.com/rooms/32611/discussion-between-brijesh-thakur-and-user1731626 - Brijesh Thakur
显示剩余3条评论

0

使用相对布局:

TextView View TextView

第一个设置宽度以包裹内容,并放置在上一行的文本视图下方。
第二个视图,设置为第一个文本视图的右侧,并使用水平重复的点背景可绘制对象。将宽度设置为匹配父级。
最后一个视图,设置为中间视图的右侧,宽度为包裹内容并与父级右对齐。


这与Jacek Milewski的回答类似。我的评论在下面。 - Sergio
确实如此。但是将点作为背景比在文本视图中使用大量点更优雅。使用相对布局将使每一行独立,因此它会起作用。相信我。 - Benoit Duffez
不适合我,因为视图(第二个元素)将从整个TextView的宽度放置,但我需要将点放置在TextVeiw的最后一行的宽度上(例如问题中的智能手机)。 - Sergio

0

我曾经遇到过同样的问题,并找到了使用ConstraintLayout的解决方案:

   <androidx.constraintlayout.widget.ConstraintLayout
                android:layout_width="match_parent"
                android:layout_height="wrap_content"
                >

            <TextView
                android:id="@+id/item"
                android:layout_width="wrap_content"
                android:layout_height="wrap_content"
                android:text="Phone"
                app:layout_constraintTop_toTopOf="parent"
                app:layout_constraintLeft_toLeftOf="parent"
                />

            <TextView
                android:layout_width="0dp"
                android:layout_height="match_parent"
                android:text="...................................................................................................."
                android:maxLines="1"
                app:layout_constraintTop_toTopOf="parent"
                app:layout_constraintLeft_toRightOf="@id/item"
                app:layout_constraintRight_toLeftOf="@id/price"/>

            <TextView
                android:id="@+id/price"
                android:layout_width="wrap_content"
                android:layout_height="wrap_content"
                android:gravity="end"
                android:text="100"
                app:layout_constraintTop_toTopOf="parent"
                app:layout_constraintRight_toRightOf="parent"
                />
   </androidx.constraintlayout.widget.ConstraintLayout>

网页内容由stack overflow 提供, 点击上面的
可以查看英文原文,
原文链接