我尝试做的事情
我试图通过Java代码设置我的ImageButton的layout_gravity,希望ImageButton呈现的方式如下图橙色框所示:
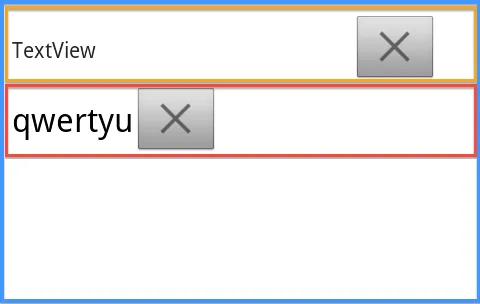
蓝色框是一个垂直的LinearLayout,作为“基本”布局,这是我试图添加子布局的布局。
橙色和红色都是水平的LinearLayout。
橙色布局是我想要放置ImageButton和TextView的方式,这个布局是通过XML设置的。
红色布局是我试图通过Java代码模仿橙色布局的结果。
相关代码
以下是设置橙色布局的XML代码,这是我希望通过Java代码实现的效果:
        <!-- Begin the Orange Layout -->
        <LinearLayout
            android:layout_width="match_parent"
            android:layout_height="wrap_content"
            android:layout_marginLeft="@dimen/info_left_padding"
            android:layout_marginRight="@dimen/info_right_padding" >

            <TextView
                android:id="@+id/textView1"
                android:layout_width="wrap_content"
                android:layout_height="wrap_content"
                android:layout_gravity="center_vertical"
                android:gravity="center_vertical"
                android:minHeight="@dimen/detail_min_line_item_height"
                android:text="TextView" />

            <FrameLayout
                android:layout_width="match_parent"
                android:layout_height="wrap_content" >

                <ImageButton
                    android:id="@+id/imageButton1"
                    android:layout_width="wrap_content"
                    android:layout_height="wrap_content"
                    android:layout_gravity="right|center_vertical"
                    android:adjustViewBounds="true"
                    android:maxHeight="@dimen/abs__action_bar_default_height"
                    android:scaleType="fitCenter"
                    android:src="@drawable/navigation_cancel" />
            </FrameLayout>
        </LinearLayout>
这是设置红色布局的Java代码
        int textHeight = (int)getResources().getDimension(R.dimen.detail_min_line_item_height);
        int imgHeight = (int)getResources().getDimension(R.dimen.abs__action_bar_default_height);

        TextView mTextView = new TextView(this);
        ImageButton mDeleteButton = new ImageButton(this);

        // Set Delete Button Padding
//      mDeleteButton.setPadding(buttonPadding, buttonPadding, buttonPadding, buttonPadding);

        // Set Imagebutton Scale type as fitCentre
        mDeleteButton.setScaleType(ScaleType.FIT_CENTER);

        // Set AdjustViewBounds
        mDeleteButton.setAdjustViewBounds(true);

        // Set max height of the image
        mDeleteButton.setMaxHeight(imgHeight);

        // Set the text appearance to be "large"
        mTextView.setTextAppearance(this, android.R.style.TextAppearance_Large);
        mTextView.setText(text);

        // Set the minimum height of this textview
        mTextView.setMinHeight(textHeight);

        // Set the content of the textview to be centred
        mTextView.setGravity(Gravity.CENTER_VERTICAL);

        // Set the ImageButton's background image
        mDeleteButton.setImageResource(R.drawable.navigation_cancel);

        LinearLayout.LayoutParams hParams = new LinearLayout.LayoutParams(LayoutParams.MATCH_PARENT, LayoutParams.WRAP_CONTENT);

        LinearLayout hLayout = new LinearLayout(this);
        // Set Margins
        hParams.leftMargin = (int) getResources().getDimension(R.dimen.info_left_padding);
        hParams.rightMargin = (int) getResources().getDimension(R.dimen.info_right_padding);
        hParams.bottomMargin = (int) getResources().getDimension(R.dimen.text_layout_margin);

        hLayout.setLayoutParams(hParams);
        // Set orientation to horizontal
        hLayout.setOrientation(LinearLayout.HORIZONTAL);

        // The settings below is actually setting up some of the button's parameters
        LinearLayout.LayoutParams buttonParams = new LinearLayout.LayoutParams(LayoutParams.WRAP_CONTENT, LayoutParams.WRAP_CONTENT);
        buttonParams.gravity = Gravity.RIGHT;
        mDeleteButton.setLayoutParams(buttonParams);

        hLayout.addView(mTextView);
        hLayout.addView(mDeleteButton);

        layout_blue.addView(hLayout);
我已经尝试过的
根据一些 Stack Overflow 帖子,比如 Java method for android:layout_gravity ,我最初尝试先将我的 ImageButton 放入一个 FrameLayout 中,然后设置这个 FrameLayout 的参数,像这样:
FrameLayout buttonFrame = new FrameLayout(this);
FrameLayout.LayoutParams buttonParams = new FrameLayout.LayoutParams(android.widget.FrameLayout.LayoutParams.WRAP_CONTENT,
                                                                            android.widget.FrameLayout.LayoutParams.WRAP_CONTENT,
                                                                            Gravity.RIGHT | Gravity.CENTER_VERTICAL);
buttonFrame.setLayoutParams(buttonParams);
buttonFrame.addView(mDeleteButton);
但是我得到的结果和上面呈现的图片相同。后来,我尝试将LayoutParams的宽度改为MATCH_PARENT,结果发现ImageButton被水平拉伸了(是的,被拉伸了)。
接着,我尝试采用这两篇SO帖子中介绍的方法:
他们的方法是首先设置一个LinearLayout.Params,然后将此参数应用于按钮(在“相关代码”部分中发布的代码应用了此方法)。简而言之,就是:
    // The settings below is actually setting up some of the button's parameters
    LinearLayout.LayoutParams buttonParams = new LinearLayout.LayoutParams(LayoutParams.WRAP_CONTENT, LayoutParams.WRAP_CONTENT);
    buttonParams.gravity = Gravity.RIGHT;
    mDeleteButton.setLayoutParams(buttonParams);
然而,结果仍然与上面展示的图像相同。
问题
由于我需要以编程方式向蓝色布局添加更多子视图,我想知道是否有一种方法可以设置每个子布局的设置,就像图像中的橙色一样?
最后
我找到了一个解决方案,它与@Permita的答案非常相似。
这是我的解决方案:
    LinearLayout.LayoutParams textParams = new LinearLayout.LayoutParams(0, LayoutParams.WRAP_CONTENT);
    textParams.weight = 1.0f;
    mTextView.setLayoutParams(textParams);
LinearLayout.LayoutParams textParams = new LinearLayout.LayoutParams(0, LayoutParams.WRAP_CONTENT); textParams.weight = 1.0f; mTextView.setLayoutParams(textParams);- dumbfingers