我刚开始使用Tesseract库,但结果真的很糟糕。我按照Git存储库中的说明进行操作(https://github.com/gali8/Tesseract-OCR-iOS)。我的ViewController使用以下方法开始识别:
即使字符白名单只包含数字,我得到的结果与图像相差甚远:
我猜测使用的iPad mini相机拍摄照片存在问题,但我无法确定是什么问题以及原因。
有任何提示吗?
Tesseract *t = [[Tesseract alloc] initWithLanguage:@"deu"];
t.delegate = self;

[t setVariableValue:@"0123456789ABCDEFGHIJKLMNOPQRSTUVWXYZabcdefghijklmnopqrstuvwxyz" forKey:@"tessedit_char_whitelist"];
[t setImage:img];

[t recognize];

NSLog( @"Recognized text: %@", [t recognizedText] );

labelRecognizedText.text = [t recognizedText];

t = nil;
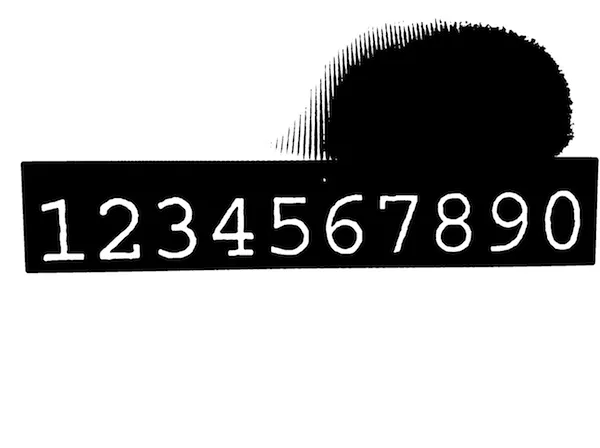
项目模板中的示例图片 效果良好(这告诉我项目本身设置正确),但每当我尝试使用其他图片时,识别出来的文本就会变得一团糟。例如,我试图拍摄我的finder显示示例图片:
https://dl.dropboxusercontent.com/u/607872/tesseract.jpg(1.5 MB)
但Tesseract识别成:
Recognized text: s f l TO  if v   Ysssifss f

 ssqxizg ss sfzzlj z

s N T IYIOGY Z I l EY s s

k Es ETL ZHE s UEY

z xhks Fsjs Es z VIII c

s I   XFTZT c s  h V Ijzs

L s sk  sisijk J

s f s ssj Jss sssHss H VI

s s  H

i s H st xzs
s s k 4  is x2 IV
Illlsiqss sssnsiisfjlisszxiij s
K
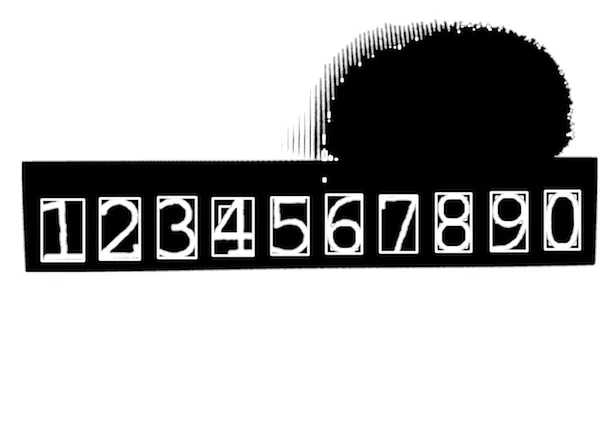
即使字符白名单只包含数字,我得到的结果与图像相差甚远:
Recognized text:       3          74 211

    1

         1 1    1

  3  53 379     1

3  1   33  5    3 2
      3          9 73
    1  61 2 2
    3   1  6   5 212   7
       1
4     9 4
           1  17
 111  11    1 1  11  1 1 1 1
我猜测使用的iPad mini相机拍摄照片存在问题,但我无法确定是什么问题以及原因。
有任何提示吗?
更新 #1
回复Tomas:
我按照你的帖子中的教程操作,但是在过程中遇到了几个错误...
UIImage+OpenCV类别无法在我的ARC项目中使用- 我不能在我的控制器中导入
<opencv2/...>,自动补全不提供它(因此[UIImage CVMat]未定义)
我认为我的OpenCV集成出了问题,尽管我遵循了Hello-tutorial并添加了框架。我是否需要在我的Mac上构建OpenCV,还是仅将框架包含在我的Xcode项目中就足够了?
由于我真的不知道您在此时可能会考虑哪些内容“重要”(我已经阅读了几篇帖子和教程,并尝试了不同的步骤),请随意询问 :)
更新 #2
@Tomas:非常感谢,ARC 部分很关键。我的 ViewController 已经被重命名为 .mm。关于"无法导入 opencv2/"的部分可以不用管了,因为我已经在我的 TestApp-Prefix.pch 中包含了它(正如 Hello 教程中所述)。
接下来是下一个挑战 ;)
我发现,当我使用相机拍摄的图像时,roi 对象的边界计算不成功。我尝试调整设备方向,并在我的视图中放置一个 UIImage 来查看图像处理步骤,但有时候(即使图像正确对齐),值仍然为负数,因为 if 条件没有得到满足。最糟糕的情况是 minX/Y 和 maxX/Y 从未被触及。长话短说:以 Mat roi = inranged(cv::Rect( 开头的那行代码会抛出异常(断言失败,因为这些值是 < 0)。我不知道轮廓数量是否有影响,但我认为有,因为图像越大,断言异常的可能性就越大。
