Flutter:如何在滚动时改变小部件的不透明度和颜色的最佳方法

16

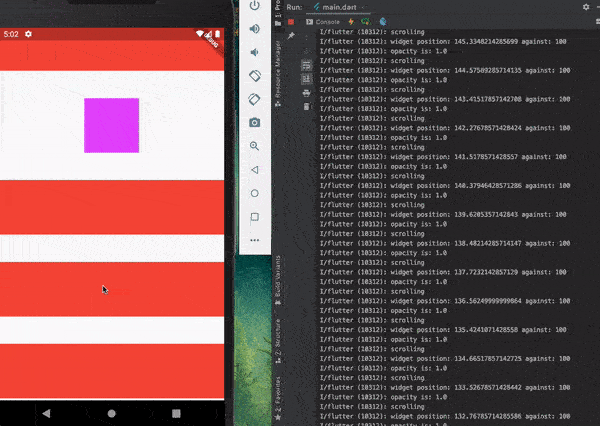
我的目标是当用户向下滚动时更改应用程序栏的颜色和不透明度。

我的逻辑是:

  • 滚动偏移量 = 0:应用程序栏为红色,不透明度为1
  • 0 < 滚动偏移量 < 40:应用程序栏为蓝色,不透明度为0.4
  • 40 <= 滚动偏移量:应用程序栏为蓝色,不透明度与滚动偏移量成比例

我想出了以下代码:


(Tips: In the original text, there is no actual code provided so nothing is lost in translation.)
import 'package:flutter/material.dart';
import 'package:gradient_app_bar/gradient_app_bar.dart';

void main() => runApp(MyApp());

class MyApp extends StatelessWidget {
  @override
  Widget build(BuildContext context) {
    return MaterialApp(
      title: 'Flutter Demo',
      theme: ThemeData(
        primarySwatch: Colors.blue,
      ),
      home: MyHomePage(title: 'Flutter Demo Home Page'),
    );
  }
}

class MyHomePage extends StatefulWidget {
  MyHomePage({Key key, this.title}) : super(key: key);

  final String title;

  @override
  _MyHomePageState createState() => _MyHomePageState();
}

class _MyHomePageState extends State<MyHomePage> {
  var _gradientColor1 = Colors.red[400];
  var _gradientColor2 = Colors.red[800];
  ScrollController _scrollViewController;

  void changeColor(){
    if((_scrollViewController.offset == 0) && (_gradientColor1 != Colors.red[400])){
      setState(() {
        _gradientColor1 = Colors.red[400];
        _gradientColor2 = Colors.red[800];
      });
    }else if((_scrollViewController.offset <= 40) && (_gradientColor1 != Color.fromRGBO(66,165,245 ,0.4))){
      setState(() {
        _gradientColor1 = Color.fromRGBO(66,165,245 ,0.4);
        _gradientColor2 = Color.fromRGBO(21,101,192 ,0.4);
      });
    }else if((_scrollViewController.offset <= 100) && (_scrollViewController.offset > 40)){
      var opacity = _scrollViewController.offset/100;
      setState(() {
        _gradientColor1 = Color.fromRGBO(66,165,245 ,opacity);
        _gradientColor2 = Color.fromRGBO(21,101,192 ,opacity);
      });
    }
  }

  @override
  void initState() {
    _scrollViewController = ScrollController(initialScrollOffset: 0.0);
    _scrollViewController.addListener(changeColor);
  }

  @override
  Widget build(BuildContext context) {

    return Scaffold(
      appBar: GradientAppBar(
        backgroundColorStart: _gradientColor1,
        backgroundColorEnd: _gradientColor2,
        elevation: 0,
      ),
      body: SingleChildScrollView(
        controller: _scrollViewController,
        child: Column(
          children: <Widget>[
            Container(color: Colors.red, height: 400,),
            Container(color: Colors.purple, height: 400,),
          ],
        ),
      ),
    );
  }
}

它的功能符合预期,但是在UI变得更加复杂时会变得卡顿。 在我的示例中,我正在使用GradientAppbar:https://github.com/joostlek/GradientAppBar


1
你在用户滚动时每帧都调用 setState。也许可以添加一个检查,如果颜色已经是你想要设置的颜色,则不要调用 setState。例如,在第一个 if 中检查颜色是否已经是 Colors.red[400]Colors.red[800]。这样就不会有太多对 setState 的调用了。 - tudorprodan
1
@tudorprodan 我已经在每个if语句中进行了检查,即:_gradientColor1 != Colors.red[400] - woshitom
2个回答

37

我认为最好的方法是使用AnimatedBuilder,你会发现body中的第一个container不会改变颜色,因为widget状态没有改变,结果如下:

enter image description here

代码:

import 'dart:math';
import 'package:flutter/material.dart';

class ProductDetails extends StatefulWidget {
  @override
  _ProductDetailsState createState() => _ProductDetailsState();
}

class _ProductDetailsState extends State<ProductDetails>
    with TickerProviderStateMixin {
  AnimationController _ColorAnimationController;
  AnimationController _TextAnimationController;
  Animation _colorTween, _iconColorTween;
  Animation<Offset> _transTween;

  @override
  void initState() {
    _ColorAnimationController =
        AnimationController(vsync: this, duration: Duration(seconds: 0));
    _colorTween = ColorTween(begin: Colors.transparent, end: Color(0xFFee4c4f))
        .animate(_ColorAnimationController);
    _iconColorTween = ColorTween(begin: Colors.grey, end: Colors.white)
        .animate(_ColorAnimationController);


    _TextAnimationController =
        AnimationController(vsync: this, duration: Duration(seconds: 0));

    _transTween = Tween(begin: Offset(-10, 40), end: Offset(-10, 0))
        .animate(_TextAnimationController);

    super.initState();
  }

  bool _scrollListener(ScrollNotification scrollInfo) {
    if (scrollInfo.metrics.axis == Axis.vertical) {
      _ColorAnimationController.animateTo(scrollInfo.metrics.pixels / 350);

      _TextAnimationController.animateTo(
          (scrollInfo.metrics.pixels - 350) / 50);
      return true;
    }
  }

  @override
  Widget build(BuildContext context) {
    return Scaffold(
      backgroundColor: Color(0xFFEEEEEE),
      body: NotificationListener<ScrollNotification>(
        onNotification: _scrollListener,
        child: Container(
          height: double.infinity,
          child: Stack(
            children: <Widget>[
              SingleChildScrollView(
                child: Column(
                  children: <Widget>[
                    Container(
                      height: 150,
                      color:
                          Color((Random().nextDouble() * 0xFFFFFF).toInt() << 0)
                              .withOpacity(1),
                      width: 250,
                    ),
                    Container(
                      height: 150,
                      color: Colors.pink,
                      width: 250,
                    ),
                    Container(
                      height: 150,
                      color: Colors.deepOrange,
                      width: 250,
                    ),
                    Container(
                      height: 150,
                      color: Colors.red,
                      width: 250,
                    ),
                    Container(
                      height: 150,
                      color: Colors.white70,
                      width: 250,
                    ),
                  ],
                ),
              ),
              Container(
                height: 80,
                child: AnimatedBuilder(
                  animation: _ColorAnimationController,
                  builder: (context, child) => AppBar(
                    backgroundColor: _colorTween.value,
                    elevation: 0,
                    titleSpacing: 0.0,
                    title: Transform.translate(
                      offset: _transTween.value,
                      child: Text(
                        "اسم کالا اینجا",
                        style: TextStyle(
                            color: Colors.white,
                            fontWeight: FontWeight.bold,
                            fontSize: 16),
                      ),
                    ),
                    iconTheme: IconThemeData(
                      color: _iconColorTween.value,
                    ),
                    actions: <Widget>[
                      IconButton(
                        icon: Icon(
                          Icons.local_grocery_store,
                        ),
                        onPressed: () {
//                          Navigator.of(context).push(TutorialOverlay());
                        },
                      ),
                      IconButton(
                        icon: Icon(
                          Icons.more_vert,
                        ),
                        onPressed: () {},
                      ),
                    ],
                  ),
                ),
              ),
            ],
          ),
        ),
      ),
    );
  }
}

这是在考虑性能的情况下最好的方法吗? - Nithin Sai
现在可以通过使用 extendBodyBehindAppBar: true(从Flutter稳定版1.12+开始)直接将动画AppBar添加到Staffold中。 - Kamil Svoboda

0
在这个小例子中,我做了以下几件事情:根据一些条件(即是否从屏幕顶部到底部的距离超过100像素),改变我的AnimatedOpacityopacity。我使用RenderBoxGlobalKey来获取所述偏移量。这些验证和事件发生在传递给我的scrollListener函数中。这意味着它们会在每次滚动时触发。以下是完整代码。
import 'package:flutter/material.dart';

void main() {
  runApp(MyApp());
}

class MyApp extends StatelessWidget {
  @override
  Widget build(BuildContext context) {
    return MaterialApp(
      title: 'Flutter Demo',
      theme: ThemeData(
        primarySwatch: Colors.blue,
      ),
      home: MyHomePage(title: 'Flutter Demo Home Page'),
    );
  }
}

class MyHomePage extends StatefulWidget {
  MyHomePage({Key key, this.title}) : super(key: key);

  final String title;

  @override
  _MyHomePageState createState() => _MyHomePageState();
}

class _MyHomePageState extends State<MyHomePage> {
  ScrollController _scrollController;
  GlobalKey widgetKey = GlobalKey();
  Offset widgetOffset;
  double _currentPosition;
  double opacity = 1;

  @override
  void initState() {
    _scrollController = ScrollController();
    _scrollController.addListener(_scrollListener);
    super.initState();
  }

  _scrollListener() {
    print('scrolling');

    RenderBox textFieldRenderBox = widgetKey.currentContext.findRenderObject();
    widgetOffset = textFieldRenderBox.localToGlobal(Offset.zero);
    _currentPosition = widgetOffset.dy;

    print(
        "widget position: $_currentPosition against: 100");

    if (100 > _currentPosition && _currentPosition > 1) {
      setState(() {
        opacity = _currentPosition / 100;
      });
    } else if (_currentPosition > 100 && opacity != 1) {
      opacity = 1;
    }
    else if (_currentPosition < 0 && opacity != 0) {
      opacity = 0;
    }
    print("opacity is: $opacity");
  }

  @override
  Widget build(BuildContext context) {
    return Scaffold(
      body: SingleChildScrollView(
          controller: _scrollController,
          child: Column(
            crossAxisAlignment: CrossAxisAlignment.stretch,
            children: [
              Container(
                margin: EdgeInsets.only(bottom: 50),
                height: 100,
                width: 100,
                color: Colors.red,
              ),
              Container(
                margin: EdgeInsets.only(bottom: 50),
                height: 100,
                width: 100,
                color: Colors.red,
              ),
              AnimatedOpacity(
                key: widgetKey,
                duration: Duration(milliseconds: 1),
                opacity: opacity,
                child: Center(
                  child: Container(
                    margin: EdgeInsets.only(bottom: 50),
                    height: 100,
                    width: 100,
                    color: Colors.purpleAccent,
                  ),
                ),
              ),
              Container(
                margin: EdgeInsets.only(bottom: 50),
                height: 100,
                width: 100,
                color: Colors.red,
              ),
              Container(
                margin: EdgeInsets.only(bottom: 50),
                height: 100,
                width: 100,
                color: Colors.red,
              ),
              Container(
                margin: EdgeInsets.only(bottom: 50),
                height: 100,
                width: 100,
                color: Colors.red,
              ),
              Container(
                margin: EdgeInsets.only(bottom: 50),
                height: 100,
                width: 100,
                color: Colors.teal,
              ),
              Container(
                margin: EdgeInsets.only(bottom: 50),
                height: 100,
                width: 100,
                color: Colors.teal,
              ),
              Container(
                margin: EdgeInsets.only(bottom: 50),
                height: 100,
                width: 100,
                color: Colors.teal,
              ),
            ],
          )),
    );
  }
}

Scroll and animation behavior


1
每次滚动更新时调用setState对性能来说是非常糟糕的。 - JediBurrell
1
你说得很有道理。任何想要实现这个功能的人都应该确保只在必要时调用 setState。欢迎提出建议。 - Iván Yoed

网页内容由stack overflow 提供, 点击上面的
可以查看英文原文,
原文链接