你可以使用字体的capHeight属性。
Objective-C
NSTextAttachment *icon = [[NSTextAttachment alloc] init];
UIImage *iconImage = [UIImage imageNamed:@"icon.png"];
[icon setBounds:CGRectMake(0, roundf(titleFont.capHeight - iconImage.size.height)/2.f, iconImage.size.width, iconImage.size.height)];
[icon setImage:iconImage];
NSAttributedString *iconString = [NSAttributedString attributedStringWithAttachment:icon];
[titleText appendAttributedString:iconString];
Swift
let iconImage = UIImage(named: "icon.png")!
var icon = NSTextAttachment()
icon.bounds = CGRect(x: 0, y: (titleFont.capHeight - iconImage.size.height).rounded() / 2, width: iconImage.size.width, height: iconImage.size.height)
icon.image = iconImage
let iconString = NSAttributedString(attachment: icon)
titleText.append(iconString)
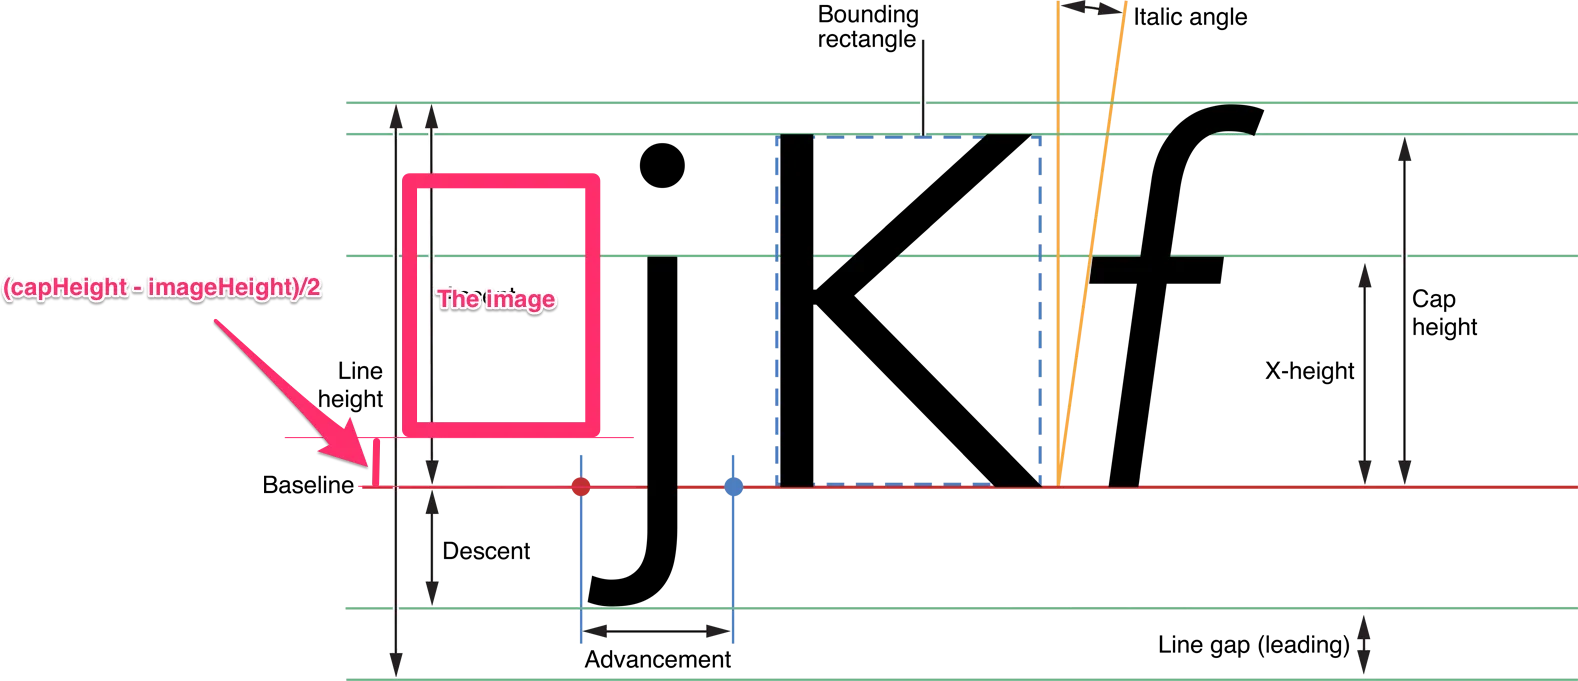
附件图像以文本基线为基础进行呈现。同时,它的y轴与核心绘图坐标系相反。如果您想将图像向上移动,请将bounds.origin.y设为正数。
图像应该与文本的capHeight垂直居中对齐。因此我们需要将bounds.origin.y设置为(capHeight - imageHeight)/2。
为了避免图像出现一些锯齿状的效果,我们应该在y的小数部分四舍五入。但是,字体和图像通常很小,即使只有1像素的差异,也会让图像看起来错位。因此,在除法之前,我使用了round函数。它使得y值的小数部分为.0或.5
在您的情况下,图像高度大于字体的capHeight。但是您仍然可以使用同样的方法。偏移量y值将为负值。并且它将从基线以下布局。
参考资料:
Apple developer iOS文本编程指南