将Core Data添加到现有的iPhone项目中

140

我希望给一个已有的iPhone项目添加核心数据,但是我仍然遇到了很多编译错误:

- NSManagedObjectContext undeclared

 - Expected specifier-qualifier-list before 'NSManagedObjectModel'

 - ...

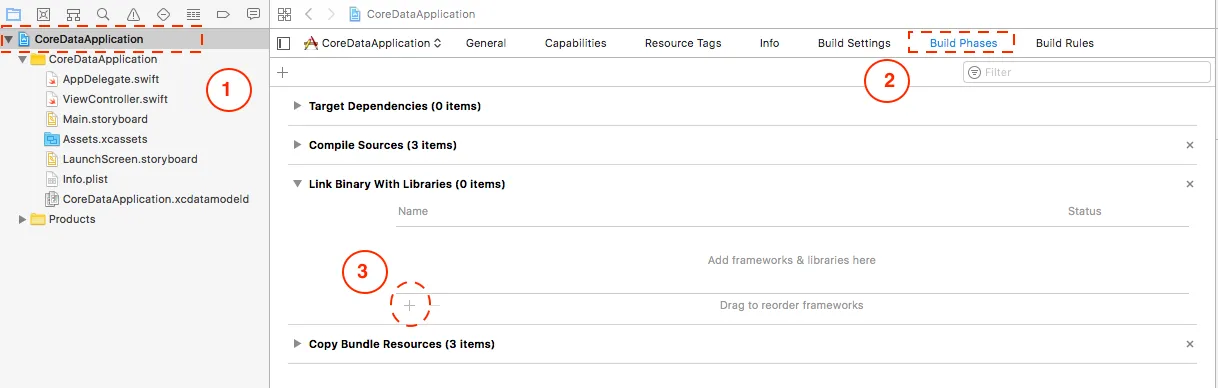
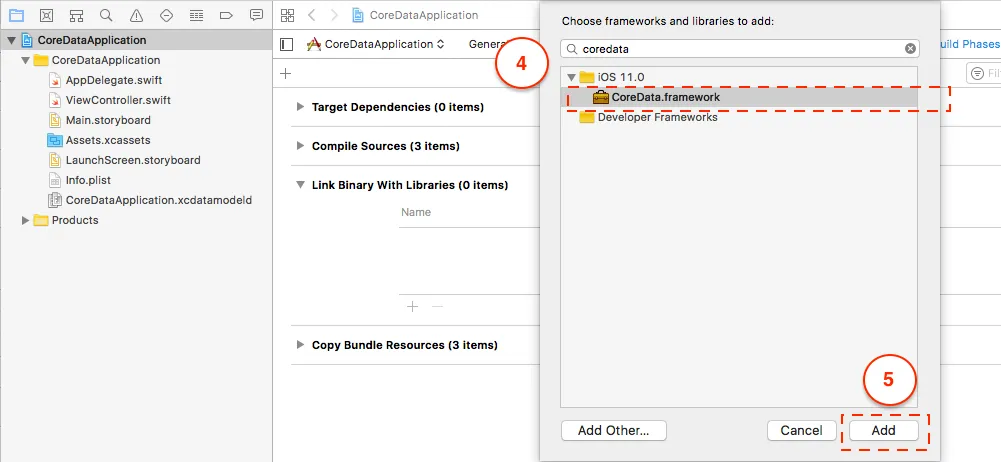
我已经将Core Data框架添加到目标中(在“Targets”下右键单击我的项目,“Add” - “Existing Frameworks” - “CoreData.framework”)。

我的头文件:

NSManagedObjectModel *managedObjectModel;
NSManagedObjectContext *managedObjectContext;       
NSPersistentStoreCoordinator *persistentStoreCoordinator;

[...]

@property (nonatomic, retain, readonly) NSManagedObjectModel *managedObjectModel;
@property (nonatomic, retain, readonly) NSManagedObjectContext *managedObjectContext;
@property (nonatomic, retain, readonly) NSPersistentStoreCoordinator *persistentStoreCoordinator;

我错过了什么?开始一个新项目不是选项...

非常感谢!

编辑 抱歉,我确实有那些实现...但似乎缺少库...实现方法中充满了编译错误,如“managedObjectContext未声明”,“NSPersistentStoreCoordinator未声明”,但也包括“在NSManagedObjectContext之前期望')'”(尽管括号似乎是正确的)...

#pragma mark -
#pragma mark Core Data stack

/**
 Returns the managed object context for the application.
 If the context doesn't already exist, it is created and bound to the persistent store         
coordinator for the application.
 */
- (NSManagedObjectContext *) managedObjectContext {

    if (managedObjectContext != nil) {
        return managedObjectContext;
    }

    NSPersistentStoreCoordinator *coordinator = [self persistentStoreCoordinator];
    if (coordinator != nil) {
        managedObjectContext = [[NSManagedObjectContext alloc] init];
        [managedObjectContext setPersistentStoreCoordinator: coordinator];
    }
    return managedObjectContext;
}


/**
 Returns the managed object model for the application.
 If the model doesn't already exist, it is created by merging all of the models found in    
 application bundle.
 */
- (NSManagedObjectModel *)managedObjectModel {

    if (managedObjectModel != nil) {
        return managedObjectModel;
    }
    managedObjectModel = [[NSManagedObjectModel mergedModelFromBundles:nil] retain];    
    return managedObjectModel;
}


/**
 Returns the persistent store coordinator for the application.
 If the coordinator doesn't already exist, it is created and the application's store added to it.
 */
- (NSPersistentStoreCoordinator *)persistentStoreCoordinator {

    if (persistentStoreCoordinator != nil) {
        return persistentStoreCoordinator;
    }

    NSURL *storeUrl = [NSURL fileURLWithPath: [[self applicationDocumentsDirectory] 
        stringByAppendingPathComponent: @"Core_Data.sqlite"]];

    NSError *error = nil;
    persistentStoreCoordinator = [[NSPersistentStoreCoordinator alloc] 
    initWithManagedObjectModel:[self managedObjectModel]];
    if (![persistentStoreCoordinator addPersistentStoreWithType:NSSQLiteStoreType 
    configuration:nil URL:storeUrl options:nil error:&error]) {
    /*
     Replace this implementation with code to handle the error appropriately.

     abort() causes the application to generate a crash log and terminate. You should 
    not use this function in a shipping application, although it may be useful during 
    development. If it is not possible to recover from the error, display an alert panel that 
    instructs the user to quit the application by pressing the Home button.

     Typical reasons for an error here include:
     * The persistent store is not accessible
     * The schema for the persistent store is incompatible with current managed object 
                model
     Check the error message to determine what the actual problem was.
     */
    NSLog(@"Unresolved error %@, %@", error, [error userInfo]);
    abort();
}    

return persistentStoreCoordinator;
}
13个回答

144

所有的 CoreData 头文件都在 App_Prefix.pch 中被导入,因此 CoreData 类将在整个项目中可用,因此您无需在需要这些文件的文件中手动导入头文件。

因此,打开 Xcode 并查找一些类似于 App_Prefix.pch 的文件, 默认情况下它在 Other Sources 组中。在 UIKit 导入语句之后添加以下行:

#import <CoreData/CoreData.h>

你应该已经准备好了。

Xcode 4

对于在Xcode 4中创建的项目,前缀文件可以在Project navigator中的Supporting Files组中找到。它默认命名为“projectname-Prefix.pch”。

Xcode 6+

从Xcode 6开始,默认不再包含预编译头文件。这是因为引入了模块化,模块化消除了使用预编译头文件的必要性。虽然仍然可以手动添加PCH文件以全局包含CoreData头文件,但建议在每个使用CoreData的文件中使用@import CoreData;*指定CoreData依赖关系。这使得依赖关系明确,并且更重要的是可以避免未来类似问题。

*需要启用模块才能正常工作


如果我找不到任何App_prefix.pch文件怎么办?我正在使用Xcode 6.4和iOS 8.4。 - Anees

131

为了更好地解释如何将Core Data添加到之前没有它的项目中,以下是所有必须执行的步骤:

步骤1:添加框架

点击应用程序目标(在左侧面板上,它是具有您应用程序名称的顶部图标),然后转到“Build Phases”选项卡,然后在“Link Binary With Libraries”下方单击小加号,然后找到“CoreData.framework”并将其添加到您的项目中。

然后,使用以下方法之一在您需要的所有对象上导入coredata(非常规方法):

Swift

import CoreData

Objective C

#import <CoreData/CoreData.h>

或者在您的.pch文件中的常规导入下面添加导入(更加性感),如下所示:

#ifdef __OBJC__
    #import <UIKit/UIKit.h>
    #import <Foundation/Foundation.h>
    #import <CoreData/CoreData.h>
#endif

步骤2:添加数据模型

要添加.xcdatamodel文件,请右键/控制单击右侧窗格中的文件(例如放在资源文件夹中以保持安全),选择添加新文件,选择文件类型时点击Core Data选项卡,然后点击“数据模型”,给它命名并点击下一步和完成即可将其添加到您的项目中。当您单击此模型对象时,您将看到界面,可以向项目添加实体以及任何您想要的关系。

步骤3:更新应用程序委托

Swift中,打开AppDelegate.swift文件

//replace the previous version of applicationWillTerminate with this
func applicationWillTerminate(application: UIApplication) {
    // Called when the application is about to terminate. Save data if appropriate. See also applicationDidEnterBackground:.
    // Saves changes in the application's managed object context before the application terminates.
    self.saveContext()
}

func saveContext () {
    var error: NSError? = nil
    let managedObjectContext = self.managedObjectContext
    if managedObjectContext != nil {
        if managedObjectContext.hasChanges && !managedObjectContext.save(&error) {
            // Replace this implementation with code to handle the error appropriately.
            // abort() causes the application to generate a crash log and terminate. You should not use this function in a shipping application, although it may be useful during development.
            //println("Unresolved error \(error), \(error.userInfo)")
            abort()
        }
    }
}

// #pragma mark - Core Data stack

// Returns the managed object context for the application.
// If the context doesn't already exist, it is created and bound to the persistent store coordinator for the application.
var managedObjectContext: NSManagedObjectContext {
    if !_managedObjectContext {
        let coordinator = self.persistentStoreCoordinator
        if coordinator != nil {
            _managedObjectContext = NSManagedObjectContext()
            _managedObjectContext!.persistentStoreCoordinator = coordinator
        }
    }
    return _managedObjectContext!
}
var _managedObjectContext: NSManagedObjectContext? = nil

// Returns the managed object model for the application.
// If the model doesn't already exist, it is created from the application's model.
var managedObjectModel: NSManagedObjectModel {
    if !_managedObjectModel {
        let modelURL = NSBundle.mainBundle().URLForResource("iOSSwiftOpenGLCamera", withExtension: "momd")
        _managedObjectModel = NSManagedObjectModel(contentsOfURL: modelURL)
    }
    return _managedObjectModel!
}
var _managedObjectModel: NSManagedObjectModel? = nil

// Returns the persistent store coordinator for the application.
// If the coordinator doesn't already exist, it is created and the application's store added to it.
var persistentStoreCoordinator: NSPersistentStoreCoordinator {
    if !_persistentStoreCoordinator {
        let storeURL = self.applicationDocumentsDirectory.URLByAppendingPathComponent("iOSSwiftOpenGLCamera.sqlite")
        var error: NSError? = nil
        _persistentStoreCoordinator = NSPersistentStoreCoordinator(managedObjectModel: self.managedObjectModel)
        if _persistentStoreCoordinator!.addPersistentStoreWithType(NSSQLiteStoreType, configuration: nil, URL: storeURL, options: nil, error: &error) == nil {
            /*
            Replace this implementation with code to handle the error appropriately.
            abort() causes the application to generate a crash log and terminate. You should not use this function in a shipping application, although it may be useful during development.
            Typical reasons for an error here include:
            * The persistent store is not accessible;
            * The schema for the persistent store is incompatible with current managed object model.
            Check the error message to determine what the actual problem was.
            If the persistent store is not accessible, there is typically something wrong with the file path. Often, a file URL is pointing into the application's resources directory instead of a writeable directory.
            If you encounter schema incompatibility errors during development, you can reduce their frequency by:
            * Simply deleting the existing store:
            NSFileManager.defaultManager().removeItemAtURL(storeURL, error: nil)
            * Performing automatic lightweight migration by passing the following dictionary as the options parameter:
            [NSMigratePersistentStoresAutomaticallyOption: true, NSInferMappingModelAutomaticallyOption: true}
            Lightweight migration will only work for a limited set of schema changes; consult "Core Data Model Versioning and Data Migration Programming Guide" for details.
            */
            //println("Unresolved error \(error), \(error.userInfo)")
            abort()
        }
    }
    return _persistentStoreCoordinator!
}
var _persistentStoreCoordinator: NSPersistentStoreCoordinator? = nil

// #pragma mark - Application's Documents directory

// Returns the URL to the application's Documents directory.
var applicationDocumentsDirectory: NSURL {
    let urls = NSFileManager.defaultManager().URLsForDirectory(.DocumentDirectory, inDomains: .UserDomainMask)
    return urls[urls.endIndex-1] as NSURL
}

Objective C 中,确保将这些对象添加到 AppDelegate.h 文件中。

 @property (nonatomic, retain, readonly) NSManagedObjectModel *managedObjectModel;
 @property (nonatomic, retain, readonly) NSManagedObjectContext *managedObjectContext;
 @property (nonatomic, retain, readonly) NSPersistentStoreCoordinator *persistentStoreCoordinator;

 - (NSURL *)applicationDocumentsDirectory; // nice to have to reference files for core data

请将AppDelegate.m中之前的对象合成为以下形式:

将之前的对象在AppDelegate.m中合并如下:

@synthesize managedObjectContext = _managedObjectContext;
@synthesize managedObjectModel = _managedObjectModel;
@synthesize persistentStoreCoordinator = _persistentStoreCoordinator;

然后将这些方法添加到AppDelegate.m中(确保在所示的位置上放置您添加的模型名称):

- (void)saveContext{
    NSError *error = nil;
    NSManagedObjectContext *managedObjectContext = self.managedObjectContext;
    if (managedObjectContext != nil) {
        if ([managedObjectContext hasChanges] && ![managedObjectContext save:&error]) {
            NSLog(@"Unresolved error %@, %@", error, [error userInfo]);
            abort();
        }
    }
}

- (NSManagedObjectContext *)managedObjectContext{
    if (_managedObjectContext != nil) {
        return _managedObjectContext;
    }

    NSPersistentStoreCoordinator *coordinator = [self persistentStoreCoordinator];
    if (coordinator != nil) {
        _managedObjectContext = [[NSManagedObjectContext alloc] init];
        [_managedObjectContext setPersistentStoreCoordinator:coordinator];
    }
    return _managedObjectContext;
}

- (NSManagedObjectModel *)managedObjectModel{
    if (_managedObjectModel != nil) {
        return _managedObjectModel;
    }
    NSURL *modelURL = [[NSBundle mainBundle] URLForResource:@"NAMEOFYOURMODELHERE" withExtension:@"momd"];
    _managedObjectModel = [[NSManagedObjectModel alloc] initWithContentsOfURL:modelURL];
    return _managedObjectModel;
}

- (NSPersistentStoreCoordinator *)persistentStoreCoordinator
{
    if (_persistentStoreCoordinator != nil) {
        return _persistentStoreCoordinator;
    }

    NSURL *storeURL = [[self applicationDocumentsDirectory] URLByAppendingPathComponent:@"NAMEOFYOURMODELHERE.sqlite"];

    NSError *error = nil;
    _persistentStoreCoordinator = [[NSPersistentStoreCoordinator alloc] initWithManagedObjectModel:[self managedObjectModel]];
    if (![_persistentStoreCoordinator addPersistentStoreWithType:NSSQLiteStoreType configuration:nil URL:storeURL options:nil error:&error]) {

        NSLog(@"Unresolved error %@, %@", error, [error userInfo]);
        abort();
    }

    return _persistentStoreCoordinator;
}

 #pragma mark - Application's Documents directory

// Returns the URL to the application's Documents directory.
- (NSURL *)applicationDocumentsDirectory{
    return [[[NSFileManager defaultManager] URLsForDirectory:NSDocumentDirectory inDomains:NSUserDomainMask] lastObject];
}

步骤4:将数据对象传递到需要数据的视图控制器中

选项1:从VC使用App Delegate的Managed Context(首选且更容易)

建议使用@brass-kazoo提供的方式-通过以下方式检索对AppDelegate及其managedObjectContext的引用:

Swift

 let appDelegate = UIApplication.sharedApplication().delegate as! AppDelegate
 appDelegate.managedObjectContext

Objective C

 [[[UIApplication sharedApplication] delegate] managedObjectContext];

在您的ViewController中

选项2. 在您的VC中创建ManagedObjectContext,并将其与AppDelegate中的匹配(原始方法)

仅显示Objective C的旧版本,因为使用首选方法更容易

在ViewController.h中

@property (nonatomic, retain) NSManagedObjectContext *managedObjectContext;

在ViewController.m中。
@synthesize managedObjectContext = _managedObjectContext;

在AppDelegate中,或者创建ViewController的类中,将managedObjectContext设置为与AppDelegate相同的对象。
ViewController.managedObjectContext = self.managedObjectContext;

如果您希望视图控制器使用Core Data作为FetchedResultsController,则需要确保以下内容在您的ViewController.h中。
@interface ViewController : UIViewController <NSFetchedResultsControllerDelegate> {
  NSFetchedResultsController *fetchedResultsController;
  NSManagedObjectContext *managedObjectContext;
}

 @property (nonatomic, retain) NSFetchedResultsController *fetchedResultsController;

这是在ViewController.m文件中的代码:

@synthesize fetchedResultsController, managedObjectContext;

经过所有这些步骤,您现在可以使用此 managedObjectContext 运行所有通常所需的 fetchRequests,以获得 CoreData 的优良表现!享受吧


2
在AppDelegate.h文件中,applicationDocumentsDirectory方法应该返回NSURL而不是NSString。 - NSRover
9
在我看来,这是最好的答案!尽管在步骤4中,我通过[[UIApplication sharedApplication] delegate]检索了对AppDelegate的引用,然后通过[appDelegate managedObjectContext]检索了上下文。 - brasskazoo
不要忘记在你的AppDelegate.h文件中导入Coredata。 - Frantz Romain

21

对于Swift 3: 包括数据的保存和获取

步骤1: 添加框架

enter image description here

enter image description here

步骤2: 添加数据模型

文件 > 新建 > 文件 > Core Data > 数据模型

  • 将文件命名为SampleData,生成的文件应该是SampleData.xcdatamodelId

步骤3: 将以下函数添加到你的App Delegate,并在顶部添加 "import CoreData"。

func applicationWillTerminate(_ application: UIApplication) {
    // Called when the application is about to terminate. Save data if appropriate. See also applicationDidEnterBackground:.
    // Saves changes in the application's managed object context before the application terminates.
    self.saveContext()
}


// MARK: - Core Data stack

lazy var persistentContainer: NSPersistentContainer = {
    /*
     The persistent container for the application. This implementation
     creates and returns a container, having loaded the store for the
     application to it. This property is optional since there are legitimate
     error conditions that could cause the creation of the store to fail.
     */


    // SEE BELOW LINE OF CODE WHERE THE 'name' IS SET AS THE FILE NAME (SampleData) FOR THE CONTAINER

    let container = NSPersistentContainer(name: "SampleData")
    container.loadPersistentStores(completionHandler: { (storeDescription, error) in
        if let error = error as NSError? {
            // Replace this implementation with code to handle the error appropriately.
            // fatalError() causes the application to generate a crash log and terminate. You should not use this function in a shipping application, although it may be useful during development.

            /*
             Typical reasons for an error here include:
             * The parent directory does not exist, cannot be created, or disallows writing.
             * The persistent store is not accessible, due to permissions or data protection when the device is locked.
             * The device is out of space.
             * The store could not be migrated to the current model version.
             Check the error message to determine what the actual problem was.
             */
            fatalError("Unresolved error \(error), \(error.userInfo)")
        }
    })
    return container
}()

// MARK: - Core Data Saving support

func saveContext () {
    let context = persistentContainer.viewContext
    if context.hasChanges {
        do {
            try context.save()
        } catch {
            // Replace this implementation with code to handle the error appropriately.
            // fatalError() causes the application to generate a crash log and terminate. You should not use this function in a shipping application, although it may be useful during development.
            let nserror = error as NSError
            fatalError("Unresolved error \(nserror), \(nserror.userInfo)")
        }
    }
}

步骤4: 向模型添加实体和属性

a) 添加实体 enter image description here

b) 添加属性 enter image description here

步骤5: 保存数据

func saveItem(itemToSave: String){
    let context = (UIApplication.shared.delegate as! AppDelegate).persistentContainer.viewContext

//**Note:** Here we are providing the entityName **`Entity`** that we have added in the model
    let entity = NSEntityDescription.entity(forEntityName: "Entity", in: context)
    let myItem = NSManagedObject(entity: entity!, insertInto: context)

    myItem.setValue(itemToSave, forKey: "item")
    do {
        try context.save()
    }
    catch{
        print("There was an error in saving data")
    }
}

第五步:检索数据

override func viewWillAppear(_ animated: Bool) {
    // Obtaining data from model
    let context = (UIApplication.shared.delegate as! AppDelegate).persistentContainer.viewContext
    let fetchRequest = NSFetchRequest<NSFetchRequestResult>(entityName: "Entity")

    do {
        let results = try context.fetch(fetchRequest)
        let obtainedResults = results as! [NSManagedObject]
        let firstResult = obtainedResults[0]
        let myValue = firstResult.value(forKey: "item")

        print("myValue: \(myValue)")
    } catch {
        print("Error")
    }
}

11

尝试创建基于Core Data的Cocoa应用程序并查看AppDelegate。您将看到核心数据堆栈实现方法,以及管理对象模型文件,用于定义实体和其他与核心数据相关的内容。

您仅展示了Core Data堆栈的头文件(即声明),但未展示其实现(即定义)。


对于Swift 3,我使用了ColossalChris的步骤,但在AppDelegate部分,我使用了这个答案(从具有核心数据支持的新项目中复制)来获取Swift 3兼容代码。 - MrAn3

8
如果你遇到了和我一样的问题,而且是在Xcode 4中,解决方法有所不同:你需要先选择项目,在目标中展开"Link Binary With Libraries",这里会显示当前的库。然后点击加号(+)选择你需要的额外库。我把它放在项目顶部,然后拖动到Frameworks Group即可。

5
作为Eimantas所述,您缺少核心堆栈的实现,例如:
- (NSManagedObjectContext *) managedObjectContext;
- (NSManagedObjectModel *)managedObjectMode;
- (NSPersistentStoreCoordinator *)persistentStoreCoordinator;

一个解决办法是创建一个新的核心数据驱动项目,并将实现复制/粘贴到您的项目中。

2
那么,如何管理上下文以使其了解模型?自动化吗? - fengd

4

对于 Swift 3:

文件 -> 新建文件 -> CoreData -> 模型来创建一个模型。

参考这个链接了解如何实现它的更多信息。


1

//在Swift 2.2中,您可以在不更改AppDelegate文件的情况下执行以下操作。

  1. Project->targets-->linked frameworks and libraries Now add a new framework (click on +) 'CoreData'
  2. File->new file->CoreData->DataModel name it as say A.xcdatamodelid
  3. In A.xcdatamodelid create new enitity (click on entity+) name it as say Bc and set its class as 'Bc' in inspector window on right.
  4. Now Add attributes to the entity (click on attributes +) , add one attribute for eg : name and its type as String.
  5. Now editor->create NSManagedObject Subclass -->click next on the pop up window-->again next-->then click create. Two new files will be created 1. a new class named Bc.swift and an extension named Bc+coredataproperties.swift.
  6. File->new file->ios->cocoa Touch class-->set its subclass as NSObject->name it as DataController.swift Inside the file include ///

    import UIKit import CoreData class DataController: NSObject {

    var managedObjectContext: NSManagedObjectContext
    
    override  init() {
        // This resource is the same name as your xcdatamodeld contained in your project.
        guard let modelURL = NSBundle.mainBundle().URLForResource("A", withExtension:"momd") else {
            fatalError("Error loading model from bundle")
        }
        // The managed object model for the application. It is a fatal error for the application not to be able to find and load its model.
        guard let mom = NSManagedObjectModel(contentsOfURL: modelURL) else {
            fatalError("Error initializing mom from: \(modelURL)")
        }
        let psc = NSPersistentStoreCoordinator(managedObjectModel: mom)
        self.managedObjectContext = NSManagedObjectContext(concurrencyType: .MainQueueConcurrencyType)
        self.managedObjectContext.persistentStoreCoordinator = psc
    
        let urls = NSFileManager.defaultManager().URLsForDirectory(.DocumentDirectory, inDomains: .UserDomainMask)
        let docURL = urls[urls.endIndex-1]
        /* The directory the application uses to store the Core Data store file.
        This code uses a file named "A.sqlite" in the application's documents directory.
        */
        let storeURL = docURL.URLByAppendingPathComponent("A.sqlite")
        do {
            try psc.addPersistentStoreWithType(NSSQLiteStoreType, configuration: nil, URL: storeURL, options: nil)
        } catch {
            fatalError("Error migrating store: \(error)")
        }
    
    }
    

    }

//////

现在,在视图控制器文件中,您可以使用两种方法访问您的数据库。 重要提示:在您的视图控制器中包含语句"import CoreData"。 a. 调用seed() -> 将值插入到数据库/实体中 b. 调用fetch() -> 从数据库/实体中获取值
func seedPerson() {

        // create an instance of our managedObjectContext
        let moc = DataController().managedObjectContext

        // we set up our entity by selecting the entity and context that we're targeting
        let entity = NSEntityDescription.insertNewObjectForEntityForName("Bc", inManagedObjectContext: moc) as! Bc

        // add our data
        entity.setValue("Meera", forKey: "name")


        // we save our entity
        do {
            try moc.save()
        } catch {
            fatalError("Failure to save context: \(error)")
        }
    }

//fetch() def

func fetch() {
        let moc = DataController().managedObjectContext
        let personFetch = NSFetchRequest(entityName: "Bc")

        do {
            let fetchedPerson = try moc.executeFetchRequest(personFetch) as! [Bc]
            print(fetchedPerson.first!.name!)

        } catch {
            fatalError("Failed to fetch person: \(error)")
        }
    }

0
 let alert  = UIAlertController(title:"Error", message: "No Internet Connection", preferredStyle: .alert)
            alert.addAction(UIAlertAction(title: "Ok", style: .default, handler: { (action) in}))
            alert.addAction(UIAlertAction(title: "Try Again", style: .default, handler: { (action) in
                self.networkCall(text: self.daySelected)
            }))
            self.present(alert, animated: false, completion: nil)

0

示例编码视图1

#import "ViewController.h"
#import "DetailViewController.h"

 @interface ViewController ()
 {
  NSInteger indexPathvalue;
 }
 @end

  @implementation ViewController

 - (NSManagedObjectContext *)managedObjectContext {
     NSManagedObjectContext *context = nil;
     id delegate = [[UIApplication sharedApplication] delegate];
     if ([delegate performSelector:@selector(managedObjectContext)]) {
       context = [delegate managedObjectContext];
     }
   return context;
  }

  - (void)viewDidLoad {
      [super viewDidLoad];
  // Do any additional setup after loading the view, typically from a nib.
    NSLog(@"call this one2");
 }

 - (void)viewDidAppear:(BOOL)animated
 {
   [super viewDidAppear:animated];
   NSManagedObjectContext *managedObjectContext = [self 
   managedObjectContext];
   NSFetchRequest *fetchRequest = [[NSFetchRequest alloc] 
   initWithEntityName:@"Details"];
   self.dataList = [[managedObjectContext executeFetchRequest:fetchRequest   
   error:nil] mutableCopy];
   [_coreDataList reloadData];

    NSLog(@"call this one");
 }
    #pragma mark - Table view data source

   - (NSInteger)numberOfSectionsInTableView:(UITableView *)tableView
   {
     return 1;
   }

     - (NSInteger)tableView:(UITableView *)tableView numberOfRowsInSection:
   (NSInteger)section
    {
    return self.dataList.count;
    }

   - (UITableViewCell *)tableView:(UITableView *)tableView 
   cellForRowAtIndexPath:(NSIndexPath *)indexPath
   {
   static NSString *CellIdentifier = @"Cell";
   UITableViewCell *cell = [tableView     
   dequeueReusableCellWithIdentifier:CellIdentifier];

     if (cell == nil)
    {
    cell = [[UITableViewCell   
    alloc]initWithStyle:UITableViewCellStyleSubtitle 
    reuseIdentifier:CellIdentifier];
    }

   NSManagedObject *user = [self.dataList objectAtIndex:indexPath.row];
   cell.textLabel.text = [user valueForKey:@"name"];
      cell.detailTextLabel.text = [user valueForKey:@"mobileNumber"];
    cell.imageView.image = [UIImage imageWithData:[user
    valueForKey:@"imageView"]]; 
    return cell;
    }


    - (void)tableView:(UITableView *)tableView didSelectRowAtIndexPath:
    (NSIndexPath *)indexPath
    {
    indexPathvalue = indexPath.row;
    [self performSegueWithIdentifier:@"detailView" sender:self];
    }

     - (BOOL)tableView:(UITableView *)tableView canEditRowAtIndexPath:
    (NSIndexPath *)indexPath
    {
     return YES;
     }
     - (void)tableView:(UITableView *)tableView commitEditingStyle:
      (UITableViewCellEditingStyle)editingStyle forRowAtIndexPath:
     (NSIndexPath *)indexPath
    {
    NSManagedObjectContext *context = [self managedObjectContext];
    if (editingStyle == UITableViewCellEditingStyleDelete)
    {
    [context deleteObject:[self.dataList objectAtIndex:indexPath.row]];
    NSError *error = nil;
    if (![context save:&error]) {
        NSLog(@"Can't Delete! %@ %@", error, [error localizedDescription]);
        return;
    }
    [self.dataList removeObjectAtIndex:indexPath.row];
    [_coreDataList reloadData];

     }

    }
   - (void)didReceiveMemoryWarning {
   [super didReceiveMemoryWarning];
    // Dispose of any resources that can be recreated.
    }

   - (IBAction)addBtnClick:(id)sender {
    }


    #pragma mark - Navigation

    // In a storyboard-based application, you will often want to do a little      
    - (void)prepareForSegue:(UIStoryboardSegue *)segue sender:(id)sender
     {
   // Get the new view controller using [segue destinationViewController].
   // Pass the selected object to the new view controller.
    if ([segue.identifier isEqualToString:@"detailView"])
   {
    NSManagedObject *obj = [self.dataList objectAtIndex:indexPathvalue];
    DetailViewController *detail = segue.destinationViewController;
    detail.userData = obj;
    }

    }
   @end

样本详细视图

       #import "DetailViewController.h"

       @interface DetailViewController ()

       @end

       @implementation DetailViewController

      - (NSManagedObjectContext *)managedObjectContext {
     NSManagedObjectContext *context = nil;
     id delegate = [[UIApplication sharedApplication] delegate];
     if ([delegate performSelector:@selector(managedObjectContext)]) {
    context = [delegate managedObjectContext];
     }
     return context;
    }

    - (void)viewDidLoad {
    [super viewDidLoad];
    // Do any additional setup after loading the view.
     if (self.userData) {
    [self.nameTxt setText:[self.userData valueForKey:@"name"]];
    [self.mobileTxt setText:[self.userData valueForKey:@"mobileNumber"]];
    [self.emailIdTxt setText:[self.userData valueForKey:@"email"]];
    }
    }

     - (void)didReceiveMemoryWarning {
    [super didReceiveMemoryWarning];
    // Dispose of any resources that can be recreated.
    }


   - (BOOL)textFieldShouldReturn:(UITextField *)textField
   {
    [textField resignFirstResponder];
    return YES;


}
     /*

保存按钮

    - (IBAction)saveBtnClick:(id)sender {

     NSManagedObjectContext *context = [self managedObjectContext];

     if (self.userData) {
    // Update existing data
    [self.userData setValue:self.nameTxt.text forKey:@"name"];
    [self.userData setValue:self.mobileTxt.text forKey:@"mobileNumber"];
    [self.userData setValue:self.emailIdTxt.text forKey:@"email"];
    UIImage *sampleimage = [UIImage imageNamed:@"icon.png"];
    NSData *dataImage = UIImageJPEGRepresentation(sampleimage, 1.0);
    [self.userData setValue:dataImage forKey:@"imageView"];

     } else {
    // Create a new data
    NSManagedObject *newDevice = [NSEntityDescription   
    insertNewObjectForEntityForName:@"Details" 
    inManagedObjectContext:context];
    [newDevice setValue:self.nameTxt.text forKey:@"name"];
    [newDevice setValue:self.mobileTxt.text forKey:@"mobileNumber"];
    [newDevice setValue:self.emailIdTxt.text forKey:@"email"];
    UIImage *sampleimage = [UIImage imageNamed:@"icon.png"];
    NSData *dataImage = UIImageJPEGRepresentation(sampleimage, 1.0);
    [newDevice setValue:dataImage forKey:@"imageView"];

     }

     NSError *error = nil;
    // Save the object to persistent store
     if (![context save:&error]) {
    NSLog(@"Can't Save! %@ %@", error, [error localizedDescription]);
    }

    [self dismissViewControllerAnimated:YES completion:nil];
    }
   @end

网页内容由stack overflow 提供, 点击上面的
可以查看英文原文,
原文链接