如何为 Web 部署重命名?

7

我有一个Web应用程序项目:

enter image description here

正如您所见,有3个robots.txt文件-每个环境一个。还有3个发布配置文件。
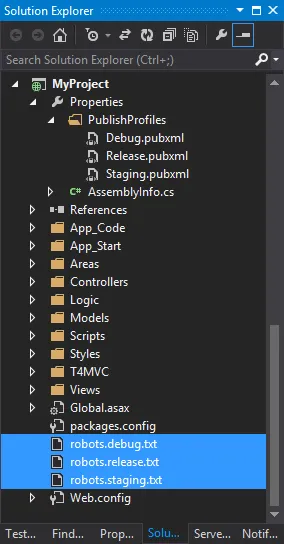
现在,对于每个pubxml,我想选择正确的"robots.xxx.txt"文件并将其重命名为"robots.txt"。理想情况下,我希望利用MSBuild并保持每个pubxml文件中的配置。
每个3个发布配置文件都使用<WebPublishMethod>MSDeploy</WebPublishMethod>。

编辑:

刚刚尝试了Richard Szalay的答案,但是没有成功。所有3个文件仍然被复制到输出目录中。这是我的发布配置文件现在的样子。

<?xml version="1.0" encoding="utf-8"?>
<Project ToolsVersion="4.0" xmlns="http://schemas.microsoft.com/developer/msbuild/2003">
    <PropertyGroup>
        <WebPublishMethod>FileSystem</WebPublishMethod>
        <LastUsedBuildConfiguration>Release</LastUsedBuildConfiguration>
        <LastUsedPlatform>Any CPU</LastUsedPlatform>
        <SiteUrlToLaunchAfterPublish />
        <LaunchSiteAfterPublish>True</LaunchSiteAfterPublish>
        <PrecompileBeforePublish>True</PrecompileBeforePublish>
        <EnableUpdateable>True</EnableUpdateable>
        <DebugSymbols>False</DebugSymbols>
        <WDPMergeOption>DonotMerge</WDPMergeOption>
        <ExcludeApp_Data>True</ExcludeApp_Data>
        <publishUrl>C:\Temp\myproject</publishUrl>
        <DeleteExistingFiles>False</DeleteExistingFiles>
    </PropertyGroup>

    <ItemGroup>
        <MsDeployReplaceRules Include="robots">
            <ObjectName>filePath</ObjectName>
            <Match>robots\.debug\.txt</Match>
            <Replace>robots.txt</Replace>
        </MsDeployReplaceRules>
    </ItemGroup>
</Project>
4个回答

3
您需要的是一个替换规则。只需将以下内容添加到您的发布配置文件中即可: ```html

您需要的是替换规则。只需将以下内容添加到您的发布配置文件中:

```
<ItemGroup>
  <MsDeployReplaceRules Include="robots">
    <ObjectName>filePath</ObjectName>
    <Match>robots\.debug\.txt</Match>
    <Replace>robots.txt</Replace>
  </MsDeployReplaceRules>
</ItemGroup>

如果文件命名约定与您的发布配置文件匹配,您可以在 Web 应用程序的根目录中创建一个单独的 Robots.wpp.targets 文件,并使用以下内容:
<Project xmlns="http://schemas.microsoft.com/developer/msbuild/2003">
  <ItemGroup>
    <MsDeployReplaceRules Include="robots">
      <ObjectName>filePath</ObjectName>
      <Match>robots\.$(PublishProfileName)\.txt</Match>
      <Replace>robots.txt</Replace>
    </MsDeployReplaceRules>
  </ItemGroup>
</Project>   

谢谢您的回复。我尝试了这段代码,但我认为我做错了什么。您能否请看一下更新后的问题? - niaher

2

我不知道这是否是技术上正确的方法,但对我来说有效。

在您的pubxml文件中,在PropertyGroup节点下添加此节点:

<Target Name="MoveRobotsTxt" AfterTargets="GatherAllFilesToPublish">
  <Move Condition=" '$(Configuration)|$(Platform)' == 'Release|AnyCPU' " SourceFiles="obj\$(ConfigurationName)\Package\PackageTmp\robots.release.txt" DestinationFiles="obj\$(ConfigurationName)\Package\PackageTmp\robots.txt" />
  <Delete Files="obj\$(ConfigurationName)\Package\PackageTmp\robots.release.txt" />
</Target>

如果您使用的不仅仅是 Release,那么您需要复制 Move 命令并将 Release|AnyCPU 改为您的构建名称或使用特殊变量 $(ConfigurationName)。
由于您没有现有的 robots.txt 文件,因此只有在发布版本时才想要替换它,您可能需要:
<Target Name="MoveRobotsTxt" AfterTargets="GatherAllFilesToPublish">
  <Move SourceFiles="obj\$(ConfigurationName)\Package\PackageTmp\robots.$(ConfigurationName).txt" DestinationFiles="obj\$(ConfigurationName)\Package\PackageTmp\robots.txt" />
</Target>

我的惊喜之处是意识到pubxml就像是一个项目文件,你可以使用与msbuild相同的所有命令。
在尝试解决此问题时,我发现2010年和2012年之间有一些变化,这可能解释了为什么Richard的答案不起作用。
编辑: 我的原始答案由于某种原因无法与MSBuild一起使用,管道在MSBuild和Visual Studio之间似乎不同。
此外,在发布配置文件中的目标未运行。因此,我编辑了我的项目文件,在BeforeBuild/AfterBuild之后添加了以下内容:
<Target Name="move_robots_in_msbuild"  AfterTargets="PipelinePreDeployCopyAllFilesToOneFolder">
  <Move Condition=" '$(Configuration)' == 'Live' " SourceFiles="obj\$(ConfigurationName)\Package\PackageTmp\robots.live.txt" DestinationFiles="obj\$(ConfigurationName)\Package\PackageTmp\robots.txt" />
  <Delete Files="obj\$(ConfigurationName)\Package\PackageTmp\robots.live.txt" />
</Target>
<Target Name="move_robots_in_visual_studio" AfterTargets="GatherAllFilesToPublish">
  <Move Condition=" '$(Configuration)' == 'Live' " SourceFiles="obj\$(ConfigurationName)\Package\PackageTmp\robots.live.txt" DestinationFiles="obj\$(ConfigurationName)\Package\PackageTmp\robots.txt" />
  <Delete Files="obj\$(ConfigurationName)\Package\PackageTmp\robots.live.txt" />
</Target>

2
我今天早上也遇到了同样的问题,但是上面提供的两个答案对我都没用。
最终,我按照这篇文章的指导进行了操作 - http://www.asp.net/mvc/overview/deployment/visual-studio-web-deployment/deploying-extra-files
然后,在我的debug、release和staging .pubxml文件中,在</Project>标签之前添加了这段标记,并将robots.release.txt重命名为合适的名称。
  <Target Name="CustomCollectFiles">
    <ItemGroup>
      <_CustomFiles Include="robots.release.txt" />
      <FilesForPackagingFromProject Include="%(_CustomFiles.Identity)">
        <DestinationRelativePath>%(RecursiveDir)robots.txt</DestinationRelativePath>
      </FilesForPackagingFromProject>
    </ItemGroup>
  </Target>
  <PropertyGroup>
    <CopyAllFilesToSingleFolderForPackageDependsOn>
      CustomCollectFiles;
      $(CopyAllFilesToSingleFolderForPackageDependsOn);
    </CopyAllFilesToSingleFolderForPackageDependsOn>

    <CopyAllFilesToSingleFolderForMsdeployDependsOn>
      CustomCollectFiles;
      $(CopyAllFilesToSingleFolderForPackageDependsOn);
    </CopyAllFilesToSingleFolderForMsdeployDependsOn>
  </PropertyGroup>

你应该得到+2分。一个是因为指出其他解决方案都是垃圾。 - Benj Sanders

0
使用 .net 5 core,我尝试使用提供的代码,并通过结合一些解决方案使其工作。 在我的情况下,我基于配置,但我使用内容删除来进行一些清理。
<Choose>
    <When Condition="'$(Configuration)' == 'Debug'">
        <ItemGroup>
            <MsDeployReplaceRules Include="webconf">
                <ObjectName>filePath</ObjectName>
                <Match>Web\.Debug\.config</Match>
                <Replace>Web\.config</Replace>
           </MsDeployReplaceRules>
           <Content Remove="Web.Staging.config;Web.Debug.config" />
        </ItemGroup>
    </When>
    <When Condition="'$(Configuration)' == 'Staging'">
        <ItemGroup>
            <MsDeployReplaceRules Include="webconf">
                <ObjectName>filePath</ObjectName>
                <Match>Web\.Staging\.config</Match>
                <Replace>Web\.config</Replace>
            </MsDeployReplaceRules>
            <Content Remove="Web.Debug.config;Web.Staging.config" />
        </ItemGroup>
    </When>
</Choose>

网页内容由stack overflow 提供, 点击上面的
可以查看英文原文,
原文链接