如何使用OpenCv在图像中找到角落

54

我正在尝试在一张图片中找到四个角落,不需要轮廓,只需要4个角落。我将使用这4个角落来改变透视。

我正在使用Opencv,但是我需要知道如何找到这些角落的步骤和要使用的函数。

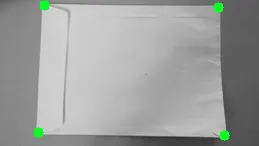
我的图片将是这样的:(没有红色点,我会在之后涂上这些点) enter image description here

编辑:

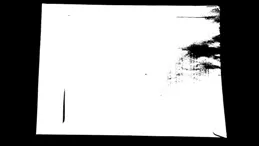
按照建议的步骤,我写下了代码:(注意:我并没有使用纯OpenCV,而是使用javaCV,但是逻辑相同)。

// Load two images and allocate other structures (I´m using other image)
    IplImage colored = cvLoadImage(
            "res/scanteste.jpg",
            CV_LOAD_IMAGE_UNCHANGED);

在这里输入图片描述

    IplImage gray = cvCreateImage(cvGetSize(colored), IPL_DEPTH_8U, 1);
    IplImage smooth = cvCreateImage(cvGetSize(colored), IPL_DEPTH_8U, 1);

    //Step 1 - Convert from RGB to grayscale (cvCvtColor)
    cvCvtColor(colored, gray, CV_RGB2GRAY);

在这里输入图片描述

    //2 Smooth (cvSmooth)
    cvSmooth( gray, smooth, CV_BLUR, 9, 9, 2, 2); 

这里输入图片描述

    //3 - cvThreshold  - What values?
    cvThreshold(gray,gray, 155, 255, CV_THRESH_BINARY);

在此输入图片描述

    //4 - Detect edges (cvCanny) -What values?
    int N = 7;
    int aperature_size = N;
    double lowThresh = 20;
    double highThresh = 40;     
    cvCanny( gray, gray, lowThresh*N*N, highThresh*N*N, aperature_size );   

在此输入图片描述

    //5 - Find contours (cvFindContours)
    int total = 0;
    CvSeq contour2 = new CvSeq(null);
    CvMemStorage storage2 = cvCreateMemStorage(0);
    CvMemStorage storageHull = cvCreateMemStorage(0);
    total = cvFindContours(gray, storage2, contour2, Loader.sizeof(CvContour.class), CV_RETR_CCOMP, CV_CHAIN_APPROX_NONE);
    if(total > 1){
          while (contour2 != null && !contour2.isNull()) {
              if (contour2.elem_size() > 0) {
                //6 - Approximate contours with linear features (cvApproxPoly)
                  CvSeq points = cvApproxPoly(contour2,Loader.sizeof(CvContour.class), storage2, CV_POLY_APPROX_DP,cvContourPerimeter(contour2)*0.005, 0);
                  cvDrawContours(gray, points,CvScalar.BLUE, CvScalar.BLUE, -1, 1, CV_AA);

              }
              contour2 = contour2.h_next();
          }

    } 

enter image description here

我想找到图像的角点,但是我不知道如何使用诸如cvCornerHarris等函数来查找角点。


4
OpenCV的“角点”函数并不是以你所想的方式寻找角点 - 粗略地说,它们会找到具有显着水平和垂直变化的区域。OpenCV中角点函数的目标是寻找图像的独特部分,这些部分对于视觉跟踪非常有用,但这并不一定是我们通常所认为的角落。 - Josh Bleecher Snyder
除了调整大小部分,因为您的图像已经足够小,https://dev59.com/aWoy5IYBdhLWcg3wQr5i#14368605 上的确切代码给出了 http://i.imgur.com/hMdAlHX.png。 - mmgp
寻找全局阈值并使用“轮廓”(blob)检测对于这种应用程序来说并不是一种稳健的方法。如果您的应用程序是查找(扭曲的)纸矩形,则从图像边缘向内水平和垂直扫描边缘是一个合理的开始。 - Rethunk
@Ricardo,你能提供最终可用的代码吗? - Akash Chaudhary
5个回答

38

首先,查看您的OpenCV分发中的/samples/c/squares.c。这个示例提供了一个正方形检测器,对于如何检测角点等特征应该是一个很好的起点。然后,看一下OpenCV的面向特征的函数,如cvCornerHarris()和cvGoodFeaturesToTrack()。

上述方法可以返回许多类似于角点的特征,但大多数都不是您要寻找的“真实角点”。在我的应用程序中,我必须检测已经旋转或扭曲(由于透视)的正方形。我的检测流程包括:

  1. 从RGB转换为灰度(cvCvtColor)
  2. 平滑(cvSmooth)
  3. 阈值(cvThreshold)
  4. 检测边缘(cvCanny)
  5. 查找轮廓(cvFindContours)
  6. 用线性特征近似轮廓(cvApproxPoly)
  7. 找到“矩形”,这些结构具有:多边形化轮廓具有4个点,面积足够大,相邻边缘为~90度,相对顶点之间的距离足够大等特征。

步骤7是必要的,因为稍微嘈杂的图像可能会产生许多在多边形化之后看起来是矩形的结构。在我的应用程序中,我还必须处理出现在所需正方形内部或重叠的类似正方形的结构。我发现轮廓的面积属性和重心对于识别正确的矩形很有帮助。


我需要在第七步中使用cvCornerHarris,并结合我的示例进行操作,详见编辑后的帖子,你能帮我吗? - Ricardo Cunha
1
cvSmooth是一种类似于高斯模糊的东西吗? 您是否对cvCanny的结果进行膨胀处理? 如何用大约5个角(因阴影等原因而变形的正方形)或带有小脊的正方形来近似轮廓。您的方法基本上是我想要做的,但我很难应对。您能提供一些代码示例吗?这将非常有帮助。 - sschrass

21

乍一看,对于人眼而言有四个角落。但在计算机视觉中,角落被认为是在其邻域内具有大梯度变化的点。邻域可以是4个像素邻域或8个像素邻域。

enter image description here

在提供的方程中寻找强度梯度时,已经考虑了4个像素邻域 查看文档

这是我对所提出问题图像的方法。我也有Python代码:

path = r'C:\Users\selwyn77\Desktop\Stack\corner'
filename = 'env.jpg'

img = cv2.imread(os.path.join(path, filename))
gray = cv2.cvtColor(img,cv2.COLOR_BGR2GRAY)    #--- convert to grayscale 

模糊图像通常是一种不错的选择,可以减少梯度变化并保留更加强烈的部分。我选择了双边滤波器,与高斯滤波器不同,它不会对邻域中的所有像素进行模糊处理。相反,它只会对像素强度类似于中心像素的像素进行模糊处理。简而言之,它保留了高梯度变化的边缘/角落,但会模糊具有最小梯度变化的区域。

bi = cv2.bilateralFilter(gray, 5, 75, 75)
cv2.imshow('bi',bi)

enter image description here

对于人类来说,与原始图像相比并没有太大的区别。但确实很重要。现在寻找可能的角落:

dst = cv2.cornerHarris(bi, 2, 3, 0.04)

dst 返回一个数组(与图像相同的2D形状),其中包含从此处提到的最终方程中获得的特征值。

现在必须应用一个阈值来选择那些超出某个值的角点。我将使用文档中的一个阈值:

#--- create a black image to see where those corners occur ---
mask = np.zeros_like(gray)

#--- applying a threshold and turning those pixels above the threshold to white ---           
mask[dst>0.01*dst.max()] = 255
cv2.imshow('mask', mask)

图片描述

白色像素是可能的角落区域。你可以找到许多相邻的角落。

要在图像上绘制选定的角落:

img[dst > 0.01 * dst.max()] = [0, 0, 255]   #--- [0, 0, 255] --> Red ---
cv2.imshow('dst', img)

enter image description here

(红色像素是角落,不太明显)

为了获得所有带有角落的像素数组:

coordinates = np.argwhere(mask)

更新

变量coor是一个数组的数组。将其转换为列表的列表

coor_list = [l.tolist() for l in list(coor)]

将上述内容转换为元组的列表

coor_tuples = [tuple(l) for l in coor_list]

我有一个简单而相对幼稚的方法来找到4个角落。我仅计算了每个角落到其他每个角落的距离。我保留了那些距离超过一定阈值的角落。

以下是代码:

thresh = 50

def distance(pt1, pt2):
    (x1, y1), (x2, y2) = pt1, pt2
    dist = math.sqrt( (x2 - x1)**2 + (y2 - y1)**2 )
    return dist

coor_tuples_copy = coor_tuples

i = 1    
for pt1 in coor_tuples:

    print(' I :', i)
    for pt2 in coor_tuples[i::1]:
        print(pt1, pt2)
        print('Distance :', distance(pt1, pt2))
        if(distance(pt1, pt2) < thresh):
            coor_tuples_copy.remove(pt2)      
    i+=1

在运行上面的代码段之前,coor_tuples包含所有的角点:

[(4, 42), (4, 43), (5, 43), (5, 44), (6, 44), (7, 219), (133, 36), (133, 37), (133, 38), (134, 37), (135, 224), (135, 225), (136, 225), (136, 226), (137, 225), (137, 226), (137, 227), (138, 226)]

运行代码后,我剩下了4个角落:

[(4, 42), (7, 219), (133, 36), (135, 224)]

更新2

现在您只需在原始图像的副本上标记这4个点即可。

img2 = img.copy()
for pt in coor_tuples:
    cv2.circle(img2, tuple(reversed(pt)), 3, (0, 0, 255), -1)
cv2.imshow('Image with 4 corners', img2) 

输入图片描述


谢谢!最后一步:如何仅提取4个点作为角落(有助于进一步的去斜校正/透视校正)?您需要使用算法来查找许多点中的聚类吗?(“白色像素是可能角落的区域。您可以找到很多相邻的角落。”)您能添加一个例子吗? - Basj
非常感谢 @JeruLuke! - Basj
你能帮我把这些示例代码翻译成C++语言吗? - noobie
@noobie 我没有 C++ 的代码。 - Jeru Luke

7

这里是使用 cv2.goodFeaturesToTrack() 实现角点检测的方法。步骤如下:

  • 将图像转换为灰度图
  • 执行边缘检测
  • 检测角点
  • 可选地执行四点透视变换以获得图像的俯视图

使用这个起始图像,

enter image description here

在转换为灰度图像后,我们执行Canny边缘检测

enter image description here

现在我们有了一个不错的二进制图像,我们可以使用cv2.goodFeaturesToTrack()

corners = cv2.goodFeaturesToTrack(canny, 4, 0.5, 50)

对于参数,我们给出canny图像,将最大角点数设为4(maxCorners),使用0.5的最小接受质量(qualityLevel),并将返回的角点之间可能存在的欧氏距离设置为50(minDistance)。以下是结果

enter image description here

现在我们已经确定了角落,我们可以执行四点透视变换来获得物体的俯视图。我们首先按顺时针顺序排列点,然后将结果绘制到掩模上。
注意:我们本可以只在Canny图像上找到轮廓而不是执行此步骤来创建掩模,但假装我们只有4个角点可用。

enter image description here

接下来,我们在这个掩模上找到轮廓,并使用cv2.arcLength()cv2.approxPolyDP()进行过滤。思路是,如果轮廓有4个点,那么它必须是我们的对象。一旦我们有了这个轮廓,我们就执行透视变换。

enter image description here

最后,根据所需的方向旋转图像。 这是结果。

enter image description here

只检测角点的代码

import cv2

image = cv2.imread('1.png')
gray = cv2.cvtColor(image, cv2.COLOR_BGR2GRAY)
canny = cv2.Canny(gray, 120, 255, 1)

corners = cv2.goodFeaturesToTrack(canny,4,0.5,50)

for corner in corners:
    x,y = corner.ravel()
    cv2.circle(image,(x,y),5,(36,255,12),-1)

cv2.imshow('canny', canny)
cv2.imshow('image', image)
cv2.waitKey()

用于检测角点和执行透视变换的代码

import cv2
import numpy as np

def rotate_image(image, angle):
    # Grab the dimensions of the image and then determine the center
    (h, w) = image.shape[:2]
    (cX, cY) = (w / 2, h / 2)

    # grab the rotation matrix (applying the negative of the
    # angle to rotate clockwise), then grab the sine and cosine
    # (i.e., the rotation components of the matrix)
    M = cv2.getRotationMatrix2D((cX, cY), -angle, 1.0)
    cos = np.abs(M[0, 0])
    sin = np.abs(M[0, 1])

    # Compute the new bounding dimensions of the image
    nW = int((h * sin) + (w * cos))
    nH = int((h * cos) + (w * sin))

    # Adjust the rotation matrix to take into account translation
    M[0, 2] += (nW / 2) - cX
    M[1, 2] += (nH / 2) - cY

    # Perform the actual rotation and return the image
    return cv2.warpAffine(image, M, (nW, nH))

def order_points_clockwise(pts):
    # sort the points based on their x-coordinates
    xSorted = pts[np.argsort(pts[:, 0]), :]

    # grab the left-most and right-most points from the sorted
    # x-roodinate points
    leftMost = xSorted[:2, :]
    rightMost = xSorted[2:, :]

    # now, sort the left-most coordinates according to their
    # y-coordinates so we can grab the top-left and bottom-left
    # points, respectively
    leftMost = leftMost[np.argsort(leftMost[:, 1]), :]
    (tl, bl) = leftMost

    # now, sort the right-most coordinates according to their
    # y-coordinates so we can grab the top-right and bottom-right
    # points, respectively
    rightMost = rightMost[np.argsort(rightMost[:, 1]), :]
    (tr, br) = rightMost

    # return the coordinates in top-left, top-right,
    # bottom-right, and bottom-left order
    return np.array([tl, tr, br, bl], dtype="int32")

def perspective_transform(image, corners):
    def order_corner_points(corners):
        # Separate corners into individual points
        # Index 0 - top-right
        #       1 - top-left
        #       2 - bottom-left
        #       3 - bottom-right
        corners = [(corner[0][0], corner[0][1]) for corner in corners]
        top_r, top_l, bottom_l, bottom_r = corners[0], corners[1], corners[2], corners[3]
        return (top_l, top_r, bottom_r, bottom_l)

    # Order points in clockwise order
    ordered_corners = order_corner_points(corners)
    top_l, top_r, bottom_r, bottom_l = ordered_corners

    # Determine width of new image which is the max distance between 
    # (bottom right and bottom left) or (top right and top left) x-coordinates
    width_A = np.sqrt(((bottom_r[0] - bottom_l[0]) ** 2) + ((bottom_r[1] - bottom_l[1]) ** 2))
    width_B = np.sqrt(((top_r[0] - top_l[0]) ** 2) + ((top_r[1] - top_l[1]) ** 2))
    width = max(int(width_A), int(width_B))

    # Determine height of new image which is the max distance between 
    # (top right and bottom right) or (top left and bottom left) y-coordinates
    height_A = np.sqrt(((top_r[0] - bottom_r[0]) ** 2) + ((top_r[1] - bottom_r[1]) ** 2))
    height_B = np.sqrt(((top_l[0] - bottom_l[0]) ** 2) + ((top_l[1] - bottom_l[1]) ** 2))
    height = max(int(height_A), int(height_B))

    # Construct new points to obtain top-down view of image in 
    # top_r, top_l, bottom_l, bottom_r order
    dimensions = np.array([[0, 0], [width - 1, 0], [width - 1, height - 1], 
                    [0, height - 1]], dtype = "float32")

    # Convert to Numpy format
    ordered_corners = np.array(ordered_corners, dtype="float32")

    # Find perspective transform matrix
    matrix = cv2.getPerspectiveTransform(ordered_corners, dimensions)

    # Return the transformed image
    return cv2.warpPerspective(image, matrix, (width, height))

image = cv2.imread('1.png')
original = image.copy()
gray = cv2.cvtColor(image, cv2.COLOR_BGR2GRAY)
canny = cv2.Canny(gray, 120, 255, 1)

corners = cv2.goodFeaturesToTrack(canny,4,0.5,50)

c_list = []
for corner in corners:
    x,y = corner.ravel()
    c_list.append([int(x), int(y)])
    cv2.circle(image,(x,y),5,(36,255,12),-1)

corner_points = np.array([c_list[0], c_list[1], c_list[2], c_list[3]])
ordered_corner_points = order_points_clockwise(corner_points)
mask = np.zeros(image.shape, dtype=np.uint8)
cv2.fillPoly(mask, [ordered_corner_points], (255,255,255))

mask = cv2.cvtColor(mask, cv2.COLOR_BGR2GRAY)
cnts = cv2.findContours(mask, cv2.RETR_EXTERNAL, cv2.CHAIN_APPROX_SIMPLE)
cnts = cnts[0] if len(cnts) == 2 else cnts[1]

for c in cnts:
    peri = cv2.arcLength(c, True)
    approx = cv2.approxPolyDP(c, 0.015 * peri, True)
    if len(approx) == 4:
        transformed = perspective_transform(original, approx)

result = rotate_image(transformed, -90)

cv2.imshow('canny', canny)
cv2.imshow('image', image)
cv2.imshow('mask', mask)
cv2.imshow('transformed', transformed)
cv2.imshow('result', result)
cv2.waitKey()

1
  1. find contours with RETR_EXTERNAL option.(gray -> gaussian filter -> canny edge -> find contour)
  2. find the largest size contour -> this will be the edge of the rectangle
  3. find corners with little calculation

    Mat m;//image file
    findContours(m, contours_, hierachy_, RETR_EXTERNAL);
    auto it = max_element(contours_.begin(), contours_.end(),
        [](const vector<Point> &a, const vector<Point> &b) {
            return a.size() < b.size(); });
    Point2f xy[4] = {{9000,9000}, {0, 1000}, {1000, 0}, {0,0}};
    for(auto &[x, y] : *it) {
        if(x + y < xy[0].x + xy[0].y) xy[0] = {x, y};
        if(x - y > xy[1].x - xy[1].y) xy[1] = {x, y};
        if(y - x > xy[2].y - xy[2].x) xy[2] = {x, y};
        if(x + y > xy[3].x + xy[3].y) xy[3] = {x, y};
     }
    

xy[4]将成为四个角落。 我能够用这种方式提取出四个角落。


-4

对Canny图像应用Hough线变换 - 您将获得一组点,对这组点应用凸包


网页内容由stack overflow 提供, 点击上面的
可以查看英文原文,
原文链接