我不知道Play Books是如何实现这一点的,但你可以创建一个
PopupWindow,并使用
Layout.getSelectionPath和一些数学计算来计算选定文本的位置以确定其位置。基本上,我们要做到以下几点:
- 计算所选文本的边界
- 计算
PopupWindow的边界和初始位置
- 计算两者之间的差异
- 将
PopupWindow偏移,使其水平/垂直居中于所选文本的上方或下方
计算选择边界
从文档中得知:
填充指定路径,使其呈现出指定偏移量之间的高亮表示。这通常是一个矩形或一组可能不连续的矩形。如果开始和结束相同,则返回的路径为空。
因此,在我们的情况下,指定的偏移量将是选择的起始位置和结束位置,可以使用
Selection.getSelectionStart和
Selection.getSelectionEnd找到。为了方便,
TextView给出了
TextView.getSelectionStart,
TextView.getSelectionEnd和
TextView.getLayout。
    final Path selDest = new Path();
    final RectF selBounds = new RectF();
    final Rect outBounds = new Rect();

    // Calculate the selection start and end offset
    final int selStart = yourTextView.getSelectionStart();
    final int selEnd = yourTextView.getSelectionEnd();
    final int min = Math.max(0, Math.min(selStart, selEnd));
    final int max = Math.max(0, Math.max(selStart, selEnd));

    // Calculate the selection outBounds
    yourTextView.getLayout().getSelectionPath(min, max, selDest);
    selDest.computeBounds(selBounds, true /* this param is ignored */);
    selBounds.roundOut(outBounds);
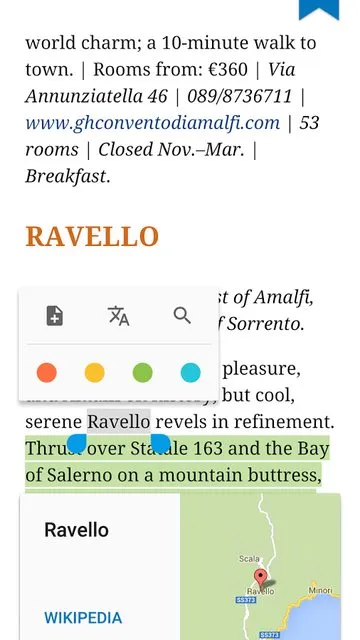
现在,我们已经获取到所选文本边界的Rect,我们可以选择将PopupWindow放置在哪里。在这种情况下,我们会水平居中显示它,沿着所选文本的顶部或底部,具体取决于我们有多少空间来显示弹出窗口。
计算初始弹出窗口坐标
接下来,我们需要计算弹出内容的边界。为了做到这一点,我们首先需要调用PopupWindow.showAtLocation,但是我们填充的View的边界不会立即可用,因此我建议使用一个ViewTreeObserver.OnGlobalLayoutListener来等待它们变得可用。
popupWindow.showAtLocation(yourTextView, Gravity.TOP, 0, 0)
PopupWindow.showAtLocation需要以下内容:
- 一个
View,用于检索有效的Window token,它仅唯一标识要放置弹出窗口的Window
- 一个可选的重力,但在我们的情况下将是
Gravity.TOP
- 可选的x/y偏移量
由于我们无法确定弹出窗口内容的x/y偏移量,因此我们将最初将其放置在默认位置。如果在传递给它的View布局完成之前尝试调用PopupWindow.showAtLocation,则会收到WindowManager.BadTokenException,因此您可以考虑使用ViewTreeObserver.OnGlobalLayoutListener来避免这种情况,但它主要出现在您选择文本并旋转设备时。
    final Rect cframe = new Rect();
    final int[] cloc = new int[2];
    popupContent.getLocationOnScreen(cloc);
    popupContent.getLocalVisibleRect(cbounds);
    popupContent.getWindowVisibleDisplayFrame(cframe);

    final int scrollY = ((View) yourTextView.getParent()).getScrollY();
    final int[] tloc = new int[2];
    yourTextView.getLocationInWindow(tloc);

    final int startX = cloc[0] + cbounds.centerX();
    final int startY = cloc[1] + cbounds.centerY() - (tloc[1] - cframe.top) - scrollY;
一旦我们获得了所需的所有信息,就可以计算弹出内容的最终起始x / y坐标,然后使用这些坐标来确定它们与所选文本的
Rect之间的差异,以便我们可以将
PopupWindow.update更新到新位置。
计算弹出坐标的偏移量
final int popupHeight = cbounds.height();
final int textPadding = yourTextView.getPaddingLeft();
final int topOffset = Math.round(selBounds.top - startY);
final int btmOffset = Math.round(selBounds.bottom - (startY - popupHeight));
final int x = Math.round(selBounds.centerX() + textPadding - startX);
final int y = Math.round(selBounds.top - scrollY < startY ? btmOffset : topOffset);
如果有足够的空间在所选文本上方显示弹出窗口,那么我们会将其放在那里;否则,我们会将其偏移至所选文本下方。在我的情况下,我在我的TextView周围有16dp的填充,因此也需要考虑到这一点。最终,我们将得到偏移PopupWindow的最终x和y位置。
popupWindow.update(x, y, -1, -1);
-1 这里只是表示我们为 PopupWindow 提供的默认宽度/高度,在我们的情况下,它将是 ViewGroup.LayoutParams.WRAP_CONTENT。
监听选择更改
我们希望每次更改所选文本时,PopupWindow 都会更新。
监听选择更改的一种简单方法是子类化 TextView 并提供一个回调函数到 TextView.onSelectionChanged。
public class NotifyingSelectionTextView extends AppCompatTextView {

    private SelectionChangeListener listener;

    public NotifyingSelectionTextView(Context context, @Nullable AttributeSet attrs) {
        super(context, attrs);
    }

    @Override
    protected void onSelectionChanged(int selStart, int selEnd) {
        super.onSelectionChanged(selStart, selEnd);
        if (listener != null) {
            if (hasSelection()) {
                listener.onTextSelected();
            } else {
                listener.onTextUnselected();
            }
        }
    }

    public void setSelectionChangeListener(SelectionChangeListener listener) {
        this.listener = listener;
    }

    public interface SelectionChangeListener {
        void onTextSelected();
        void onTextUnselected();
    }

}
监听滚动变化
如果你在一个滚动容器中有一个TextView,比如ScrollView,你可能也想要监听滚动变化,这样你就可以在滚动时锚定弹出窗口。一种简单的监听方式是继承 ScrollView 并提供一个回调函数给View.onScrollChanged。
public class NotifyingScrollView extends ScrollView {

    private ScrollChangeListener listener;

    public NotifyingScrollView(Context context, @Nullable AttributeSet attrs) {
        super(context, attrs);
    }

    @Override
    protected void onScrollChanged(int l, int t, int oldl, int oldt) {
        super.onScrollChanged(l, t, oldl, oldt);
        if (listener != null) {
            listener.onScrollChanged();
        }
    }

    public void setScrollChangeListener(ScrollChangeListener listener) {
        this.listener = listener;
    }

    public interface ScrollChangeListener {
        void onScrollChanged();
    }

}
创建一个空的 ActionMode.Callback
正如您在帖子中提到的那样,我们需要在ActionMode.Callback.onCreateActionMode中返回true,以使我们的文本保持可选择状态。但是,在ActionMode.Callback.onPrepareActionMode中,我们还需要调用Menu.clear以删除所选文本中可能包含的所有ActionMode项。
static final class EmptyActionMode extends SimpleActionModeCallback {
@Override
public boolean onCreateActionMode(ActionMode mode, Menu menu) {
return true;
}
@Override
public boolean onPrepareActionMode(ActionMode mode, Menu menu) {
menu.clear();
return true;
}
}
现在我们可以使用
TextView.setCustomSelectionActionModeCallback来应用我们的自定义
ActionMode。
SimpleActionModeCallback是一个自定义类,它只提供了
ActionMode.Callback的存根,有点类似于
ViewPager.SimpleOnPageChangeListener。
public class SimpleActionModeCallback implements ActionMode.Callback {

    @Override
    public boolean onCreateActionMode(ActionMode mode, Menu menu) {
        return false;
    }

    @Override
    public boolean onPrepareActionMode(ActionMode mode, Menu menu) {
        return false;
    }

    @Override
    public boolean onActionItemClicked(ActionMode mode, MenuItem item) {
        return false;
    }

    @Override
    public void onDestroyActionMode(ActionMode mode) {

    }

}
布局
这是我们正在使用的Activity布局:
<your.package.name.NotifyingScrollView
    xmlns:android="http://schemas.android.com/apk/res/android"
    android:id="@+id/notifying_scroll_view"
    android:layout_width="match_parent"
    android:layout_height="match_parent">

    <your.package.name.NotifyingSelectionTextView
        android:id="@+id/notifying_text_view"
        android:layout_width="wrap_content"
        android:layout_height="wrap_content"
        android:padding="16dp"
        android:textIsSelectable="true"
        android:textSize="20sp" />

</your.package.name.NotifyingScrollView>
这是我们的弹出窗口布局:
<LinearLayout
    xmlns:android="http://schemas.android.com/apk/res/android"
    xmlns:tools="http://schemas.android.com/tools"
    android:layout_width="wrap_content"
    android:layout_height="wrap_content"
    android:background="@drawable/action_mode_popup_bg"
    android:orientation="vertical"
    tools:ignore="ContentDescription">

    <LinearLayout
        android:layout_width="match_parent"
        android:layout_height="wrap_content"
        android:orientation="horizontal">

        <ImageButton
            android:id="@+id/view_action_mode_popup_add_note"
            style="@style/ActionModePopupButton"
            android:src="@drawable/ic_note_add_black_24dp" />

        <ImageButton
            android:id="@+id/view_action_mode_popup_translate"
            style="@style/ActionModePopupButton"
            android:src="@drawable/ic_translate_black_24dp" />

        <ImageButton
            android:id="@+id/view_action_mode_popup_search"
            style="@style/ActionModePopupButton"
            android:src="@drawable/ic_search_black_24dp" />

    </LinearLayout>

    <View
        android:layout_width="match_parent"
        android:layout_height="1dp"
        android:layout_margin="8dp"
        android:background="@android:color/darker_gray" />

    <LinearLayout
        android:layout_width="wrap_content"
        android:layout_height="wrap_content"
        android:orientation="horizontal">

        <ImageButton
            android:id="@+id/view_action_mode_popup_red"
            style="@style/ActionModePopupSwatch"
            android:src="@drawable/round_red" />

        <ImageButton
            android:id="@+id/view_action_mode_popup_yellow"
            style="@style/ActionModePopupSwatch"
            android:src="@drawable/round_yellow" />

        <ImageButton
            android:id="@+id/view_action_mode_popup_green"
            style="@style/ActionModePopupSwatch"
            android:src="@drawable/round_green" />

        <ImageButton
            android:id="@+id/view_action_mode_popup_blue"
            style="@style/ActionModePopupSwatch"
            android:src="@drawable/round_blue" />

        <ImageButton
            android:id="@+id/view_action_mode_popup_clear_format"
            style="@style/ActionModePopupSwatch"
            android:src="@drawable/ic_format_clear_black_24dp"
            android:visibility="gone" />

    </LinearLayout>

</LinearLayout>
这些是我们的弹出按钮样式:
<style name="ActionModePopupButton">
    <item name="android:layout_width">48dp</item>
    <item name="android:layout_height">48dp</item>
    <item name="android:layout_weight">1</item>
    <item name="android:background">?selectableItemBackground</item>
</style>

<style name="ActionModePopupSwatch" parent="ActionModePopupButton">
    <item name="android:padding">12dp</item>
</style>
实用工具
你将看到的ViewUtils.onGlobalLayout只是一个处理一些ViewTreeObserver.OnGlobalLayoutListener样板代码的实用方法。
public static void onGlobalLayout(final View view, final Runnable runnable) {
    final OnGlobalLayoutListener listener = new OnGlobalLayoutListener() {

        @Override
        public void onGlobalLayout() {
            view.getViewTreeObserver().removeOnGlobalLayoutListener(this);
            runnable.run();
        }

    };
    view.getViewTreeObserver().addOnGlobalLayoutListener(listener);
}
汇总
现在,我们已经:
- 计算出所选文本的边界
- 计算出弹出窗口的边界
- 计算出差异并确定弹出窗口的偏移量
- 提供了一种监听滚动变化和选定文本变化的方法
- 创建了我们的
Activity和弹出窗口布局
将所有内容汇总起来可能看起来像:
public class ActionModePopupActivity extends AppCompatActivity
implements ScrollChangeListener, SelectionChangeListener {
private static final int DEFAULT_WIDTH = -1;
private static final int DEFAULT_HEIGHT = -1;
private final Point currLoc = new Point();
private final Point startLoc = new Point();
private final Rect cbounds = new Rect();
private final PopupWindow popupWindow = new PopupWindow();
private final ActionMode.Callback emptyActionMode = new EmptyActionMode();
private NotifyingSelectionTextView yourTextView;
@SuppressLint("InflateParams")
@Override
protected void onCreate(@Nullable Bundle savedInstanceState) {
super.onCreate(savedInstanceState);
setContentView(R.layout.activity_action_mode_popup);
final LayoutInflater inflater = LayoutInflater.from(this);
popupWindow.setContentView(inflater.inflate(R.layout.view_action_mode_popup, null));
popupWindow.setWidth(WRAP_CONTENT);
popupWindow.setHeight(WRAP_CONTENT);
final NotifyingScrollView scroll
= (NotifyingScrollView) findViewById(R.id.notifying_scroll_view);
scroll.setScrollChangeListener(this);
yourTextView = (NotifyingSelectionTextView) findViewById(R.id.notifying_text_view);
yourTextView.setText(IPSUM);
yourTextView.setSelectionChangeListener(this);
yourTextView.setCustomSelectionActionModeCallback(emptyActionMode);
}
@Override
public void onScrollChanged() {
if (popupWindow.isShowing()) {
final Point ploc = calculatePopupLocation();
popupWindow.update(ploc.x, ploc.y, DEFAULT_WIDTH, DEFAULT_HEIGHT);
}
}
@Override
public void onTextSelected() {
final View popupContent = popupWindow.getContentView();
if (popupWindow.isShowing()) {
final Point ploc = calculatePopupLocation();
popupWindow.update(ploc.x, ploc.y, DEFAULT_WIDTH, DEFAULT_HEIGHT);
} else {
ViewUtils.onGlobalLayout(yourTextView, () -> {
popupWindow.showAtLocation(yourTextView, TOP, 0, 0);
ViewUtils.onGlobalLayout(popupContent, () -> {
final Rect cframe = new Rect();
final int[] cloc = new int[2];
popupContent.getLocationOnScreen(cloc);
popupContent.getLocalVisibleRect(cbounds);
popupContent.getWindowVisibleDisplayFrame(cframe);
final int scrollY = ((View) yourTextView.getParent()).getScrollY();
final int[] tloc = new int[2];
yourTextView.getLocationInWindow(tloc);
final int startX = cloc[0] + cbounds.centerX();
final int startY = cloc[1] + cbounds.centerY() - (tloc[1] - cframe.top) - scrollY;
startLoc.set(startX, startY);
final Point ploc = calculatePopupLocation();
popupWindow.update(ploc.x, ploc.y, DEFAULT_WIDTH, DEFAULT_HEIGHT);
});
});
}
}
@Override
public void onTextUnselected() {
popupWindow.dismiss();
}
private Point calculatePopupLocation() {
final ScrollView parent = (ScrollView) yourTextView.getParent();
final int selStart = yourTextView.getSelectionStart();
final int selEnd = yourTextView.getSelectionEnd();
final int min = Math.max(0, Math.min(selStart, selEnd));
final int max = Math.max(0, Math.max(selStart, selEnd));
final RectF selBounds = new RectF();
final Path selection = new Path();
yourTextView.getLayout().getSelectionPath(min, max, selection);
selection.computeBounds(selBounds, true );
final int cx = startLoc.x;
final int cy = startLoc.y;
final int popupHeight = cbounds.height();
final int textPadding = yourTextView.getPaddingLeft();
final int topOffset = Math.round(selBounds.top - cy);
final int btmOffset = Math.round(selBounds.bottom - (cy - popupHeight));
final int scrollY = parent.getScrollY();
final int x = Math.round(selBounds.centerX() + textPadding - cx);
final int y = Math.round(selBounds.top - scrollY < cy ? btmOffset : topOffset);
currLoc.set(x, y - scrollY);
return currLoc;
}
static final class EmptyActionMode extends SimpleActionModeCallback {
@Override
public boolean onCreateActionMode(ActionMode mode, Menu menu) {
return true;
}
@Override
public boolean onPrepareActionMode(ActionMode mode, Menu menu) {
menu.clear();
return true;
}
}
}
结果
使用操作栏(视频链接):
没有动作栏(视频链接):
奖励 - 动画
由于我们知道PopupWindow的起始位置和选择更改时的偏移位置,因此我们可以轻松地在两个值之间执行线性插值,以在移动内容时创建漂亮的动画效果。
public static float lerp(float a, float b, float v) {
    return a + (b - a) * v;
}
private static final int DEFAULT_ANIM_DUR = 350;
private static final int DEFAULT_ANIM_DELAY = 500;
@Override
public void onTextSelected() {
final View popupContent = popupWindow.getContentView();
if (popupWindow.isShowing()) {
popupContent.getHandler().removeCallbacksAndMessages(null);
popupContent.postDelayed(() -> {
final int currx = currLoc.x;
final int curry = currLoc.y;
final Point ploc = calculatePopupLocation();
currLoc.set(ploc.x, ploc.y);
final ValueAnimator anim = ValueAnimator.ofFloat(0f, 1f);
anim.addUpdateListener(animation -> {
final float v = (float) animation.getAnimatedValue();
final int x = Math.round(AnimUtils.lerp(currx, ploc.x, v));
final int y = Math.round(AnimUtils.lerp(curry, ploc.y, v));
popupWindow.update(x, y, DEFAULT_WIDTH, DEFAULT_HEIGHT);
});
anim.setDuration(DEFAULT_ANIM_DUR);
anim.start();
}, DEFAULT_ANIM_DELAY);
} else {
...
}
}
结果
使用操作栏 - 动画(视频链接)
额外内容
我不会详细介绍如何将点击监听器附加到弹出操作中,可能有几种方法可以使用不同的计算和实现来实现相同的效果。但是我会提到,如果您想检索所选文本,然后对其进行某些操作,您只需要从所选文本中获取min和max,并使用CharSequence.subSequence方法即可。
无论如何,希望这对您有所帮助!如果您有任何问题,请告诉我。
 我尝试从onCreateActionMode返回false,但是当我这样做时,我也无法选择文本。