如何在IOS中使用核心图形绘制一组45度平行线跨越形状的填充?示例代码?
(我特别关注在MKMapKit中使用MKPolygon,但目前只是尝试查看是否可以在UIView中使用drawRect?因此用交叉斜线填充UIView的背景)
如何在IOS中使用核心图形绘制一组45度平行线跨越形状的填充?示例代码?
(我特别关注在MKMapKit中使用MKPolygon,但目前只是尝试查看是否可以在UIView中使用drawRect?因此用交叉斜线填充UIView的背景)
对于Swift 3,使用来自@user3230875的方法
final class CrossHatchView: UIView {

    // MARK: - LifeCycle

    override func draw(_ rect: CGRect) {

        // create rect path with bounds that equal to the
        // size of a view, in addition it adds rounded corners, this will
        // be used later as a canvas for dash drawing
        let path:UIBezierPath = UIBezierPath(roundedRect: bounds, cornerRadius: 5)

        // specify the new area where the our drawing will be visible
        // check [link][1] for more
        path.addClip()

        // grab the size of drawing area
        let pathBounds = path.bounds

        // cleanUp rounded rect, that is drawn above
        // just remove roundedRect in the words
        path.removeAllPoints()

        // get start and end point of the line
        let p1 = CGPoint(x:pathBounds.maxX, y:0)
        let p2 = CGPoint(x:0, y:pathBounds.maxX)

        // draw line
        path.move(to: p1)
        path.addLine(to: p2)

        // set line width equal to double width of view
        // because we later will draw this line using dash pattern
        path.lineWidth = bounds.width * 2

        // set dash pattern with some interval
        let dashes:[CGFloat] = [0.5, 7.0]
        path.setLineDash(dashes, count: 2, phase: 0.0)

        // set color for line
        UIColor.lightGray.withAlphaComponent(0.5).set()

        // actually draw a line using specific
        // color and dash pattern
        path.stroke()
    }
}
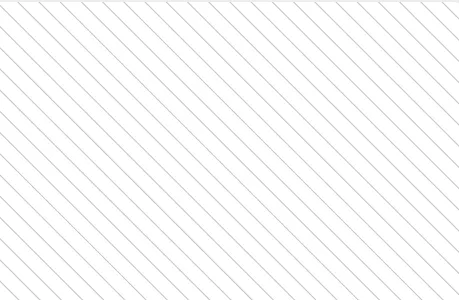
结果:
嘿,试试这个示例代码,我在一个300x300的UIView上尝试过。
- (void)drawRect:(CGRect)rect
{
    CGContextRef context = UIGraphicsGetCurrentContext();
    CGContextSetLineWidth(context, 1.5);
    CGContextSetStrokeColorWithColor(context, [UIColor grayColor].CGColor);
    int backward=0;

    for (int i=0;i<15; i++)
    {
        CGContextMoveToPoint(context, backward, 0);
        CGContextAddLineToPoint(context, 300, 300-backward);
        backward=backward+20;
    }
    int backwardNegitive=0;
    for (int i=0;i<15; i++)
    {
        CGContextMoveToPoint(context, 0,backwardNegitive);
        CGContextAddLineToPoint(context, 300-backwardNegitive,300);
        backwardNegitive=backwardNegitive+20;
    }
    int forward=0;
    for (int i=0;i<15; i++)
    {
        CGContextMoveToPoint(context, 300-forward, 0);
        CGContextAddLineToPoint(context, 0, 300-forward);
        forward=forward+20;
    }
    int forwardNegative=0;
    for (int i=0;i<15; i++)
    {
        CGContextMoveToPoint(context, 0,300+forwardNegative);
        CGContextAddLineToPoint(context,300+forwardNegative,0);
        forwardNegative=forwardNegative+20;
    }
    CGContextStrokePath(context);

}
以下是我在苹果开发者论坛上谈论的内容:
#import "CrossHatchView.h"

@implementation CrossHatchView

static  CGFloat  sides = 5.0;

- (void)drawRect:(CGRect)rect
{
    CGRect  bounds = self.bounds;

    UIBezierPath  *path = [UIBezierPath bezierPath];

    CGFloat  xCentre = CGRectGetMidX(bounds);
    CGFloat  yCentre = CGRectGetMidY(bounds);
    CGFloat  radius = 0.0;

    if (CGRectGetWidth(bounds) > CGRectGetHeight(bounds)) {
        radius = CGRectGetHeight(bounds) / 2.0;
    } else {
        radius = CGRectGetWidth(bounds) / 2.0;
    }
    CGFloat  angleIncrement = 2.0 * M_PI / sides;

    CGFloat  initialAngle = ( M_PI + (2.0 * M_PI / sides) ) / 2.0;

    for (NSUInteger  i = 0;  i < sides;  i++) {
        CGFloat  angle = initialAngle + i * angleIncrement;
        CGFloat  x = xCentre + radius * cos(angle);
        CGFloat  y = yCentre + radius * sin(angle);
        CGPoint  point = CGPointMake(x, y);
        if (i == 0) {
            [path moveToPoint:point];
        } else {
            [path addLineToPoint:point];
        }
    }
    [path closePath];
    [[UIColor cyanColor] set];
    [path addClip];

    CGRect  pathBounds = [path bounds];

    [path removeAllPoints];
    CGPoint  p1 = pathBounds.origin;
    CGPoint  p2 = CGPointMake(CGRectGetMaxX(pathBounds), CGRectGetMaxY(pathBounds));
    [path moveToPoint:p1];
    [path addLineToPoint:p2];
    path.lineWidth = 400.0;
    CGFloat  dashes[] = { 2.0, 2.0 };
    [path setLineDash:dashes count:2 phase:0.0];
    [[UIColor blackColor] set];
    [path stroke];
}

@end