创建自定义选项卡控制器,哪种方法最好?

10

我正在开发一个应用程序,类似于tabBarController应用程序。但是我不能使用tabBarController,因为我需要在底部使用自定义的tab处理程序,并且我需要自定义项目之间的间距。因此,我正在创建自定义tabBarController

我想知道最佳方法是什么。目前我的方法如下(使用storyboardiOS6):我在ViewController上放置了一个UIToolbar,它将充当底部的tab栏(CustomTabBarViewController)。我为每个选项卡取了ContainerViews。当用户在toolbar上选择一个项目时,我将显示该containerView

请告诉我是否有错误或指导最佳方法。谢谢。

4个回答

17

你做得非常非常错误。当你可以使用默认的视图层次结构时,不要创建自定义视图层次结构。

你想做的是创建一个UITabBarController子类,并创建一个.xib文件,其中包含你的自定义选项卡栏 - 仅仅是一个图像和任意数量的UIButtons(我想是5个)。

enter image description here

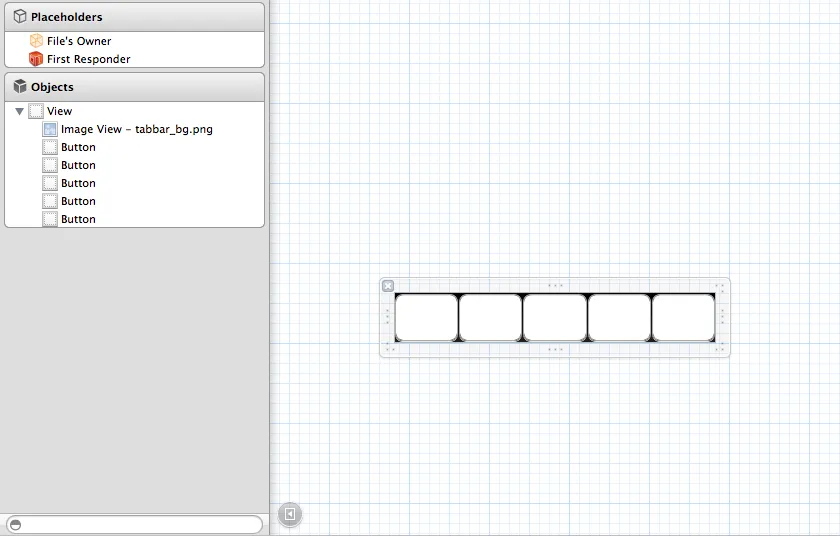
为它们设置标签,只需1-5个标签,你可能可以使用自定义的UIView子类来完成,但在这种情况下,这将是多余的,所以只需通过标签获取控件。

创建UITabBarController的子类。你需要引用所有这些按钮,并且还需要一个属性来查看最后按下的按钮,以便你可以相应地更新UI。还要为不同的控制状态分配不同的图像或标题,在本例中我使用了默认和选定状态。

MYBaseTabBarController.h

@interface MYBaseTabBarController : UITabBarController
@property (strong, nonatomic) UIButton *btn1;
@property (strong, nonatomic) UIButton *btn2;
@property (strong, nonatomic) UIButton *btn3;
@property (strong, nonatomic) UIButton *btn4;
@property (strong, nonatomic) UIButton *btn5;
@property (weak, nonatomic) UIButton *lastSender;

@property (strong, nonatomic) UIView *tabBarView;

@end

MYBaseTabBarController.m

首先创建视图控制器(在这种情况下,它们都是UINavigationController的子类),并将它们分配给您的UITabBarController子类作为viewControllers属性。

- (id)init {
  self = [super init];
  if (self) {
    [self setup];
  }
  return self;
}

- (void)setup {
  NSMutableArray *viewControllers = [NSMutableArray array];

  MYViewController1 *viewController1 = [[MYStoryboardManager storyboard1] instantiateInitialViewController];
  viewController1.title = @"1";
  [viewControllers addObject:viewController1];

  MYViewController2 *viewController2 = [[MYStoryboardManager storyboard2] instantiateInitialViewController];
  viewController2.title = @"2";
  [viewControllers addObject:viewController2];

  UIViewController *blankController = [UIViewController new]; // Center button, performs an action instead of leading to a controller
  [viewControllers addObject:blankController];

  MYViewController3 *viewController3 = [[MYStoryboardManager storyboard3] instantiateInitialViewController];
  viewController3.title = @"3";
  [viewControllers addObject:viewController3];

  MYViewController3 *viewController4 = [[MYStoryboardManager storyboard4] instantiateInitialViewController];
  viewController4.title = @"4";
  [viewControllers addObject:viewController4];

  self.viewControllers = viewControllers;
}

接下来,获取之前创建的按钮,并在 -viewDidLoad 方法中为它们分配动作:

Next grab the buttons you've created previously and assign actions to them in the -viewDidLoad method:


- (void)viewDidLoad {
  [super viewDidLoad];

  _tabbarView = [[[NSBundle mainBundle] loadNibNamed:@"MyTabBar" owner:nil options:nil] lastObject]; // "MyTabBar" is the name of the .xib file
  _tabbarView.frame = CGRectMake(0.0,
                                 self.view.frame.size.height - _tabbarView.frame.size.height,
                                 _tabbarView.frame.size.width,
                                 _tabbarView.frame.size.height); // make it overlay your actual tab bar
  [self.view addSubview:_tabbarView];

  _btn1 = (UIButton *)[_tabbarView viewWithTag:1];
  [_btn1 addTarget:self action:@selector(processBtn:) forControlEvents:UIControlEventTouchUpInside];

  _btn2 = (UIButton *)[_tabbarView viewWithTag:2];
  [_btn2 addTarget:self action:@selector(processBtn:) forControlEvents:UIControlEventTouchUpInside];

  _btn3 = (UIButton *)[_tabbarView viewWithTag:3];
  [_btn3 addTarget:self action:@selector(processBtn:) forControlEvents:UIControlEventTouchUpInside];

  _btn4 = (UIButton *)[_tabbarView viewWithTag:4];
  [_btn4 addTarget:self action:@selector(processBtn:) forControlEvents:UIControlEventTouchUpInside];

  _btn5 = (UIButton *)[_tabbarView viewWithTag:5];
  [_btn5 addTarget:self action:@selector(processBtn:) forControlEvents:UIControlEventTouchUpInside];

  _lastSender = _btn1;
  [self setSelectedViewController:self.viewControllers[0]]; // make first controller selected
}

添加处理方法:

- (void)processBtn:(UIButton *)sender {
  _lastSender = sender;
  [self setSelectedViewController:[self.viewControllers objectAtIndex:sender.tag - 1]];
}

最后,重写 -setSelectedViewController: 方法:

- (void)setSelectedViewController:(UIViewController *)selectedViewController {
  if (_lastSender != _btn3) { // check if it's not the action button
    for (UIButton *btn in [_tabbarView subviews]) {
      if ([btn isKindOfClass:[UIButton class]]) {
        if (btn == _lastSender) {
          btn.selected = YES;
        }
        else {
          btn.selected = NO;
        }
      }
    }
  }
  if ([self.viewControllers indexOfObject:selectedViewController] == 2) {
    MYActionController *viewController = [[MYStoryboardManager actionStoryboard] instantiateInitialViewController];
    [self presentViewController:viewController animated:YES completion:nil];
  }
  else {
    if (self.selectedViewController == selectedViewController) {
      [(UINavigationController *)self.selectedViewController popToRootViewControllerAnimated:animate]; // pop to root if tapped the same controller twice
    }
    [super setSelectedViewController:selectedViewController];
  }
}

我假设您启用了ARC编程,并且有一个管理您的故事板的类,但无论如何都很简单。


这应该是被选中的答案,因为它完美地工作。谢谢! - huong
3
在viewDidLoad方法中,这一行代码[self.view _tabbarView]是什么意思?看起来像是一个打字错误。 - inorganik
你能否将这段代码转换成Swift代码? - Eman Shedeed

4

以下代码在我的项目中完美运行。

我使用了以下的 swift3 版本:

我添加了一个包含 4 个按钮的 UIView 的 MyTabBar.xib 文件。 在 xib 文件中,设置 UIView 的 Class。class = "MyTabBar"
分别给 4 个按钮设置标签为 1、2、3、4。

下面是 myTabBarController 文件:

myTabBarController.swift 代码如下:

class myTabBarController: UITabBarController {

var tabBarView: UIView!

var btn1: UIButton!
var btn2: UIButton!
var btn3: UIButton!
var btn4: UIButton!

var lastSender: UIButton!

var categoryViewController: CategoryViewController?
var subCategoryViewController: SubCategoryViewController?
var scoreViewController: ScoreViewController?
var profileViewController: ProfileViewController?

override func viewDidLoad() {
    super.viewDidLoad()
    self.setup()

    tabBarView = Bundle.main.loadNibNamed("MyTabBar", owner: nil, options: nil)?.last as! UIView
    tabBarView.frame = CGRect(x: 0.0, y: self.view.frame.size.height - tabBarView.frame.size.height, width: tabBarView.frame.size.width, height: tabBarView.frame.size.height)
    self.view.addSubview(tabBarView)

    btn1 = tabBarView.viewWithTag(1) as? UIButton
    btn1.addTarget(self, action: #selector(self.processBtn), for: .touchUpInside)
    btn2 = tabBarView.viewWithTag(2) as? UIButton
    btn2.addTarget(self, action: #selector(self.processBtn), for: .touchUpInside)
    btn3 = tabBarView.viewWithTag(3) as? UIButton
    btn3.addTarget(self, action: #selector(self.processBtn), for: .touchUpInside)
    btn4 = tabBarView.viewWithTag(4) as? UIButton
    btn4.addTarget(self, action: #selector(self.processBtn), for: .touchUpInside)

    let width1 = self.view.frame.width/4
    btn1.frame = CGRect(x: 0, y: 0, width: width1, height: tabBarView.frame.size.height)
    btn2.frame = CGRect(x: btn1.frame.width, y: 0, width: width1, height: tabBarView.frame.size.height)
    btn3.frame = CGRect(x: btn2.frame.origin.x+btn2.frame.width, y: 0, width: width1, height: tabBarView.frame.size.height)
    btn4.frame = CGRect(x: btn3.frame.origin.x+btn3.frame.width, y: 0, width: width1, height: tabBarView.frame.size.height)

    lastSender = btn1
    selectedViewController = viewControllers?[0]
}

func processBtn(_ sender: UIButton) {
    lastSender = sender
    selectedViewController = viewControllers?[sender.tag - 1]

    if sender.tag == 1 {
        btn1.backgroundColor = UIColor.red
        btn2.backgroundColor = UIColor.yellow
        btn3.backgroundColor = UIColor.yellow
        btn4.backgroundColor = UIColor.yellow
    }else if sender.tag == 2 {
        btn1.backgroundColor = UIColor.yellow
        btn2.backgroundColor = UIColor.red
        btn3.backgroundColor = UIColor.yellow
        btn4.backgroundColor = UIColor.yellow
    }else if sender.tag == 3 {
        btn1.backgroundColor = UIColor.yellow
        btn2.backgroundColor = UIColor.yellow
        btn3.backgroundColor = UIColor.red
        btn4.backgroundColor = UIColor.yellow
    }else if sender.tag == 4 {
        btn1.backgroundColor = UIColor.yellow
        btn2.backgroundColor = UIColor.yellow
        btn3.backgroundColor = UIColor.yellow
        btn4.backgroundColor = UIColor.red
    }
}

func setup() {
    var viewControllers = [AnyObject]()

    categoryViewController = self.storyboard!.instantiateViewController(withIdentifier: "CategoryViewController") as? CategoryViewController
    viewControllers.append(categoryViewController!)

    subCategoryViewController = self.storyboard!.instantiateViewController(withIdentifier: "SubCategoryViewController") as? SubCategoryViewController
    viewControllers.append(subCategoryViewController!)

    scoreViewController = self.storyboard!.instantiateViewController(withIdentifier: "ScoreViewController") as? ScoreViewController
    viewControllers.append(scoreViewController!)

    profileViewController = self.storyboard!.instantiateViewController(withIdentifier: "ProfileViewController") as? ProfileViewController
    viewControllers.append(profileViewController!)

    self.viewControllers = viewControllers as? [UIViewController]
}

func tabBarController(_ tabBarController: UITabBarController, shouldSelect viewController: UIViewController) -> Bool {

    for view in tabBarView.subviews as [UIView] {
        if let btn = view as? UIButton {
            if btn == lastSender {
                btn.isSelected = true
            }
            else {
                btn.isSelected = false
            }
        }
    }

    if self.selectedViewController == viewController {
        (self.selectedViewController as? UINavigationController)?.popToRootViewController(animated: true)
        // pop to root if tapped the same controller twice
    }

    return (viewController != tabBarController.selectedViewController)
}

override func didReceiveMemoryWarning() {
    super.didReceiveMemoryWarning()
}

这样,您就可以根据自己的需要设计自定义的选项卡栏。

谢谢。


我可以问一下关于你的“自定义tabBarController”代码的问题吗? - Tekhe

0

以下是制作以下视图所需遵循的步骤:

1:获取UITabBarController并将其设置为应用程序窗口的rootViewController。

2:现在向此UITabbarController添加五个选项卡。

3:分别向每个选项卡添加五个单独的UINavigationController。

4:现在分别向UINavigationController添加五个不同的UIViewControllers。

5:现在创建自定义Tabbar:

5.1:创建自定义Tabbar的一种方法是获取Tabbar高度的UIView,并将UIButtons作为Tab添加到Tabbar中。

6:将自定义tabBar添加到MainWindow。在选择自定义tabbar上的各个按钮时,更改应用程序UITabbarController的setSelectedIndex。


0

对于iOS 9.0+,在水平方向上使用UIStackView,并创建一个名为CustomTabBarView的xib。

CustomTabBarView.Xibinsert uistackview in it

Set Stack view attributes like this

创建另一个视图 CustomTabBarItem。

CustomTabBarItem.xib enter image description here

创建一个名为CustomTabBarItem.swift的文件,用于实现选项卡项目的功能。
class CustomTabItem: UIView {

//MARK:- IBOutlets
@IBOutlet weak var itemImage: UIImageView!
@IBOutlet weak var itemTitle: SelectableLabel!
@IBOutlet weak var topButton: UIButton!

//MARK:- Variables
var isSelected: Bool = false {
    didSet {
        self.itemImage.image = CommonFunctions.getTabItemImage(isSelected: isSelected, tag: topButton.tag)
        itemTitle.isSelected = isSelected
        if isSelected {
            self.backgroundColor = UIColor.appDarkBlueColor
        }
        else {
            self.backgroundColor = UIColor.appWhiteColor
        }
    }
}

//MARK:- IBActions
@IBAction func onClickButton(_ sender: Any) {

}

}

在 TabBarViewController 中实现此代码。
func createCustomTabBarView(tabItemCount: Int){

    customTabBarView = Bundle.main.loadNibNamed("CustomTabBarView", owner: nil, options: nil)?.last as! UIView
    customTabBarView.frame = CGRect(x: 0, y: self.view.frame.height - self.tabBar.frame.height, width: self.tabBar.frame.width, height: self.tabBar.frame.size.height)
    self.view.addSubview(customTabBarView)

    var stackView = UIStackView()
    for subView in customTabBarView.subviews{
        if subView is UIStackView {
            stackView = subView as! UIStackView
        }
    }

    for i in 0..<tabItemCount {
        let customTabItemView = Bundle.main.loadNibNamed("CustomTabItem", owner: nil, options: nil)?.last as! CustomTabItem
        switch i {
        case CustomTabbarButtonTag.TabBarItem_First.rawValue:
            customTabItemView.itemTitle.text = "TabBarItem_First"
            customTabItemView.topButton.tag = CustomTabbarButtonTag.TabBarItem_First.rawValue
            customTabItemView.isSelected = false

        case CustomTabbarButtonTag.TabBarItem_Second.rawValue:
            customTabItemView.itemTitle.text = "TabBarItem_Second"
            customTabItemView.topButton.tag = CustomTabbarButtonTag.TabBarItem_Second.rawValue
            lastSelectedTabItem = customTabItemView
            customTabItemView.isSelected = true

        case CustomTabbarButtonTag.TabBarItem_Third.rawValue:
            customTabItemView.itemTitle.text = "TabBarItem_Third"
            customTabItemView.topButton.tag = CustomTabbarButtonTag.TabBarItem_Third.rawValue
            customTabItemView.isSelected = false

        case CustomTabbarButtonTag.TabBarItem_Fourth.rawValue:
            customTabItemView.itemTitle.text = "TabBarItem_Fourth" 
            customTabItemView.topButton.tag = CustomTabbarButtonTag.TabBarItem_Fourth.rawValue
            customTabItemView.isSelected = false
            cmsTabItem = customTabItemView

        default:
            break
        }

        customTabItemView.topButton.addTarget(self, action: #selector(tabBarButtonPressed), for: .touchUpInside)
        stackView.addArrangedSubview(customTabItemView)
    }
}

//MARK:- IBActions
func tabBarButtonPressed(_ sender: UIButton){
    // create global variable lastSelectedTabItem for store last selected tab item and set its isSelected value for manage highlight current selected tabItem
    lastSelectedTabItem.isSelected = false
    let customTabItem = sender.superview as! CustomTabItem
    lastSelectedTabItem = customTabItem
    lastSelectedTabItem.isSelected = true 
    self.selectedIndex = sender.tag
}

网页内容由stack overflow 提供, 点击上面的
可以查看英文原文,
原文链接