在某个时刻,我想你会将通过编程方式创建的LinearLayout添加到你在.xml文件中定义的根布局中。
这只是我的一个建议,可能有很多解决方案,但它是有效的:
简单地为通过程序创建的布局设置一个ID,并将其添加到你在.xml文件中定义的根布局中,然后使用该ID来添加Fragment。
代码示例:
LinearLayout rowLayout = new LinearLayout();
rowLayout.setId(whateveryouwantasid);
// add rowLayout to the root layout somewhere here

FragmentManager fragMan = getFragmentManager();
FragmentTransaction fragTransaction = fragMan.beginTransaction();

Fragment myFrag = new ImageFragment();
fragTransaction.add(rowLayout.getId(), myFrag , "fragment" + fragCount);
fragTransaction.commit();
只需要选择您想要的整数值作为ID即可:
rowLayout.setId(12345);
如果您不只一次使用以上代码,最好找出一种创建唯一ID的方法,以避免重复。
更新:
以下是应该这样做的完整代码:(此代码已经过测试并且可用)
我将两个片段添加到具有水平方向的LinearLayout中,这样片段就会排在一起。请注意,我使用了固定高度和宽度为200dp,因此一个片段不会占用整个屏幕,就像使用“match_parent”一样。
MainActivity.java:
public class MainActivity extends Activity {

    @SuppressLint("NewApi")
    @Override
    protected void onCreate(Bundle savedInstanceState) {
        super.onCreate(savedInstanceState);
        setContentView(R.layout.activity_main);

        LinearLayout fragContainer = (LinearLayout) findViewById(R.id.llFragmentContainer);

        LinearLayout ll = new LinearLayout(this);
        ll.setOrientation(LinearLayout.HORIZONTAL);

        ll.setId(12345);

        getFragmentManager().beginTransaction().add(ll.getId(), TestFragment.newInstance("I am frag 1"), "someTag1").commit();
        getFragmentManager().beginTransaction().add(ll.getId(), TestFragment.newInstance("I am frag 2"), "someTag2").commit();

        fragContainer.addView(ll);
    }
}
TestFragment.java:
public class TestFragment extends Fragment {

    public static TestFragment newInstance(String text) {

        TestFragment f = new TestFragment();

        Bundle b = new Bundle();
        b.putString("text", text);
        f.setArguments(b);
        return f;
    }

    @Override
    public View onCreateView(LayoutInflater inflater, ViewGroup container, Bundle savedInstanceState) {

        View v =  inflater.inflate(R.layout.fragment, container, false);

        ((TextView) v.findViewById(R.id.tvFragText)).setText(getArguments().getString("text"));
        return v;
    }
}
activity_main.xml:
<RelativeLayout xmlns:android="http://schemas.android.com/apk/res/android"
    xmlns:tools="http://schemas.android.com/tools"
    android:id="@+id/rlMain"
    android:layout_width="match_parent"
    android:layout_height="match_parent"
    android:padding="5dp"
    tools:context=".MainActivity" >

    <TextView
        android:id="@+id/textView1"
        android:layout_width="wrap_content"
        android:layout_height="wrap_content"
        android:text="@string/hello_world" />

    <LinearLayout
        android:id="@+id/llFragmentContainer"
        android:layout_width="match_parent"
        android:layout_height="match_parent"
        android:layout_alignLeft="@+id/textView1"
        android:layout_below="@+id/textView1"
        android:layout_marginTop="19dp"
        android:orientation="vertical" >
    </LinearLayout>
</RelativeLayout>
fragment.xml:
  <?xml version="1.0" encoding="utf-8"?>
<RelativeLayout xmlns:android="http://schemas.android.com/apk/res/android"
    android:layout_width="200dp"
    android:layout_height="200dp" >

    <TextView
        android:id="@+id/tvFragText"
        android:layout_width="wrap_content"
        android:layout_height="wrap_content"
        android:layout_centerHorizontal="true"
        android:layout_centerVertical="true"
        android:text="" />

</RelativeLayout>
以下是上述代码的结果:(两个片段并排对齐)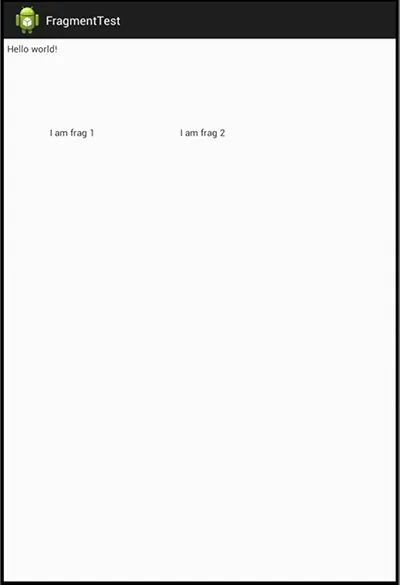
View.generateViewId()来生成视图ID。 - Jeremy Wiebe